If you’re a beginner at meal prep: Be prepared to set aside 2-3 hours. Once mise en place is complete, all of these recipes can be completed one by one.
If you’re a meal prep pro, use the sequenced steps below: These steps give you the flexibility to cook items simultaneously in a sequence of events.
Be sure to set timers and check on food items to avoid overcooking. Sequencing will save you time and meal prep can be done in 1-2 hours.
Meal Prep Run Down
First, preheat the oven and start boiling the eggs.
Next, place the bbq chicken and broccoli hash in baking dishes and start baking them in the oven. Then, saute the chicken and broccoli rice on the stovetop. Once cooked, place it in a greased baking dish with the cheese and place it in the oven.
Meanwhile, cook the cajun soup on the stove. You can also cook the granola.
After all the items finish cooking, let them cool. While these items are cooling, prepare the seafood salad.
When everything is finished cooking, plate everything up in containers, and let them cool before refrigerating.
If you’re sequencing your meal prep, be sure to keep an eye on everything! Make sure food is kept refrigerated under 40F degrees until ready to eat.
Assembly Tips
Evenly divide meals according to the serving size
Let all items cool before placing them in the refrigerator
Keep all items refrigerated under 40F until ready to eat or reheat
Breakfast: These items can be reheated in the microwave. Serve the boiled eggs chilled.
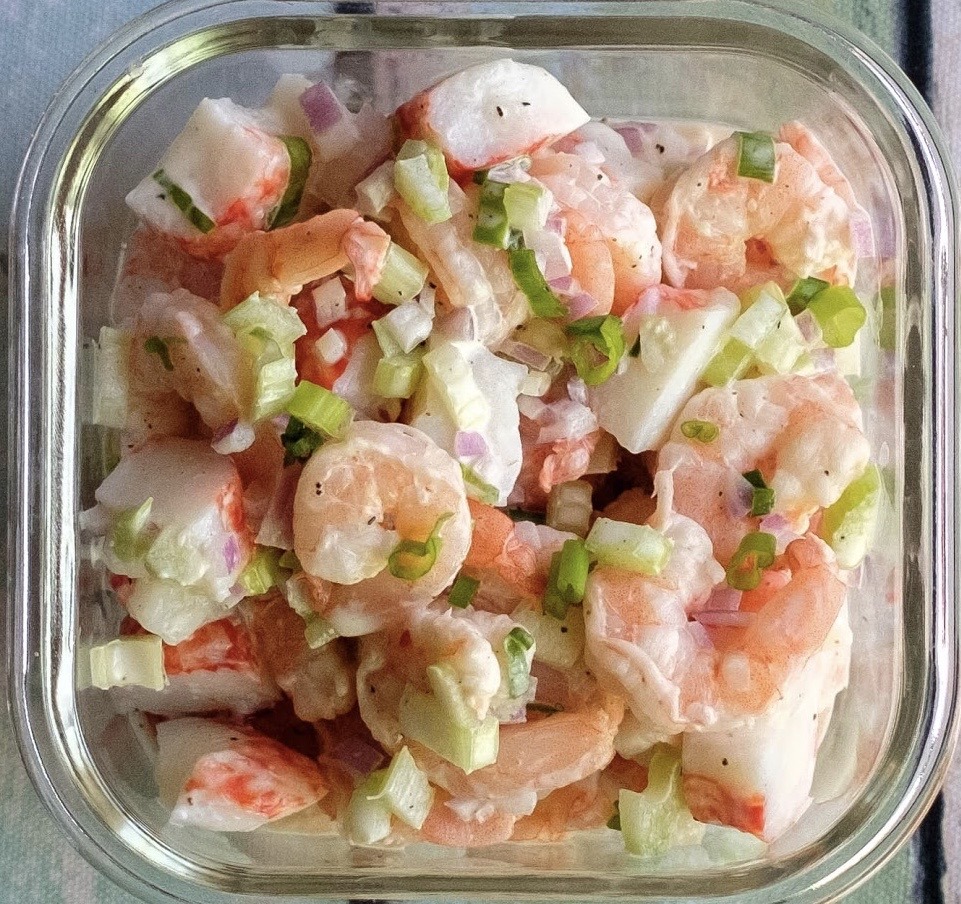
Lunch: Serve the seafood salad chilled, while the soup can be reheated in the microwave
Dinner: Both meals can be reheated in the microwave
Extra Flavors and Substitutions
Granola: Feel free to add whatever dried fruit you have on hand.
Broccoli rice: You can also use cauliflower rice
Chicken: You can use your choice of chicken such as chicken breasts or chicken tenderloins
Seafood Salad: You can also use canned tuna or canned salmon for this recipe
Supplement meals with additional snacks such as fresh veggies and fruit for additional daily caloric needs. You can use lime/lemon and olive oil in place of salad dressing
Extra Leftover Ingredients Not Used
Protein: Freeze any uncooked meats and save for a later recipe, or you can cook the full amount, and freeze the portion that you do not eat, and save for later use.
Fruit: Use leftover fruit in smoothies, on top of yogurt, or with your cereal
Veggies: Freeze any leftover veggies for later use. Use leftover herbs in omelets or other dishes for the weekend
Ready to conquer your day with a delicious and nutritious meal that won’t keep you tied to the kitchen for hours? Let’s dive into our fantastic Pork Chops and Sautéed Persimmons recipe – a feast for both your taste buds and your busy schedule! Now is the time to add pork meal prep into your routine.
This post may contain affiliate links. Please see our privacy policy for details.
Flavor Harmony: The rich, sweet, and tangy notes of balsamic glaze beautifully complement the natural sweetness of ripe persimmons. The combination creates a symphony of flavors, balancing savory and sweet for a delightful taste experience that feels both indulgent and satisfying.
Seasonal Simplicity: Persimmons come into their prime during the winter months, offering a burst of seasonal freshness to the dish. The warmth of cinnamon and the smokiness of paprika in the pork chops embrace the cozy, comforting vibes of winter, making this meal a perfect cold-weather comfort.
Textural Bliss: The tender, succulent pork chops provide a satisfying contrast to the crisp, sautéed persimmons. It’s a play on textures that keeps each bite interesting and enjoyable. The caramelization of the persimmons adds a delightful crunch, creating a mouthwatering experience.
Impressive Yet Budget-Friendly: Balsamic glaze adds a touch of sophistication to the dish, making it feel like a restaurant-quality meal without breaking the bank. Pork chops, especially when thinly sliced, are a cost-effective protein option. The use of simple yet flavorful ingredients keeps it elegant and budget-friendly.
Versatility at Its Core: Whether you’re hosting a dinner party or preparing a weekday family meal, this dish is versatile and adaptable. The combination of pork chops and persimmons feels special enough for a festive gathering, yet it’s easy and quick enough to fit into your busy weeknight routine. It’s a culinary chameleon that suits different occasions with grace.
The PrepYoSelf Newsletter
Ingredient Breakdown
Pork Chops: A lean source of protein that’s not only essential for muscle maintenance but also incredibly satisfying. Pro-tip: Opt for thin slices for quicker cooking and more even marination.
Balsamic Glaze: Adds a sweet and tangy depth that elevates the entire dish. Pro-tip: Look for a high-quality balsamic glaze for richer flavor.
Cinnamon: Brings warmth and a hint of sweetness, balancing out the savory notes. Pro-tip: A small amount goes a long way, so embrace the magic of this spice.
Paprika: Infuses a smoky undertone, adding complexity to the marinade. Pro-tip: Choose sweet or smoked paprika based on your flavor preference.
Thyme: Infuses a fresh, earthy aroma that complements the pork beautifully. Pro-tip: If using fresh thyme, strip the leaves from the stems for maximum flavor.
Persimmon: Brings a natural sweetness and a pop of vibrant color to the dish. Pro-tip: Choose a ripe persimmon for the best flavor and texture.
Baby Spinach:Packed with nutrients, adds a crisp texture, and balances the richness of the pork. Pro-tip: Go for baby spinach for a tender bite.
Salad Dressing: Adds a burst of flavor and turns your side salad into a taste sensation. Pro-tip: Pick a dressing that complements the overall flavor profile; a balsamic vinaigrette would be a great match!
How to Meal Prep Pork Chops
Remove the top of the persimmon stem and slice them into delightful wedges.
Time to give those pork chops some love! In a bowl, mix balsamic glaze, cinnamon, paprika, garlic powder, thyme, and salt. Massage this flavorful concoction onto your pork chops, ensuring each piece is coated in yumminess.
Heat up a pan with a tablespoon of olive oil over medium-high heat. Place your marinated pork chops in the pan, and let them sizzle away for 3 to 5 minutes on each side. Keep flipping until they reach a juicy and safe internal temperature of 145°F.
Once your pork chops are perfection on a plate, remove them and lower the heat to low-medium. Toss those persimmon slices into the pan and sauté them for a quick 2 to 3 minutes – just enough to enhance their natural sweetness.
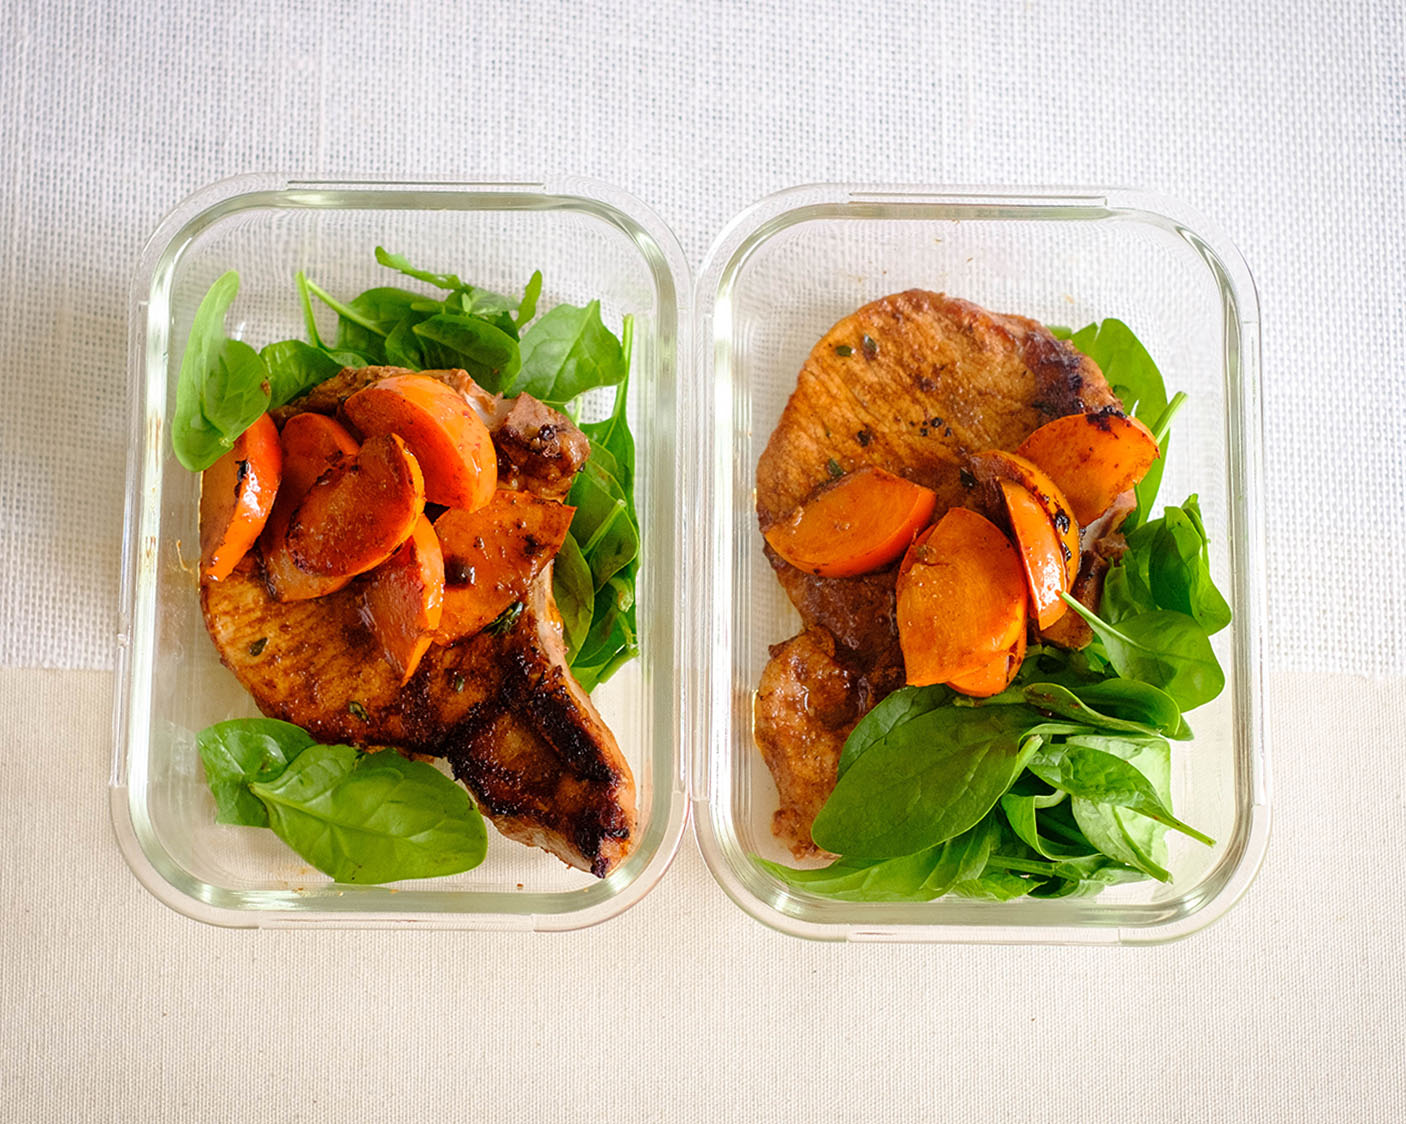
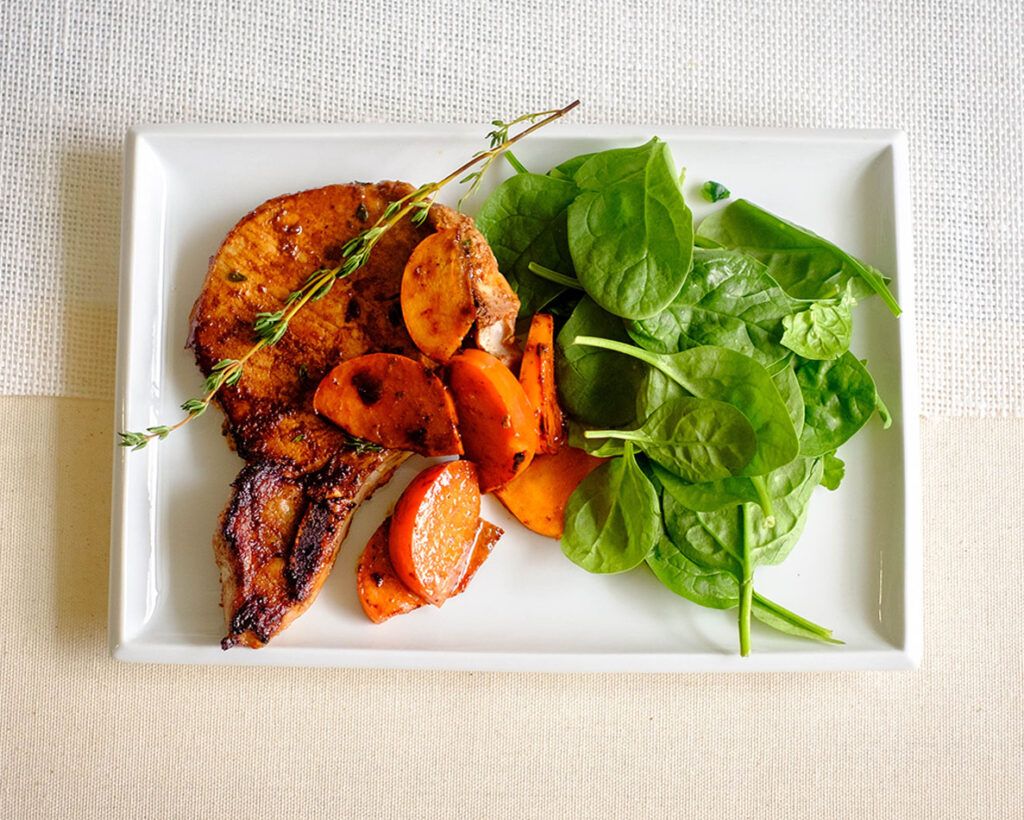
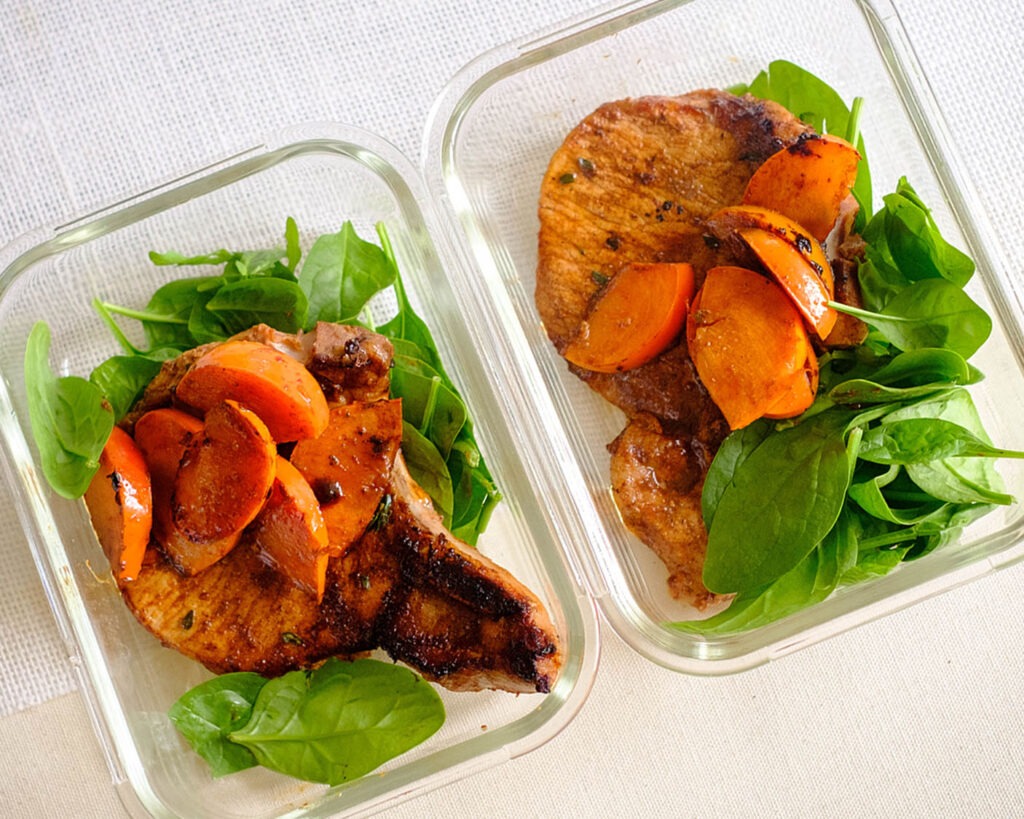
Arrange your succulent pork chops alongside the sautéed persimmons, and serve them up with a generous side of fresh baby spinach. Top it all off with your favorite salad dressing for an extra burst of flavor.
Reference the recipe card below for detailed instructions.
Pork Meal Prep Pairing Tips
Grainy Goodness: Serve the pork chops over a bed of wild rice, quinoa, or farro. These grains add a nutty flavor and a chewy texture that pairs wonderfully with the tender pork.
Citrusy Sidekick: Consider adding a citrusy element, like an orange or grapefruit salad, to cut through the richness of the dish. The acidity of citrus provides a refreshing contrast.
Cheese Pleaser: A sprinkle of crumbled goat cheese or feta over the baby spinach adds a delightful creaminess, while the tangy notes elevate the overall flavor profile.
Nutty Crunch: Toasted nuts, such as pecans or almonds, add a delightful crunch. Sprinkle them over the salad or use them as a garnish for an extra layer of texture.
Freshness Finale: End your meal on a refreshing note with a fruit-based dessert. A simple fruit salad or a light sorbet can provide a satisfying conclusion to the feast.
Balsamic Glazed Pork Chops with Persimmons and Spinach
Indulge in the perfect winter dish — balsamic glazed pork chops, marinated to perfection with cinnamon and thyme, paired with sautéed persimmons and served alongside a vibrant baby spinach salad for a restaurant-worthy experience that's both delicious and budget-friendly
Remove the top of the persimmon stem and slice them into wedges.
Marinate the pork with balsamic glaze, cinnamon, paprika, garlic powder, thyme, and salt. Add oil to a pan on medium high heat and place the pork chops in the pan. Sear them on each side for about 3 to 5 minutes until they are fully cooked to an internal temperature of 145F.
Remove the pork chops from the pan and lower the heat to low-medium. Place the persimmon slices in the pan and saute for about 2 to 3 minutes.
Enjoy the pork chops and sauteed persimmons with a side salad and dressing.
Notes
Nutrition information provided is an estimate. It will vary based on cooking method and specific ingredients used. Please consult with your healthcare provider for specific dietary needs. To gain a better understanding, explore our nutrition disclaimer here.
Absolutely! This marinade works well with various proteins. You can try it with chicken breasts, turkey cutlets, or even tofu for a vegetarian option.
What if I can’t find persimmons?
No worries! While persimmons add a unique flavor, you can substitute them with other seasonal fruits like apples, pears, or even figs for a similar sweet and savory pairing.
Can I use a grill instead of a pan to cook the pork chops?
Certainly! Grilling adds a smoky flavor to the pork chops. Grill them over medium-high heat for 3 to 5 minutes on each side or until they reach an internal temperature of 145°F.
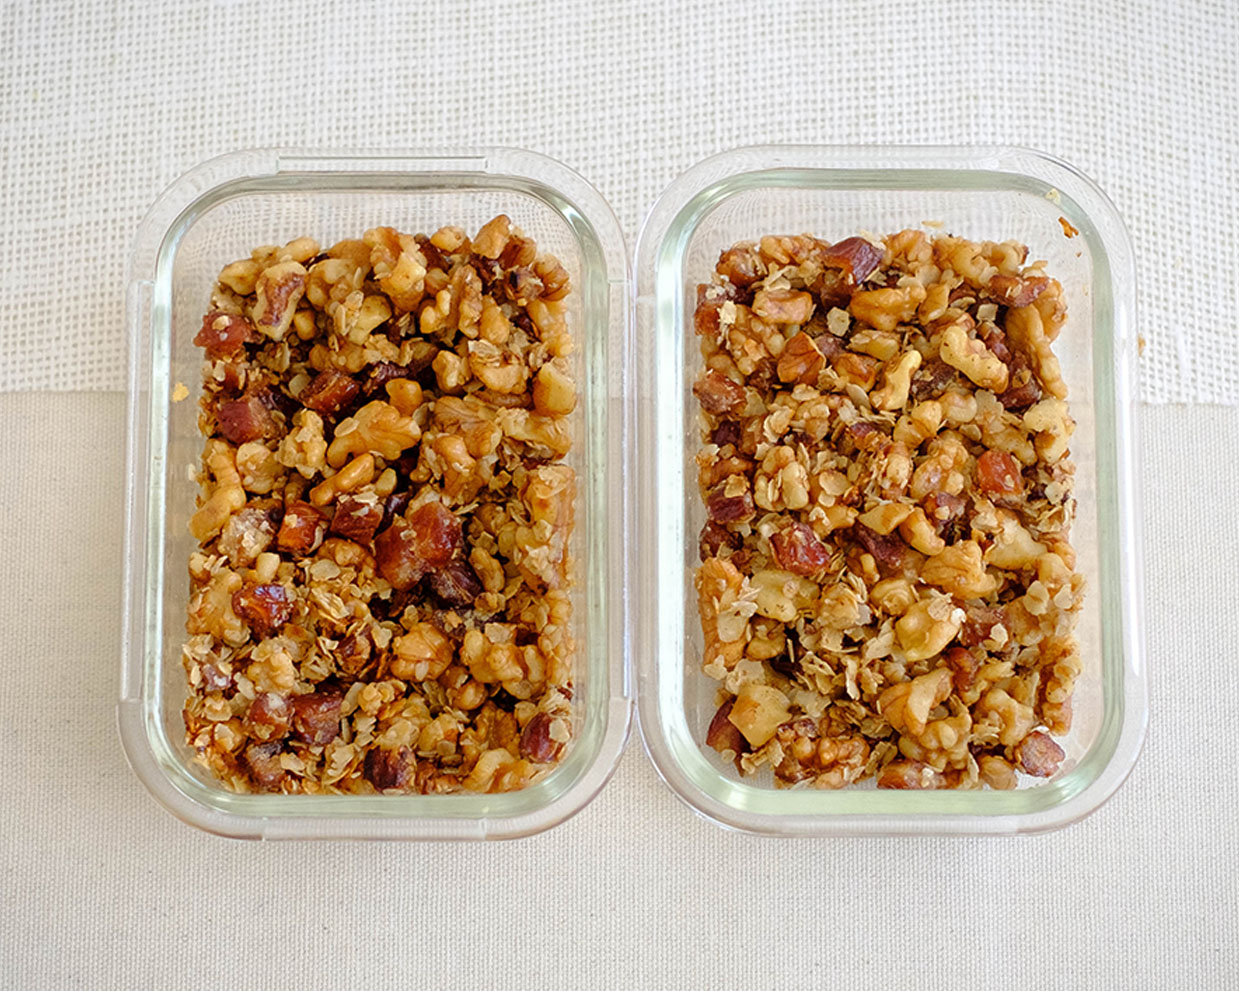
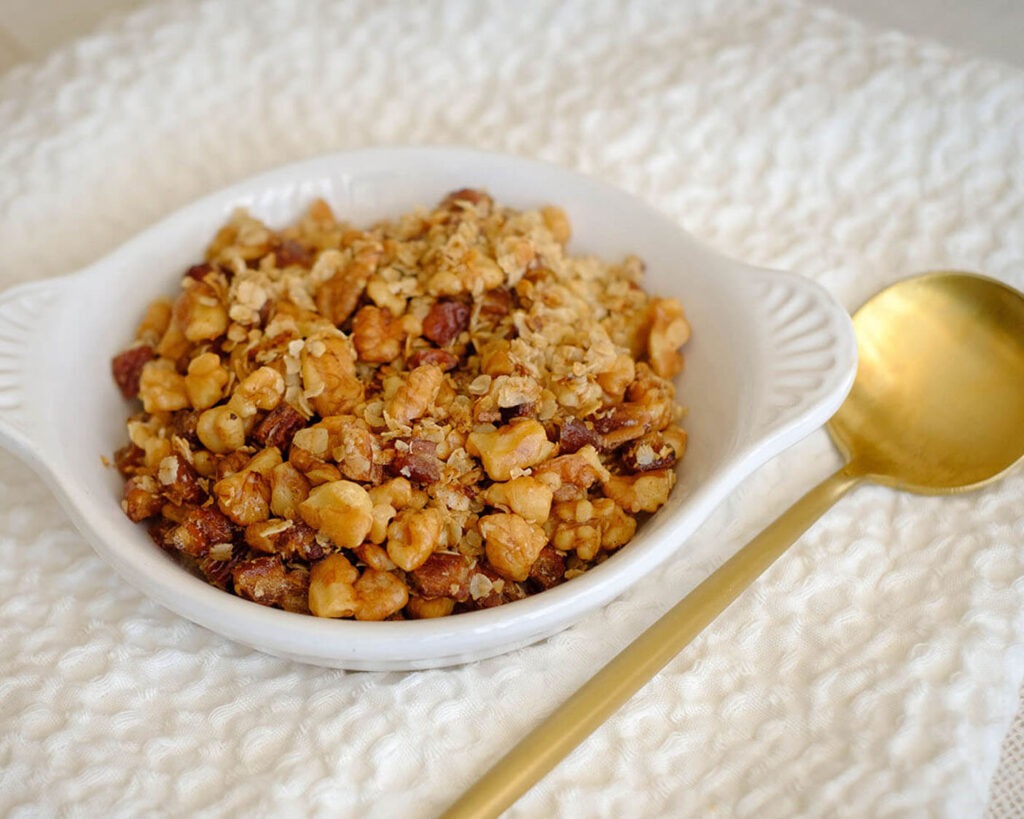
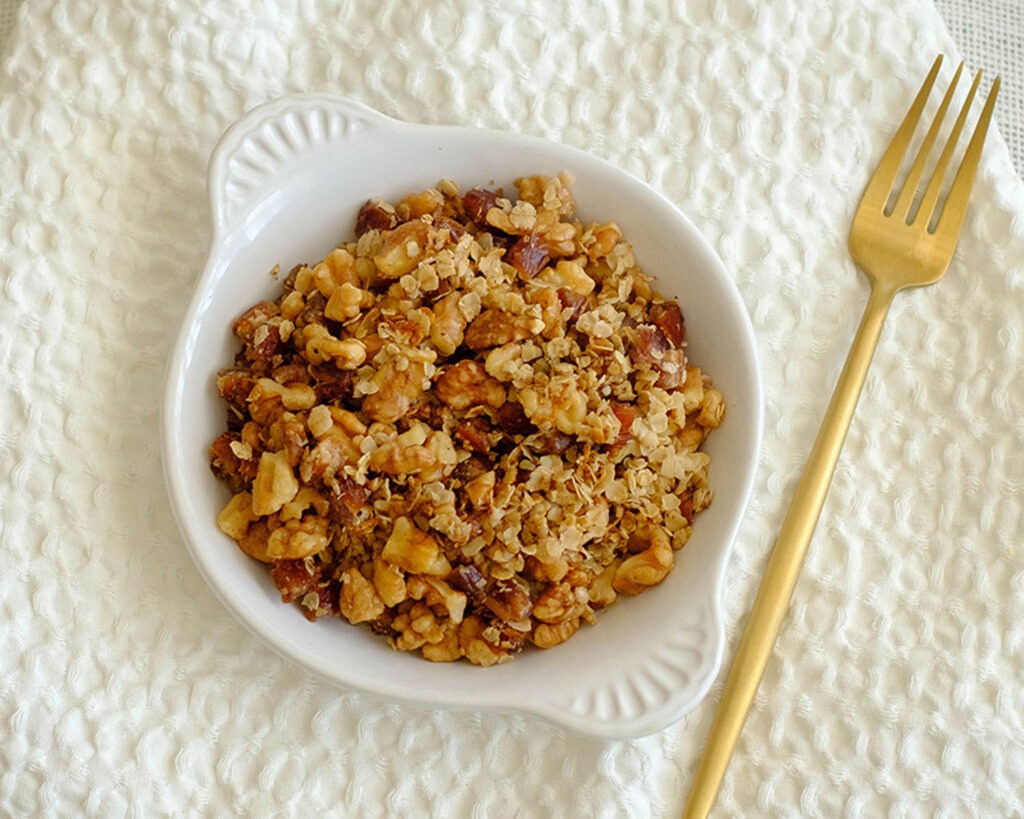
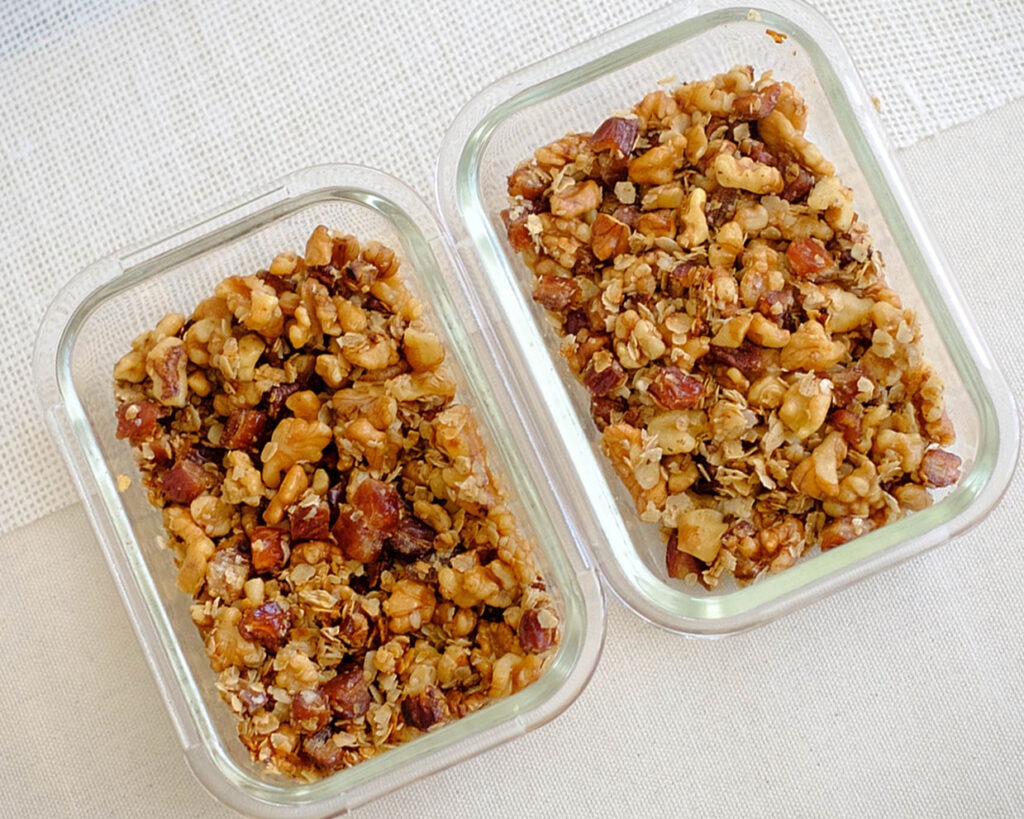
Energize Your Day with a healthy breakfast of Homemade Date and Walnut Granola! Life is a whirlwind of meetings, deadlines, and endless to-do lists. But guess what? You don’t have to compromise your health for the sake of a busy schedule. Today, I’m here to share a delightful meal prep recipe that’s not only quick and easy but also tasty and affordable.
This post may contain affiliate links. Please see our privacy policy for details.
Time-Saving Wonder: It takes only a few minutes to prepare, giving you more time to conquer the day.
Energizing Ingredients: Rolled oats provide lasting energy, while dates and walnuts bring natural sweetness and a dose of healthy fats.
Versatility at Its Best: Sprinkle this granola on yogurt, top your smoothie bowl, or simply grab a handful for a quick, satisfying snack.
Health-Boosting Goodness: Packed with fiber, antioxidants, and nutrients, this granola is a tasty way to keep your health goals on track.
So make your mornings brighter and your days more energized with this fantastic Date and Walnut Granola for a healthy breakfast. Your health journey doesn’t have to be bland or time-consuming—embrace the delicious side of wellness! Prep it, pack it, and conquer your day with a smile.
The PrepYoSelf Newsletter
What You’ll Need to Prepare Granola for a Healthy Breakfast
Rolled Oats: Opt for old-fashioned or whole rolled oats for a heartier texture. Ingredient Swaps: For a gluten-free option, choose certified gluten-free oats. Experiment with steel-cut oats for a nuttier and chewier texture.
Dried Dates: Choose unsweetened, preservative-free dried dates for a more natural sweetness. Ingredient Swaps: Purchase whole dates and chop them at home for a fresher taste. Swap dates for raisins, apricots, or figs for variety.
Walnuts: These are an excellent source of omega-3 fatty acids for heart health.Store walnuts in an airtight container in the refrigerator to preserve their freshness. Ingredient Swaps: Substitute walnuts with almonds, pecans, or pistachios. Toasted seeds like pumpkin or sunflower seeds can be a nut-free alternative.
Honey: Choose raw, unprocessed honey for maximum health benefits. Ingredient Swaps: Maple syrup or agave nectar can be used as a vegan alternative. For a lower glycemic option, try using coconut nectar.
Cinnamon: Experiment with ground nutmeg or cardamom for a different flavor profile. Consider adding a dash of vanilla extract for a subtle sweetness.
Olive Oil: Choose extra virgin olive oil for its rich flavor and higher nutritional content. Ingredient Swaps: Coconut oil or avocado oil can be used for a different flavor. If you prefer a lower-fat option, try using applesauce.
How to Meal Prep Granola for a Healthy Breakfast
Add a tablespoon of olive oil to a sauté pan over medium heat.
Pour in the rolled oats and let the magic begin. Stir it around until each oat is coated with the glorious olive oil, and you start to get that delightful toasty aroma. Trust me; it’s the scent of a healthier, happier you!
Now, it’s time to sweeten things up. Add those two tablespoons of honey, sprinkle in the cinnamon, and give it a good mix.
Toss in the chopped dates and walnuts. These little gems will add a chewy, crunchy goodness that will make your taste buds sing with joy.
Turn off the heat and mix everything together like you’re crafting a masterpiece. The warm oats will absorb all the sweet, nutty, and cinnamon-infused goodness, creating a symphony of flavors.
Reference the recipe card below for detailed instructions.
Meal Prep Tips for Date and Walnut Granola
Refrigerate for Freshness: If you’ve added perishable items like fresh fruit to your granola, consider storing it in the refrigerator to maintain freshness throughout the week.
Layered Pairfaits: Prepare layered yogurt parfaits with the granola, alternating with fresh fruits. Seal them in jars for a visually appealing and convenient breakfast or snack.
Freeze Extras: If you’ve made an extra-large batch, freeze some portions in zip-top bags. Thaw a bag in the refrigerator the night before you need it for a quick grab-and-go option.
On-the Go Snack Packs: Create small snack packs of granola for your purse, briefcase, or desk drawer. This way, you’ll have a healthy snack readily available wherever you are.
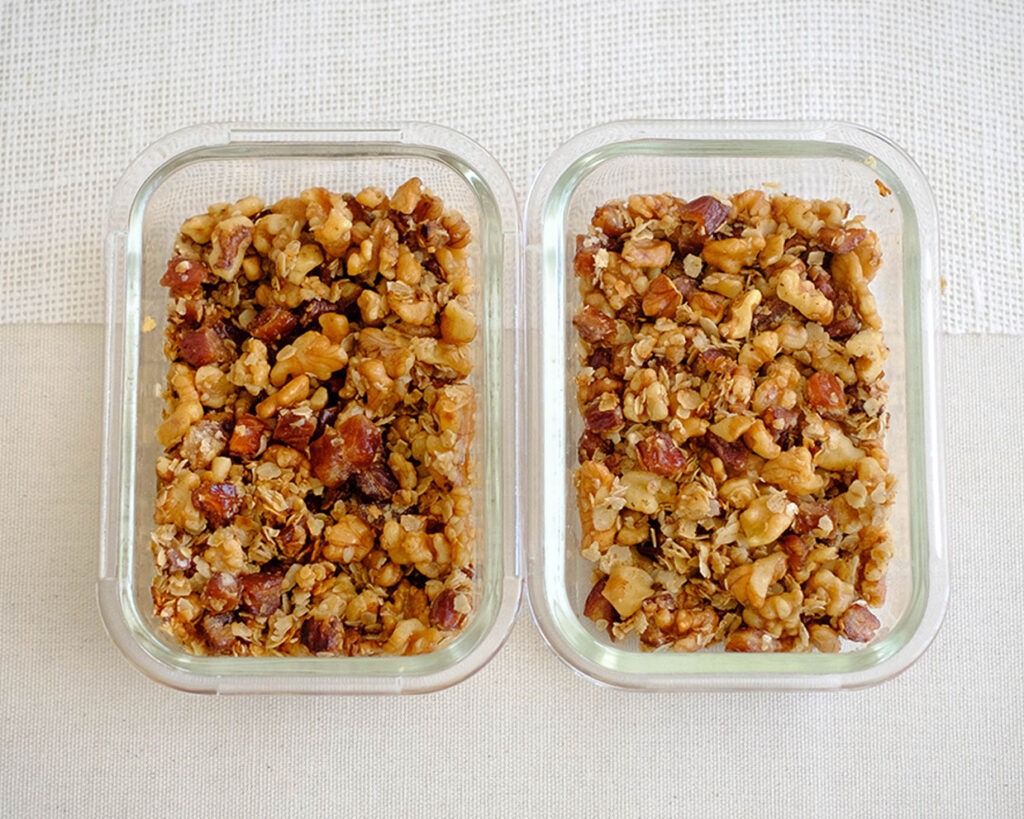
Date and Walnut Granola
Elevate your mornings with our quick and nutritious Date and Walnut Granola, a delightful blend of rolled oats, chopped dates, walnuts, honey, and cinnamon, perfect for busy individuals seeking a healthy and flavorful start to their day!
Pour in the rolled oats and stir it around until it is fully coated with the oil and gets slightly toasted
Next, add the honey, cinnamon, and mix well
Finally, add the dates and walnuts
Turn off the heat and mix it all together
Notes
Nutrition information provided is an estimate. It will vary based on cooking method and specific ingredients used. Please consult with your healthcare provider for specific dietary needs. To gain a better understanding, explore our nutrition disclaimer here.
Absolutely! Fresh fruit like berries, sliced banana, or diced apple can be added when serving for extra flavor and nutrition. However, you may want to mix it in when you are ready to eat the granola to prevent it from getting soggy.
How can I make the granola more crunchy?
If you prefer a crunchier texture, spread the granola mixture in a thin layer on a baking sheet and bake it for a few additional minutes until it reaches your desired crispiness. You can also make this in the Air Fryer by mixing all the ingredients together and cooking it at 330F for about 5 to 7 minutes until it reaches your desired crunchiness.
What are ways to use leftovers from this recipe?
Leftover ingredients like chopped dates, walnuts, and honey can be used in various recipes, from salads to baked goods.
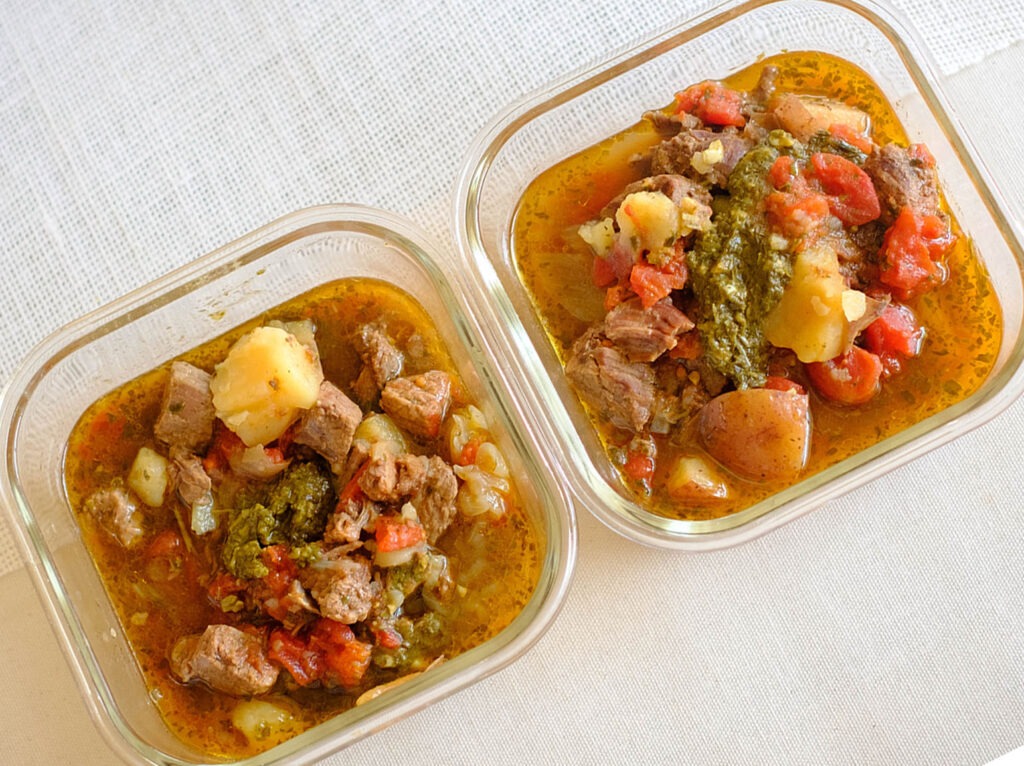
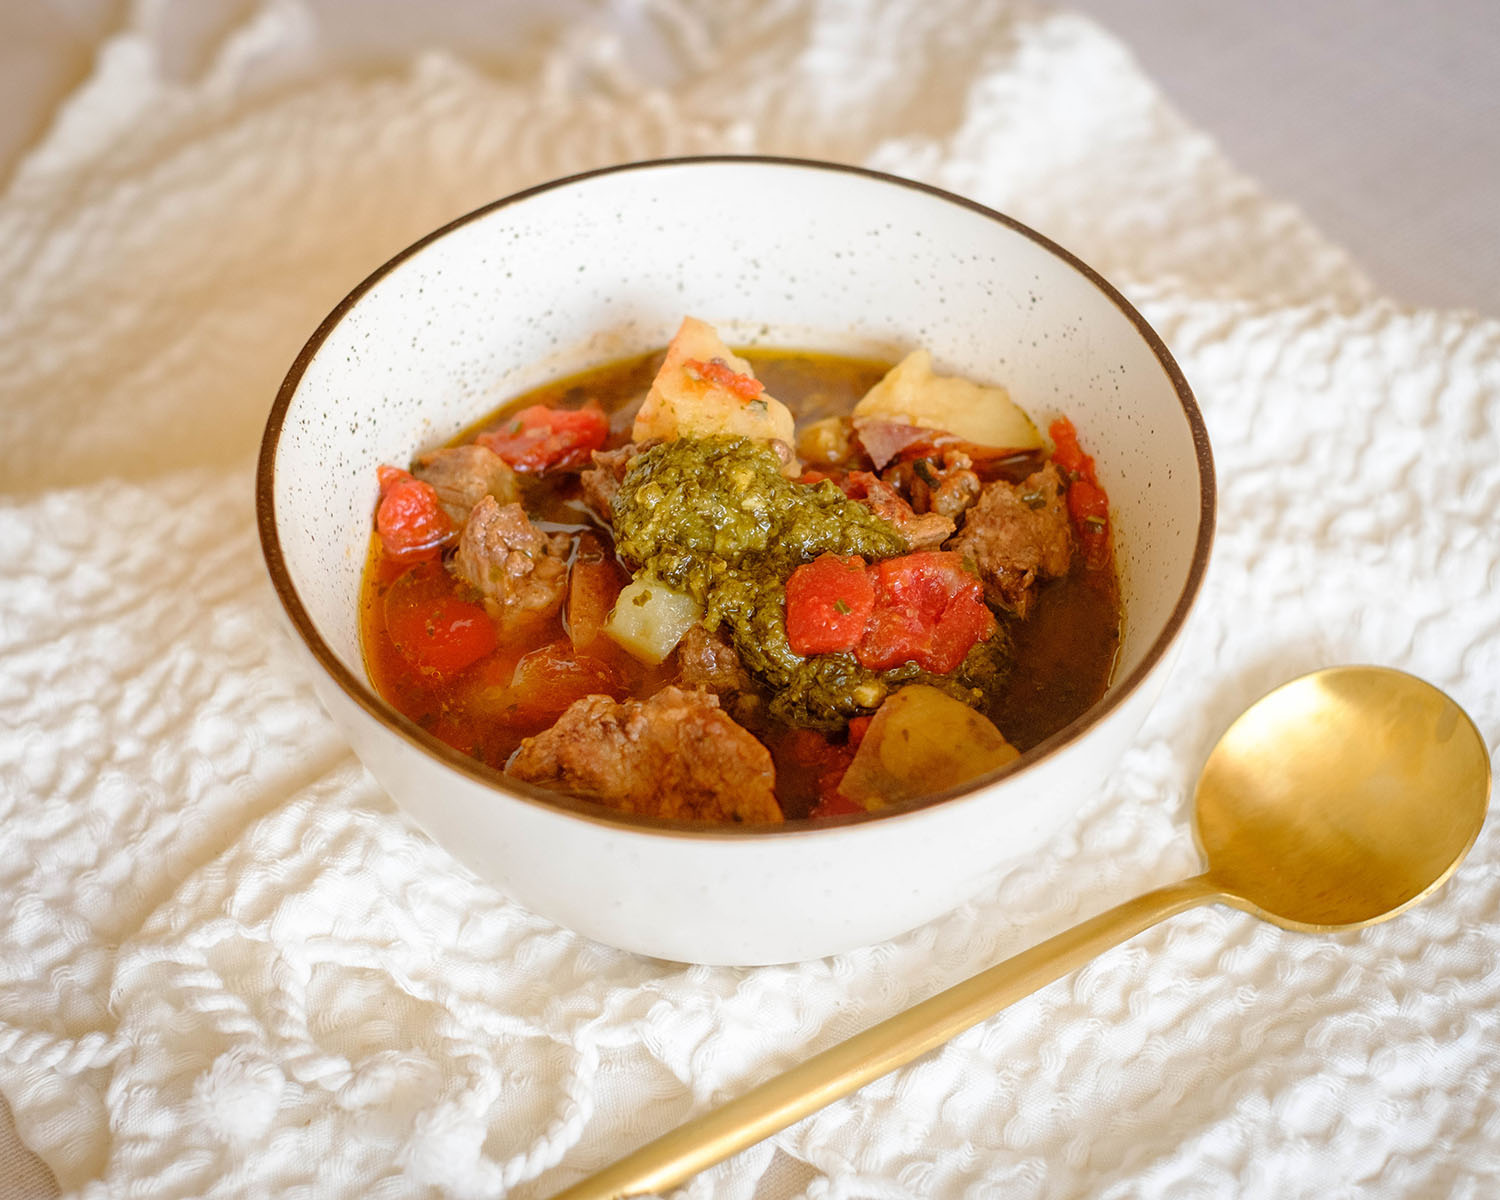
Our Instant Pot Basil Pesto Beef Stew is a meal prep masterpiece that seamlessly marries convenience, nutrition, and indulgent flavors. Crafted for those seeking a harmonious blend of wholesome ingredients and time-saving efficiency, this recipe promises to level up your weekly meal prep routine. With budget-friendly staples like beef stew meat, red potatoes, and canned tomatoes, it proves that gourmet dining need not break the bank. What sets this dish apart is the secret weapon – basil pesto. Not only does it effortlessly elevate the soup base, but it also introduces a burst of fresh, herbaceous notes that transform each bite into a symphony of flavors.
This post may contain affiliate links. Please see our privacy policy for details.
Meal Prep Hack: Elevating Soup Base Flavors with Basil Pesto
Incorporating basil pesto into the soup base not only adds convenience but also introduces a layer of depth and richness, making this Instant Pot Basil Pesto Beef Stew an excellent choice for those seeking a delicious, nutritious, and hassle-free meal prep option. Here are the reasons why:
Basil pesto infuses the stew with vibrant, aromatic basil, creating a lively and refreshing flavor profile.
Adding pesto eliminates the need for multiple herbs and spices, simplifying the ingredient list while maintaining a complex and sophisticated taste.
With just a few tablespoons, basil pesto instantly transforms a basic stew into a restaurant-worthy dish, making it a perfect solution for elevating flavors in a time-efficient manner.
Basil pesto pairs well with a variety of ingredients, enhancing the overall taste without overpowering the dish. It’s a versatile ingredient that complements the savory notes of the stew.
The PrepYoSelf Newsletter
Essential Ingredients:
Beef Stew Meat: Opt for lean cuts like sirloin or chuck for a healthier stew. Buy in bulk and freeze in individual portions for future use. Substitute beef with chicken or turkey for a lighter option.
Red Onions: Purchase a bag of red onions to have them handy for various recipes. They add a sweet and mild flavor to dishes.
Red Potato: Choose firm, unblemished red potatoes. Buying in bulk bags can be cost-effective for regular use in different recipes. Feel free to add carrots, celery, or other favorite veggies.
Garlic Cloves: Consider purchasing garlic in bulk; it’s a kitchen staple. Opt for fresh garlic for enhanced flavor.
Canned Diced Tomatoes: Look for no-salt-added or low-sodium options. Canned tomatoes are pantry essentials, versatile for numerous recipes.
Basil Pesto Sauce: While store-bought is convenient, try making your own for a personalized touch. Store extra in ice cube trays for easy future use. Experiment with different pesto variations like sun-dried tomato or spinach for a unique twist
How to Meal Prep Instant Pot Basil Beef Stew
Gather all your ingredients and ensure they are measured and prepared. Dice the red onions, cube the red potato, and peel the garlic cloves. Place all the prepared ingredients in the Instant Pot. Pour in 2 cups of canned diced tomatoes over the beef stew meat, red onions, red potato, and garlic cloves.
Add 3 tablespoons of the star ingredient – basil pesto sauce – for that irresistible herbal kick. Pour in 1 cup of water to create a savory broth. Season the stew with 1/4 teaspoon each of salt, pepper, and Italian seasoning. Give it a good stir to ensure the flavors meld together.
Secure the Instant Pot with the lid and set the valve to the sealed position. Program the Instant Pot to cook for 45 minutes on medium pressure. The anticipation of the rich aroma filling your kitchen begins!
Once the timer goes off, follow the Instant Pot instruction manual for a natural release of steam. As the lid comes off, you’ll be greeted by the sight and scent of a perfectly cooked Basil Pesto Beef Stew.
Spoon out generous servings into your meal prep containers, ensuring each portion gets its fair share of the delectable broth.
Elevate the flavor profile by adding an extra tablespoon of basil pesto to each serving just before consumption. This step not only enhances the taste but also adds a vibrant green hue to your stew.
For those without an Instant Pot, fear not! This recipe is slow-cooker-friendly. Cook on high for 4 to 6 hours and savor the same mouthwatering results.
Reference the recipe card below for detailed instructions.
Meal Prep Tips
Versatile Side Options: Consider preparing different sides to pair with the stew. Rice, quinoa, or a crusty baguette can add variety to your meals throughout the week.
Explore Different Bases: While the stew is delightful on its own, experiment with serving it over different bases like mashed cauliflower, sweet potato, or a bed of greens to keep your meals interesting.
Double Up on Veggies: Increase the nutritional content by adding extra vegetables. Chop and store them separately to maintain their freshness, adding them to the stew just before reheating.
Extra Pesto on the Side: Keep additional basil pesto on hand to add a fresh burst of flavor when serving. Include a small container with each meal for an extra taste of indulgence.
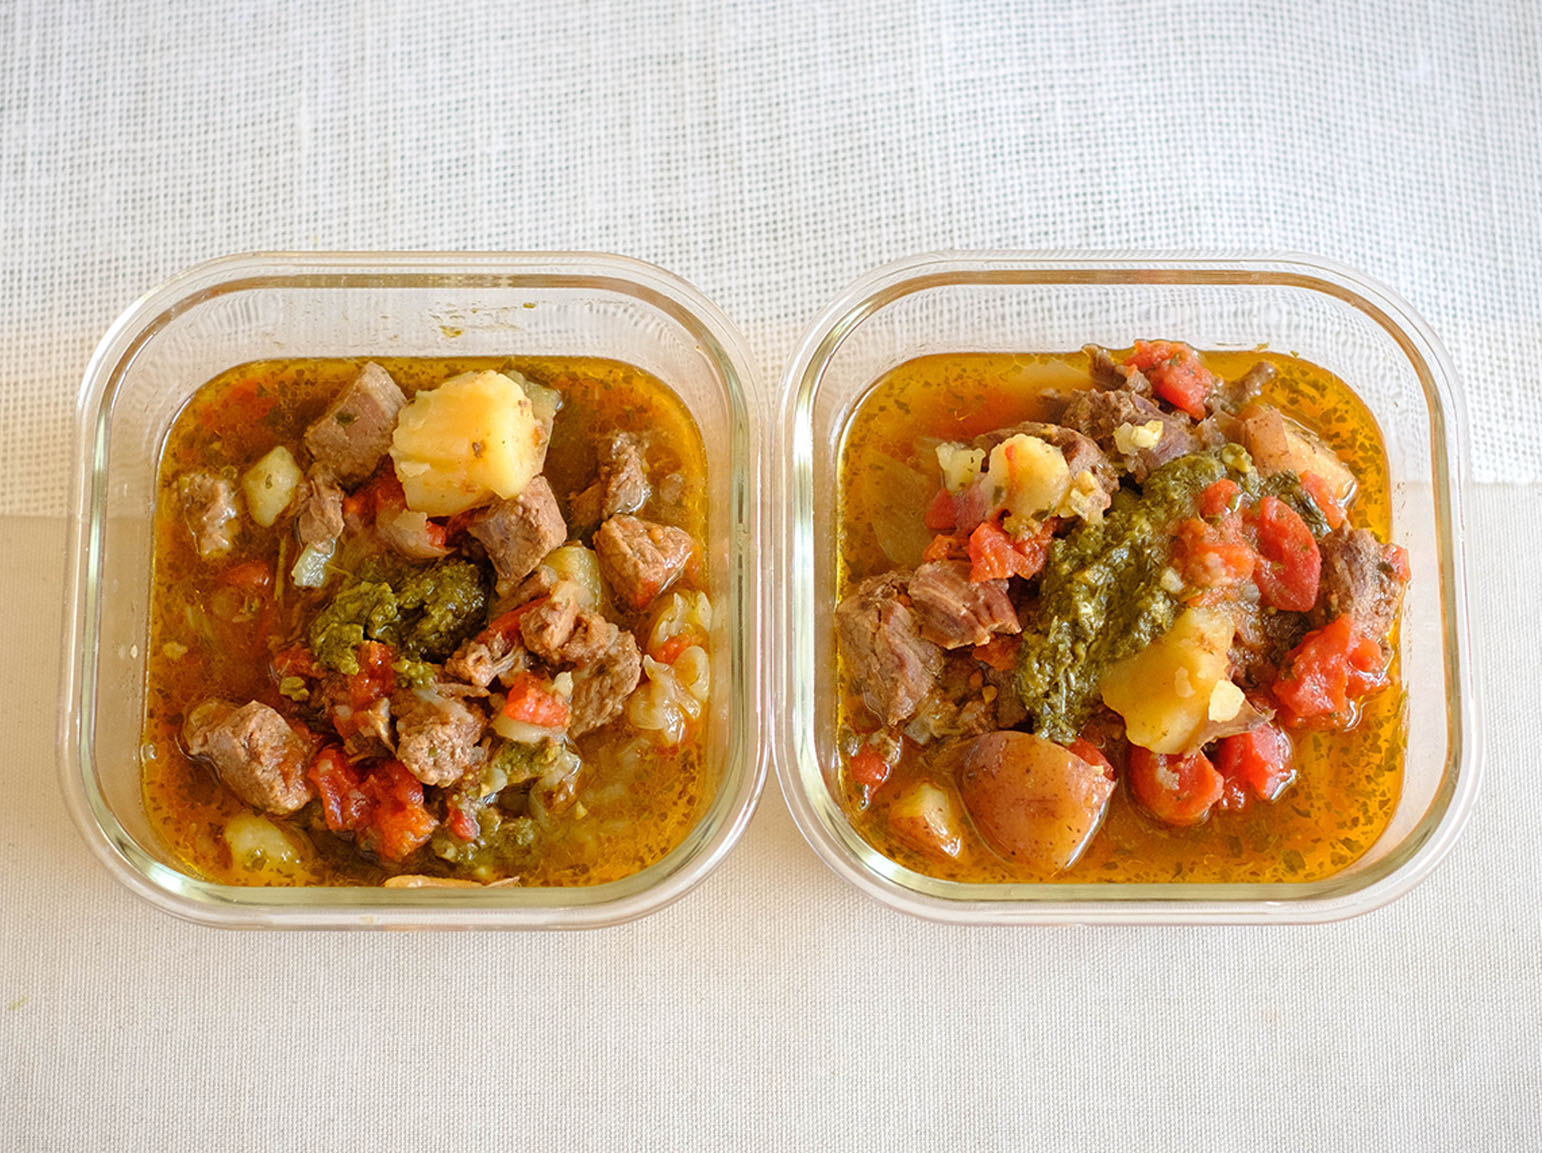
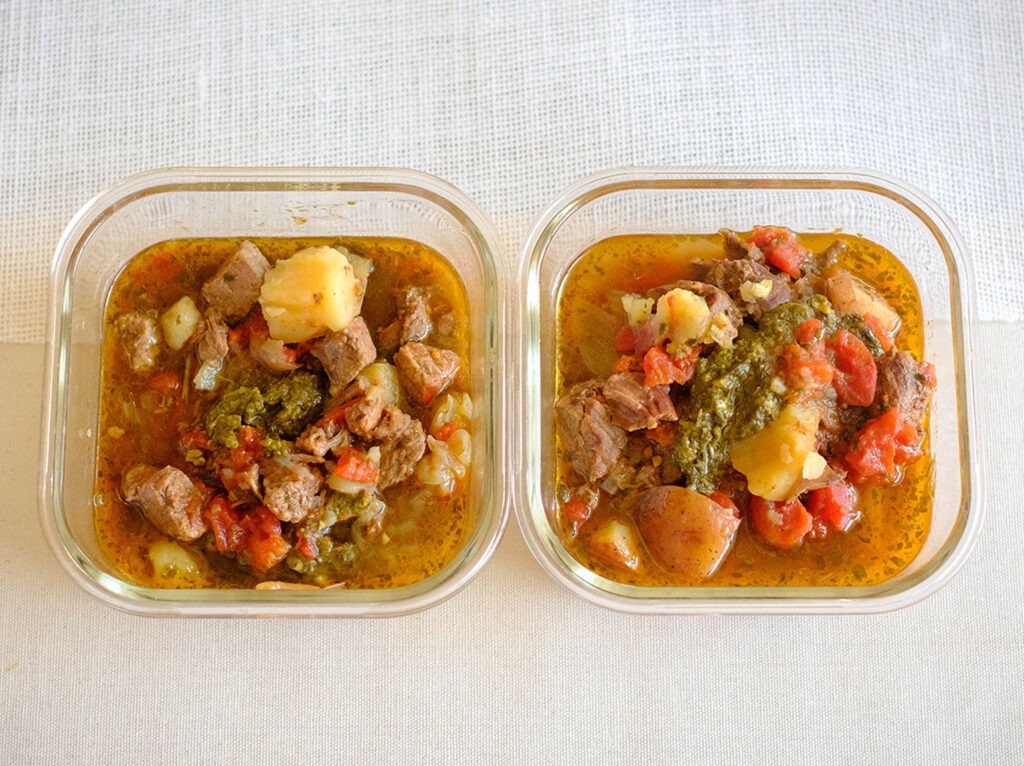
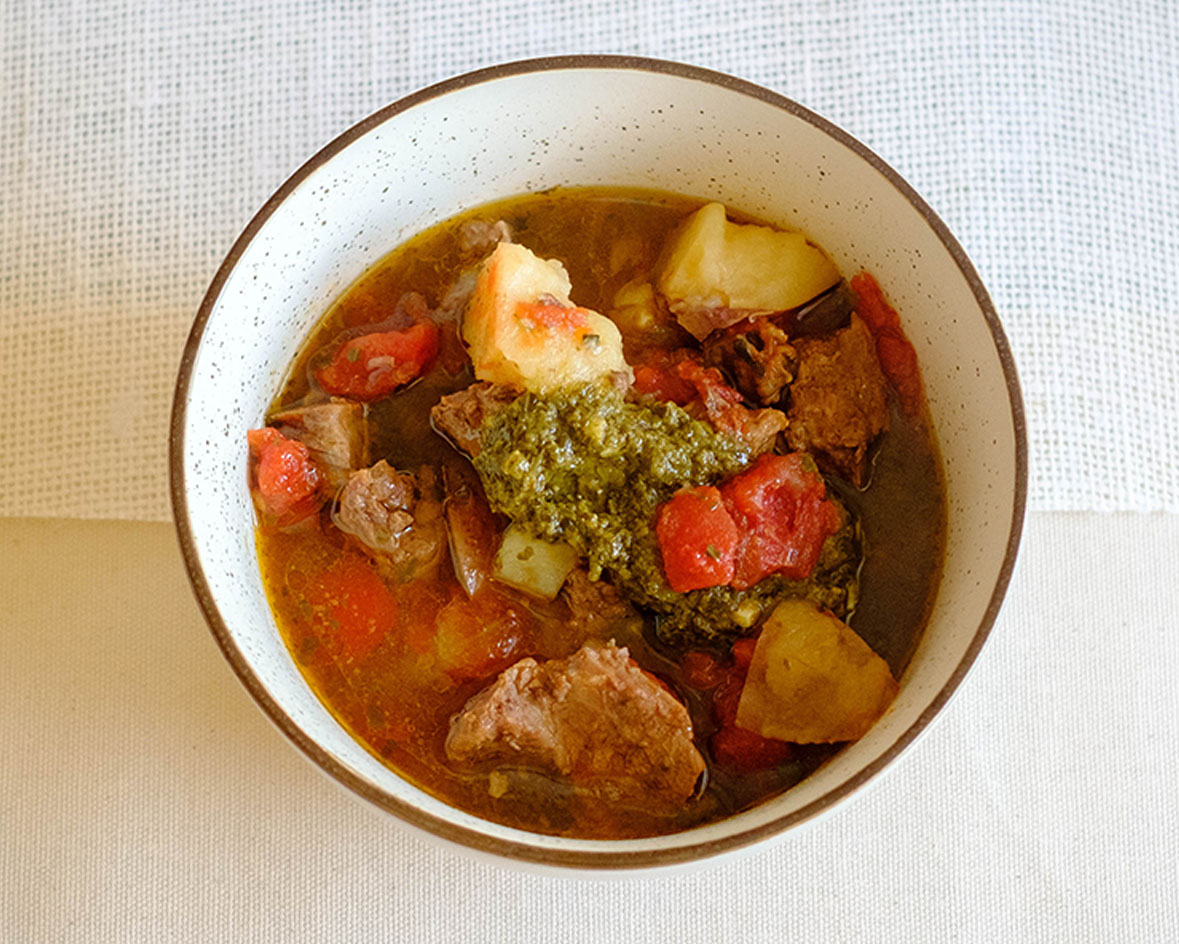
Instant Pot Basil Pesto Beef Stew
Instant Pot Basil Pesto Beef Stew, a budget-friendly and nutrition-packed delight that effortlessly combines lean beef, vibrant vegetables, and aromatic basil pesto for a week's worth of hearty, flavorful meal prep.
Place all of the ingredients in the Instant Pot. Cover the pot with the lid and place the valve in the sealed position. Set the timer for 45 minutes on medium. Note: If you don't have an Instant Pot, you can cook this in the slow cooker for 4 to 6 hours on high.
After it cooks, follow the instruction manual to naturally release the steam. Enjoy each serving with an extra tablespoon of basil pesto for extra flavor
Notes
Nutrition information provided is an estimate. It will vary based on cooking method and specific ingredients used. Please consult with your healthcare provider for specific dietary needs. To gain a better understanding, explore our nutrition disclaimer here.
While the pesto adds a unique flavor, you can omit it if needed. The stew will still be delicious, though the basil pesto contributes a distinctive herbal kick. You can also just use fresh basil leaves and extra garlic as an alternative.
Is the 45-minute cooking time in the Instant Pot flexible?
Yes, the cooking time can be adjusted based on your preferences. We prefer the longer cook time so that the meat is fork tender. Experiment with shorter or longer cooking times to achieve your desired stew consistency.
Can I freeze this stew for longer storage?
Absolutely. Portion the stew into freezer-friendly containers, leaving some space for expansion, and freeze for up to 2-3 months. Thaw overnight in the refrigerator before reheating.
If you’re a beginner at meal prep: Be prepared to set aside 2-3 hours. Once mise en place is complete, all of these recipes can be completed one by one.
If you’re a meal prep pro, use the sequenced steps below: These steps give you the flexibility to cook items simultaneously in a sequence of events.
Be sure to set timers and check on food items to avoid overcooking. Sequencing will save you time and meal prep can be done in 1-2 hours.
Meal Prep Run Down
First, preheat the oven.
Next, start preparing the items that require the oven such as the: egg frittata, peach muffin bar, basil pesto chicken for the lunch and dinner recipe, and the green beans.
Then, assemble the chicken enchiladas and also go ahead and place them in the oven.
While these items are baking in the oven, cook the shrimp quesadillas on the stovetop.
When everything is finished cooking, plate everything up in containers, and let them cool before refrigerating.
If you’re sequencing your meal prep, be sure to keep an eye on everything! Make sure food is kept refrigerated under 40F degrees until ready to eat.
Assembly Tips
Evenly divide meals according to the serving size
Let all items cool before placing them in the refrigerator
Keep all items refrigerated under 40F until ready to eat or reheat
Breakfast: These items can be reheated in the microwave
Lunch: Serve the chicken salad chilled, while the quesadillas can be reheated in the microwave
Dinner: Both meals can be reheated in the microwave
Extra Flavors and Substitutions
Egg Frittata: Feel free to serve with sliced avocado or salsa
Tortillas: You can also use your choice of tortillas such as corn, almond flour tortillas, or cassava tortillas
Chicken: You can use your choice of chicken such as boneless chicken thighs or chicken tenderloins
Salad Mix: Use your choice of salad mix, and if you have extra spinach, you can also use that for your salad
Supplement meals with additional snacks such as fresh veggies and fruit for additional daily caloric needs. You can use lime/lemon and olive oil in place of salad dressing
Extra Leftover Ingredients Not Used
Protein: Freeze any uncooked meats and save for a later recipe, or you can cook the full amount, and freeze the portion that you do not eat, and save for later use.
Fruit: Use leftover fruit in smoothies, on top of yogurt, or with your cereal
Veggies: Freeze any leftover veggies for later use. Use leftover herbs in omelets or other dishes for the weekend
If you’re a beginner at meal prep: Be prepared to set aside 2-3 hours. Once mise en place is complete, all of these recipes can be completed one by one.
If you’re a meal prep pro, use the sequenced steps below: These steps give you the flexibility to cook items simultaneously in a sequence of events.
Be sure to set timers and check on food items to avoid overcooking. Sequencing will save you time and meal prep can be done in 1-2 hours.
Meal Prep Run Down
First, prepare the barley, quinoa, and boiled eggs on the stovetop. Then, preheat the oven.
Next, start prepping the recipes that require the oven such as the tilapia with broccolini and roasted chicken with brussels sprouts and squash. Place them in the oven to start baking.
Meanwhile, saute the brussels sprouts breakfast hash and cook the sausage soup on the stovetop.
Finally, prepare yogurt with cantaloupe.
When everything is finished cooking, plate everything up in containers, and let them cool before refrigerating.
If you’re sequencing your meal prep, be sure to keep an eye on everything! Make sure food is kept refrigerated under 40F degrees until ready to eat.
Assembly Tips
Evenly divide meals according to the serving size
Let all items cool before placing them in the refrigerator
Keep all items refrigerated under 40F until ready to eat or reheat
Breakfast: Serve the yogurt and boiled egg chilled, while the breakfast brussels sprouts hash can be reheated in the microwave
Lunch: Serve the quinoa salad chilled, while the soup can be reheated in the microwave
Dinner: Both meals can be reheated in the microwave
Extra Flavors and Substitutions
Yogurt: Feel free to use other toppings for your choice of fruit and nuts
Eggs: You can also cook your eggs sunny side up
Tilapia: You can use your choice of white fish
Chicken: Use your choice of chicken such as chicken breasts or chicken tenderloins
Supplement meals with additional snacks such as fresh veggies and fruit for additional daily caloric needs. You can use lime/lemon and olive oil in place of salad dressing
Extra Leftover Ingredients Not Used
Protein: Freeze any uncooked meats and save for a later recipe, or you can cook the full amount, and freeze the portion that you do not eat, and save for later use.
Fruit: Use leftover fruit in smoothies, on top of yogurt, or with your cereal
Veggies: Freeze any leftover veggies for later use. Use leftover herbs in omelets or other dishes for the weekend
If you’re a beginner at meal prep: Be prepared to set aside 2-3 hours. Once mise en place is complete, all of these recipes can be completed one by one.
If you’re a meal prep pro, use the sequenced steps below: These steps give you the flexibility to cook items simultaneously in a sequence of events.
Be sure to set timers and check on food items to avoid overcooking. Sequencing will save you time and meal prep can be done in 1-2 hours.
Meal Prep Run Down
First, prepare the turkey tenderloin in the Instant Pot. Go ahead and preheat the oven to 400F.
Next, start prepping the recipes that require the oven such as the cranberry oatmeal muffin bars and butternut squash stuffing. Place them in the oven to start baking.
Meanwhile, prepare the Italian sausage and tomato pesto turkey meatballs on the stovetop.
Finally, prepare cold items such as yogurt and cranberry pear chicken salad.
When everything is finished cooking, plate everything up in containers, and let them cool before refrigerating.
If you’re sequencing your meal prep, be sure to keep an eye on everything! Make sure food is kept refrigerated under 40F degrees until ready to eat.
Assembly Tips
Evenly divide meals according to the serving size
Let all items cool before placing them in the refrigerator
Keep all items refrigerated under 40F until ready to eat or reheat
Breakfast: Serve the yogurt chilled, while the muffin can be reheated in the microwave
Lunch: Serve the cranberry chicken salad chilled, while the Italian Sausage and Butternut squash stuffing can be reheated in the microwave
Dinner: Both meals can be reheated in the microwave
Extra Flavors and Substitutions
Cranberries: You can use fresh or dried cranberries
Yogurt: Feel free to use other toppings such as nuts
Butternut Squash: You can also use sweet potato as an alternate
Supplement meals with additional snacks such as fresh veggies and fruit for additional daily caloric needs. You can use lime/lemon and olive oil in place of salad dressing
Extra Leftover Ingredients Not Used
Protein: Freeze any uncooked meats and save for a later recipe, or you can cook the full amount, and freeze the portion that you do not eat, and save for later use.
Fruit: Use leftover fruit in smoothies, on top of yogurt, or with your cereal
Veggies: Freeze any leftover veggies for later use. Use leftover herbs in omelets or other dishes for the weekend
If you’re a beginner at meal prep: Be prepared to set aside 2-3 hours. Once mise en place is complete, all of these recipes can be completed one by one.
If you’re a meal prep pro, use the sequenced steps below: These steps give you the flexibility to cook items simultaneously in a sequence of events.
Be sure to set timers and check on food items to avoid overcooking. Sequencing will save you time and meal prep can be done in 1-2 hours.
Meal Prep Run Down
First, prepare the recipes that require the oven such as the persimmon muffins, stuffed chicken enchilada peppers, and egg frittata. Place them in the oven to start baking.
Meanwhile, prepare the beef and tomatillo stew on the stove top. While the soup is simmering, you can start panfrying the pork chops and sauteeing the persimmons.
Finally, prepare the Moroccan chicken and couscous.
When everything is finished cooking, plate everything up in containers, and let them cool before refrigerating.
If you’re sequencing your meal prep, be sure to keep an eye on everything! Make sure food is kept refrigerated under 40F degrees until ready to eat.
Assembly Tips
Evenly divide meals according to the serving size
Let all items cool before placing them in the refrigerator
Keep all items refrigerated under 40F until ready to eat or reheat
Breakfast: Both meals can be reheated in the microwave
Lunch: Both meals can be reheated in the microwave, serve the salad chilled
Dinner: Both meals can be reheated in the microwave
Extra Flavors and Substitutions
Egg Frittata: Instead of sweet potatoes, you can use regular potatoes or any choice of veggies. To keep it low-carb or keto-friendly, use sausage or non-starchy veggies such as bell peppers and broccoli
Persimmons: If you can’t find persimmons, blend together 1/4 cup of carrots and 1 cup of applesauce as a replacement for the muffins. You can also use apples, pears, or plums as a substitute for the pork chops
Ground Beef: You can also use ground turkey or ground chicken
Enchilada sauce: You can also use tomato sauce seasoned with paprika and chili powder
Supplement meals with additional snacks such as fresh veggies and fruit for additional daily caloric needs. You can use lime/lemon and olive oil in place of salad dressing
Extra Leftover Ingredients Not Used
Protein: Freeze any uncooked meats and save for a later recipe, or you can cook the full amount, and freeze the portion that you do not eat, and save for later use.
Fruit: Use leftover fruit in smoothies, on top of yogurt, or with your cereal
Veggies: Freeze any leftover veggies for later use. Use leftover herbs in omelets or other dishes for the weekend
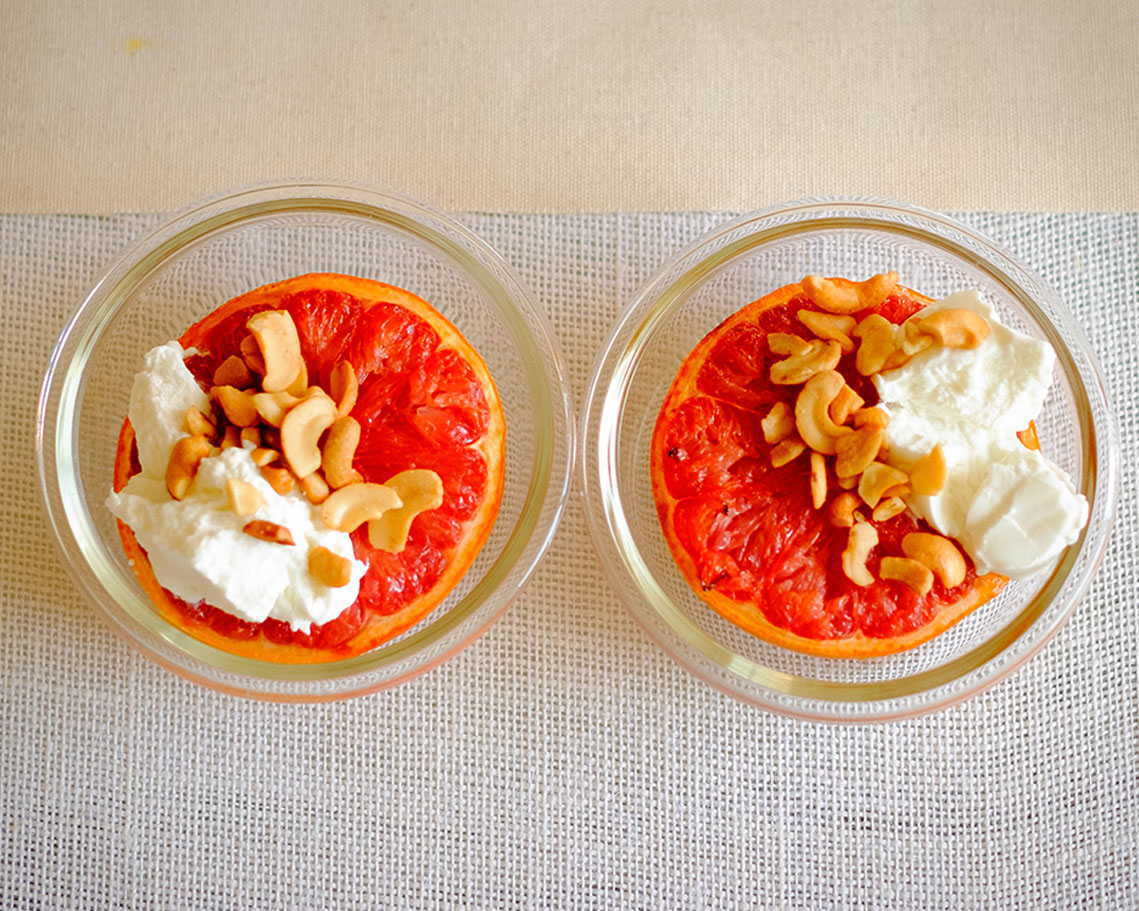
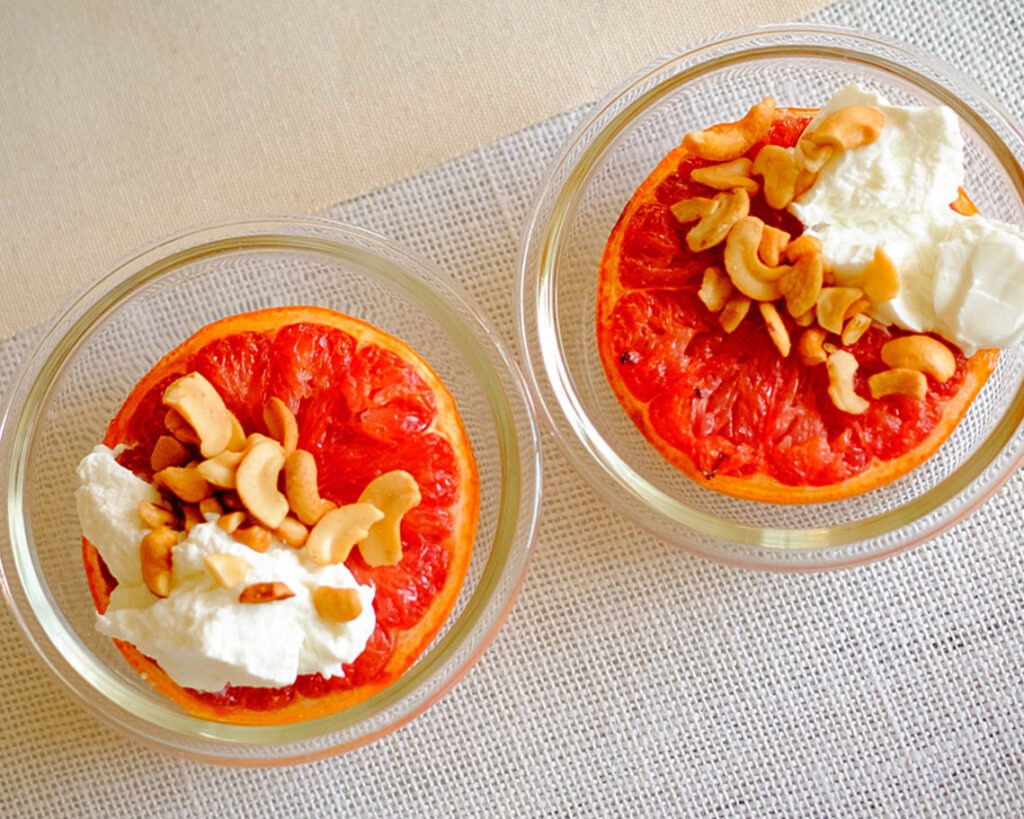
Air Fryer Honey Grapefruit! This delightful creation combines the sweet and zesty goodness of grapefruit with the rich touch of honey, crunchy cashews, and your favorite yogurt. Let’s dive right into this citrusy adventure for an air fryer breakfast!
This post may contain affiliate links. Please see our privacy policy for details.
This Air Fryer Honey Grapefruit breakfast isn’t just a tasty and convenient option for busy mornings – it’s a deliberate choice for health and well-being. From its quick preparation to its nutrient-rich profile and adaptability, it’s a meal that aligns with the needs of individuals navigating a hectic lifestyle while aiming for a healthy reset. Here’s the reason we love this meal prep idea:
Efficiency and Speed: In the fast-paced world we live in, efficiency is key. The Air Fryer makes this breakfast a breeze to prepare – in just 8 minutes, you have a delicious, health-packed meal ready to go. This means less time in the kitchen and more time for other morning routines or a few extra minutes of sleep.
Nutrient-Packed Goodness: Grapefruit is a nutrient powerhouse, loaded with vitamin C and antioxidants. Combining it with honey, cashews, and yogurt adds a variety of essential nutrients – from healthy fats and proteins to gut-friendly probiotics. This meal isn’t just tasty; it’s a nutrient-packed, energy-boosting start to your day.
Balanced and Satisfying: This breakfast hits all the right notes – the natural sugars in honey and grapefruit provide a quick energy boost, while the yogurt and cashews add proteins and healthy fats that keep you feeling satisfied throughout the morning. It’s a balanced combination that curbs mid-morning cravings and sets you up for success.
Versatility in Flavors and Textures: The beauty of this recipe lies in its adaptability. You can customize the yogurt choice to your preference, experiment with different types of honey, or even try various nuts for added crunch. This versatility ensures that you won’t get bored and allows you to cater the flavors to your liking, keeping your taste buds excited.
Gentle Reset for Healthy Choices: After a weekend of indulgence or during busy weeks where meal choices may sway off track, this Air Fryer Honey Grapefruit serves as a gentle reset button. It’s a deliciously wholesome option that feels like a treat, making it easier to transition back to healthier eating habits. The natural sugars in the grapefruit and honey satisfy sweet cravings without derailing your health goals.
The PrepYoSelf Newsletter
Ingredients You’ll Need For This Nutritious Air Fryer Breakfast
Grapefruit: Our main squeeze, the grapefruit, is not only a burst of vibrant citrusy flavor but also packs a punch of nutritional goodness. Loaded with vitamin C, antioxidants, and a refreshing tanginess, the grapefruit sets the tone for a wholesome and invigorating dish. Grocery Tip: Look for grapefruits that are firm, heavy for their size, and have a bright, smooth skin for the juiciest results.
Honey: Ah, liquid gold! The honey in this recipe is not just a sweetener; it’s a caramelized drizzle of goodness that enhances the natural sweetness of the grapefruit. Beyond its delightful taste, honey also brings its antibacterial and anti-inflammatory properties to the table, making this recipe a treat for your taste buds and your well-being. Grocery Tip: Opt for locally sourced honey for a touch of regional flair and to support local beekeepers.
Cashews: Now, let’s talk about the crunchy element – cashews! These buttery nuts add a layer of texture to the dish, elevating each bite to a whole new level. Cashews bring a subtle nuttiness and a satisfying crunch that complements the juicy tenderness of the grapefruit. Plus, they’re a fantastic source of healthy fats and essential minerals. Prep Tip: Toast the cashews briefly in a dry pan for an extra depth of flavor before adding them to the grapefruit.
Yogurt: Yogurt, the creamy canvas that ties everything together! Whether you choose Greek yogurt for its thickness, coconut yogurt for a tropical twist, or almond yogurt for a nutty undertone, the yogurt adds a velvety richness to the dish. It also introduces a layer of probiotics, promoting gut health and making this recipe a deliciously nutritious treat. Grocery Tip: Experiment with different yogurt varieties to find your perfect flavor combination.
Easy Recipe Steps to Air Fry Grapefruit
Start by grabbing a juicy grapefruit – the star of our show! Slice it in half, revealing those vibrant citrusy segments. Now, get ready to elevate the flavor with a drizzle of liquid gold – honey! Pour honey on top of the grapefruit flesh, and with a spoon, spread it evenly to ensure every bite is coated in sweetness.
Time to place the grapefruit in the Air Fryer! Place the honey-drizzled grapefruit halves in the basket, and set the temperature to 400°F. Let the magic happen for 8 minutes – the aroma that fills your kitchen will have you counting down the seconds!
As your grapefruit basks in the Air Fryer glory, it’s time to prepare the crunchy surprise. Take 1/4 cup of cashews and give them a rough chop for that extra texture. After the 8-minute mark, sprinkle these golden nuggets over the grapefruit, adding a delightful crunch that will have your taste buds doing a happy dance.
Last but certainly not least, let’s crown our Air Fryer Honey Grapefruit masterpiece with a generous dollop of yogurt! Whether you prefer Greek, coconut, or almond yogurt, the choice is yours. Spoon it over the honey-drizzled, cashew-covered grapefruit halves, turning each bite into a symphony of flavors.
Reference the recipe card below for detailed instructions.
Meal Prep Tips:
Set Up a Breakfast Station: Designate a specific area in your refrigerator for all the prepped components – honey-drizzled grapefruit halves, portioned yogurt, and a container of chopped cashews. Having a designated breakfast station makes it easy to grab everything you need quickly.
Use Air Fryer Liners for Easy Cleanup: Consider using air fryer parchment paper or liners for easy cleanup after cooking the grapefruit. This eliminates the need for scrubbing the air fryer basket, saving you time in the morning rush.
Experiment with Flavors: While meal prepping, consider experimenting with different honey varieties, yogurt flavors, or even trying different types of nuts. This way, you can switch things up throughout the week, keeping your breakfasts exciting and flavorful.
Air Fryer Honey Grapefruit
Enjoy this burst of citrusy goodness with Air Fryer Honey Grapefruit—juicy grapefruit halves drizzled with honey, air-fried to perfection, and topped with crunchy cashews and creamy yogurt for a deliciously refreshing and wholesome breakfast!
Slice the grapefruit in half. Drizzle honey on top of the flesh and spread it across.
Place the grapefruit in the Air Fryer basket and cook for 8 minutes at 400F. Note: If you don't have an Air Fryer, you can bake it i the oven for 10-12 minutes at 425.
Afterward, top it off with cashews and your choice of yogurt.
Notes
Nutrition information provided is an estimate. It will vary based on cooking method and specific ingredients used. Please consult with your healthcare provider for specific dietary needs. To gain a better understanding, explore our nutrition disclaimer here.
Yes, feel free to use your favorite variety of grapefruit! Whether it’s ruby red, pink, or white grapefruit, the recipe works well with all types.
Can I Use a Different Sweetener Instead of Honey?
Certainly! While honey adds a unique flavor, you can experiment with other natural sweeteners like maple syrup or agave nectar to suit your taste preferences.
Do I Need to Peel the Grapefruit Before Air Frying?
No need to peel! The grapefruit halves are air fried with the skin intact. Once cooked, the juicy segments can be easily scooped out with a spoon.
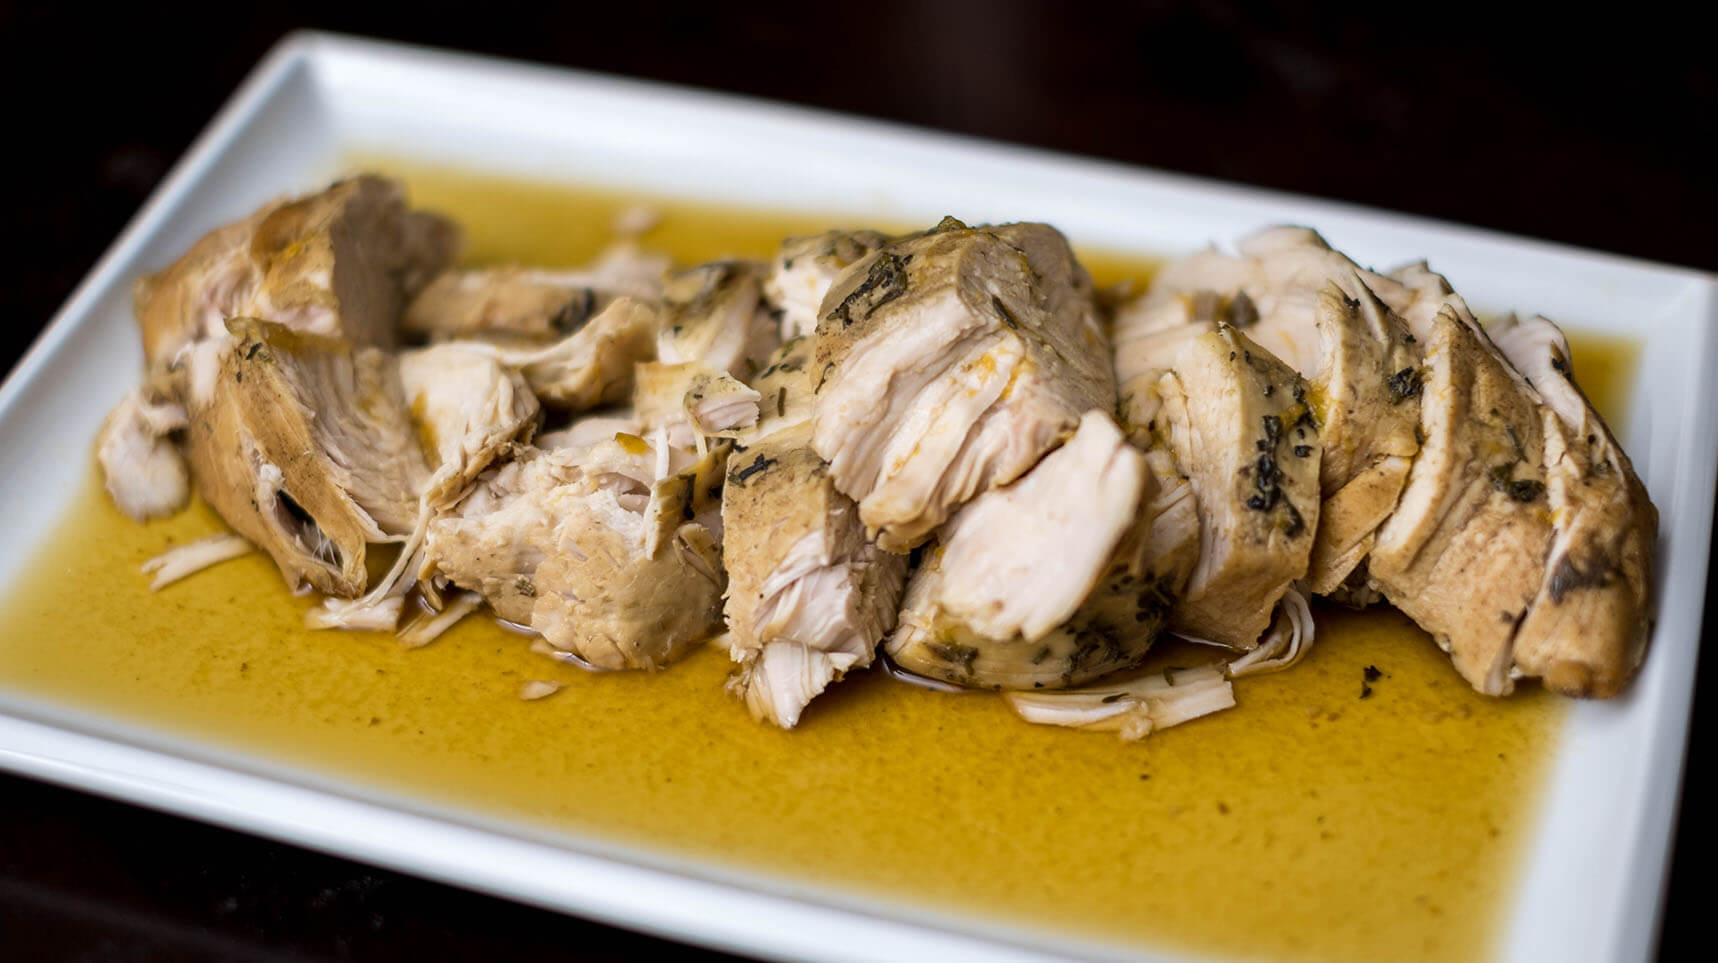
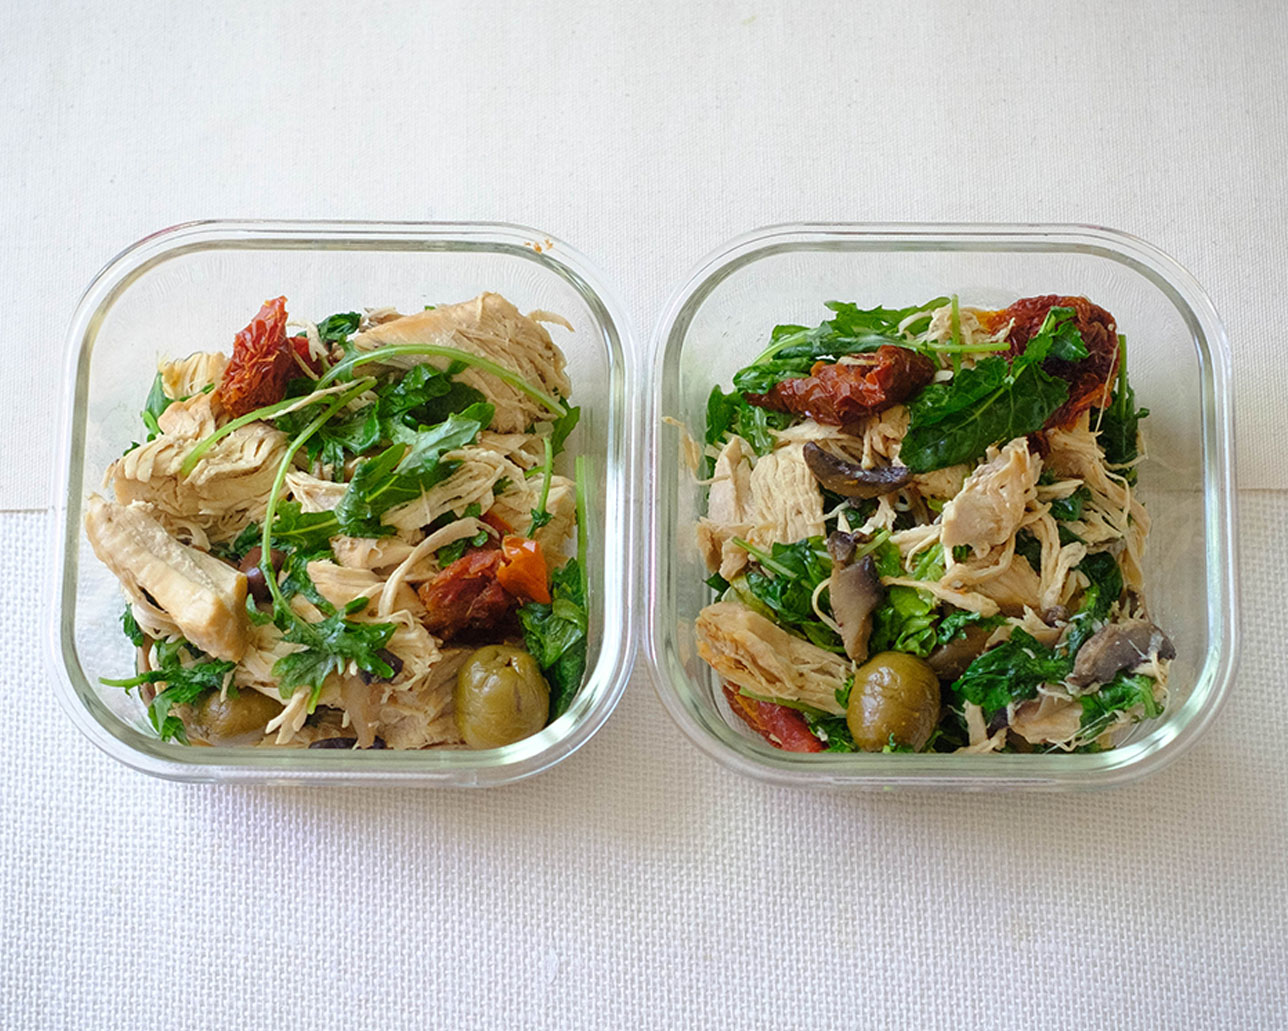
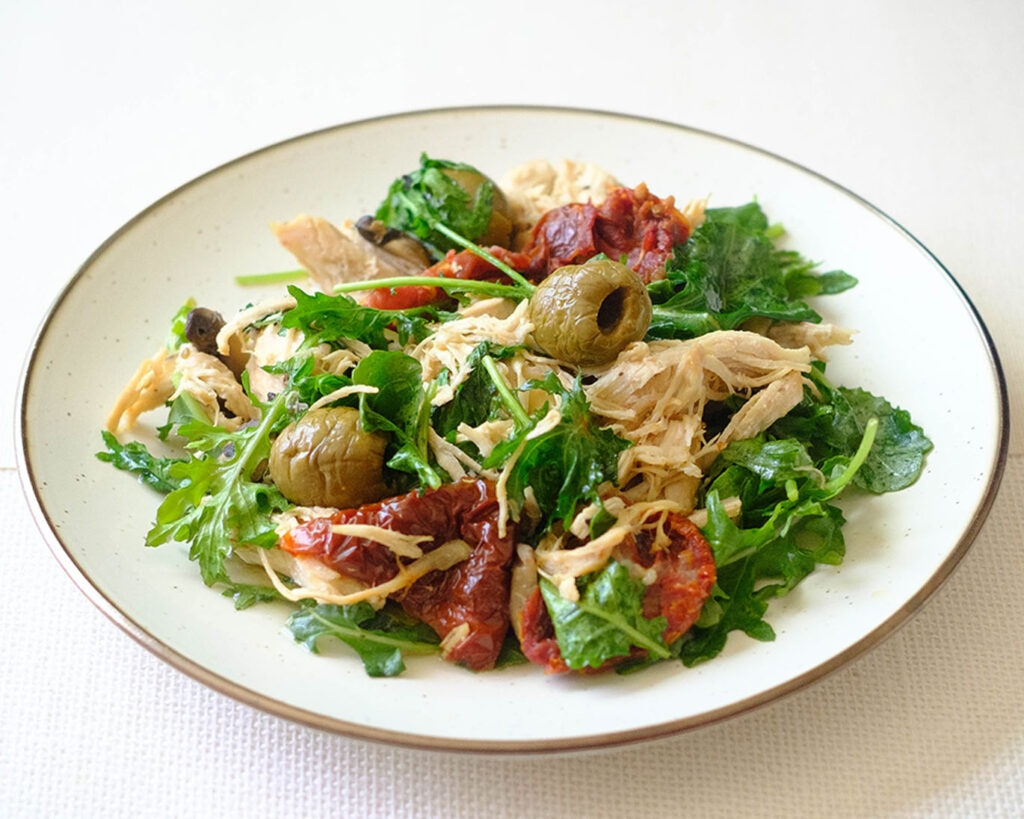
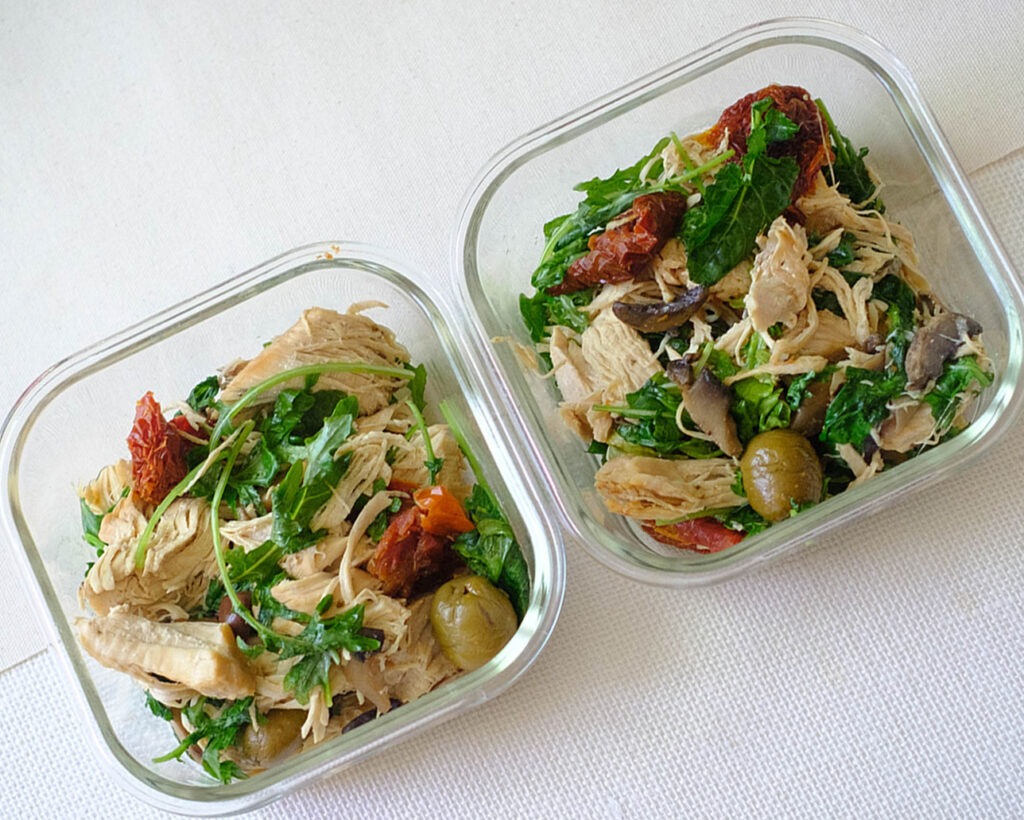
Our Instant Pot Sun-Dried Tomato Chicken is a symphony of succulent chicken, sun-kissed tomatoes, and a harmonious blend of herbs. In just 30 minutes, your Instant Pot transforms simple ingredients into a dish that’s not only a breeze to prepare but also a nutritional powerhouse. Bursting with lean proteins, colorful veggies, and the allure of sun-drenched flavors, this recipe is your ticket to a week of effortless, healthy dining. So, buckle up for a journey through taste, where every bite is a passport to culinary satisfaction and well-being.
This post may contain affiliate links. Please see our privacy policy for details.
Why this Instant Pot Chicken Recipe is Great for Meal Prep:
Streamline your busy schedule! In just 30 minutes with the Instant Pot, you can secure a week’s supply of delicious and healthy meals. It’s like a time-travel shortcut to a flavorful, time-efficient kitchen.
Loaded with lean protein, vibrant vegetables, and a diverse array of nutrients, this dish is your go-to for a comprehensive and health-packed meal. Your body will thank you for the nutrient-rich goodness!
You can unleash your culinary creativity! Whether over quinoa, rice, or paired with cauliflower rice for a low-carb option, this dish offers endless possibilities for your meal-prepping masterpieces.
The PrepYoSelf Newsletter
Ingredient Breakdown:
Chicken Breasts: Opt for lean, boneless, and skinless chicken breasts to keep it healthy. Consider buying in bulk and freezing portions for future meal preps. Ingredient swap: You can also swap with boneless, skinless chicken thighs for a different taste
Sun-Dried Tomatoes (Sliced): Look for sun-dried tomatoes without added sugars or excessive salt. You can find them in the dried goods section or at the deli counter. Ingredient swap: Try using cherry tomatoes or roasted red peppers for a fresh twist.
Green Olives: Go for pitted green olives for convenience. Check the olive bar for variety and freshness. Ingredient swap: Experiment with Kalamata olives for a more intense flavor.
White Onions (Diced): Buy onions in bulk as they’re a kitchen staple and have a longer shelf life. Consider pre-dicing and freezing onions for quicker meal prep in the future. Ingredient swap: Substitute with red onions for a milder taste.
Baby Kale: Purchase pre-washed and bagged baby kale to save time. Ingredient swap: Spinach or arugula can be excellent substitutes.
Fresh Basil: Buy fresh basil for maximum flavor. Ingredient swap: Swap with fresh parsley for a different herbaceous note.
How to Meal Prep This Instant Pot Chicken Recipe
Grab your Instant Pot and assemble the ingredients – chicken breasts, sun-dried tomatoes, green olives, diced white onions, fresh basil, garlic powder, salt, dried thyme, and water. Time to create some culinary magic!
Toss all your ingredients into the Instant Pot, except for the baby kale. Set the Instant Pot to cook for 20 minutes on medium pressure. Now, sit back and let the pot work its enchantment.
Ding, ding, ding! The timer goes off, and your kitchen is filled with the tantalizing aroma of sun-drenched goodness. Follow your Instant Pot’s instructions to release the steam – we’re about to reveal the masterpiece within!
Armed with two forks, delicately shred the chicken right there in the pot. Now, introduce the baby kale to the party. Stir it around until it gracefully wilts and dances with the savory flavors.
Reference the recipe card below for detailed instructions.
Leftover Ingredient Tips:
Chicken Salad Remix: Shred any leftover chicken and toss it into a vibrant salad. Mix in some fresh greens, cherry tomatoes, and a light vinaigrette for a refreshing and healthy lunch option.
Mediterranean Wrap Extravaganza: Grab whole-grain wraps or tortillas and stuff them with leftover chicken, sliced olives, diced onions, and a dollop of Greek yogurt. Instant Mediterranean wrap – portable and delicious!
Pasta Perfection: Cook up some whole-grain pasta and toss it with reheated Sun-Dried Tomato Chicken. Add a sprinkle of Parmesan cheese and fresh basil for an effortless pasta dish with a Mediterranean twist.
Sun-Dried Tomato Chicken Pizza Party: Turn your leftovers into a pizza topping sensation! Spread a thin layer of tomato sauce on whole-grain flatbreads, add shredded chicken, olives, and sliced onions, then bake to cheesy perfection.
Sun-Dried Tomato Chicken Pita Pocket: Fill whole-wheat pita pockets with your reheated chicken, some baby kale, and a dollop of hummus. It’s a convenient and tasty lunch that’s ready in minutes.
Instant Pot Sun-Dried Tomato Chicken
Take a flavorful voyage with our Instant Pot Sun-Dried Tomato Chicken, a quick and vibrant Mediterranean-inspired dish featuring succulent chicken, sun-drenched tomatoes, and a medley of herbs, perfect for a week of easy, healthy meals.
Place all of the ingredients (except for the baby kale) in the Instant Pot and cook for 20 minutes on medium pressure.
Once the cook time finishes, carefully release the steam following the manufacturer's instructions.
Use two forks to carefully shred the chicken in the pot. Add the baby kale and stir it around until it has softened.
Notes
Nutrition information provided is an estimate. It will vary based on cooking method and specific ingredients used. Please consult with your healthcare provider for specific dietary needs. To gain a better understanding, explore our nutrition disclaimer here.
Can I use fresh tomatoes instead of sun-dried tomatoes?
While sun-dried tomatoes add a unique flavor, you can experiment with fresh tomatoes for a different twist.
Can I use frozen chicken breasts for this recipe?
Yes, you can use frozen chicken, but adjust the cooking time accordingly.
Is there a vegetarian version of this recipe?
Absolutely! Substitute chicken with chickpeas or tofu, and you’ve got a delightful vegetarian alternative.
Manage Consent
To provide the best experiences, we use technologies like cookies to store and/or access device information. Consenting to these technologies will allow us to process data such as browsing behavior or unique IDs on this site. Not consenting or withdrawing consent, may adversely affect certain features and functions.
Functional
Always active
The technical storage or access is strictly necessary for the legitimate purpose of enabling the use of a specific service explicitly requested by the subscriber or user, or for the sole purpose of carrying out the transmission of a communication over an electronic communications network.
Preferences
The technical storage or access is necessary for the legitimate purpose of storing preferences that are not requested by the subscriber or user.
Statistics
The technical storage or access that is used exclusively for statistical purposes.The technical storage or access that is used exclusively for anonymous statistical purposes. Without a subpoena, voluntary compliance on the part of your Internet Service Provider, or additional records from a third party, information stored or retrieved for this purpose alone cannot usually be used to identify you.
Marketing
The technical storage or access is required to create user profiles to send advertising, or to track the user on a website or across several websites for similar marketing purposes.


Balsamic Glazed Pork Chops with Persimmons and Spinach
Equipment
Ingredients
Pork Chops and Marinade
Sides
Instructions
Notes
Nutrition