Meal prep better tasting and more nutritious chicken! The secret is meal prep chicken thighs. Chicken thighs are a less common cut of chicken so it’s generally more affordable. With the price of groceries what it is, every little bit of savings helps. Chicken thighs can be up to a third of the price of chicken breasts.
Meal Prep Chicken Thigh Flavor
Meal prep chicken thighs have more fat and juices, this means more flavor, unlike the leaner breast meat. The succulent meat is delicious and versatile. Whether marinated, grilled, roasted, or slow-cooked, chicken thighs absorb and complement a wide array of flavors, from bold spices and tangy marinades to savory herbs. Meal prep chicken thighs pair well with diverse cuisines, from hearty American BBQ to fragrant Asian stir-fries, making chicken thighs a beloved ingredient in kitchens around the world.
For the best flavor, marinate the chicken thighs for at least 2 hours, or overnight if possible. Use marinades that include acidic components like lemon juice or vinegar, along with herbs, spices, and a bit of oil to enhance flavor and tenderness. This can make a world of difference when cooking and mixing flavors. The marinade can blend complex flavors.
How To Choose Good Chicken Thighs
Choosing the right chicken thighs to meal prep is important. For convenience and a quicker cook time opt for skinless, boneless chicken thighs. If you’re looking for more flavor and tenderness, bone-in and skin-on can provide more opportunity while cooking. Most people won’t be able to tell the difference and if you’re new to thighs, try different options.
How To Cook Chicken Thighs
Baking: Preheat the oven to 400°F (200°C). Place marinated chicken thighs on a baking sheet lined with parchment paper. Bake for 25-30 minutes or until the internal temperature reaches 165°F (75°C).
Grilling: Preheat the grill to medium-high heat. Grill chicken thighs for 6-7 minutes on each side, ensuring they are cooked through.
Slow Cooking: Place chicken thighs in a slow cooker with desired seasonings and a bit of broth or sauce. Cook on low for 6-7 hours or high for 3-4 hours.
Stir-Frying: Cut chicken thighs into bite-sized pieces. Stir-fry in a hot pan with vegetables and sauce until fully cooked.
Meal Prep Chicken Thighs Reheats Well
Meal prepping chicken thighs is a great option since it stores and reheats well. Allow cooked chicken thighs to cool to room temperature before transferring them to meal prep containers. If you’re keeping the chicken for up to four days, store in the fridge. The freezer can store cooked chicken thighs for up to three months. To reheat, ensure the chicken thighs are thoroughly defrosted if frozen. Reheat in the microwave covered with a damp paper towel to maintain moisture, or in an oven preheated to 350°F (175°C) for about 10-15 minutes to achieve a crisp texture
Our Instant Pot Butter Chicken is a succulent blend of boneless chicken thighs, aromatic spices, and creamy tomato goodness, all prepared effortlessly in your trusty Instant Pot. We’ve cracked the code to create a restaurant-quality dish that won’t break the bank, tailored for busy individuals craving a taste of luxury without compromising their health or…
The delightful combination of sweet raspberries, tangy honey, soy sauce, chipotle powder, and garlic powder will make your taste buds sing. With its ease of preparation and versatility in serving, this chicken soft taco dish is an absolute winner for meal prep.
Hello foodie friends! I’m excited to share this delicious and healthy honey sesame, air fryer chicken recipe that’s not only convenient and cheap but also just as good as takeout! I also want to talk to you about the magic of sesame seeds and how they can add amazing flavor to your Asian-Inspired chicken dishes. In…
This Grilled Italian Marinated Chicken recipe is so easy to make and it results in a delicious and juicy chicken dish. This post may contain affiliate links. Please see our privacy policy for details. We love marinating our meats to add flavor and also keep it juicy during the cooking process. Sometimes, we don’t have…
This sweet and tangy Air Fryer Chicken Thigh recipe is a healthier version of one of our favorite take-out meals. This post may contain affiliate links. Please see our privacy policy for details. You can’t go wrong with ordering Orange Soy Chicken for take-out. Those bite-sized chicken pieces, dredged in fried, golden, and crispy batter…
Low calorie meal prep is one of the biggest reasons people start meal prepping. Gradually lowering your calorie intake is a great way to lose weight and can leave you feeling more alert throughout the day. Ditch the heavy lunches and focus on light foods with delicate and deep flavors.
Low calorie meal prep isn’t for everyone and you should consult a registered dietitian if you’re concerned about your health or have existing health issues.
We’ve covered all kinds of meal prep dieting options: from Keto to vegetarian, and sometimes, it takes a while to find the right one for you, or perhaps being on one diet for a while and then shifting to a new one is the best way for you. No matter your diet of choice, do your research and pay attention to your body. A lot of lifestyle details, body type, health needs, and goals go into determining a safe level of calories for you specifically.
Low calorie meal prep does not mean eating as little calories in a day as you possibly can. Depriving yourself of calories is not a healthy way to lose weight. This can lead to many more significant health issues. For low calorie meal prep, you want to aim for a calorie deficit within a safe range. This is based on your baseline weight and maintenance calories. Maintenance calories is the amount of calories that you need to maintain your current weight. If you’re looking to lose weight, you’ll want to be just under your maintenance level. Going too far below will make the diet more difficult to sustain and won’t last long. Find a comfortable calorie amount that you can reasonably handle. Remember, your body needs calories for energy and to function properly!
There are a lot of methods to feel full while lowering your calories. This way you don’t feel like you’re cutting out so much and leaving yourself lethargic through the day. A feeling of tiredness may be expected at first but if you find it to continue being an issue you’re probably not consuming enough calories. Again, pay attention to your body and adjust as you need.
How to know how many calories you need?
This depends on your calorie burn. If you live a mostly sedentary lifestyle, working at a desk all day with little to no exercise this is likely the category you fall into. Moderate activity is a 1.5 – 3 miles a day walk or equivalent activity. This means light workouts that don’t get the heart rate too much above resting. While active lifestyles are anything above moderate. 3 plus miles a day or workouts that get the heart rate elevated for a decent length of time.
Next, you need to understand your own metabolism. Everyone’s body is different and burns calories differently. Without the help of a registered dietitian you may find it difficult to understand your metabolism without trial and error so if you’re looking to make quick improvements you should seek professional advice. If you’re moderately healthy but looking to lose a few pounds and are otherwise fairly healthy, you can more easily estimate it and make adjustments as needed.
Low Calorie Meal Prep Methods for Success
1. Set Realistic Goals
Achieving goals, even small ones, make you feel good and provides the opportunity to grow into more ambitious goals. However, failing to achieve goals is discouraging for most people. Give yourself the best chance at success and set goals you can realistically achieve and gauge your own level of commitment.
Use an online calculator to estimate your daily caloric needs based on your age, gender, weight, height, and activity level.
Aim for a modest calorie deficit to lose weight safely. Typically, a deficit of 500-750 calories per day can lead to a healthy weight loss of about 1-1.5 pounds per week.
Set Specific, Measurable Goals:
Define clear goals such as “lose 10 pounds in 2 months” or “reduce daily intake to 1,500 calories.”
Track your progress regularly to stay motivated and make adjustments as needed.
2. Educate Yourself About Nutrition
Understand Macronutrients:
Learn about the role of proteins, carbohydrates, and fats in your diet. Each macronutrient has a different caloric value (protein and carbs provide 4 calories per gram, fats provide 9 calories per gram).
Balance your diet to include all macronutrients while staying within your calorie limit.
Read Labels:
Pay attention to nutritional labels on packaged foods. Look for serving sizes, calorie counts, and ingredients.
Avoid foods with high sugar, sodium, and unhealthy fats.
3. Plan Your Meals
Create a Weekly Menu or use our weekly meal plan:
Plan your meals and snacks for the week. Focus on incorporating a variety of foods to meet your nutritional needs and keep your diet interesting.
Include lean proteins (chicken, fish, tofu), whole grains (quinoa, brown rice), plenty of vegetables, and healthy fats (avocado, nuts).
4. Portion Control
Use Measuring Tools:
Invest in a kitchen scale and measuring cups to accurately portion your food.
Pay attention to serving sizes and measure portions to avoid overeating.
This can be tedious but if you’re struggling to lose weight this can be very helpful for understanding your daily pacing. If you’re not the kind of person to stick with measuring tools, figure out some quick amounts on foods you like and try just sticking to those. A cup of air popped popcorn there is about 30-40 calories while butter popcorn is around 80 calories. Now you know quickly how much popcorn you can have as a snack and the calorie count.
5. Healthy Cooking Methods
Opt for Low-Calorie Cooking Techniques:
Grill, bake, steam, or roast foods instead of frying.
Use non-stick pans or cooking sprays to reduce the need for added fats.
Enhance the taste of your meals with herbs, spices, lemon juice, and vinegar instead of high-calorie sauces and dressings.
6. Choose Low-Calorie Snacks
Opt for snacks like fresh fruits, vegetables with hummus, Greek yogurt, or a handful of nuts.
Avoid high-calorie, sugary snacks and beverages.
Pre-Portion Snacks:
Divide snacks into individual portions to avoid overeating. Don’t take the entire bag of chips to the couch with you. Put some chips in a bowl or baggie and you’re less likely to just continue eating out of habit or boredom.
7. Stay Hydrated
Aim for at least 8 glasses of water a day. Sometimes thirst can be mistaken for hunger.
Avoid sugary drinks and limit alcohol consumption.
Drink herbal teas, black coffee, or infused water for a calorie-free flavor boost. There are tons of zero calorie water flavorings on the market so if you just can’t handle that much water or find it difficult to cut out sweet drinks, this is a great alternative.
8. Low calorie doesn’t mean no activity
Exercise regularly to burn calories and improve weight loss, get the blood pumping, and get some fresh air.
Find ways to stay active throughout the day, such as taking the stairs, walking during breaks, or doing household chores.
9. Track Your Progress
Keep track of the foods you’re eating. It can be a lot of work but for some people it’s necessary to stay on track and it can be a great thing to hold onto as a reminder as you achieve your health goals.
Keep a food diary to log what you eat and drink each day. This helps you stay accountable and identify areas for improvement.
Use apps like MyFitnessPal or Lose It! to track your caloric intake easily.
Regular Check-Ins:
Weigh yourself weekly or monthly and take body measurements to monitor your progress. Don’t be discouraged by slow progress at first. This is normal in new diets and is often down to your metabolism catching up to the new foods or simply water weight as you increase your hydration.
Adjust your calorie intake and exercise routine based on your results.
Low Calorie Meal Prep Ideas
breakfast:
Greek yogurt with berries and a drizzle of honey
Overnight oats with almond milk, chia seeds, and sliced bananas
Lunch:
Quinoa salad with mixed greens, cherry tomatoes, cucumbers, and a light vinaigrette
Grilled chicken breast with steamed broccoli and sweet potato mash
Dinner:
Baked salmon with a side of asparagus and brown rice
Turkey chili with black beans, corn, and bell peppers
Snacks:
Carrot and celery sticks with hummus
Apple slices with a small handful of almonds
Recommended Average Daily Calorie
Gender at Birth
Age
Sedentary
Moderately Active
Active
Female
14-18
1,800
2,000
2,400
19-30
1,800-2,000
2,000-2,200
2,400
31-50
1,800
2,000
2,200
Male
14-18
2,000-2,400
2,400-2,800
3,000
19-30
2,400-2,600
2,600-2,800
2,800-3,000
31-50
2,200-2,400
2,400-2,600
2,400-2,800
If you’re looking to bulk up and build muscle, then consuming above average calories can be necessary and that’s coming in a future post!
Start your mornings with a burst of flavor and energy with our Breakfast Deli Egg Roll-Ups! Packed with protein and low in carbs, these roll-ups are the perfect solution for busy individuals who crave restaurant-quality food without breaking the budget. With just a handful of ingredients and minimal prep time, you can whip up a batch of these delicious delights in no time flat. The combination of savory turkey deli meat, fluffy eggs, and vibrant bell peppers creates a mouthwatering flavor explosion that will leave you craving more. Plus, they’re completely customizable, so you can mix and match fillings to suit your taste preferences. Whether you’re rushing out the door or sitting down to a leisurely breakfast, these roll-ups are sure to satisfy your hunger and fuel your day. So go ahead, give them a try and elevate your breakfast egg game to new heights!
This post may contain affiliate links. Please see our privacy policy for details.
Speedy Prep: With just a few simple steps, you can whip up these roll-ups in no time flat. Perfect for those busy mornings when you need a nutritious breakfast without the hassle!
Minimal Ingredients: You don’t need a laundry list of ingredients to make these roll-ups. Just a handful of kitchen staples like eggs, turkey deli meat, and bell peppers are all you need to create a breakfast masterpiece.
Low Carb, High Protein: Say goodbye to sugary cereals and carb-heavy pastries! These roll-ups are low in carbohydrates, making them a great choice for anyone watching their carb intake. Plus, with the protein-packed combination of eggs and turkey deli meat, you’ll stay fuller for longer and power through your morning with ease.
Portability: Need breakfast on the go? No problem! Simply wrap these roll-ups in parchment paper or foil, and you’ve got a portable breakfast that you can enjoy anywhere – whether you’re rushing out the door or sitting at your desk.
Customizable: Don’t be afraid to get creative with your fillings! While this recipe calls for bell peppers, you can mix things up by adding in your favorite veggies like spinach, mushrooms, or onions. The possibilities are endless!
Ingredients You’ll Need
Eggs: Eggs are the star of this recipe, and for good reason! Not only are they a fantastic source of high-quality protein, but they also provide essential nutrients like vitamin D and choline. By using eggs as the base of our roll-ups, we ensure that they’re not only delicious but also satisfying and nutritious.
Turkey Deli Meat: Turkey deli meat adds a savory, meaty flavor to our roll-ups without weighing them down with unnecessary calories or fat. It’s a lean source of protein, making it perfect for those looking to build muscle or maintain a healthy weight. Plus, turkey deli meat is often more budget-friendly than other types of deli meat, making it a great choice for those watching their wallets.
Red Bell Pepper: Not only do red bell peppers add a pop of vibrant color to our roll-ups, but they also bring a subtle sweetness and crunch that complements the savory flavors of the eggs and turkey. Plus, bell peppers are packed with vitamin C, antioxidants, and fiber, making them a nutritious addition to any meal.
How to Meal Prep Breakfast Deli Egg Roll Ups
Heat up a pan over medium heat and add a teaspoon of olive oil. Once the oil is nice and warm, toss in those vibrant red bell peppers and let them sizzle until they soften. Oh, the aroma already has me drooling!
Now, crack those eggs into the pan with the bell peppers. Grab your spatula and give them a good stir until they’re cooked to perfection and nice and firm. We’re talking about eggs that are so fluffy and delicious, you’ll be doing a happy dance in your kitchen!
Alright, it’s time to assemble our breakfast magic! Take two slices of turkey deli meat and layer them on top of each other. Now, scoop two tablespoons of that mouthwatering egg and bell pepper mixture right into the center of the deli meat. Are you feeling the excitement yet?
Gently fold the deli meat over the eggs like a cozy little blanket, and secure them closed with a toothpick. Voila! You’ve just created a masterpiece – a Breakfast Deli Taco Roll-Up that’s as convenient as it is delectable.
Now, here comes the best part – packing these beauties up for your busy mornings ahead! Simply wrap each roll-up in some parchment paper or foil, pop them in a container, and stash them in the fridge. They’ll be waiting for you like a delicious surprise when you’re ready to tackle the day!
Reference the recipe card below for detailed instructions.
Meal Prep Tips:
Fresh Fruit: Balance out the savory flavors of the roll-ups with a side of fresh fruit. Sliced strawberries, blueberries, or oranges make for a refreshing and vibrant addition to your breakfast spread. Not only do they add a pop of color, but they also provide natural sweetness and a boost of vitamins and antioxidants.
Whole Grain Toast: Serve your roll-ups alongside a slice of whole grain toast for a satisfying and hearty breakfast. The fiber from the whole grains will help keep you full and satisfied until your next meal, while the toast provides a delicious vehicle for spreading on your favorite toppings like avocado or nut butter.
Greek Yogurt: Amp up the protein content of your breakfast by pairing your roll-ups with a side of creamy Greek yogurt. Top it off with a drizzle of honey and a sprinkle of granola for some added sweetness and crunch. Greek yogurt also adds a cool and tangy contrast to the warm and savory flavors of the roll-ups.
Salsa or Hot Sauce: For an extra kick of flavor, serve your roll-ups with a side of salsa or your favorite hot sauce. The acidity and heat from the salsa or hot sauce complement the savory flavors of the roll-ups and add a fun and spicy twist to your breakfast.
Breakfast Deli Egg Roll Ups
Quick and easy Breakfast Deli Taco Roll-Ups: protein-packed, low-carb delights perfect for meal prep, customizable fillings, and budget-friendly mornings!
Add oil to a heated pan on medium heat and saute the bell peppers until they soften Then, crack the eggs into the pan and use a spatula to stir the eggs until they cook and firmly set.
Layer 2 pieces of turkey deli meat on top of each other. Scoop 2 tablespoons of the egg mixture into the middle of each deli meat.
Fold the deli meat over the eggs and use a toothpick to secure them closed.
Notes
Nutrition information provided is an estimate. It will vary based on cooking method and specific ingredients used. Please consult with your healthcare provider for specific dietary needs. To gain a better understanding, explore our nutrition disclaimer here.
Yes, these roll-ups are a hit with kids! They’re fun to eat and packed with protein and veggies to keep little tummies satisfied. Plus, you can customize the fillings to suit your child’s taste preferences, making them a versatile option for even the pickiest eaters.
Can I customize the fillings?
Absolutely! Feel free to get creative with the fillings and customize them to suit your taste preferences. You can add in different veggies like spinach, mushrooms, onions, or tomatoes, or switch up the protein by using ham, chicken, or bacon instead of turkey deli meat. The possibilities are endless!
Can I freeze these roll-ups?
Yes, you can freeze these roll-ups for longer storage. Wrap them individually in plastic wrap and then place them in a freezer-safe bag or container. They should keep well in the freezer for up to 2-3 months. When you’re ready to enjoy them, simply thaw them overnight in the refrigerator or reheat them in the microwave or oven.
This Cashew Chicken and Eggplant Stir Fry recipe is the epitome of flavor meets efficiency, perfect for busy individuals seeking a nutritious yet budget-friendly meal prep option. Picture succulent boneless chicken thighs, velvety eggplant, and vibrant bell peppers dancing in a symphony of savory sauces, all topped off with crunchy cashews for that extra dose of texture and taste. With just a handful of simple ingredients and easy-to-follow instructions, you’ll be amazed at how effortlessly this dish comes together, leaving you with ample time to conquer your day.
This post may contain affiliate links. Please see our privacy policy for details.
Quick and Easy: With simple ingredients and straightforward instructions, this recipe is a breeze to whip up, perfect for those hectic days when time is of the essence.
Nutritious and Balanced: Packed with lean protein from chicken thighs, plenty of veggies like eggplant and bell peppers, and healthy fats from cashews and sesame oil, this stir fry provides a well-rounded and nutritious meal that keeps you energized throughout the day.
Budget-Friendly: Utilizing affordable ingredients like boneless chicken thighs, eggplant, and bell peppers, this recipe proves that eating healthy doesn’t have to break the bank. Plus, by preparing meals at home, you’ll save money compared to dining out or ordering takeout.
Versatile: Don’t be afraid to get creative! This stir fry is incredibly versatile, so feel free to swap in your favorite veggies or add extra ingredients like broccoli, snap peas, or even pineapple for a personalized touch.
Flavorful and Satisfying: With a combination of savory soy sauce, sweet hoisin sauce, and aromatic sesame oil, every bite of this stir fry bursts with irresistible flavor. Plus, the addition of crunchy cashews adds a delightful texture that keeps you coming back for more.
Healthy Lifestyle Support: Whether you’re trying to eat more veggies, cut back on processed foods, or simply maintain a balanced diet, this recipe aligns perfectly with your health and wellness goals, making it easy to stay on track without sacrificing taste or convenience.
Ingredients you’ll need for this Peanut Chicken Stir Fry
Boneless Chicken Thighs: Chicken thighs are not only budget-friendly but also pack a flavorful punch. They’re juicier and more tender compared to chicken breasts, making them perfect for stir-frying. Plus, they’re an excellent source of protein, helping to keep you feeling full and satisfied.
Eggplant: Eggplant adds a hearty texture and mild flavor to the stir fry. It’s also incredibly budget-friendly and loaded with nutrients like fiber, vitamins, and minerals. Eggplant soaks up the flavors of the sauce beautifully while providing a satisfying bite in every mouthful.
Red Bell Pepper: Not only does red bell pepper bring vibrant color to the dish, but it also adds a subtle sweetness and crunch. Rich in vitamin C and antioxidants, red bell peppers boost the nutritional value of the stir fry without breaking the bank.
Garlic: A staple in many cuisines, garlic infuses the stir fry with a robust, aromatic flavor. It’s also praised for its numerous health benefits, including immune-boosting properties and potential heart health benefits. Plus, a little garlic goes a long way, making it a cost-effective way to elevate the dish.
Red Onion: Red onions lend a touch of sweetness and a hint of spice to the stir fry. They’re also more budget-friendly compared to other onion varieties. Packed with antioxidants and flavonoids, red onions not only enhance the flavor but also contribute to overall health and wellness.
Green Onions: Also known as scallions, green onions add a fresh, oniony flavor and a pop of color to the dish. They’re a wallet-friendly ingredient that adds brightness and depth to the stir fry. Plus, they’re low in calories but high in vitamins and minerals, making them a nutritious addition to any meal.
Cashews: Crunchy cashews provide a delightful texture contrast to the tender chicken and veggies. They’re a budget-friendly nut option that adds richness and nuttiness to the dish. Cashews also offer healthy fats, protein, and essential nutrients like magnesium and copper, making them a wholesome addition to this stir fry.
Soy Sauce: A pantry staple in many households, soy sauce adds depth of flavor and a savory umami kick to the stir fry. It’s an affordable way to season the dish while providing a satisfying saltiness without the need for additional seasoning.
Hoisin Sauce: Sweet and tangy hoisin sauce brings a touch of sweetness and complexity to the stir fry sauce. It’s a budget-friendly condiment that adds depth of flavor and richness to the dish, elevating it to new heights of deliciousness.
Olive Oil and Sesame Oil: These oils provide a flavorful base for sautéing the ingredients and impart a subtle richness to the stir fry. Olive oil is a heart-healthy option that’s readily available and budget-friendly. Sesame oil adds a distinctive nutty aroma and flavor that complements the other ingredients perfectly.
How to Meal Prep Cashew Chicken Stir Fry
Start by cutting your chicken, eggplant, and red bell peppers into adorable little one-inch cubes. Mince up those garlic cloves, dice the red onions, and give those green onions a good chop. We’re getting ready to rock and roll!
Heat up a wok on high heat and drizzle in that olive oil. Toss in the red onions and chicken, and let the magic happen. Stir and sizzle until your chicken is golden brown and cooked through, about 5 to 6 minutes. Trust us, your kitchen is about to smell AMAZING!
Now, it’s time to add some color and flavor. Throw in the garlic, eggplant, and bell peppers, and give everything a good mix. Let those veggies soften up and mingle with the chicken for about 3 to 4 minutes. Can you smell that deliciousness wafting through the air?
This is where the magic truly happens. Pour in the soy sauce, hoisin sauce, and sesame oil, and watch as your stir-fry transforms into a symphony of flavors. Give it all a good stir to ensure every morsel is coated in that savory goodness.
Sprinkle on those crunchy cashews and vibrant green onions like the culinary artist you are. Not only do they add a delightful crunch and pop of color, but they also take this dish to the next level of deliciousness!
Reference the recipe card below for detailed instructions.
Meal Prep Tips for Cashew Chicken Stir Fry
Customize to Taste: Feel free to customize the stir fry to suit your preferences. Add extra veggies like broccoli, carrots, or snap peas for added nutrition and variety. You can also adjust the seasonings and sauces to your liking for a personalized touch.
Reheat with Care: When reheating the stir fry, use a microwave-safe container or reheat it gently on the stovetop to prevent drying out the chicken and vegetables. Add a splash of water or broth if needed to maintain moisture and freshness.
Serve with Rice or Noodles: Cashew Chicken and Eggplant Stir Fry pairs beautifully with steamed white or brown rice, or even noodles like rice noodles or udon noodles. The starch helps soak up the flavorful sauce and adds heartiness to the meal.
Add a Side Salad: Fresh, crisp salad greens with a tangy vinaigrette make a refreshing accompaniment to the stir fry. Try a simple mix of mixed greens, cherry tomatoes, cucumber, and shredded carrots for a burst of color and freshness. You can also serve this up in lettuce wraps.
Incorporate Fermented Foods: Fermented foods like kimchi or pickled vegetables add a zesty kick and probiotic goodness to your meal. Enjoy them as a side dish or incorporate them into the stir fry for extra flavor and gut health benefits.
Cashew Chicken and Eggplant Stir Fry
Deliciously flavorful Cashew Chicken and Eggplant Stir Fry, packed with tender chicken, vibrant veggies, and crunchy cashews, perfect for easy meal prep and budget-friendly weeknight dinners!
Cut the chicken, eggplant, and red bell peppers into one inch cubes. Peel and mince the garlic, dice the red onions, and chop the green onions.
Add olive oil to a wok on high heat and saute the red onions and chicken until the chicken is fully cooked and golden brown (about 5 to 6 minutes).
Next, add the garlic, eggplant, and bell peppers. Mix thoroughly until the veggies soften (about 3 to 4 minutes).
Then, season everything with the soy sauce, hoisin sauce, and sesame oil and stir it all together.
Finally, garnish with the cashews and green onions.
Notes
Nutrition information provided is an estimate. It will vary based on cooking method and specific ingredients used. Please consult with your healthcare provider for specific dietary needs. To gain a better understanding, explore our nutrition disclaimer here.
Can I use chicken breast instead of chicken thighs?
Absolutely! While chicken thighs provide extra juiciness and flavor, you can definitely use chicken breast if you prefer. Just be mindful not to overcook it to prevent it from drying out.
Can I make this dish vegetarian or vegan?
Definitely! You can easily make this dish vegetarian or vegan by omitting the chicken and using tofu or tempeh instead. Simply cube the tofu or tempeh and stir-fry it along with the veggies as directed in the recipe.
Can I make this dish spicy?
Of course! If you like a bit of heat, you can add a sprinkle of red pepper flakes or a drizzle of sriracha sauce to the stir fry when adding the sauces. Adjust the amount to your desired level of spiciness.
Start your day off right with our mouthwatering Cilantro and Bell Pepper Breakfast Egg Tacos! This easy-to-make recipe is perfect for busy mornings when you need a quick and satisfying breakfast option. Packed with protein-rich eggs, vibrant yellow bell peppers, and fresh cilantro, these tacos are bursting with flavor and nutrition. Whether you’re meal prepping for the week ahead or whipping up a delicious breakfast on the fly, these tacos are sure to please.
This post may contain affiliate links. Please see our privacy policy for details.
Eggs: Eggs are a staple ingredient in many breakfast recipes for good reason. They are not only affordable but also a nutritional powerhouse, packed with high-quality protein, vitamins, and minerals. In this recipe, eggs serve as the main protein source, providing a satisfying and filling component to the breakfast tacos. Additionally, eggs act as a binding agent, helping to hold the taco filling together while adding a rich and creamy texture to the dish.
Corn Tortillas: Corn tortillas are a traditional Mexican staple that are not only delicious but also budget-friendly. Made from corn masa, these gluten-free tortillas are a healthier alternative to flour tortillas and provide a hearty base for the breakfast tacos. Corn tortillas are low in fat and calories but rich in complex carbohydrates, making them a nutritious and filling option to help fuel your day.
Yellow Bell Peppers: Bell peppers are not only colorful and vibrant but also packed with vitamins and antioxidants. In this recipe, yellow bell peppers add a pop of color and sweetness to the breakfast tacos, while also providing a crunchy texture and a subtle flavor. Bell peppers are rich in vitamin C, vitamin A, and other beneficial nutrients, making them a nutritious addition to any meal. By sautéing diced yellow bell peppers, we enhance their natural sweetness and bring out their delicious flavor, adding depth and complexity to the dish.
Cilantro: Cilantro is a versatile herb that adds a burst of fresh and herbaceous flavor to the breakfast tacos. Not only does cilantro provide a pop of green color and visual appeal to the dish, but it also adds a refreshing and aromatic element that complements the other ingredients perfectly. Cilantro is rich in vitamins, minerals, and antioxidants, making it a healthy addition to any meal. By garnishing the breakfast tacos with chopped cilantro, we elevate the flavors and add a bright and vibrant finishing touch to the dish.
How to Meal Breakfast Tacos
Begin by adding olive oil to a pan over medium-high heat. Once the oil is hot, add in the diced yellow bell peppers and sauté them for about two minutes until they start to soften. This initial step not only adds a pop of color to your tacos but also infuses them with a subtle sweetness.
Now, it’s time to crack those eggs! Carefully crack each egg into the pan with the sautéed bell peppers. Use a spatula to gently scramble the eggs, ensuring they cook evenly with the peppers. Keep stirring until the eggs are firm and fully set. Don’t forget to season your egg mixture with a sprinkle of salt to enhance the flavors.
While your eggs are cooking, warm up your corn tortillas. You can do this by placing them in a dry skillet over medium heat for about 30 seconds on each side. This quick step helps to soften the tortillas and make them more pliable for stuffing.
Once your eggs are cooked to perfection, it’s time to assemble your breakfast tacos. Spoon the egg and bell pepper mixture evenly onto each warmed tortilla. Be generous – after all, you deserve a hearty breakfast to fuel your day!
Last but certainly not least, it’s time to add a pop of freshness to your tacos with a sprinkle of chopped cilantro. This vibrant herb not only adds a burst of flavor but also provides a touch of green goodness to your breakfast.
Now that your Cilantro and Bell Pepper Breakfast Egg Tacos are assembled, it’s time to prep them for the week ahead. Simply wrap each taco individually in foil or parchment paper to keep them fresh. Store them in an airtight container in the refrigerator, and you’ll have a grab-and-go breakfast option ready to fuel your busy mornings all week long!
Reference the recipe card below for detailed instructions.
Meal Prep Pairing Tips:
Fresh Fruit: Pair your breakfast tacos with a side of fresh fruit for a refreshing and nutritious addition to your meal. Sliced strawberries, berries, pineapple, or melon are all great options that complement the flavors of the tacos while adding a burst of sweetness and vitamins.
Avocado: Add a creamy and decadent touch to your breakfast tacos by serving them with sliced avocado or a dollop of guacamole. Avocado adds richness and healthy fats to the meal, while also providing a creamy contrast to the crunchy bell peppers and savory eggs.
Salsa or Pico de Gallo: Serve your breakfast tacos with a side of salsa or pico de gallo for a burst of flavor and spice. Whether you prefer a mild tomato salsa or a fiery salsa verde, the acidity and heat of the salsa will complement the flavors of the tacos and add a zesty kick to each bite.
Greek Yogurt: Swap out traditional sour cream for Greek yogurt to add creaminess and tanginess to your breakfast tacos without the extra calories. Greek yogurt is high in protein and probiotics, making it a healthy and nutritious alternative that pairs well with the savory flavors of the eggs and bell peppers.
Black Beans: Add a protein boost to your breakfast tacos by serving them with a side of seasoned black beans. Black beans are rich in fiber, protein, and essential nutrients, making them a nutritious and satisfying addition to any meal. Simply season the beans with a dash of cumin, garlic powder, and chili powder for added flavor.
Coffee or Fresh Juice: Wash down your breakfast tacos with a cup of hot coffee or a glass of freshly squeezed juice for a complete and satisfying breakfast experience. Whether you prefer a bold espresso or a refreshing orange juice, a beverage pairing can help balance the flavors of the meal and enhance your overall dining experience.
Cilantro and Bell Pepper Breakfast Egg Tacos
Delicious and nutritious Cilantro and Bell Pepper Breakfast Egg Tacos, packed with protein and flavor, perfect for a quick and satisfying meal any time of day!
Add oil to a pan on medium high heat and saute the bell peppers and onions for about two minutes until they soften.
Crack the eggs into the pan and stir the eggs until they firmly set. Season with salt to taste
Evenly stuff the tortillas with the egg mixture and garnish with fresh cilantro
Notes
Nutrition information provided is an estimate. It will vary based on cooking method and specific ingredients used. Please consult with your healthcare provider for specific dietary needs. To gain a better understanding, explore our nutrition disclaimer here.
While these breakfast tacos are best enjoyed fresh, you can freeze them for longer storage. Simply assemble the tacos as instructed, then wrap them individually in foil or plastic wrap before placing them in a freezer-safe bag or container. To reheat, thaw the tacos overnight in the refrigerator, then heat them in the microwave or oven until warmed through.
How can I add extra protein to these breakfast tacos?
If you’re looking to add extra protein to these breakfast tacos, you can incorporate additional protein-rich ingredients such as cooked bacon, sausage, ham, or black beans. Simply cook the protein of your choice separately and add it to the tacos along with the egg mixture.
Can I use other types of tortillas for these breakfast tacos?
Yes, you can use other types of tortillas such as flour tortillas, whole wheat tortillas, or gluten-free tortillas in place of corn tortillas. Choose the tortillas that best suit your dietary preferences and taste preferences.
Welcome to your new go-to meal prep solution that’s as delicious as it is convenient: Salmon Piccata Meal Prep! If you’re a busy individual looking to stay on track with your healthy eating goals without sacrificing flavor or breaking the bank, then you’ve come to the right place. This recipe combines tender salmon fillets, crisp asparagus, and a tangy lemon caper sauce for a gourmet experience that’s ready in a flash. With just a handful of ingredients and minimal prep time, you’ll have a week’s worth of nutritious and satisfying meals at your fingertips. Get ready to impress your taste buds and streamline your meal prep routine with this flavor-packed dish. So, let’s roll up our sleeves and dive into the kitchen – your taste buds will thank you!
This post may contain affiliate links. Please see our privacy policy for details.
Quick and Easy: With just a few simple steps and minimal prep time, this recipe fits perfectly into your busy schedule. No need to spend hours in the kitchen – you’ll have delicious meals ready to go in no time!
Healthy and Nutritious: Salmon is packed with omega-3 fatty acids, protein, and essential vitamins, making it a nutritious choice for fueling your body. Paired with nutrient-rich asparagus, this meal provides a wholesome balance of nutrients to keep you energized throughout the day.
Budget-Friendly: Eating healthy doesn’t have to break the bank! This recipe utilizes affordable ingredients like salmon and asparagus, allowing you to enjoy a gourmet meal without overspending.
Flavor Explosion: The tangy lemon sauce infused with butter, garlic, and capers adds a burst of flavor to every bite. It’s a deliciously satisfying meal that will leave your taste buds dancing with joy.
Versatile: While this recipe is designed for meal prep, it’s also versatile enough to be enjoyed for dinner parties or weeknight meals. Impress your guests or treat yourself to a gourmet dinner without the hassle.
The PrepYoSelf Newsletter
To Meal Prep This Salmon Recipe You’ll Need
Salmon: Salmon is the star of this dish for a good reason. Not only is it rich in omega-3 fatty acids, which are beneficial for heart health and brain function, but it’s also an excellent source of protein. Protein helps to keep you feeling full and satisfied, making it an essential component of any meal. Additionally, salmon has a naturally rich and buttery flavor that pairs beautifully with the tangy lemon sauce, creating a harmonious balance of flavors.
Asparagus: Asparagus not only adds vibrant color to the dish but also contributes a host of nutrients. It’s packed with vitamins, minerals, and antioxidants, including vitamins A, C, E, and K. Asparagus is also high in fiber, which aids in digestion and promotes gut health. Its slightly bitter flavor complements the richness of the salmon and adds a delightful crunch to each bite.
Lemon Juice: Lemon juice serves as the primary acidic component in the sauce, lending a bright and tangy flavor to the dish. It adds a refreshing zing that cuts through the richness of the butter and enhances the natural flavors of the salmon and asparagus. Additionally, lemon juice is a great source of vitamin C, which boosts the immune system and aids in iron absorption.
Butter: Melted butter adds a luxurious richness to the sauce, creating a velvety texture that coats the salmon and asparagus. While butter is often associated with indulgence, using it in moderation adds depth of flavor without compromising on health. Opting for unsalted butter allows you to control the sodium content of the dish.
Capers: Capers are small, briny buds that pack a punch of flavor. They add a unique, slightly tangy taste to the sauce, balancing out the richness of the butter and adding depth to the overall flavor profile. Capers are also low in calories and high in antioxidants, making them a healthy and flavorful addition to the dish.
Minced Garlic: Garlic is a kitchen staple known for its pungent flavor and numerous health benefits. It adds a savory depth to the sauce, enhancing the overall complexity of flavors. Garlic is also rich in sulfur compounds that have been shown to have anti-inflammatory and immune-boosting properties, making it a nutritious addition to any meal.
Easy Recipe Steps to Meal Prep Oven Roasted Salmon
First things first, preheat your oven to 400F. We’re getting ready to create some magic!
Rinse the baby bok choy halves thoroughly to ensure they’re dirt-free. No one wants extra crunch from the soil!
While the oven is heating up, let’s whip together that amazing sauce. In a small bowl, mix together the lemon juice, melted butter, capers, minced garlic, and a pinch of salt. Give it a good stir until everything is nicely combined. This sauce is going to be the star of the show!
Now, grab a sheet pan and lay out your salmon fillets and asparagus. It’s like creating a canvas for a masterpiece!
Next, pour that delectable sauce you just made all over the salmon and asparagus. Be generous! We want every bite to be bursting with flavor.
Once your oven is nice and toasty, pop the sheet pan in and let the magic happen. Bake for 10-12 minutes, or until the salmon is cooked to perfection and the asparagus is tender. Trust me, your kitchen is going to smell amazing!
Once the timer goes off, carefully remove the sheet pan from the oven. Let it cool for a moment before portioning out your servings into containers.
Reference the recipe card below for detailed instructions.
Meal Prep and Pairing Tips
Grains: Pairing this dish with a whole grain such as quinoa, brown rice, or farro can add texture, substance, and extra nutrients to your meal. Cook a batch of grains during your meal prep session and portion them into containers alongside the salmon and asparagus.
Fresh Fruit: Adding fresh fruit like berries, sliced apples, or grapes to your meal prep containers provides a refreshing and sweet contrast to the savory flavors of the salmon piccata. It’s a simple and nutritious way to round out your meal.
Healthy Fat Sources: Consider adding sources of healthy fats such as avocado slices, nuts, or seeds to your meal prep containers. These ingredients not only add flavor and texture but also help to keep you feeling full and satisfied.
Herbs: Garnishing your meal prep containers with fresh herbs like parsley, dill, or basil adds a pop of color and freshness.
Sauce Options: While the lemon caper sauce is delicious on its own, you can also consider pairing the salmon piccata with additional sauce options such as pesto, tzatziki, or salsa verde for variety. Portion the sauce into small containers or drizzle it directly over the meal prep containers before serving.
Oven Baked Salmon Piccata with Roasted Asparagus
Effortlessly flavorful Salmon Piccata Meal Prep: succulent salmon and crisp asparagus bathed in a tangy lemon caper sauce, perfect for busy days!
Pre-heat the oven to 400F. Mix together the sauce in a small bowl.
Place the salmon and asparagus on a sheet pan and evenly pour the sauce over the salmon and asparagus.
Bake in the oven for 10-12 minutes until the salmon is fully cooked.
Notes
Nutrition information provided is an estimate. It will vary based on cooking method and specific ingredients used. Please consult with your healthcare provider for specific dietary needs. To gain a better understanding, explore our nutrition disclaimer here.
Yes, frozen salmon can be used in this recipe. Just make sure to thaw it completely before cooking. You may need to adjust the cooking time slightly depending on the thickness of the fillets
Can I substitute a different type of fish for the salmon?
While salmon works beautifully in this recipe, you can certainly experiment with other types of fish such as trout, cod, or tilapia. Just be mindful of variations in cooking times and adjust accordingly.
I’m not a fan of asparagus. Can I use a different vegetable?
Absolutely! Feel free to swap out the asparagus for your favorite vegetable or a medley of veggies. Broccoli, green beans, or Brussels sprouts would all be delicious alternatives.
Welcome to flavor town, where hearty Cajun Sausage Stew reigns supreme! Packed with smoky Andouille sausage, vibrant veggies, and a blend of bold spices, this soul-warming dish is a celebration of Cajun cuisine at its finest. Perfect for busy individuals craving a taste of the South without sacrificing health or budget, our one pot cajun stew is a true game-changer in the world of meal prep. With just a few simple ingredients and minimal prep time, you can whip up a batch of this flavorful stew to enjoy throughout the week. So grab your apron and get ready to dive into a bowl of comfort and flavor that will leave you craving seconds!
This post may contain affiliate links. Please see our privacy policy for details.
Quick and Easy Prep: With just a handful of simple ingredients and straightforward instructions, this one pot cajun recipe can be whipped up in no time. Say goodbye to spending hours in the kitchen – our stew is ready to go in under 30 minutes, perfect for those hectic weeknights!
Budget-Friendly: We get it – sticking to a budget is important, especially when life gets busy. That’s why our one pot cajun recipe uses affordable, readily available ingredients like sausage, veggies, and pantry staples. You won’t have to break the bank to enjoy a hearty, satisfying meal.
Versatile and Customizable: Don’t be afraid to get creative! This stew is incredibly versatile, so feel free to swap out ingredients based on what you have on hand or your personal preferences. Not a fan of okra? No problem – toss in some diced zucchini instead. The possibilities are endless!
Perfect for Meal Prep: Planning ahead is key when you’re juggling a busy schedule, and our one pot Cajun Sausage Stew is the ultimate meal prep champion. Whip up a big batch on Sunday and portion it out into containers for easy grab-and-go lunches or dinners throughout the week. It reheats like a dream and tastes even better the next day!
Nutritious and Filling: Don’t let the simplicity fool you – this one pot cajun stew is packed with wholesome goodness that will keep you fueled and satisfied. From protein-packed sausage to fiber-rich veggies, each spoonful is loaded with nutrients to keep you going strong all day long. Plus, it’s hearty enough to curb even the mightiest of appetites!
The PrepYoSelf Newsletter
Ingredient Breakdown:
Andouille Sausage: This smoky, spicy sausage is the star of the show, bringing a burst of Cajun flavor to the dish. It’s not only delicious but also adds protein and richness, making the stew hearty and satisfying. Andouille sausage is also budget-friendly, making it a perfect choice for those looking to keep costs down without sacrificing flavor.
Okra: This underrated veggie adds a unique texture and flavor to the stew. When sliced and cooked down, okra releases a natural thickening agent that helps give the stew its signature hearty consistency. Plus, it’s packed with vitamins, minerals, and fiber, making it a nutritious addition to any meal.
Bell Pepper: Not only does diced bell pepper add a pop of vibrant color to the stew, but it also brings a subtle sweetness and crunch. Rich in vitamin C and antioxidants, bell peppers boost the nutritional value of the dish while adding a refreshing flavor contrast to the savory sausage and spices.
Onions, Celery, and Carrots: This classic trio of aromatics forms the flavor base of the stew, known as a mirepoix. Sauteed until soft and fragrant, they provide depth and complexity to the dish while complementing the other ingredients. Plus, they’re incredibly budget-friendly and readily available year-round.
Garlic: A staple in Cajun cuisine, minced garlic adds a bold, pungent flavor that enhances the overall taste of the stew. It’s also known for its immune-boosting properties and adds an extra layer of health benefits to the dish.
Tomato Sauce: This pantry staple not only adds richness and depth to the stew but also helps to balance out the flavors. The acidity of the tomato sauce helps to cut through the richness of the sausage, creating a harmonious balance of flavors.
Chicken Broth: Providing a savory, umami-rich base, chicken broth infuses the stew with depth of flavor. If you’re looking to keep the dish budget-friendly, water can be used as a substitute without sacrificing too much flavor.
Bay Leaf, Garlic Powder, Salt, and Paprika: These spices and seasonings are the secret weapons that take the stew from good to great. Bay leaf adds a subtle earthiness, garlic powder enhances the garlic flavor, salt balances out the other flavors, and paprika adds a hint of smokiness and depth.
Olive Oil: Used for sauteing the aromatics and sausage, olive oil adds richness and helps to marry the flavors together. It’s a healthier alternative to butter or vegetable oil and adds a touch of Mediterranean flair to the dish.
Instructions for Easy Dinner Meal Prep
Heat up a soup pan over medium-high heat and add a tablespoon of olive oil. Once the oil is shimmering, toss in your diced onions, carrots, and celery. Let them sizzle away for about 2 to 3 minutes until they start to soften and become aromatic.
Next up, it’s time to add some garlic goodness! Throw in your minced garlic and sliced Andouille sausage, and let them mingle with the veggies for another minute. Can you smell that irresistible aroma already?
Once your beef is beautifully seared, add in the sliced mushrooms and sauté them alongside the beef until they soften and release their savory flavors. Mushrooms are a fantastic source of umami and will elevate the overall taste of your stew.
Now, pour in your chicken broth (or water) and tomato sauce, followed by the diced bell pepper and sliced okra. Don’t forget to sprinkle in your bay leaf, garlic powder, salt, and paprika – these are the secret ingredients that will elevate your stew to new heights of deliciousness!
Bring the pot to a gentle boil, then reduce the heat to low-medium and pop on the lid. Let your stew simmer away for about 10 minutes, allowing all those flavors to meld together in perfect harmony.
Reference the recipe card below for detailed instructions.
Meal Prep and Pairing Tips for Cajun Sausage Stew
Crusty Bread: There’s nothing like dipping a warm, crusty piece of bread into a bowl of hearty stew. Opt for a whole grain or artisan bread for added fiber and flavor.
Rice or Quinoa: Serve the stew over cooked rice or quinoa for a complete and filling meal. Brown rice or wild rice are nutritious options that add texture and flavor to the dish.
Side Salad: Balance out the richness of the stew with a crisp, refreshing side salad. Mix up your favorite greens with sliced veggies, nuts, and a tangy vinaigrette for a light and healthy accompaniment.
Cornbread: Cornbread is a classic Southern pairing for Cajun-inspired dishes. Whip up a batch of homemade cornbread or grab a pre-made mix for a deliciously comforting side.
Steamed Vegetables: Keep things light and nutritious by serving the stew alongside steamed or roasted vegetables. Broccoli, cauliflower, and green beans are all great options that add color and nutrients to your meal.
Garnishes: Don’t forget to garnish your stew with fresh herbs like parsley or green onions for a pop of color and flavor. A dollop of sour cream or a sprinkle of shredded cheese can also take your stew to the next level.
Cajun Sausage Stew
Whip up a batch of hearty Cajun Sausage Stew, brimming with smoky Andouille sausage, vibrant veggies, and bold spices, for a flavorful and budget-friendly meal prep option!
Add oil to a soup pan on medium high heat. Saute the onions, carrots, and celery for about 2 to 3 minutes until they soften. Then, add the garlic and sliced sausage. Saute for another minute
Pour in the broth, tomato sauce, bell pepper, okra, and seasonings
Bring the pot to a boil. Once it reaches a bowl, lower the heat to low medium and cover with a lid. Let it simmer for about 10 minutes
Notes
Nutrition information provided is an estimate. It will vary based on cooking method and specific ingredients used. Please consult with your healthcare provider for specific dietary needs. To gain a better understanding, explore our nutrition disclaimer here.
Absolutely! While Andouille sausage is traditional and adds a unique flavor, feel free to substitute with your favorite type of sausage or even ground meat like turkey or chicken.
How spicy is this stew?
The level of spiciness can be adjusted to your preference by adding more or less paprika or using a spicier variety of sausage. Feel free to customize the heat in this one pot cajun recipe to suit your taste buds!
Can I add other vegetables to the stew?
Absolutely! This recipe is highly adaptable. Feel free to add your favorite veggies such as potatoes, corn, or spinach to bulk up the stew and add extra nutrition.
Our Spinach Omelette Meal Prep is bursting with protein, veggies, and cheesy goodness. This budget-friendly breakfast egg recipe is designed to fuel your day with nutrition and flavor. Perfect for those who crave a wholesome start without sacrificing convenience, each bite of this omelette is a symphony of savory delights. Imagine fluffy eggs enveloping wilted spinach and gooey mozzarella, topped with vibrant cherry tomatoes for a burst of freshness. Whether you’re rushing out the door or savoring a leisurely morning, this egg recipe is your ticket to a satisfying and nourishing breakfast experience. Get ready to conquer your day with a hearty, homemade meal that’s as easy on the wallet as it is on the taste buds!
This post may contain affiliate links. Please see our privacy policy for details.
Protein-Packed Powerhouse: Protein is essential for muscle repair and growth, keeping you feeling full and satisfied for longer periods. Say goodbye to mid-morning hunger pangs and hello to sustained energy levels!
Veggie-Rich Goodness: Spinach isn’t just Popeye’s favorite for nothing! Packed with vitamins, minerals, and antioxidants, spinach adds a nutritious punch to your morning routine. It’s a great source of iron, folate, vitamin K, and fiber, supporting overall health and vitality.
Cheese for Calcium: Who says healthy eating can’t be indulgent? The addition of shredded mozzarella not only amps up the flavor but also provides a calcium boost.
Tomato for Vitamin C: Those vibrant cherry tomatoes aren’t just there for show! Packed with vitamin C, they bolster your immune system and promote healthy skin. Plus, their juicy sweetness adds a burst of flavor that elevates the entire dish.
Long-Lasting Satisfaction: Thanks to the combination in this egg recipe of protein, fiber, and healthy fats from eggs, spinach, and olive oil, this Spinach Omelette Meal Prep keeps you feeling full and satisfied for hours. No more mid-afternoon energy crashes or desperate trips to the vending machine—just steady, sustained energy to power you through your day.
The PrepYoSelf Newsletter
Here are the Ingredients You’ll Need For This Egg Recipe:
Eggs: Eggs are the backbone of our omelette, providing a rich source of high-quality protein, essential vitamins, and minerals. They’re budget-friendly and versatile, making them a staple in any meal prep arsenal. Not only do they add a creamy texture to our omelette, but they also contribute to its satisfying and filling nature, helping you stay satiated throughout the morning.
Spinach: Popeye knew what he was talking about! Spinach adds vibrant color, texture, and a nutritional punch to our omelette. It’s packed with vitamins A, C, and K, as well as iron, folate, and fiber. By sautéing the spinach before adding it to the omelette, we not only enhance its flavor but also make its nutrients more readily available for absorption by the body. Plus, using baby spinach keeps costs down without compromising on taste or nutrition.
Mozzarella Cheese: This ooey-gooey goodness not only adds a creamy texture and cheesy flavor to our omelette but also provides a source of calcium and protein. By using shredded mozzarella, we ensure that each bite is perfectly balanced with just the right amount of cheesy goodness. Plus, mozzarella tends to be more budget-friendly compared to other types of cheese, making it a cost-effective choice for meal prep.
Cherry Tomatoes: These little bursts of flavor add a pop of color and sweetness to our omelette. Rich in vitamin C, potassium, and antioxidants, cherry tomatoes not only enhance the taste but also contribute to overall health and well-being. Slicing them up and garnishing our omelette with fresh cherry tomatoes adds a refreshing touch that complements the savory flavors perfectly.
Olive Oil: A drizzle of olive oil adds a hint of Mediterranean flair to our omelette while providing heart-healthy monounsaturated fats. By using just a tablespoon, we keep the fat content in check while still enhancing the flavor and texture of the dish. Olive oil is a pantry staple that’s both budget-friendly and versatile, making it an excellent choice for meal prep recipes.
How to Meal Prep Spinach and Cheese Omelette:
Heat up a tablespoon of olive oil in a pan over medium heat. Make sure that glorious green oil coats the bottom like a champ. Toss in those chopped spinach leaves and let them dance around until they wilt into perfection. Once they’re done, scoop ’em out of the pan and set them aside. They’ll be back for a flavorful encore!
Grab a bowl and crack those eggs into it. Give them a good whisk until they’re all buddy-buddy. Now, pour this eggy goodness into your preheated pan. Tilt the pan like a pro to spread that eggy magic all around. Let it heat up and firm up, then use your spatula skills to coax the edges towards the middle.
Once your eggs are starting to look all fancy and set, it’s time to add the stars of the show! Sprinkle that shredded mozzarella like confetti over the top, followed by your sautéed spinach. Gently fold your omelette in half, shaping it into a glorious moon of yumminess. Let it cook for a hot minute or so to melt that cheese into gooey perfection.
It’s garnish time, folks! Grab those cherry tomatoes, slice ’em up, and scatter them over your omelette masterpiece. They add a pop of color and a burst of freshness that’ll have your taste buds doing the happy dance.
Reference the recipe card below for detailed instructions.
Meal Prep and Pairing Tips:
Whole Grain Toast or English Muffins: Serve your Spinach Omelette with a slice of whole grain toast or an English muffin for added fiber and texture. It’s the perfect vehicle for soaking up any leftover egg and cheese goodness.
Fresh Fruit: Add a pop of color and sweetness to your meal with a side of fresh fruit. Berries, sliced bananas, or a fruit salad are all excellent options that complement the savory flavors of the omelette.
Greek Yogurt: Boost the protein content of your breakfast by pairing your omelette with a small serving of Greek yogurt. Top it with a drizzle of honey or a sprinkle of granola for extra flavor and crunch.
Mixed Greens Salad: Balance out the richness of the omelette with a simple mixed greens salad dressed with olive oil and balsamic vinegar. It’s a refreshing and nutritious addition to your meal.
Avocado Slices: Creamy avocado slices are a delicious addition to your breakfast plate. They add healthy fats, fiber, and a satisfying creaminess that pairs perfectly with the omelette.
Spinach and Cheese Omelette
Fuel your day with our Spinach Omelette Meal Prep—packed with protein, veggies, and cheesy goodness, it's a budget-friendly breakfast that's as nutritious as it is delicious!
Add olive oil to a pan on medium heat making sure it coats the bottom of the pan. Add the spinach and saute until it wilts. Then remove it from the pan and set it aside.
Whisk the eggs in a bowl. Pour the egg mixture into the heated pan. Tilt the pan around to spread it to the edge of the pan. Let the eggs heat through and firm up. Use the spatula to gently push the sides toward the middle, letting the liquid egg flow to the edge of the pan.
Let the eggs cook for another 2 to 3 minutes and sprinkle the top of the eggs with the shredded cheese and the cooked spinach. Gently fold the omelette in half in a moon shape and cook for another 30 seconds to let the cheese melt.
Garnish with freshly sliced cherry tomatoes.
Notes
Nutrition information provided is an estimate. It will vary based on cooking method and specific ingredients used. Please consult with your healthcare provider for specific dietary needs. To gain a better understanding, explore our nutrition disclaimer here.
Evolution Fresh Organic Pure 100% Cold-Pressed Orange Juice
Setton Farms Dry Roasted and Salted Pistachios
Filippo Berio Pesto, Classic Basil
Frequently Asked Questions
Can I use frozen spinach instead of fresh?
Absolutely! Frozen spinach works well in this recipe. Just make sure to thaw it and squeeze out any excess moisture before sautéing it in the pan.
Can I add meat to this recipe?
Yes, you can add cooked meat such as diced ham, cooked bacon, or crumbled sausage for extra protein and flavor. Make sure the meat is fully cooked before adding it to the omelette.
Can I make this recipe ahead and freeze it?
Yes, you can! Wrap individual portions of the cooked omelette tightly in plastic wrap or aluminum foil and place them in a freezer-safe bag or container. They can be frozen for up to 2-3 months. To reheat, simply thaw in the refrigerator overnight and reheat in the microwave or skillet until heated through.
Learning how to meal prep eggs will expand the volume of your meal prep recipes that’ll introduce flavors and textures you can’t get from other ingredients. Eggs have long been considered one of the best ingredients for their versatility, savory flavor, and nutritional value. You can add an egg compliment to tons of meal prep recipes with ease if you know how.
Another reason for eggs as a popular ingredient is for the affordability of the nutritional value. Eggs are relatively cheap and a great way to make meals more filling without spending a fortune on groceries. Between the affordability and versatility, meal prepping eggs is an important meal prep skill.
A good place to start with your meal prep eggs is the cooking method. There are a lot of ways to cook eggs and even more books for every method. We will focus on cooking methods that are best for meal prep. This will help with longer lasting eggs that retain texture and flavor in the fridge or freezer.
Meal Prep Egg Methods
We’ve already covered how to cook eggs in different styles so if you need help with the exact method and steps check our guide on how to cooking eggs.
Hard-Boiled Eggs: Hard-boiled eggs are great for meal prep as they can be batch cooked, store well, and pair well with a lot of recipes easily. You can boil as many eggs as you need, the exact method for boiling eggs depends on personal preference however you can reference our egg cooking guide above.
We recommend that you shell the eggs after they cool down. Doing them all at once is faster and you’ll thank yourself down the line. When you’re ready to add the hard-boiled eggs to a meal, slice them in half, into quarters, or even diced.
Scrambled Eggs with Vegetables: Scrambled eggs in general can act as an amazing base for a complete meal. Meal prep scrambled eggs can be cooked with many different vegetables. As long as you can cut the vegetables up into a small enough size and you take cooking time into consideration it should turn out delicious. Popular scrambled egg vegetables include bell peppers, onions, tomatoes, and spinach.
There are actually a lot of ways to scramble eggs. They pretty much all start with cracking eggs into a bowl and whisking though. (consider egg whites only or at least excluding some yolks to make it heart healthier) After whisking, the classic approach is stove top with a pan but you can cook them in the oven or even the microwave.
Try scrambling in large batches and portioning them out into individual meal prep egg dishes. You can add scrambled eggs as a side to many dishes.
Quiches, Frittatas, and Casseroles: All three of these are very similar but with minor differences along the cooking path. Quiches are a custardy egg mix poured into a pie crust. Quiche is velvety and has a tasty crust. Frittatas are closer to an egg scramble with a less velvety blend, which makes them a little easier and faster to cook. Frittatas are started on the stove top and finished in the oven. Egg casseroles involve the egg mix being poured over a mix of ingredients (cheese, sausage, veggies, etc.) in a casserole dish and cooked in the oven.
Quiches, frittatas, and egg casseroles are perfect options for meal prep egg recipes. They’re easier to cook in batches and portion out. Try our sweet potato egg frittata.
Egg and Rice Bowls: Scrambled or fried eggs mixed with cooked rice, veggies, and your favorite sauce. Fried rice is an incredibly popular dish around the world. It’s a quick dish to cook up and tastes amazing. Egg roll in a bowl is another popular meal prep egg dish. It’s delicious and can be very nutritious. These are really great options if you find yourself with leftover rice.
Egg Salad: Hard-boil a batch of eggs and make egg salad by mixing chopped eggs with mayonnaise, mustard, salt, and pepper. Use it as a sandwich filling, wrap filling, or as a topping for crackers or salads.
Egg Wraps or Burritos: If you have a batch of scrambled eggs and are looking for a different use for them consider breakfast tacos or burritos. Breakfast burritos are delicious and perfect meal prep egg recipes for busy people. You can easily batch make them, wrap them separately, and grab them on the go as you need. Add in cheese, salsa, beans, and other veggies to mix up the flavors and provide a more well rounded meal.
Fried egg: Frying an egg is a fantastic addition to tons of different meals. Add a fried egg on a hamburger for additional flavor and nutrition. You can also put a fried egg on top of pulled pork and chicken, rice, or even mixed greens. The trick, as it always is with eggs, will be getting the yolk to the right consistency for meal prep. Fried eggs may not be the best if you don’t plan on eating the meal for a few days. You can meal prep the rest of the dish though and then fry an egg the day of consumption. Frying eggs is pretty quick.
Batch meal prep eggs
There are literally dozens of ways to cook eggs but not all of them are a great choice for meal prepping. Methods like poaching will produce a delicious egg with an amazing texture but it won’t last long or travel well. Keep the poaching for an at home meal. Let’s take a look at some methods that work better for meal prepping meals for the week.
Stove top pan: frying eggs in a pan on the stove top or scrambling eggs are both great options for meal prepping eggs and can be added to many other dishes.
Oven: starting on the stove top and then moving to the oven is a great way to finish off dishes. Especially if you’re cooking a meal in a pan and plan to add eggs on top before you finish cooking. The oven is a great way to cook the eggs and complete the cooking process.
Sheet pan: sheet pan cooking is an essential meal prepping skill. Being able to bake or roast multiple days worth of meals at once. It’s one of the easiest batch cooking methods and you can add eggs on top for an additional layer of flavor.
Muffin tin: cooking eggs in a muffin tin is perfect for recipes like egg cups. You can catch cook a dozen eggs at once and knock out a whole week of breakfasts in one go.
Casserole dish: egg casseroles is another quick and easy way to knock out an entire week’s worth of meals in one go. It’ll take a little longer than the muffin tin but the sheer volume of delicious and nutritious food you can make is worth the extra time.
How long will meal prep eggs last
Depending on the cooking method, eggs can last up to a week in the fridge and even two months in the freezer. It’s still a good idea to plan the use of your meal prep eggs before starting to avoid overfilling your fridge or wasting food. Most egg dishes can last up to 2 months in the freezer.
Scrambled eggs: can last for two to three days in the fridge.
Fried eggs: up to four days in the fridge.
Hard boiled eggs: up to seven days in the fridge. If you know you won’t be using the eggs within a few days though, you should leave the shells on. Peeling them early is efficient but the eggs can dry out in the fridge or start to take on the flavors of the other foods in the fridge quicker.
Egg casseroles: up to four days in the fridge.
Egg salad: up to five days in the fridge.
Meal prep eggs by meal
Meal prep eggs for breakfast
Meal prepping eggs for breakfast is one of the easiest approaches with tons of recipes and a great place to start. Eggs, after all, tend to be a breakfast item by default. From breakfast burritos to traditional scrambled eggs, there are tons of available recipes.
Egg muffins
Egg biscuits
Breakfast sandwiches
Breakfast pizza
Breakfast tacos and burritos
Meal prep eggs for lunch
For busy professionals and parents lunch should be filling but light. Omelets, fried rice, and many other dishes fit the job perfectly. If you’re looking for an easier approach or introduction into egg meal prepping just add scrambled eggs or a fried egg to a dish as a topping. This is a really good option if you’re on day 4 of eating the same meal and want something different while trying to finish off your meal prep. Throw an egg on top and now there is a whole new dimension to the flavors.
Fried egg sandwich
Egg casserole
Egg salad sandwich
Salad topping
Fried rice
White rice & fried egg
Omelet
Bibimbap
Meal prep eggs for dinner
A hearty egg based meal for dinner can really round out the day, heal the soul, and provide a fantastic source of protein. Denser egg dishes can be better for dinner over lunch but it really doesn’t matter. That’s why breakfast all day has become such a popular offering at restaurants.
So, whether you’re a busy bee on the go or simply looking for a scrumptious breakfast idea to kickstart your day, the Breakfast Turkey Sausage and Veggie Scramble Egg is a winner in every aspect. It’s hearty, filling, and bursting with flavors that will put a smile on your face. Happy cooking, and bon appétit!…
Hello, my breakfast-loving friends! Let’s talk about the sheer ease of making this delightful Asparagus and Tomato Egg Frittata. With just a handful of ingredients and a few simple steps, you’ll be on your way to a delicious and satisfying meal. Get ready to savor every bite and start your day on a scrumptious note!…
This breakfast pizza is a delicious and satisfying way to start your day. You’ll feel energized and ready to tackle whatever comes your way. And let’s face it, breakfast pizza is just plain fun to eat and it’s a healthy pizza! This post may contain affiliate links. Please see our privacy policy for details. Why…
Learn how to make a perfectly cooked egg omelette with these easy tips and tricks in this recipe for one. This post may contain affiliate links. Please see our privacy policy for details. Why you’ll enjoy this omelette recipe for one: Omelettes are one of our go-to breakfast choices at our favorite local diners, but…
We love making these high-protein, low-carb egg muffins for meal prep. This post may contain affiliate links. Please see our privacy policy for details. Why sausage egg muffins are great for weight loss They are high in protein which will help you stay full longer Egg muffins can be an easy way to pack in…
Knowing how to meal prep wraps will significantly expand your lunch options especially for those busy weeks. Not only are wrap recipes quick and easy but with the right ingredients they can be incredibly delicious and nutritious. With low calories and easily balanced macronutrients, wraps are some of the easiest recipes to dial in for your specific diet.
Meal prepping wraps have another amazing advantage. Tons of different recipes can be turned into a wrap. This means you can add a ton of variety into your meal routine while keeping some of the preparation consistent. The versatility of wraps or burritos is one of the reasons they’re so popular today. From Greek style wraps to Mexican burritos, just about every cuisine has a wrap of some style.
Why meal prep wraps over sandwiches? Sandwiches are a go-to favorite for most lunch meal preppers. They’re easy to make and eat, they’re familiar, and can be changed up easily. Traditional sandwiches have limitations that wraps don’t have though. The softer bread soaks up sauces too fast and doesn’t always fare well as a meal prep lunch. The flat bread or tortilla used in wraps is not as absorbent and can keep its texture and structural rigidity for hours. Sandwiches are also not well designed to keep too many loose ingredients contained. Wraps by their very nature contain ingredients much better so they’re easier to eat on the go. Lastly, if you are calorie counting, there are a lot of great flat bread options that are healthy, low calorie, and gluten free.
Portion control is one the main reasons that meal prepping is a popular option for adjusting eating habits. Making the food ahead of time and sticking to a routine, lets you dial in your calorie and nutrient balance. Wraps can help with this too. Even if you’re changing up the internal ingredients, using the same size tortilla will limit how much filling you can add. If you know that one full size wrap fills you up, it’s much easier to meal prep without as much of a need to calculate calories or gauge volume. This built in limitation is a handy method for speeding up the whole process.
How to meal prep wraps like a pro:
Balance wet ingredients and dry ingredients. A wrap that is too dry can still be saved with a dipping sauce but ideally you have a good combination of dry and wet ingredients in the wrap itself. This will help it stay together and provide a better texture. Be careful not to go too wet. It’s not the end of the world if your wrap leaks but it does make more of a mess and ruin the wrap texture.
Lettuce as a barrier to the wrap. Just like with balancing dry and wet ingredients, the layout matters too. Use a lettuce barrier between wet ingredients and the bread to maintain texture longer. You can also use thick sauces like hummus or beans as a binding ingredient to help keep it all together. Spread it on the tortilla first, then add lettuce, then add your wet filling.
Don’t over fill. This is probably the easiest mistake to make at first. You want all of that amazing filling you made to be in the wrap but over filling the wrap will prevent you from getting a good all around seal. It will end up becoming an open faced sandwich which is less enjoyable to eat and much messier. Take it easy on the fillings and always feel free to remove fillings if you have any difficulty wrapping the tortilla.
Wrap tightly. Now that you have just the right amount of filling for your wrap, make sure it’s tight. Not only will a tighter wrap stay together better but it will also last longer in the fridge. Less air around the ingredients means they’ll keep freshness longer. Practice your wrapping and you’ll get to a tight a wrap in no time.
Use durable flat breads or tortillas for wrapping. Not all flat breads and tortillas are designed for wraps. Experiment with different options and plan for the types of fillings you’ll be using. You can use a dryer bread if the ingredients are going to be saucier. While a softer bread is better for more dry wraps.
Storing meal prep wraps is also quick and easy. You can complete the wrap with foil wrapped around it tightly, store the wrap in a sealable container, or slice the wrap into pinwheels to maximize storage space. Depending on the recipe or ingredients, wraps are only going to be good for a day to a few days stored this way. Even durable flat breads will start to get soggy. Another approach is to have the fillings ready to go and simply complete the wrap the day before you need it. This will maintain freshness of the ingredients as well as offer versatility if you find yourself looking for a mid week pivot.
The spinach and egg breakfast quesadilla is an exceptional choice for your meal prep repertoire. From its adaptability to its freezer-friendly nature and the convenience of being able to enjoy it anywhere, this recipe is truly a meal prepper’s dream come true! This breakfast meal prep option is nutritious, and it also utilizes pantry-friendly ingredients,…
Air Fryer Turkey Deli Taquitos – the ultimate air fryer lunch hero. Budget-friendly, time-saving, kid-approved, and infinitely customizable. Believe me, if you’re all about quick, budget-friendly, and delicious meal prepping, this is the game changer you’ve been waiting for! This post may contain affiliate links. Please see our privacy policy for details. We love Air…
Thinly sliced steak in a flatbread wrap served with crispy and golden Air Fryer Eggplant Fries! This post may contain affiliate links. Please see our privacy policy for details. This recipe is packed full of protein and nutrients and tastes like a delicious meal you ordered from a fancy restaurant.
Here’s a twist on the classic chicken salad. We’ve got shredded chicken tossed in a creamy and tangy mayo and dijon mustard dressing with crisp, diced veggies and crunchy nuts. This post may contain affiliate links. Please see our privacy policy for details. Reasons We Love This Chicken Salad With Celery It is filling and…
To provide the best experiences, we use technologies like cookies to store and/or access device information. Consenting to these technologies will allow us to process data such as browsing behavior or unique IDs on this site. Not consenting or withdrawing consent, may adversely affect certain features and functions.
Functional
Always active
The technical storage or access is strictly necessary for the legitimate purpose of enabling the use of a specific service explicitly requested by the subscriber or user, or for the sole purpose of carrying out the transmission of a communication over an electronic communications network.
Preferences
The technical storage or access is necessary for the legitimate purpose of storing preferences that are not requested by the subscriber or user.
Statistics
The technical storage or access that is used exclusively for statistical purposes.The technical storage or access that is used exclusively for anonymous statistical purposes. Without a subpoena, voluntary compliance on the part of your Internet Service Provider, or additional records from a third party, information stored or retrieved for this purpose alone cannot usually be used to identify you.
Marketing
The technical storage or access is required to create user profiles to send advertising, or to track the user on a website or across several websites for similar marketing purposes.


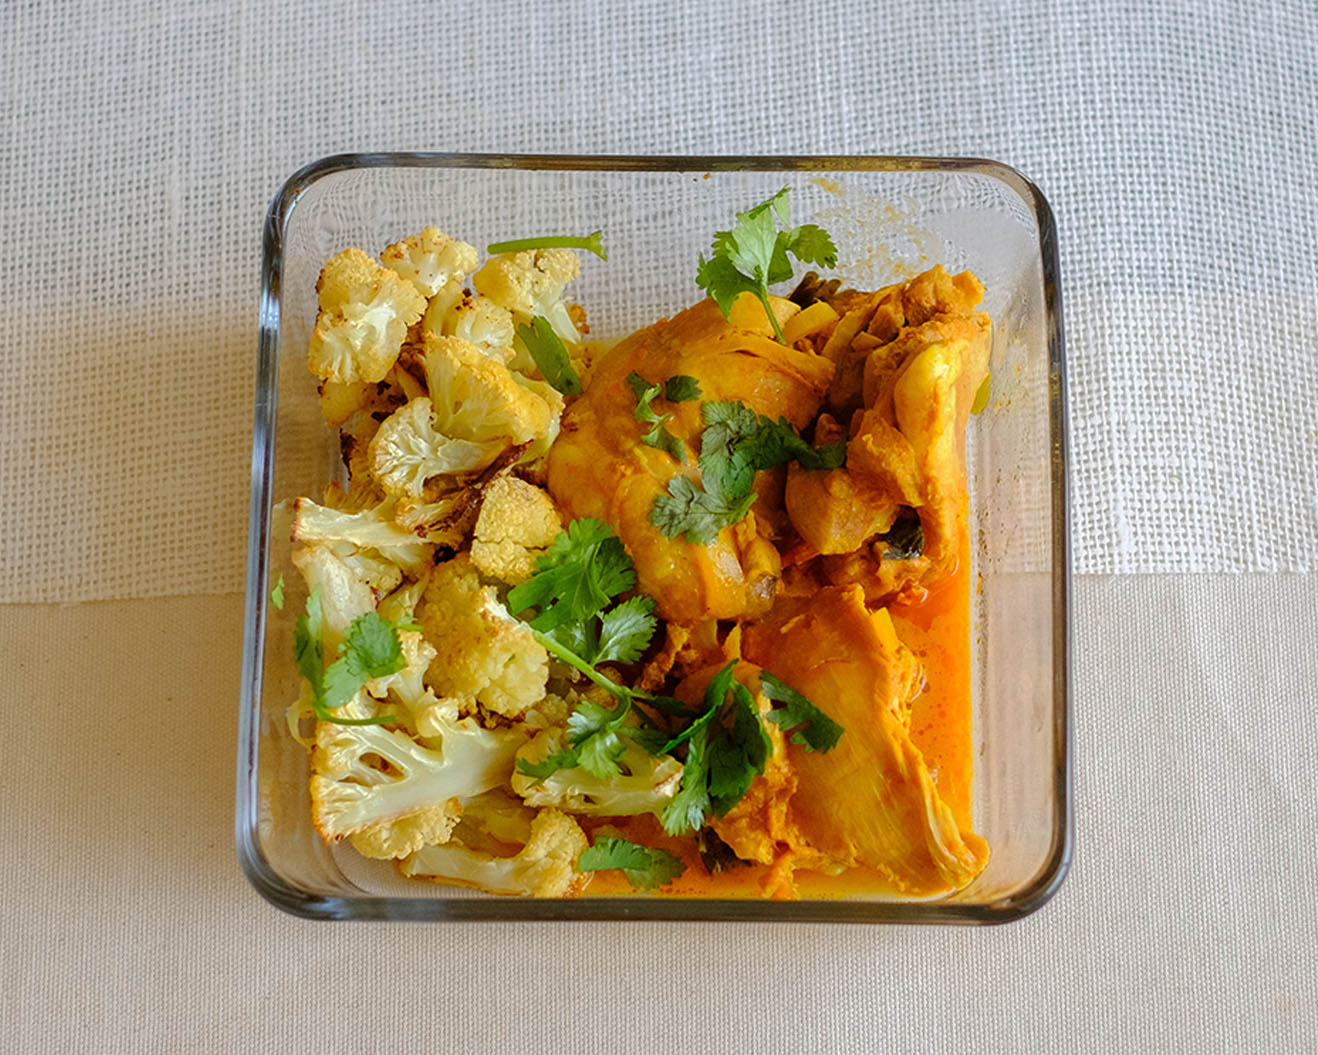
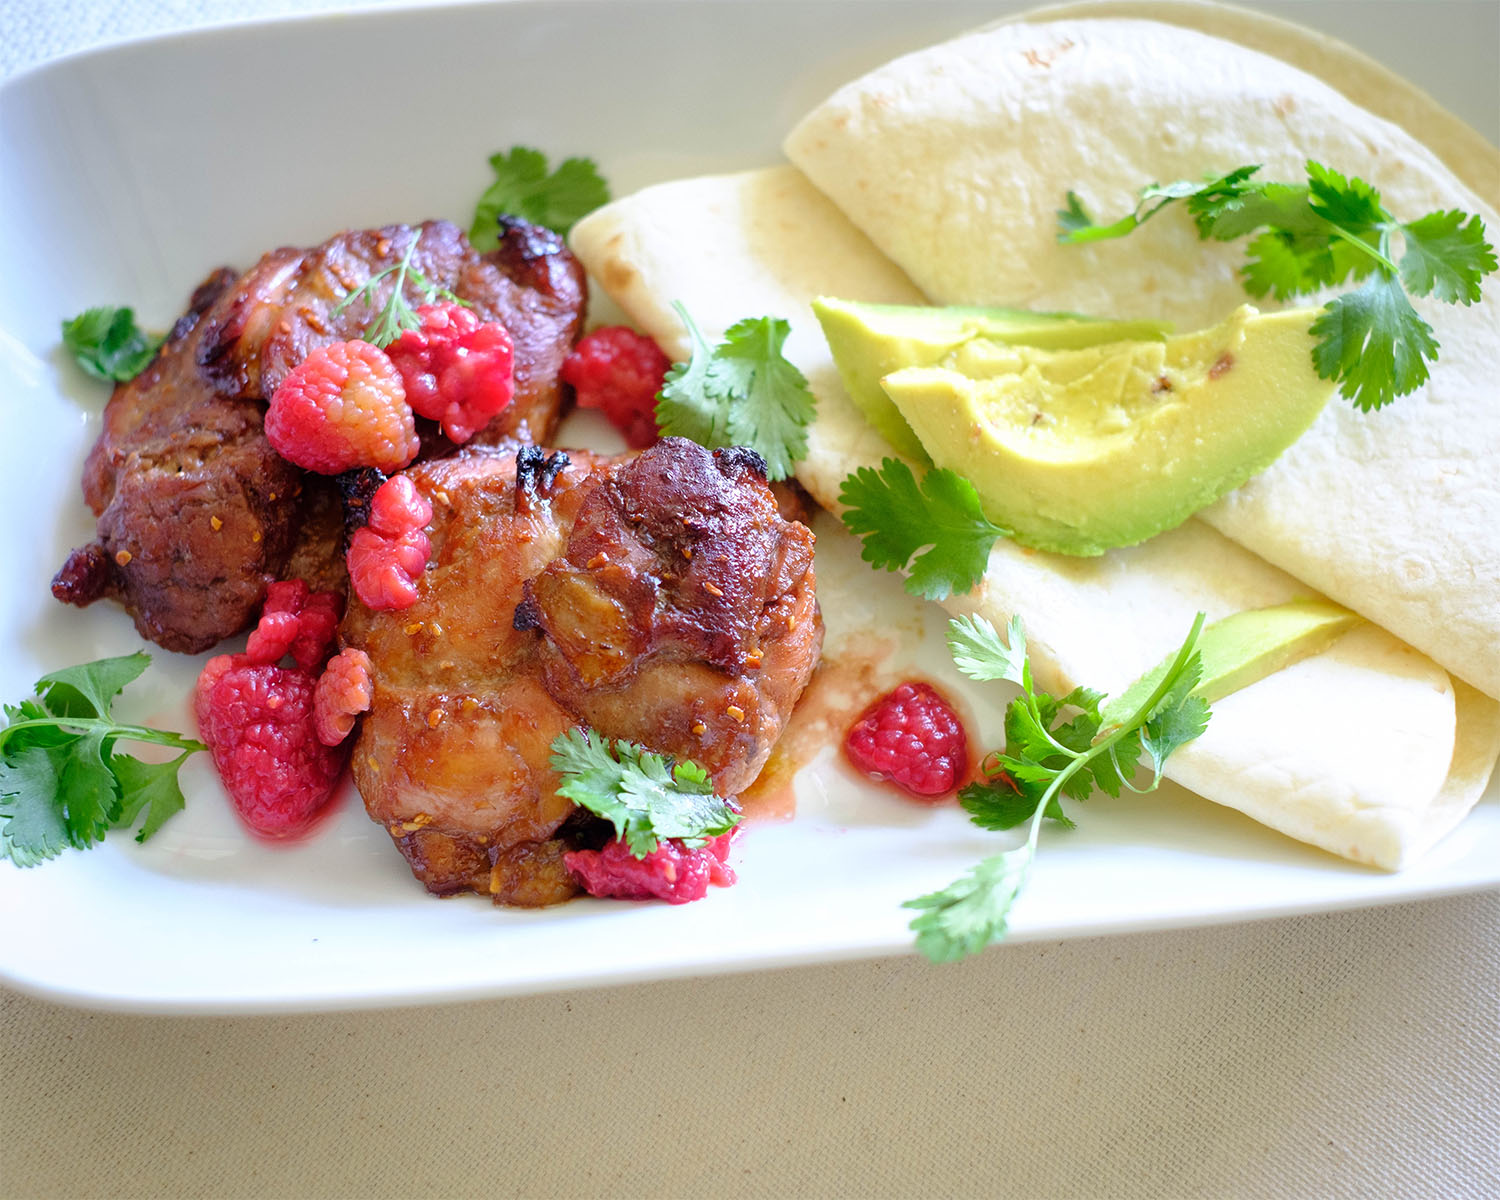


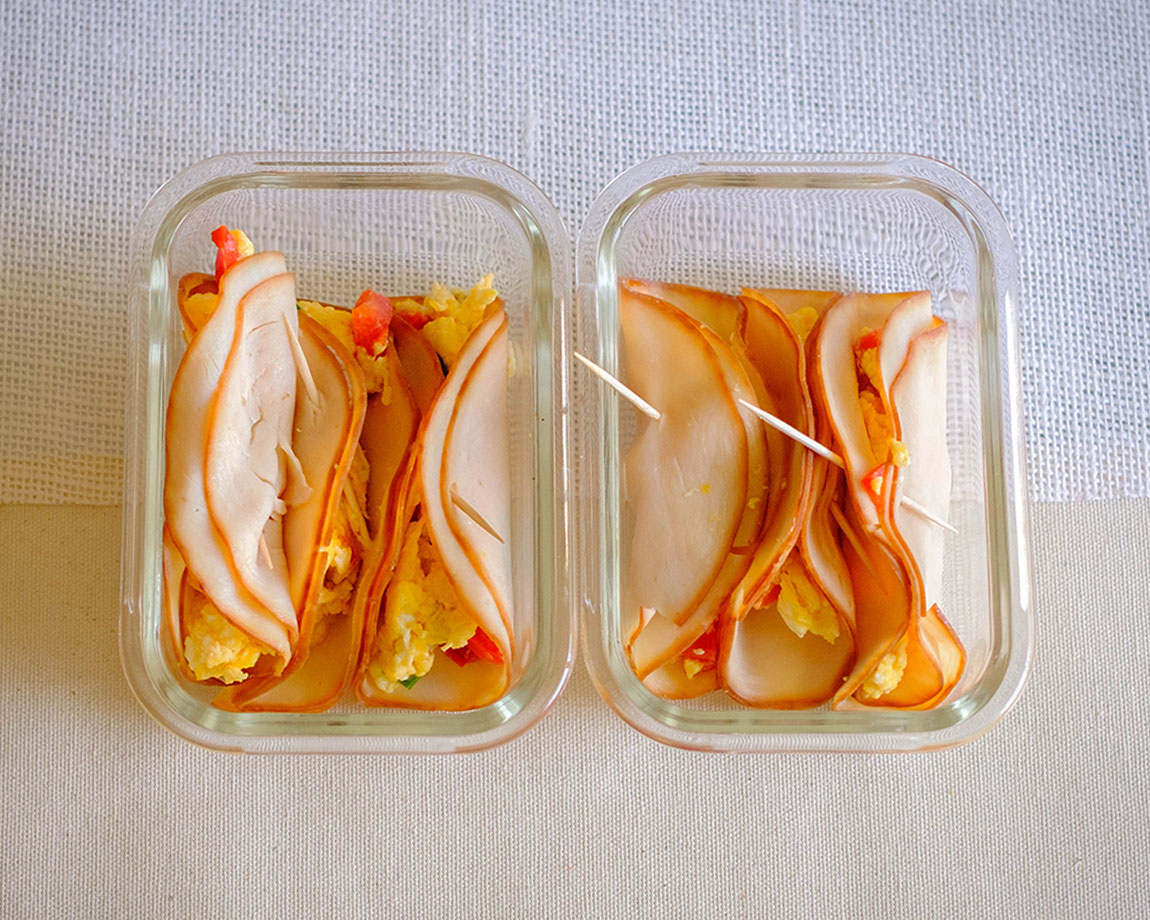


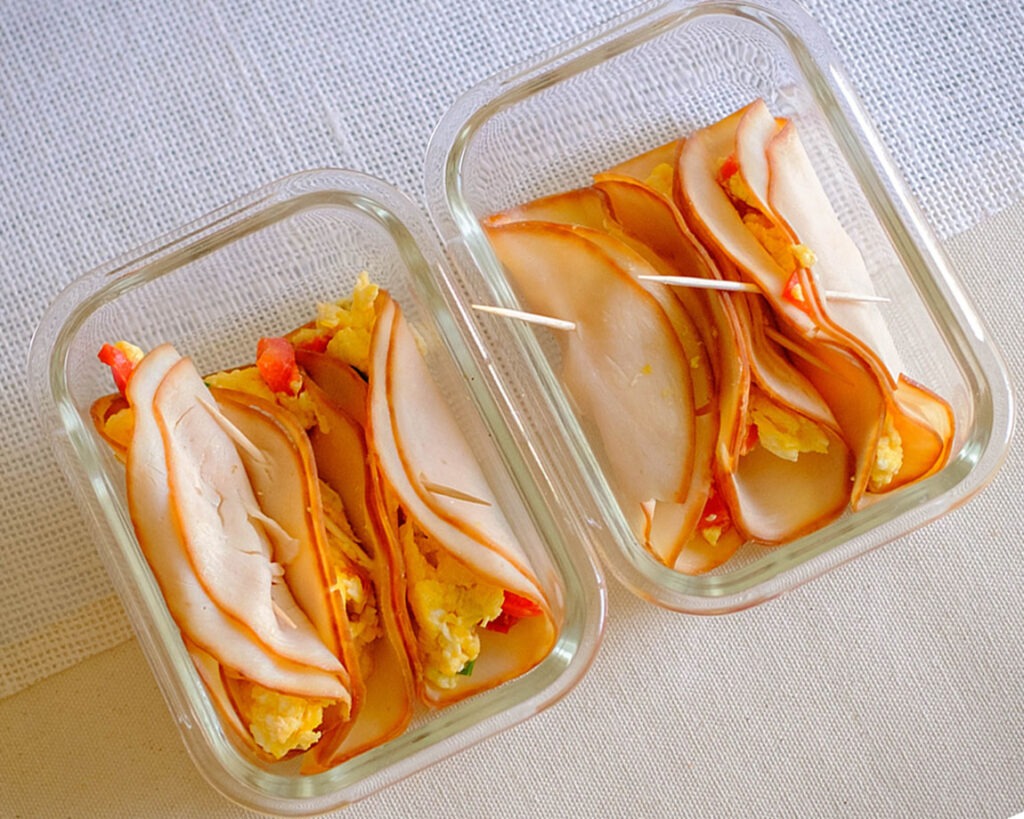


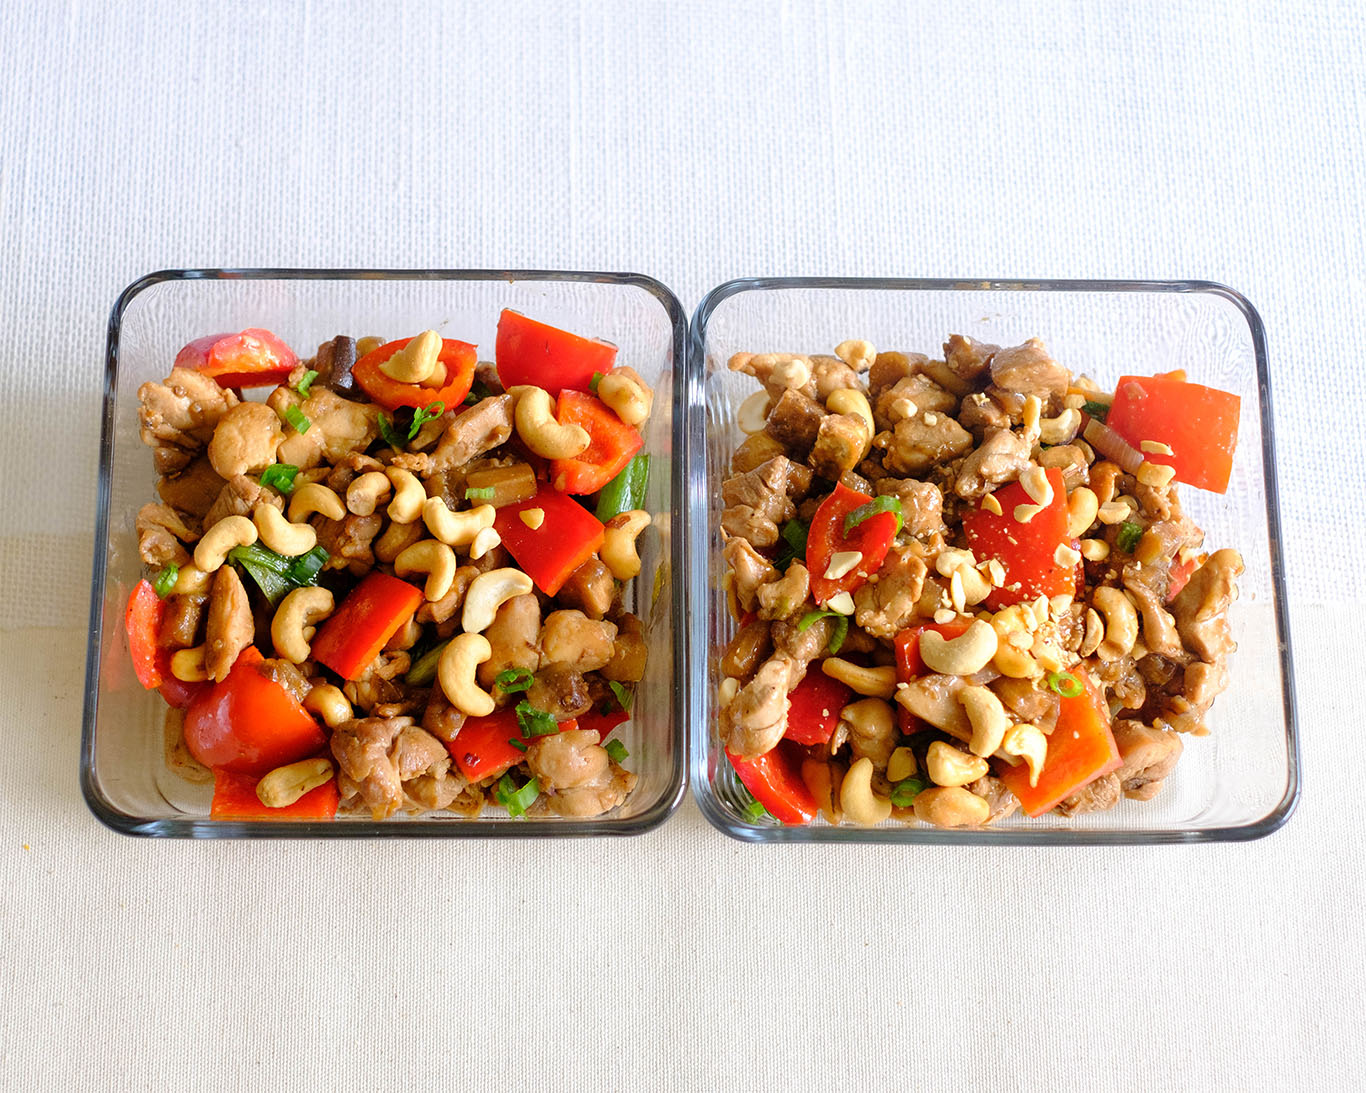
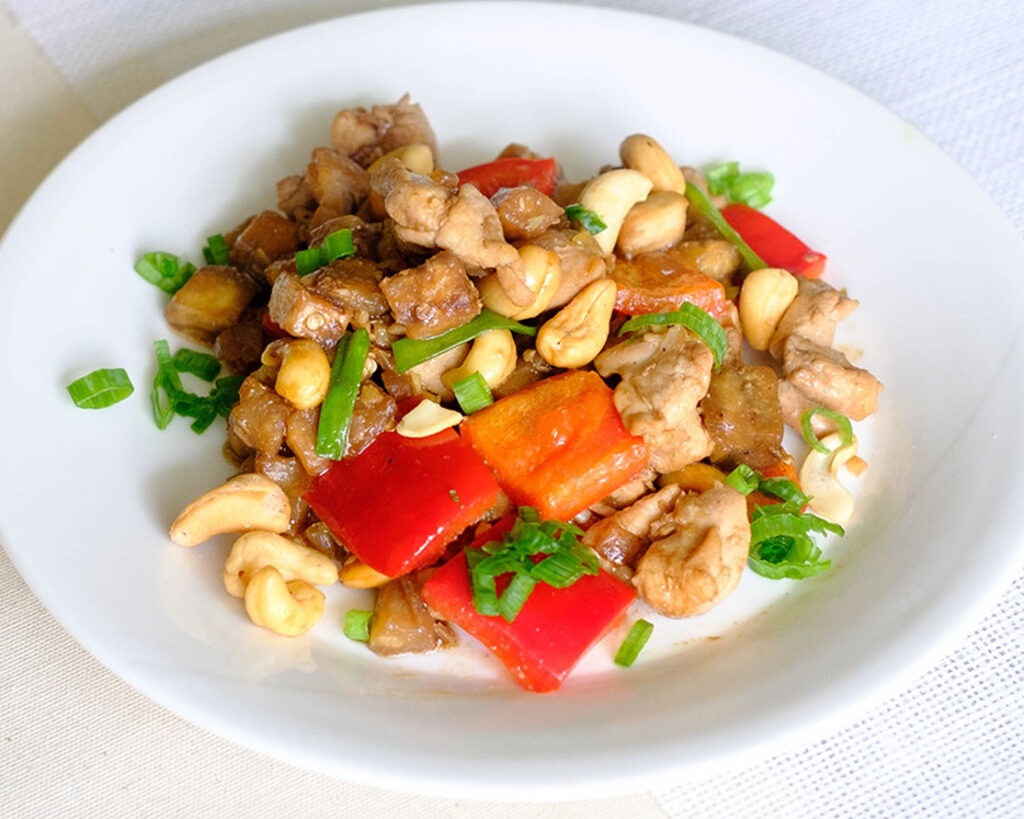
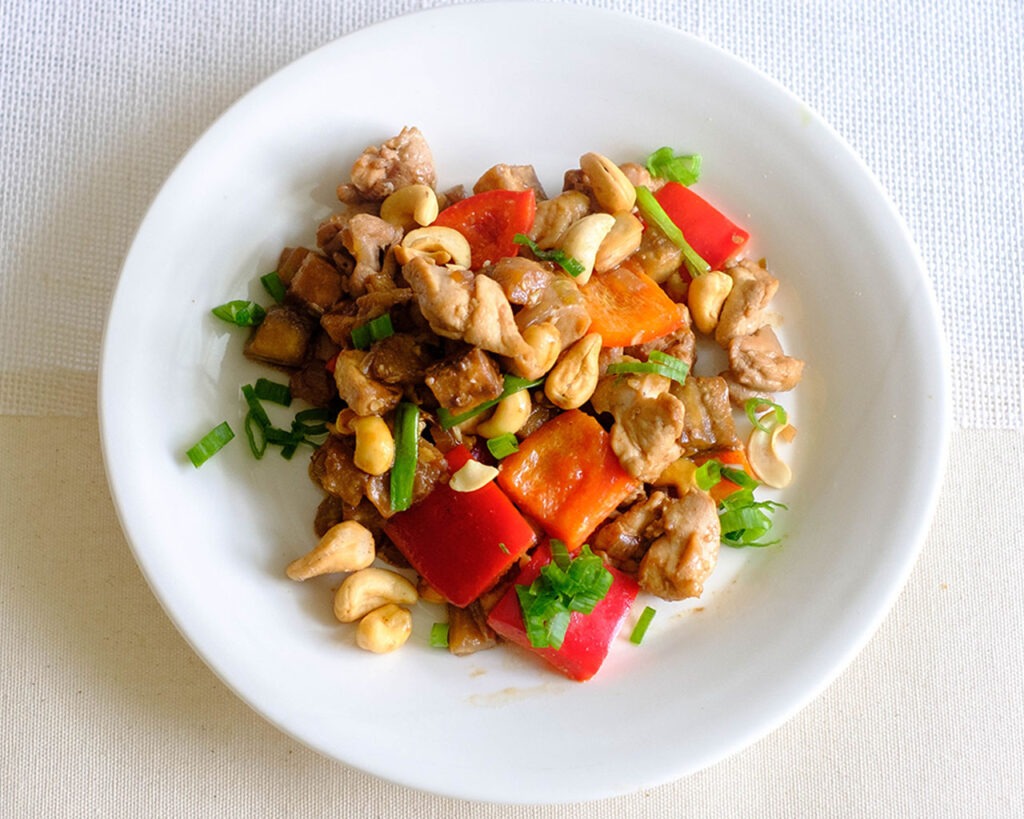
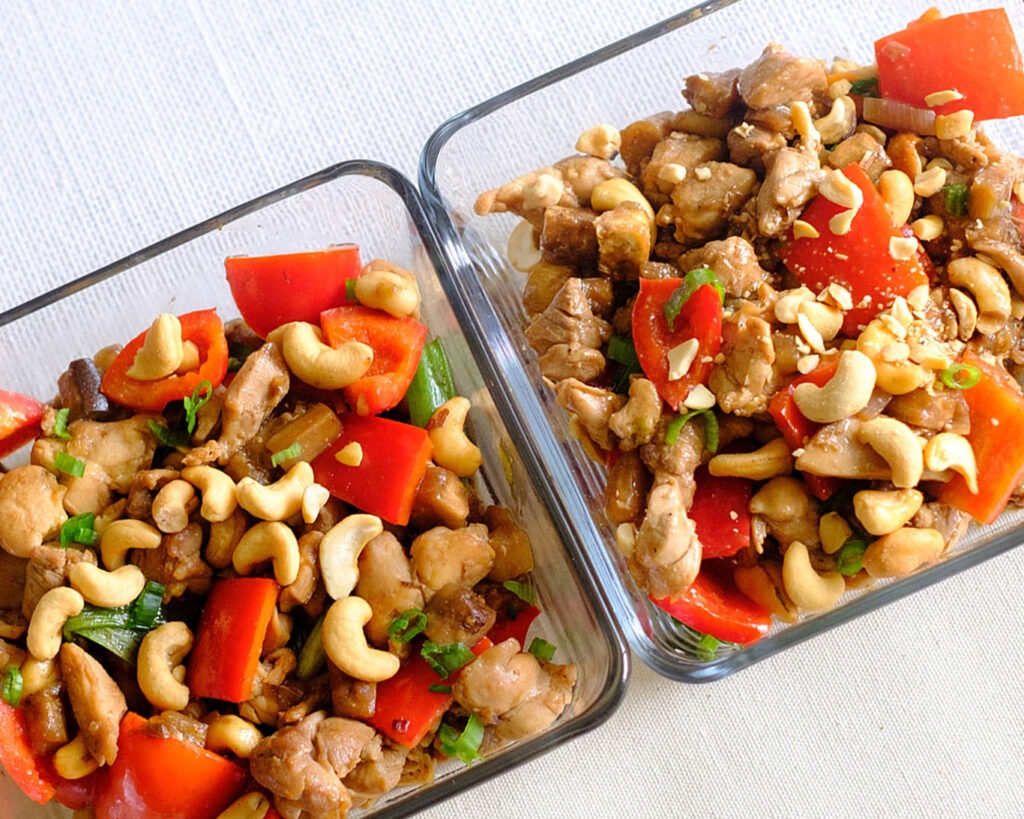
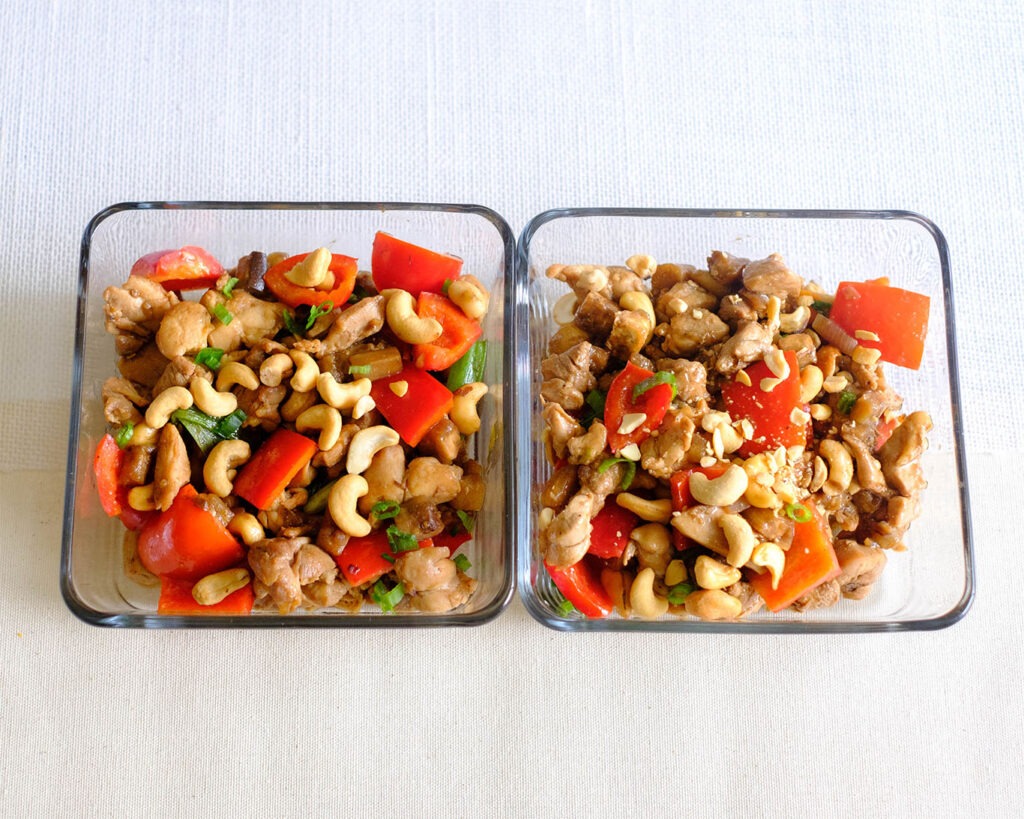


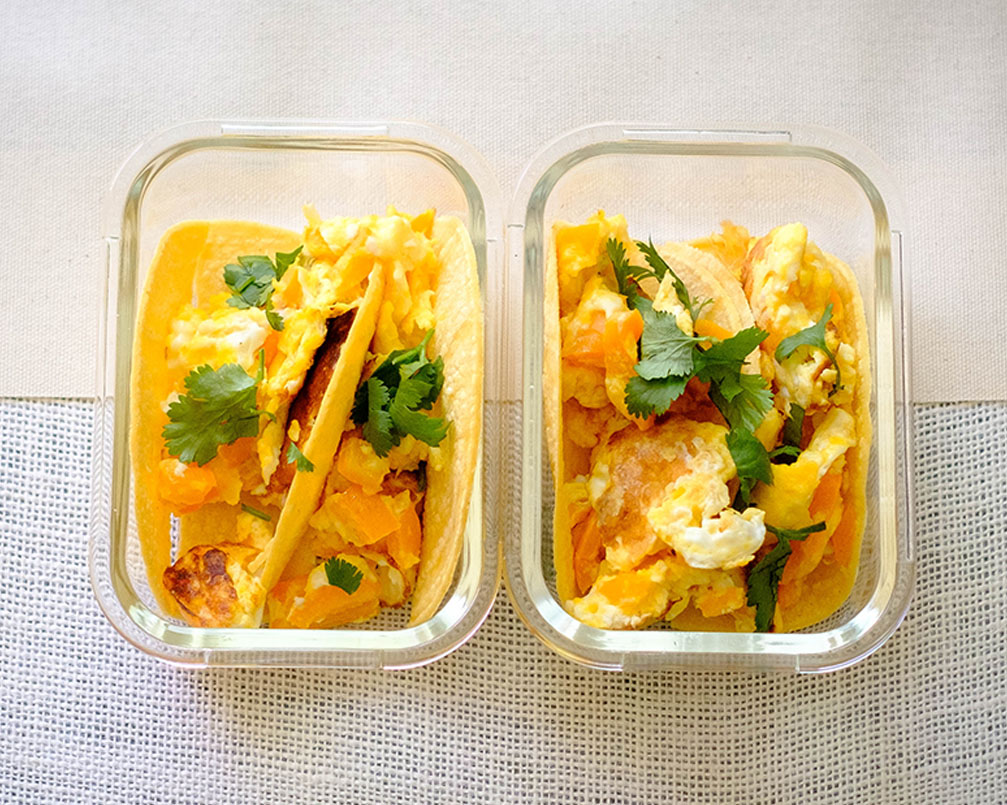


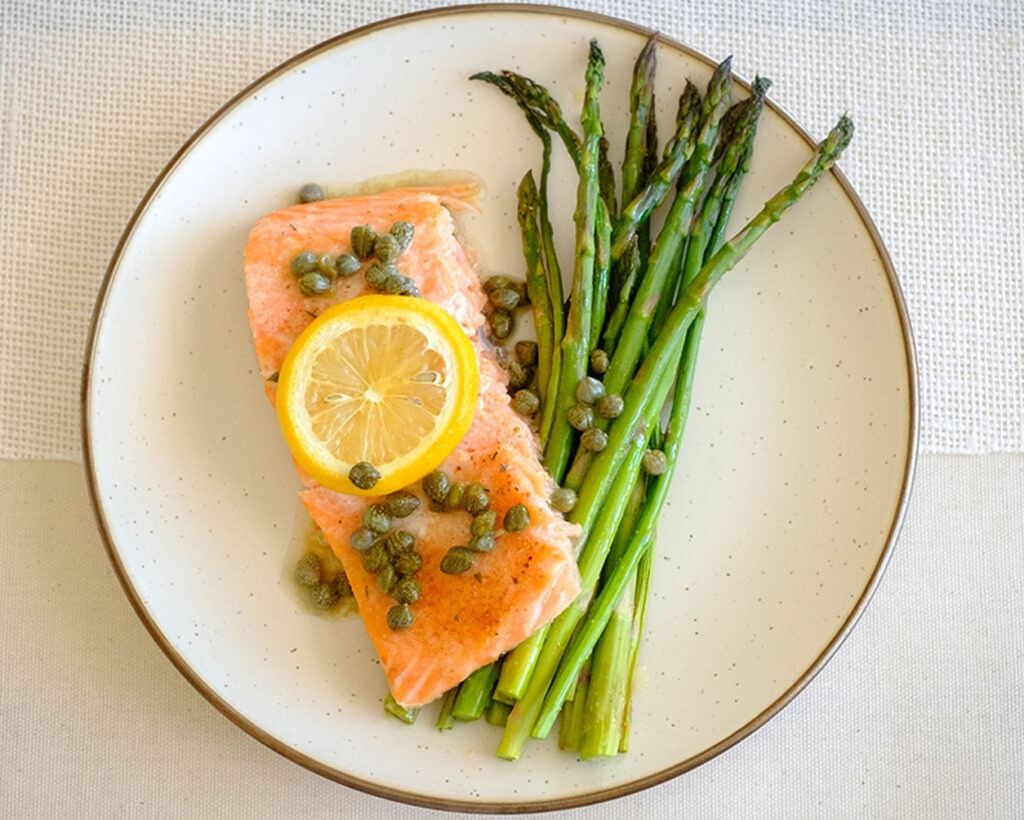
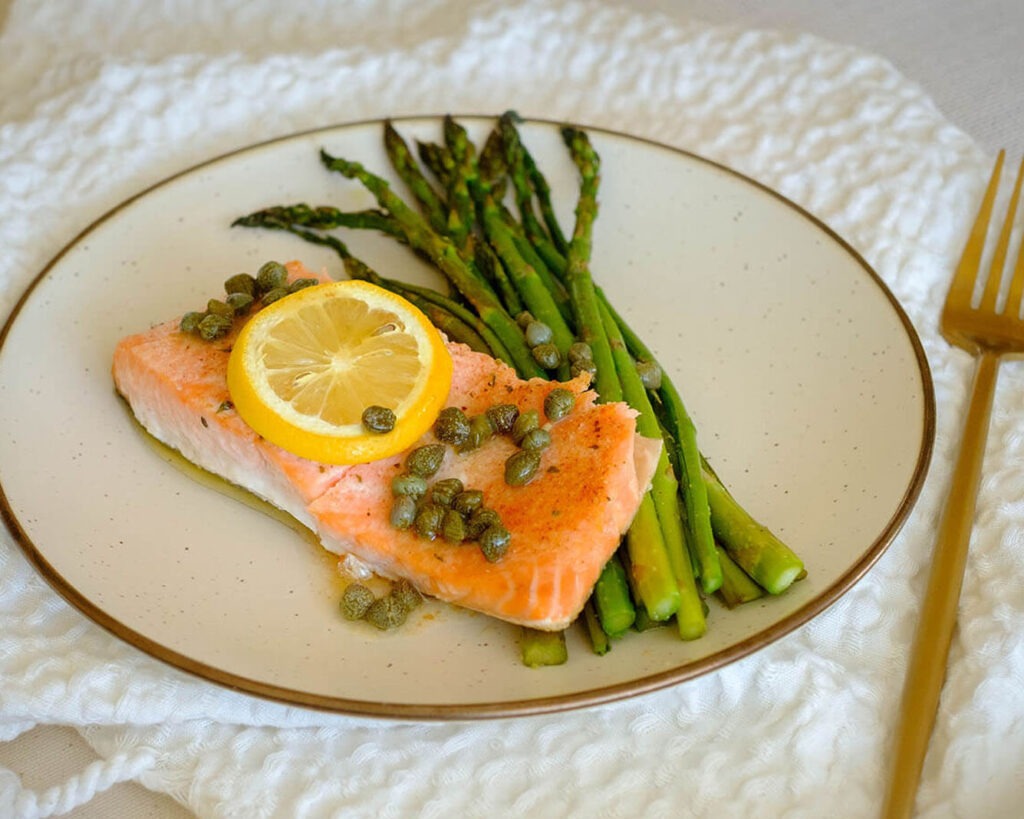

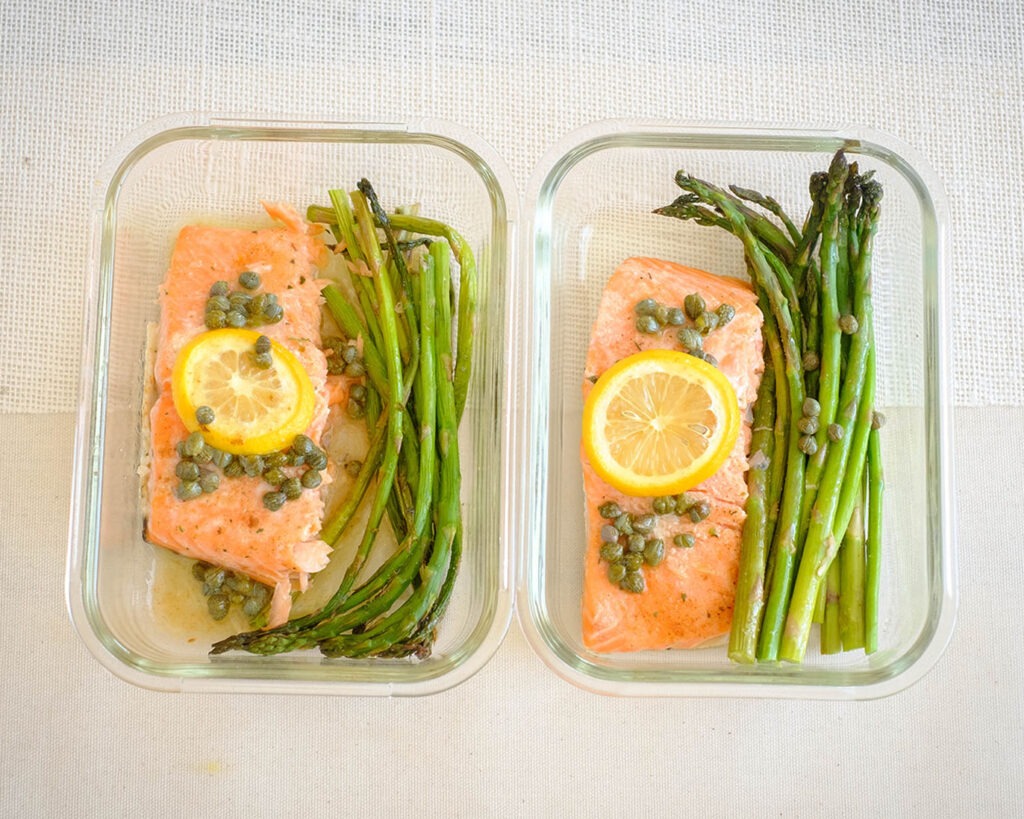
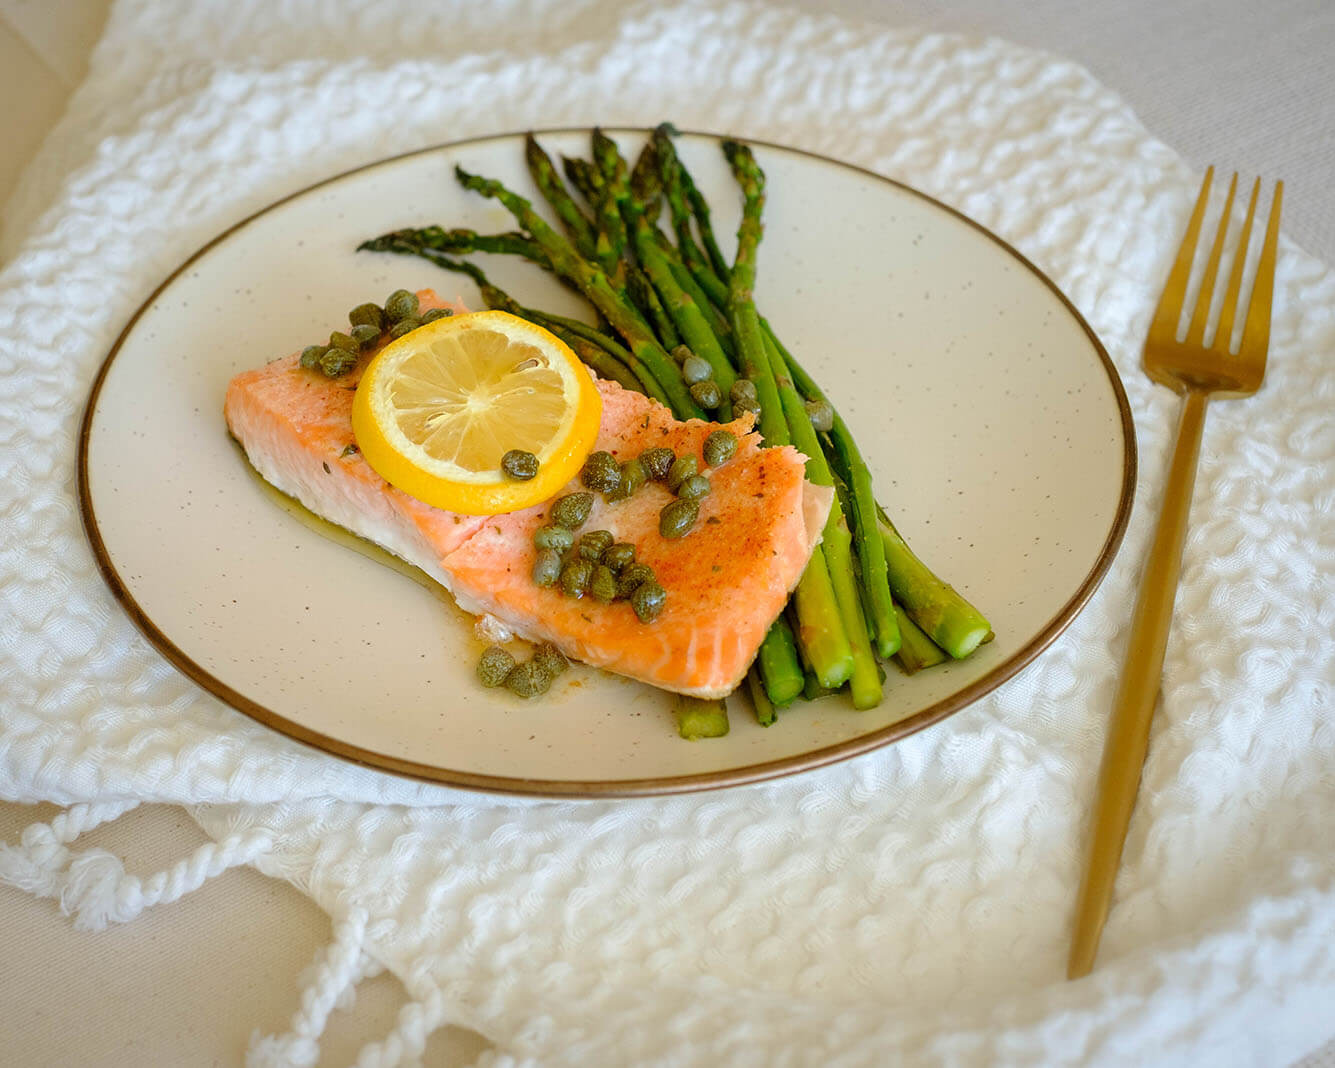


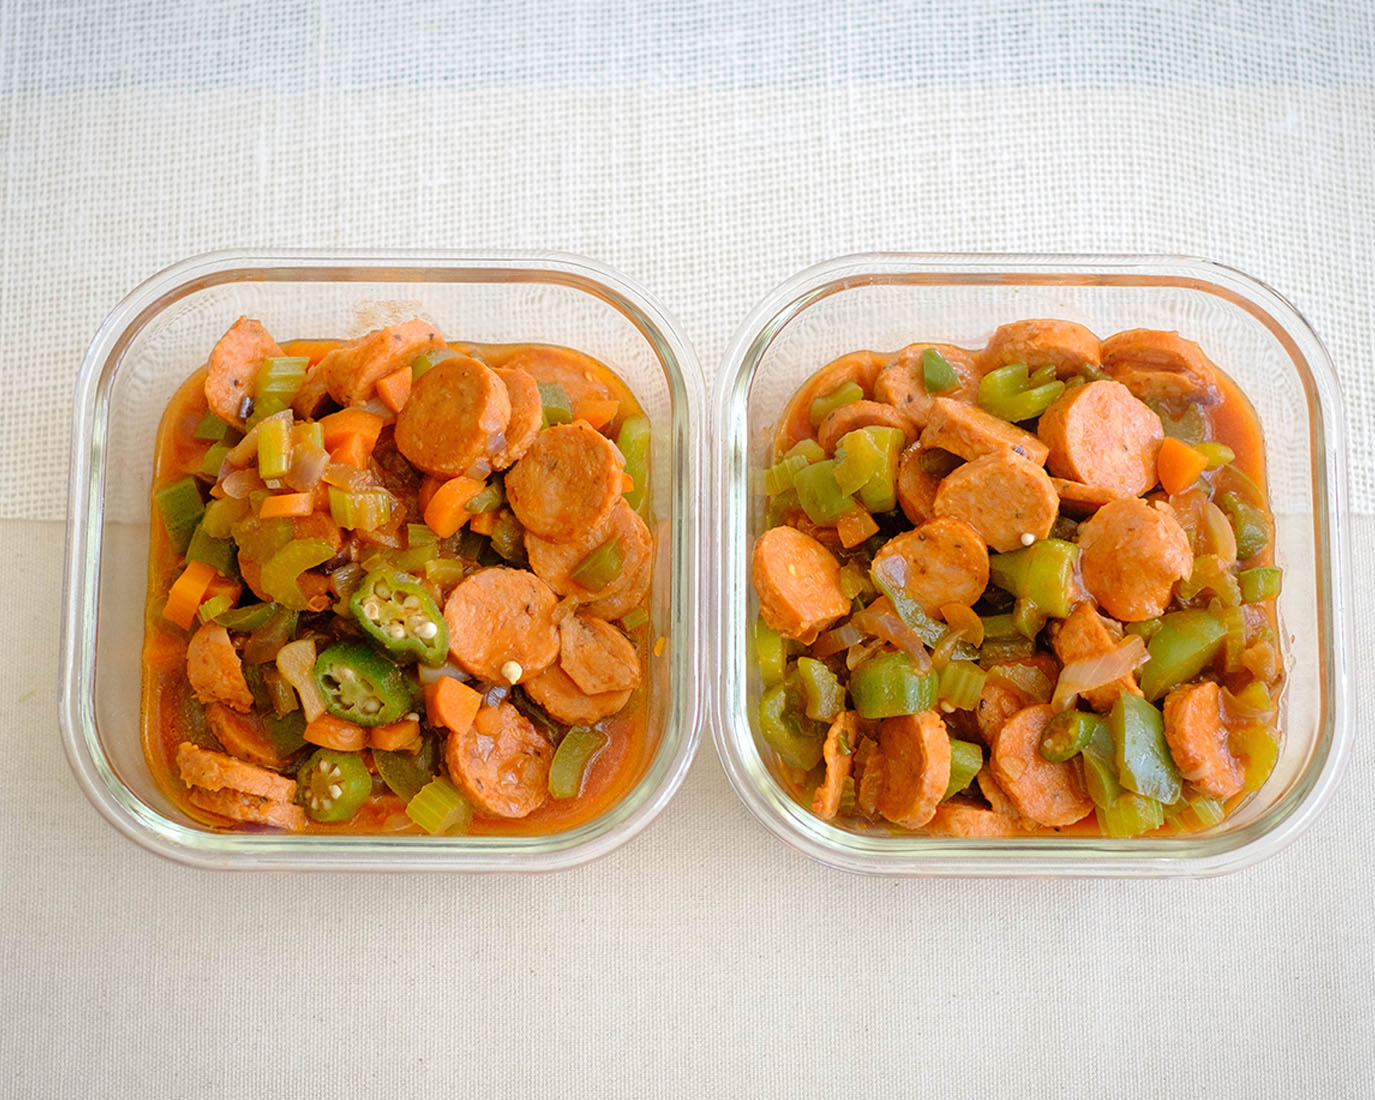
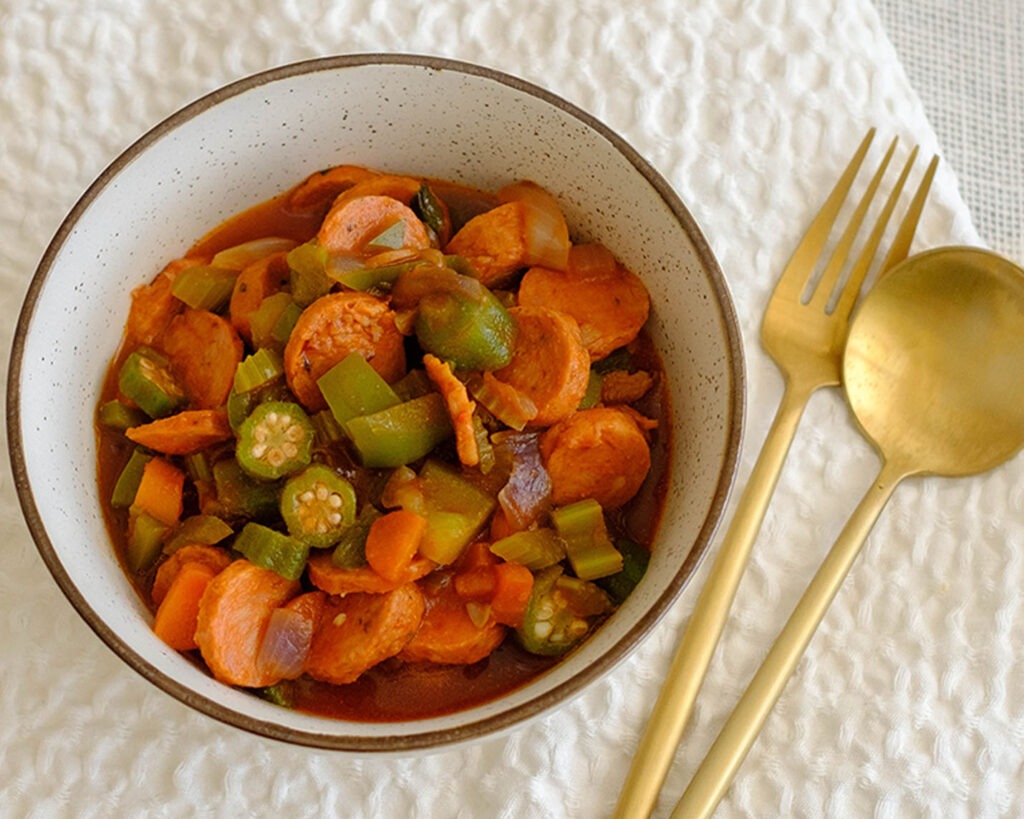
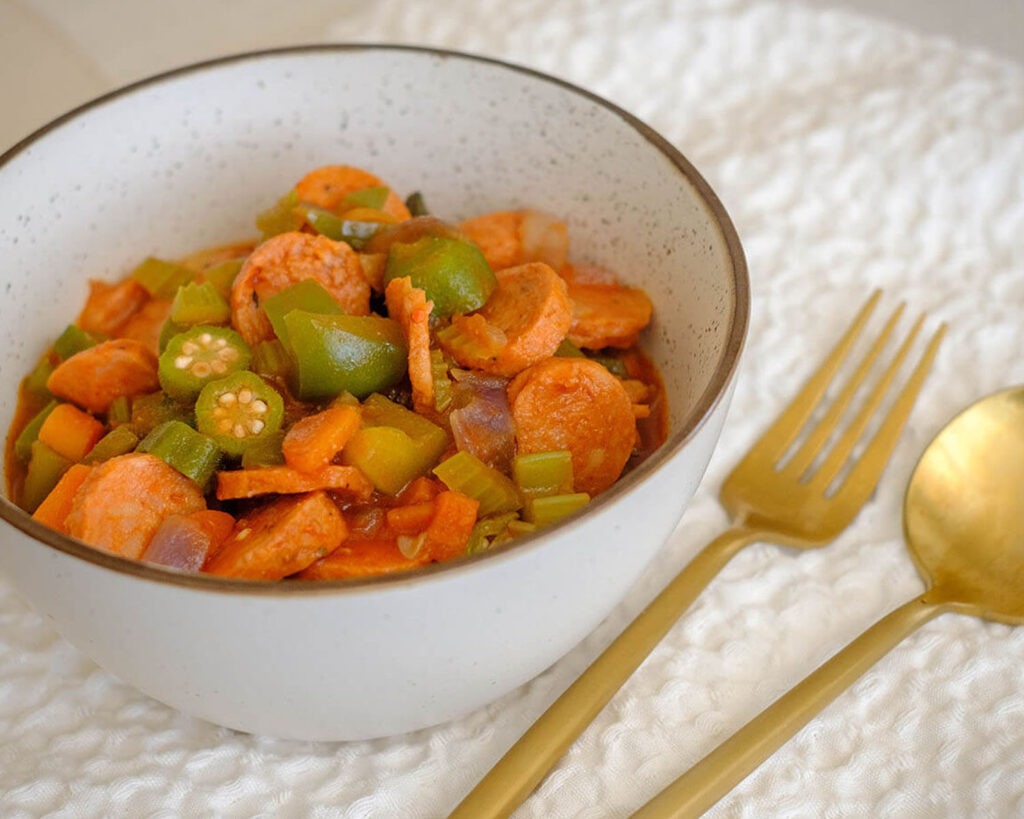
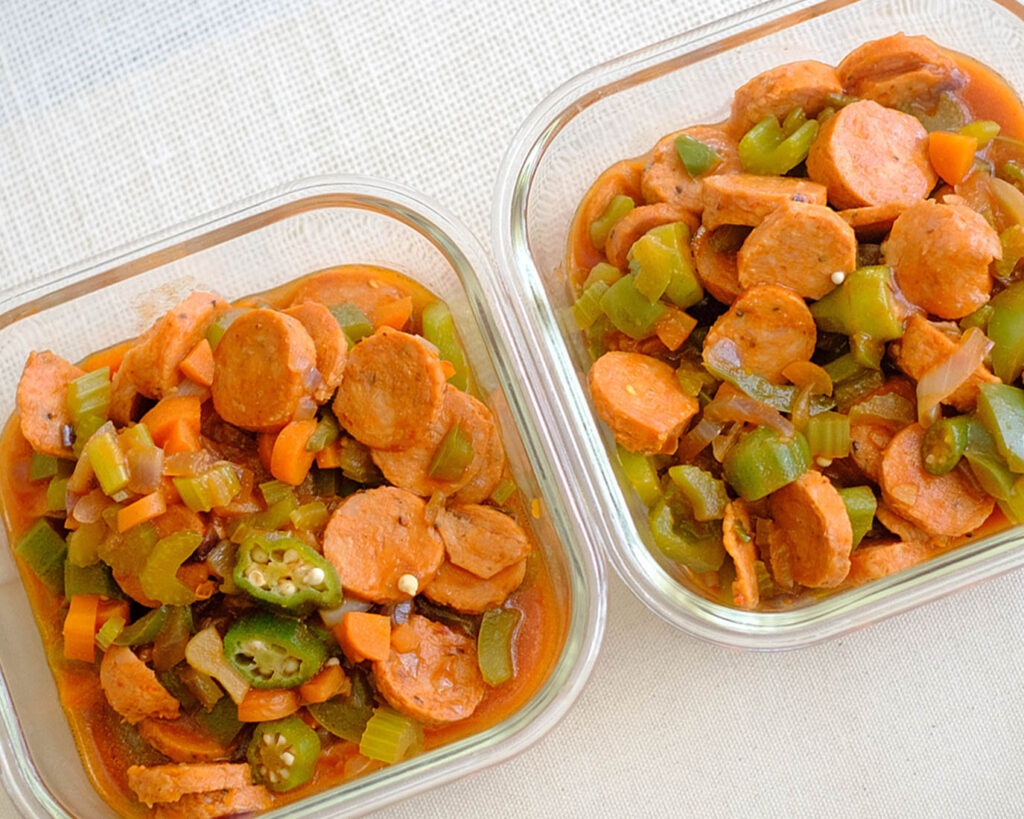

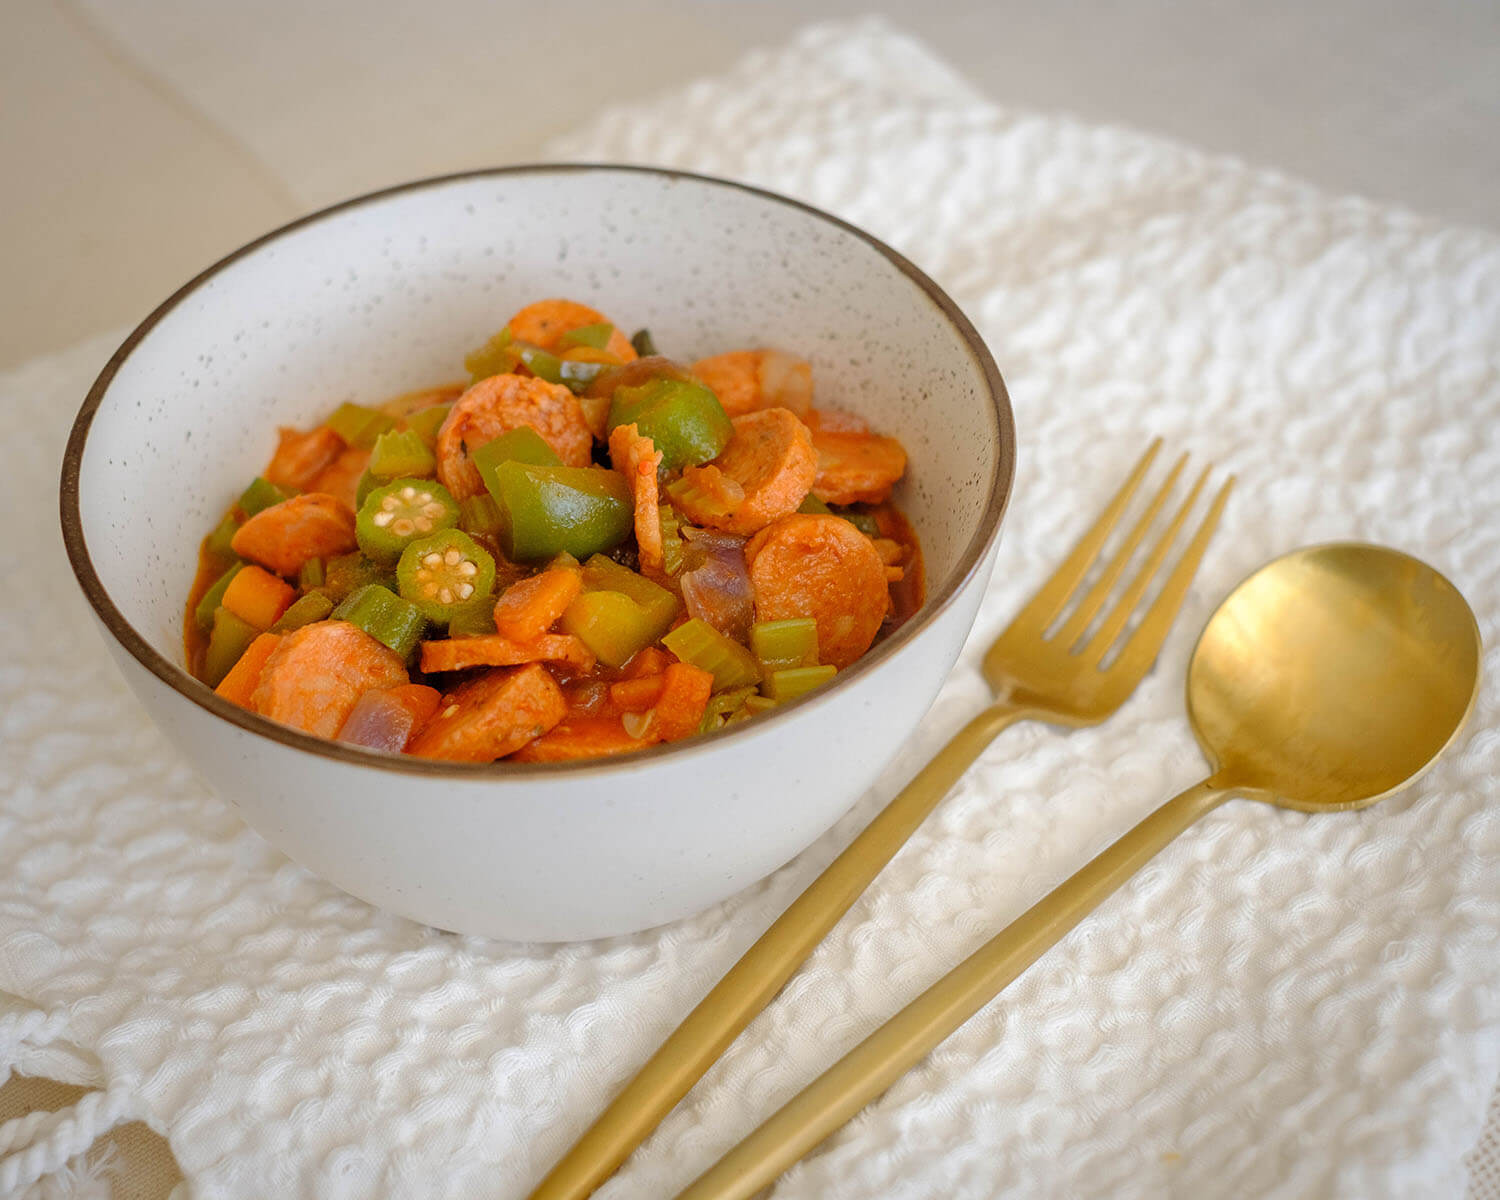


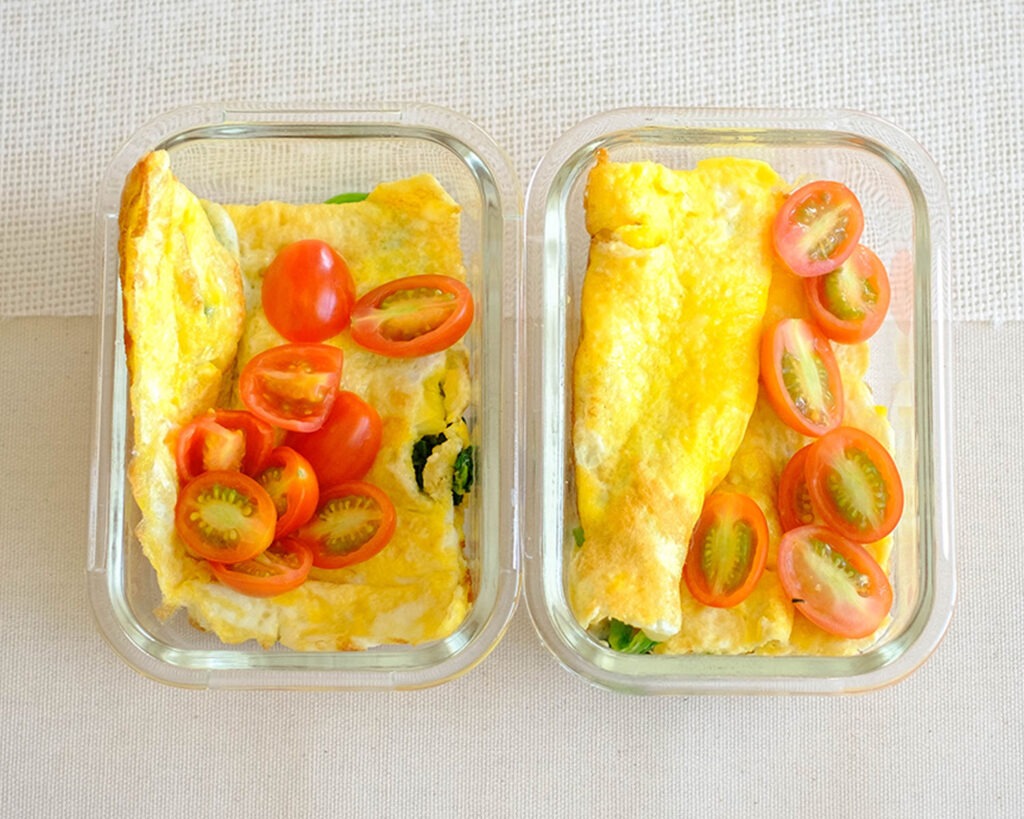


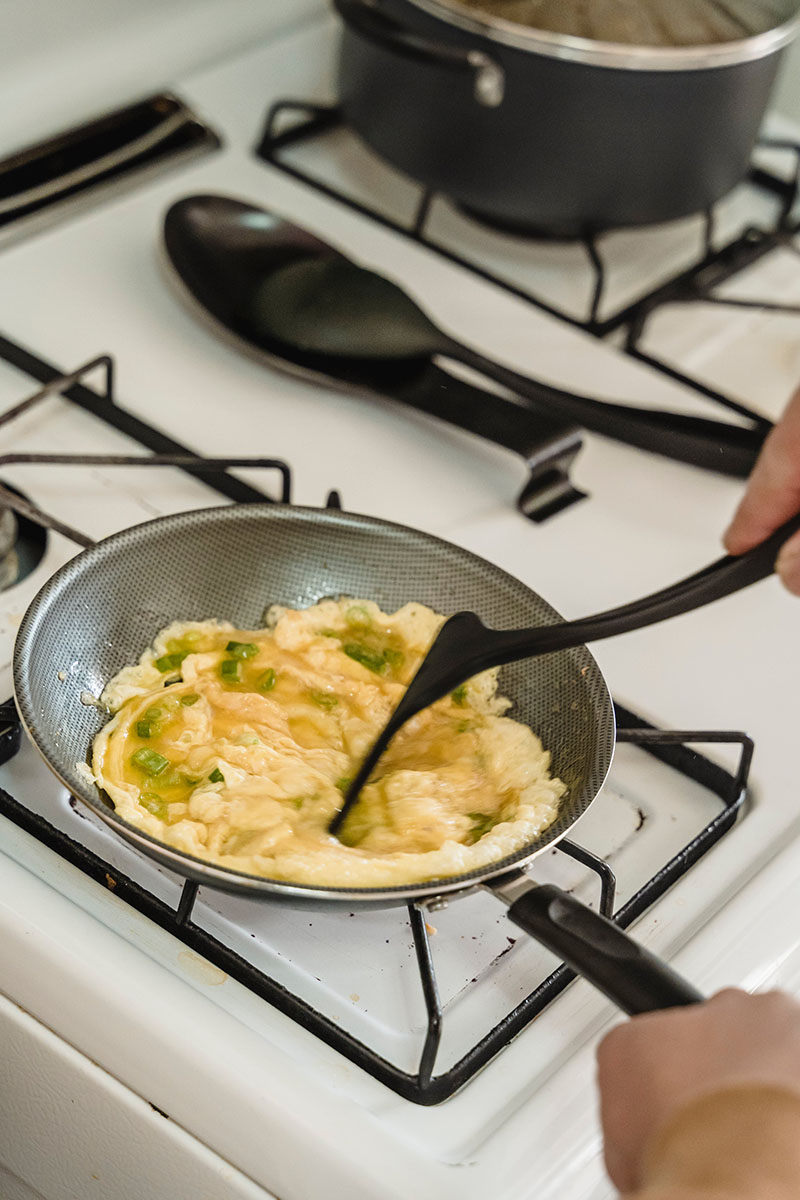


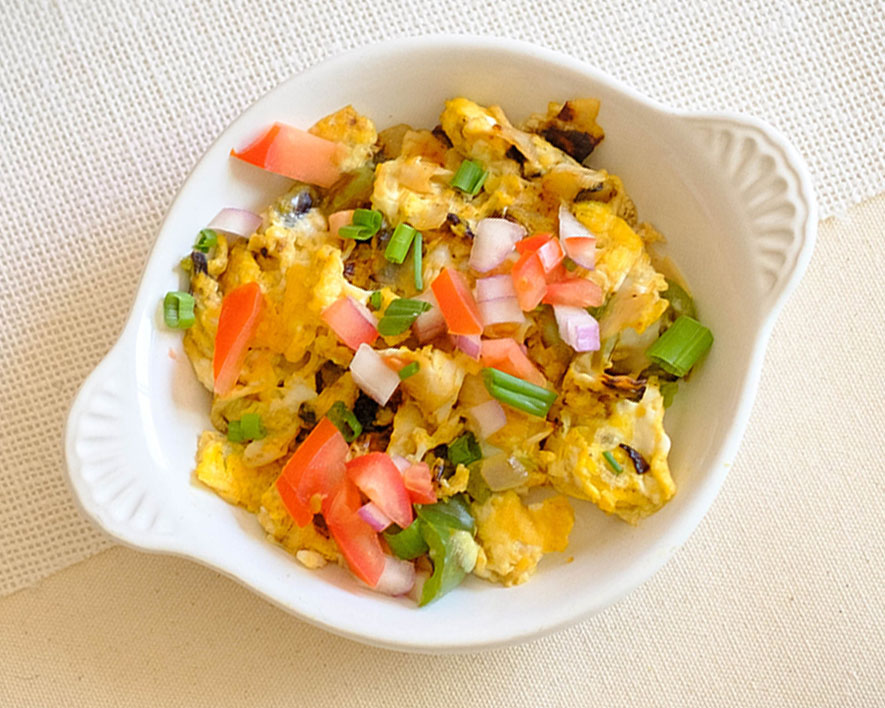
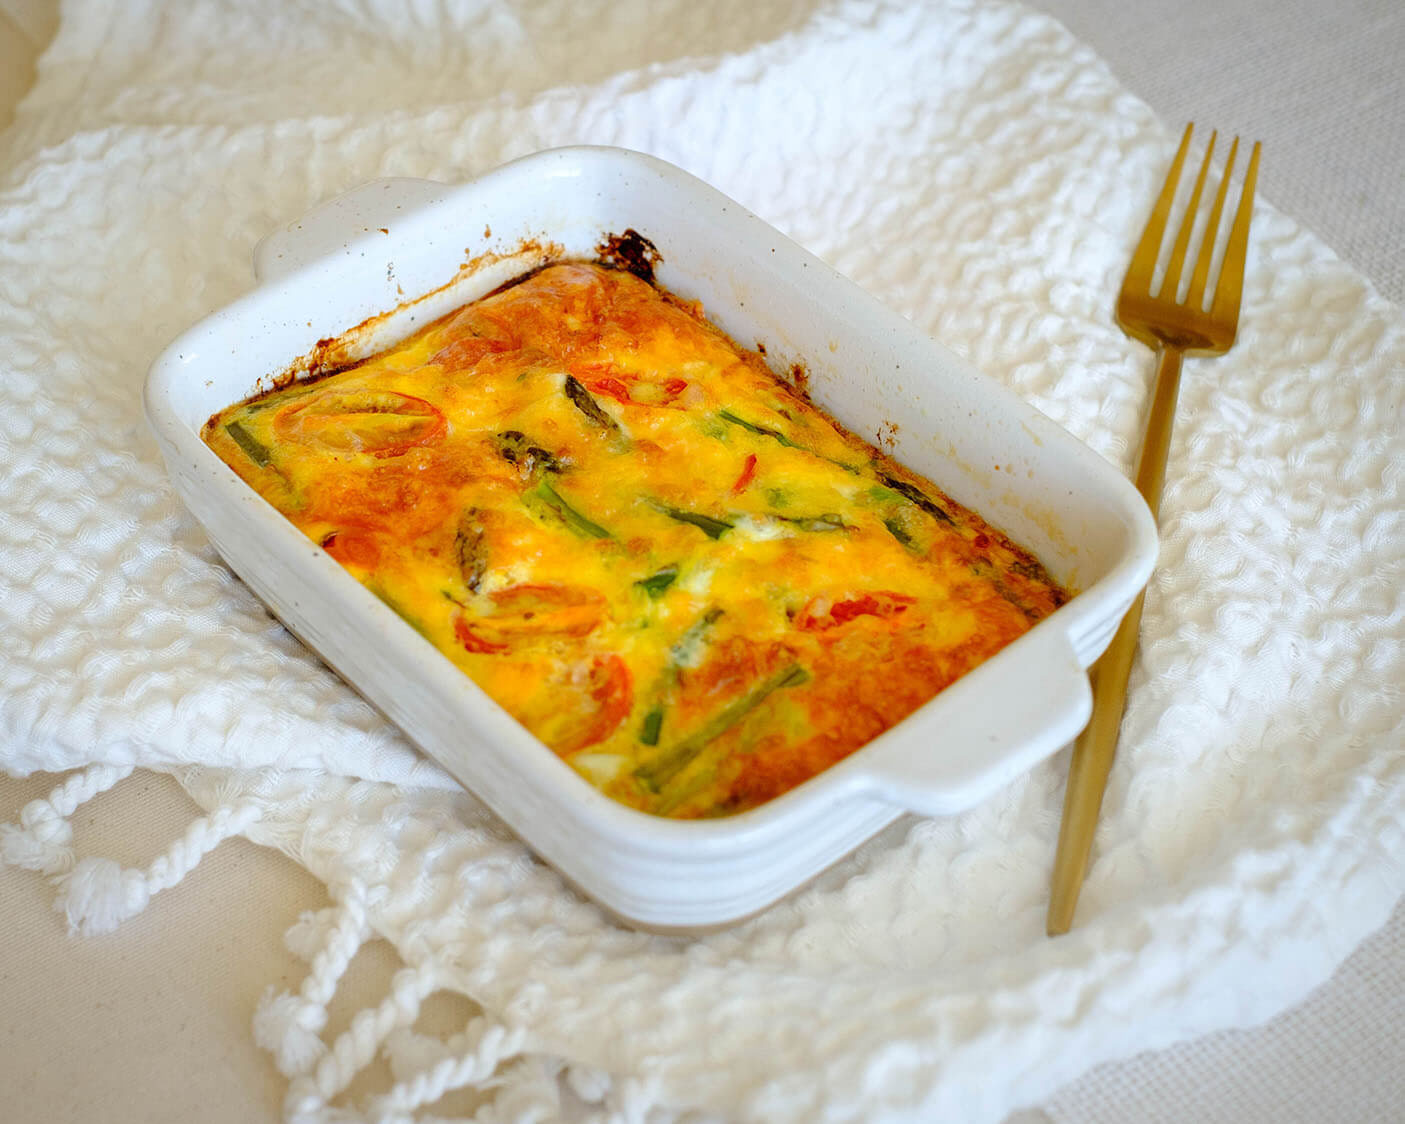


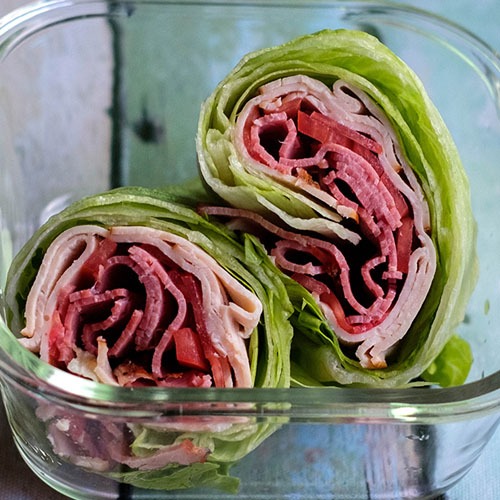

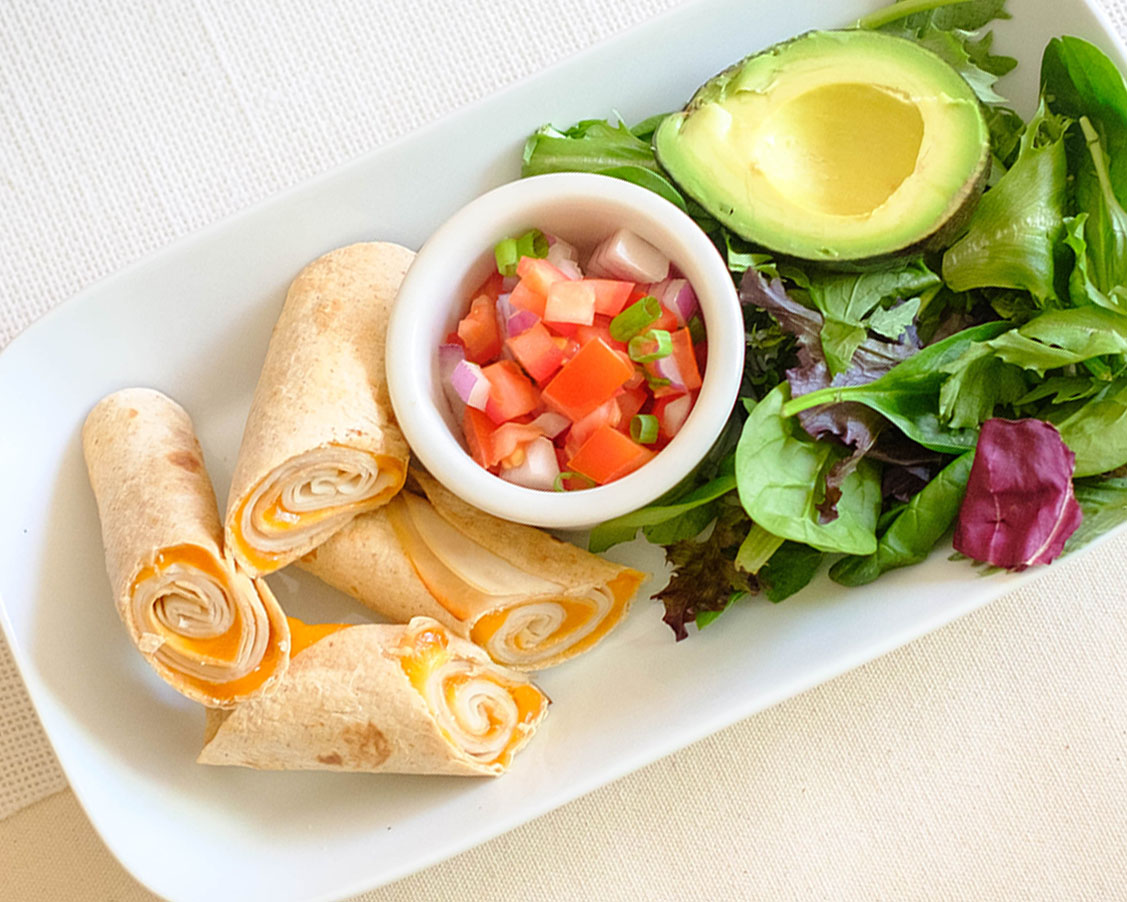
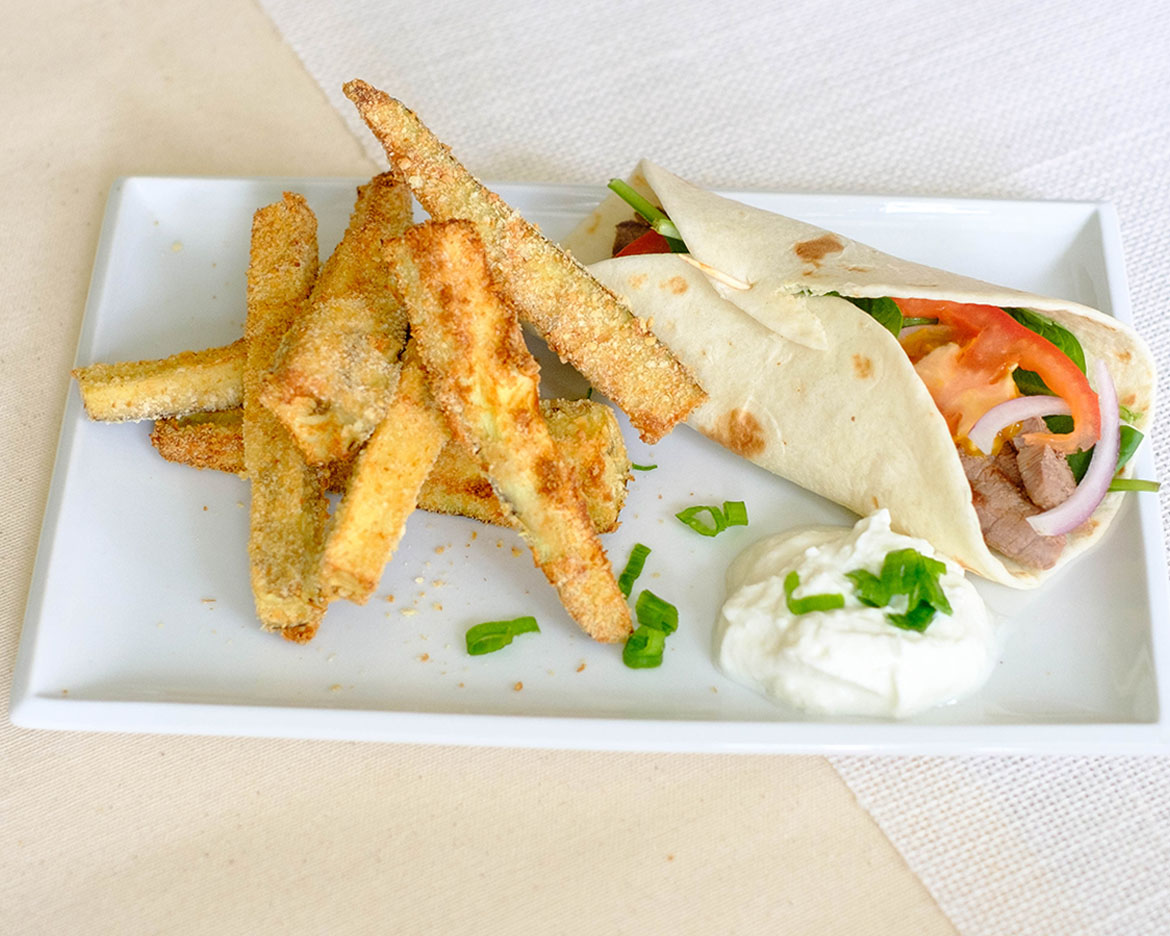

Breakfast Deli Egg Roll Ups
Equipment
Ingredients
Instructions
Notes
Nutrition