Posted on Leave a comment

Beef and Bean Sprout Stir Fry

glass square containers with sliced beef stir fry with bell peppers, sliced zucchini, and sliced mushrooms, and bean sprouts

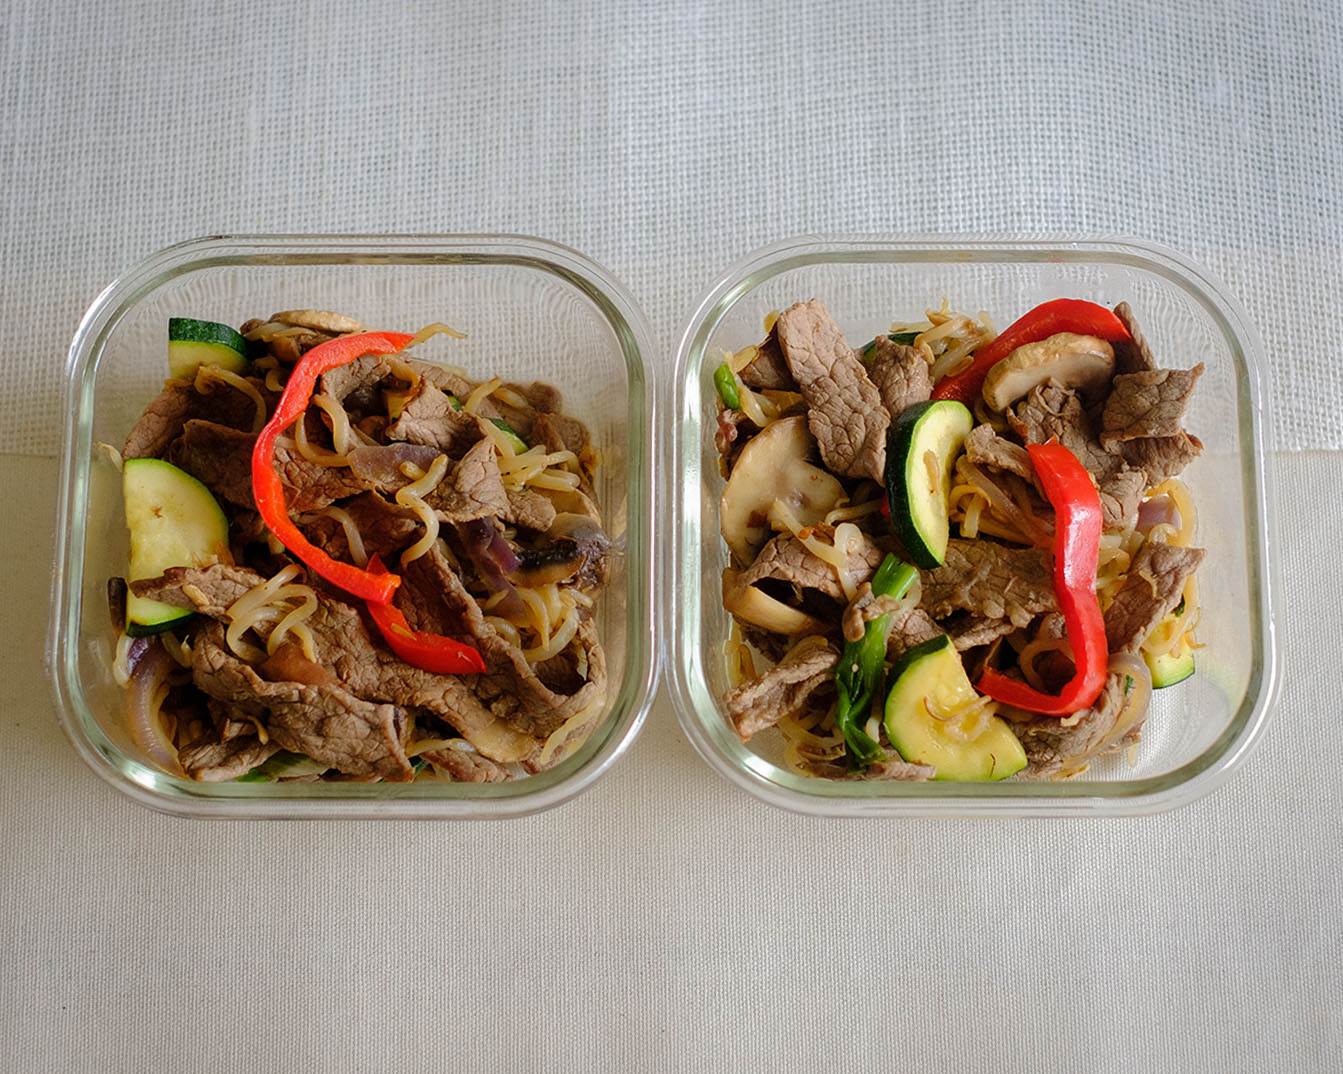
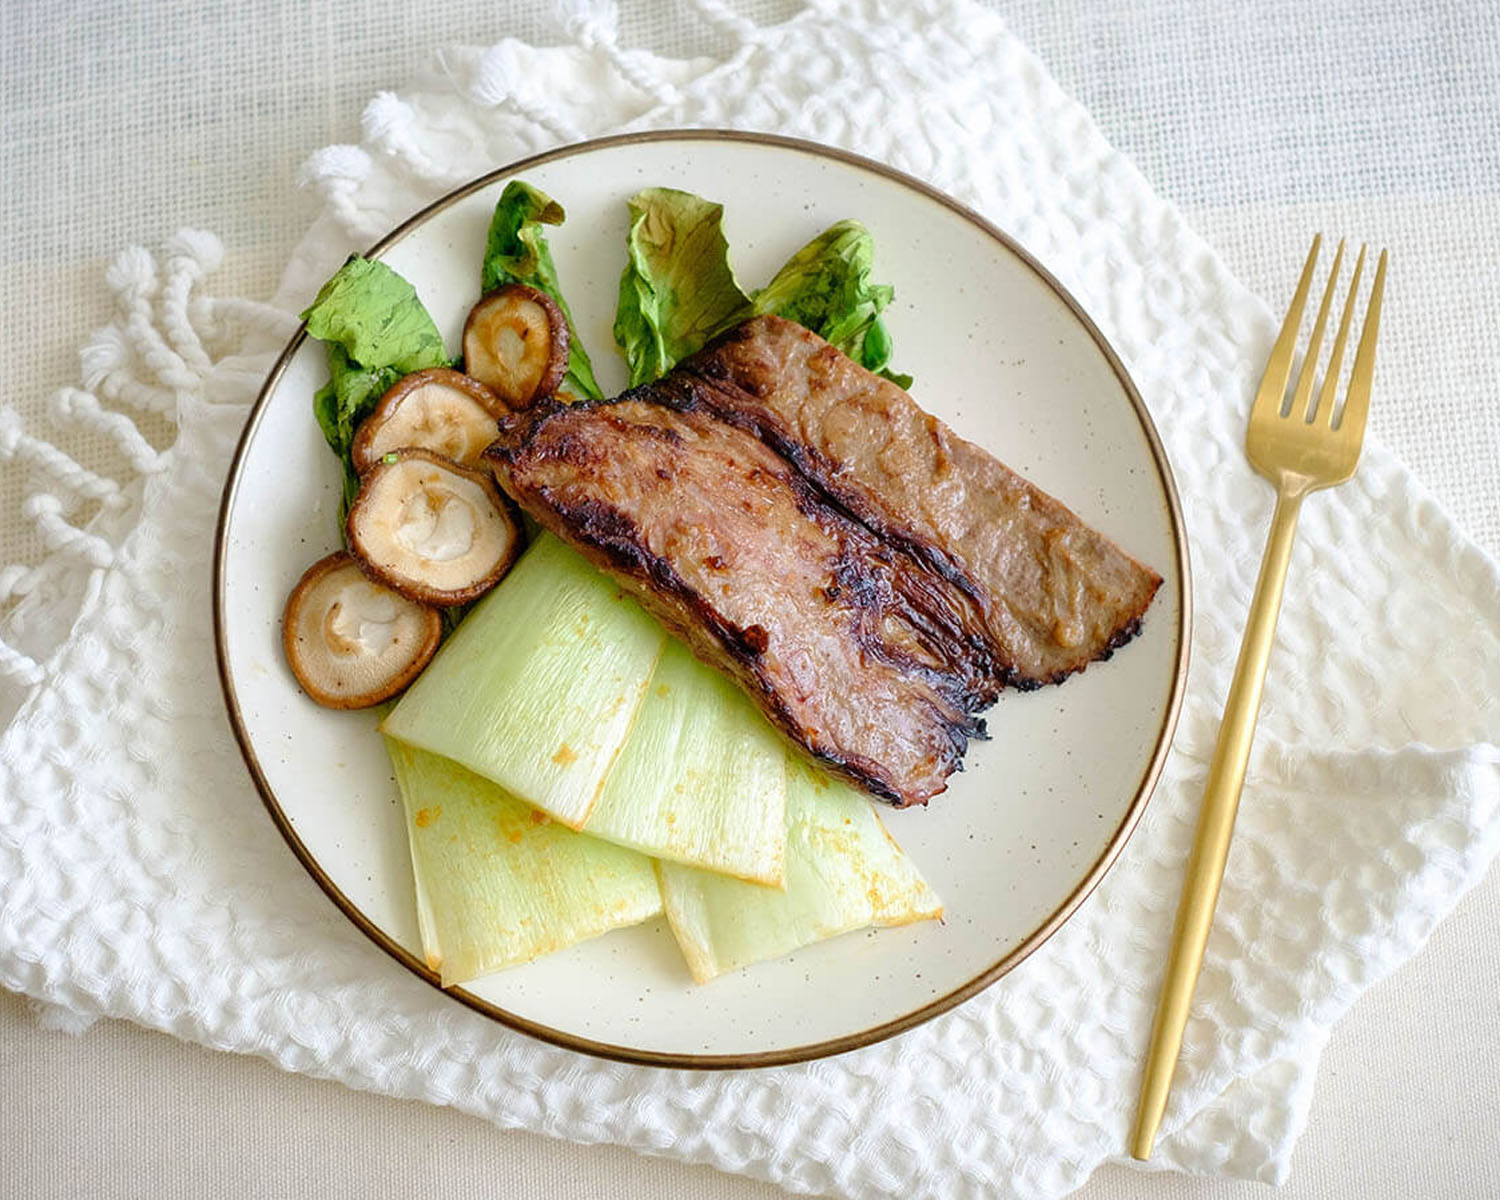
Whip up a delightful Beef and Bean Sprout Stir Fry – a budget-friendly, healthy, and quick meal prep alternative to takeout. Thinly sliced sirloin steak, vibrant veggies, and crunchy bean sprouts create a symphony of flavors in this easy-to-follow recipe. Perfect for busy individuals who need help with weekly meal prep, this dish offers convenience without compromising on taste or nutrition. From the savory soy-infused beef to the satisfying crunch of fresh bean sprouts, each bite is a celebration of deliciousness. Elevate your dinner routine with this homemade stir fry, bringing together speed, affordability, and wholesome ingredients for a delightful dining experience.

This post may contain affiliate links. Please see our privacy policy for details.

Calories: 434kcal | Carbohydrates: 23g | Protein: 50g | Fat: 18g | Saturated Fat: 4g | Polyunsaturated Fat: 2g | Monounsaturated Fat: 9g | Cholesterol: 104mg | Sodium: 1128mg | Potassium: 1535mg | Fiber: 7g | Sugar: 14g | Vitamin A: 1196IU | Vitamin C: 79mg | Calcium: 104mg | Iron: 6mg

round plate with weekly meal prep of sliced beef stir fry with bell peppers, sliced zucchini, and sliced mushrooms, and bean sprouts

Bean Sprouts: The Crunchy Marvel in Asian Cuisine

Bean sprouts are a culinary gem, especially in Asian dishes, and for good reason. These little sprouts are typically grown from mung beans and are harvested just as they start to sprout. Here’s why they’ve become a staple in Asian cuisine and weekly meal prep:

  • Nutrient-Packed Powerhouse: Despite their delicate appearance, bean sprouts are a nutritional powerhouse. They’re low in calories but high in essential nutrients like vitamins C and K, folate, and fiber. Talk about a nutrient boost without the guilt!
  • Crunchy Texture and Fresh Flavor: Bean sprouts bring a delightful crunch to any dish. This adds a textural contrast that’s particularly appreciated in stir-fries, salads, and noodle dishes. Their mild, slightly sweet flavor complements various ingredients, making them a versatile addition to any recipe.
  • Quick and Easy to Prepare: Bean sprouts require minimal preparation. A quick rinse and they’re ready to go! This makes them a time-saving ingredient for busy individuals who want to streamline their meal prep without sacrificing freshness and nutrition.
  • Affordable and Accessible: One of the best parts about bean sprouts is their accessibility and affordability. You can easily find them in grocery stores year-round, and they won’t break the bank. This makes them an excellent choice for those looking to maintain a healthy diet on a budget.
  • Versatility in Asian Cuisine: Bean sprouts play a crucial role in many Asian dishes, adding a distinctive element to classics like Pad Thai, Bibimbap, and, of course, stir-fries. They absorb the flavors of the surrounding ingredients while maintaining their own unique texture, making them an integral part of the dish.

In conclusion, bean sprouts are a weekly meal prep champion – they’re nutritious, easy to work with, and add that extra oomph to your Asian-inspired culinary creations. So, whether you’re stir-frying, tossing them into salads, or experimenting with noodle dishes, let bean sprouts take center stage in your meal prep adventures! 

The PrepYoSelf Newsletter

To Weekly Meal Prep Beef & Bean Sprout Stir Fry, You’ll Need

  • Sirloin Steak: Sirloin steak brings protein-packed goodness to the table. Sliced thinly, it cooks quickly, ensuring a tender and juicy bite. It’s the heart of our stir fry, providing substance and that meaty satisfaction.
  • Red Onions: Red onions add a touch of sweetness and vibrant color to the dish. When sautéed, they become tender and release their natural sugars, enhancing the overall flavor profile.
  • Green Onions: Green onions contribute a mild onion flavor with a hint of freshness. They’re sprinkled on top at the end, providing a pop of color and a delightful crunch.
  • Zucchini: Zucchini adds a mild, slightly sweet flavor and a wonderful tender-crisp texture. It complements the heartiness of the beef, bringing balance to the dish.
  • Red Bell Pepper: The red bell pepper introduces a burst of color and a hint of sweetness. Its crisp texture adds another layer of complexity, making each bite exciting.
  • Bean Sprouts: The crunchy heroes of our stir fry! Bean sprouts bring a refreshing, crisp texture that contrasts beautifully with the other ingredients. They absorb the savory flavors of the dish while maintaining their freshness.
  • Mushrooms: Mushrooms contribute a savory, earthy flavor and a meaty texture. They absorb the sauce beautifully, adding depth to the overall taste.
  • Soy Sauce: The umami powerhouse! Soy sauce is the key to the savory, salty goodness that ties everything together. It adds depth and richness to the dish.
  • Sesame Oil: The finishing touch! Sesame oil adds a delightful nutty aroma and flavor. Drizzled at the end, it provides a burst of authenticity and enhances the overall Asian-inspired experience.
round plate with weekly meal prep of sliced beef stir fry with bell peppers, sliced zucchini, and sliced mushrooms, and bean sprouts

How to Weekly Meal Prep Beef and Bean Sprout Stir Fry

  1. Start by slicing your sirloin steak into thin strips against the grain. Sprinkle a pinch of salt and pepper over the strips to enhance the flavor.
  2. Heat up your wok on medium-high heat, add a splash of olive oil, and sauté those beef strips until they’re golden and cooked to perfection. Once done, set them aside – we’ll bring them back into the limelight in a bit.
  3. Toss in the sliced onions, bell pepper, and bean sprouts into the wok. Let them dance around for 3 to 5 minutes until they’re soft and tender. We’re creating a symphony of colors and flavors here!
  4. Bring back those glorious beef strips to the pan, and it’s party time! Season the ensemble with soy sauce and a dash of garlic powder. Then, drizzle in that magical sesame oil. Give it a good mix until every ingredient is singing in harmony.
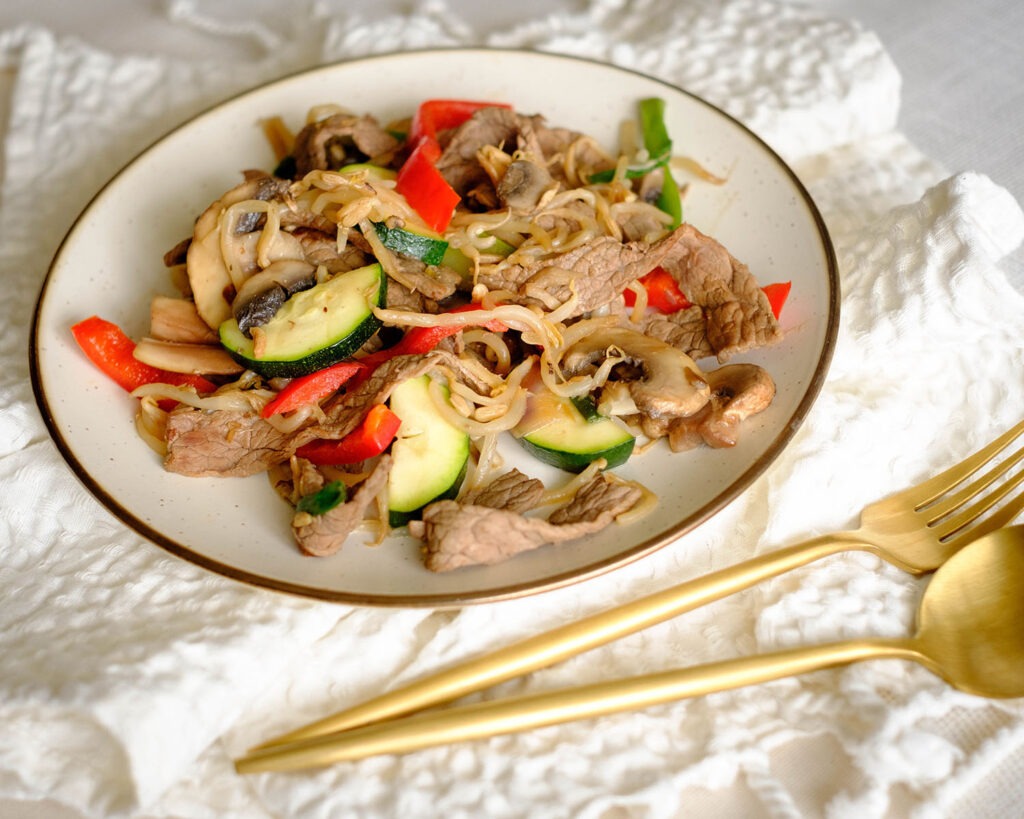
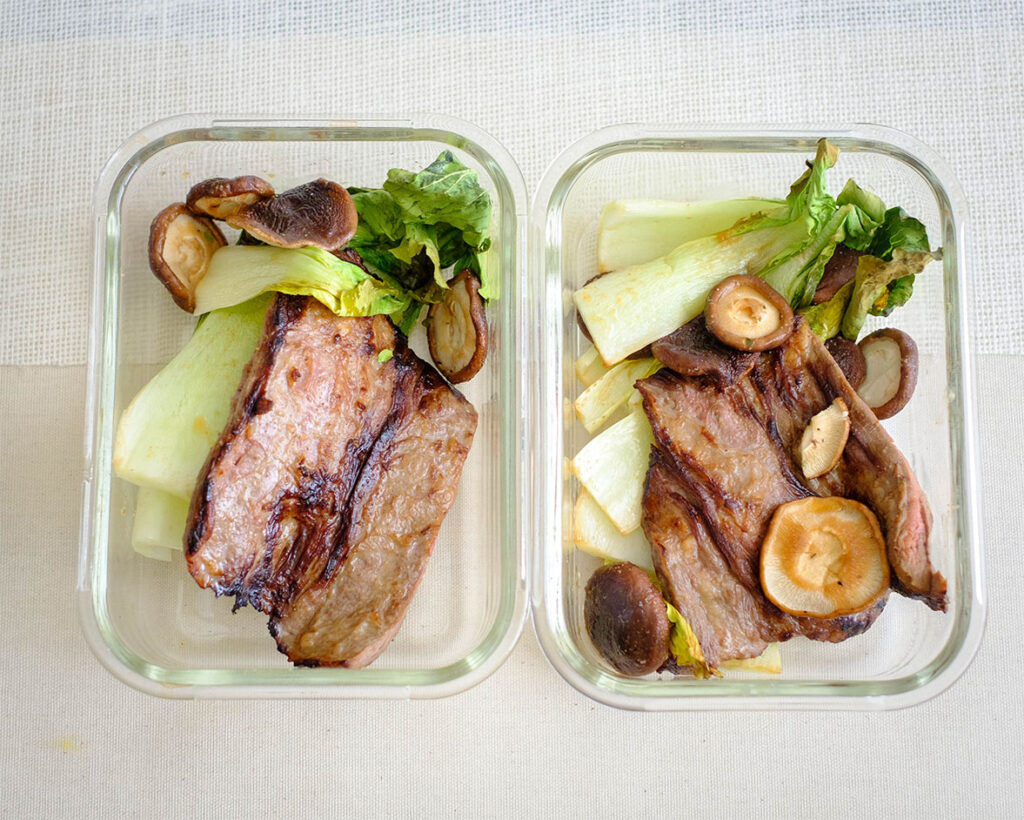
  5. Your Beef and Bean Sprout Stir Fry is ready to steal the show! Serve it up with steamed rice or noodles – whatever suits your fancy.

Reference the recipe card below for detailed instructions.

weekly meal prep glass square containers with sliced beef stir fry with bell peppers, sliced zucchini, and sliced mushrooms, and bean sprouts

Ingredient Swaps

  • Protein Variations: Swap out the sirloin steak for thinly sliced chicken breast or thigh for a leaner option. For a vegetarian twist, substitute the meat with extra-firm tofu cubes. Press the tofu to remove excess water before slicing.
  • Vegetable Options: Replace zucchini with broccoli florets for a cruciferous crunch. Add matchstick carrots for a touch of natural sweetness and vibrant color.
  • Sauce Substitutes: Switch up the flavor profile by using teriyaki sauce instead of soy sauce. For a richer umami taste, consider using oyster sauce in place of soy sauce.
  • Oil Alternatives: Infuse a hint of coconut flavor by using coconut oil instead of olive oil. If you’re out of sesame oil, use toasted sesame seed oil for a similar nutty aroma.
  • Vegetarian Option: Introduce edamame for an extra protein boost in the absence of meat.
glass square containers with sliced beef stir fry with bell peppers, sliced zucchini, and sliced mushrooms, and bean sprouts for weekly meal prep
round plate with thin slice beef stir fry with red bell pepper, zucchini, and bean sprouts

Beef and Bean Sprout Stir Fry

This beef and bean sprout stir fry is a healthy and flavorful dish that is perfect for a quick and easy weeknight dinner. It's also a great way to use up any leftover vegetables you have in your fridge.
No ratings yet
Prep Time 5 minutes
Cook Time 15 minutes
Course dinner, Main Course
Cuisine Asian
Servings 2
Calories 434 kcal

Equipment

  • knife
  • cutting board
  • wok
  • tongs

Ingredients
  

  • 12 oz sirloin steak (thinly sliced strips)
  • 1/4 cup red onions (sliced)
  • 1/4 cup green onions (sliced)
  • 1/2 zucchini (sliced)
  • 1/2 red bell pepper (sliced)
  • 14 oz bean sprouts (canned and drained, or fresh)
  • 8 oz mushrooms (sliced)
  • 2 tbsp soy sauce
  • 1/4 tsp garlic powder
  • 1 tablespoon olive oil
  • 1 teaspoon sesame oil

Instructions
 

  • Slice the beef into thin strips against the grain and season with salt and pepper.
  • Add olive oil to a wok on medium-high heat and saute the beef strips. After they cook, scoop them out of the wok and set them aside.
  • Next, add the sliced onions, bell pepper, and bean sprouts to the wok and saute them for about 3 to 5 minutes until the vegetables are soft and tender.
  • Finally, return the beef strips to the pan and season with soy sauce and garlic powder. Then, drizzle with sesame oil and mix well. Enjoy with steamed rice or noodles.

Notes

Nutrition information provided is an estimate. It will vary based on cooking method and specific ingredients used. Please consult with your healthcare provider for specific dietary needs. To gain a better understanding, explore our nutrition disclaimer here. 

Nutrition

Calories: 434kcalCarbohydrates: 23gProtein: 50gFat: 18gSaturated Fat: 4gPolyunsaturated Fat: 2gMonounsaturated Fat: 9gCholesterol: 104mgSodium: 1128mgPotassium: 1535mgFiber: 7gSugar: 14gVitamin A: 1196IUVitamin C: 79mgCalcium: 104mgIron: 6mg

Similar Recipes

ginger salmon

Oven Baked Orange Ginger Salmon and Snow Peas

orange chicken

Air Fryer Orange Soy Glazed Chicken with Broccoli

balsamic steak

Grilled Steak with Sweet Potato Wedges

You Might Also Like

Frequently Asked Questions

Can I use a different cut of beef?

Absolutely! While sirloin steak is a great option, you can use flank steak, ribeye, or even tenderloin. Adjust cooking times based on the cut’s thickness.


What type of noodles or rice pairs best with this dish?

Steamed jasmine rice or thin rice noodles are fantastic choices. Udon or soba noodles also work well. Pick your favorite or mix it up each time you make it!


How do I prevent the beef from becoming tough?

Slice the beef thinly against the grain and avoid overcooking. Sauté quickly on medium-high heat to maintain tenderness.

Posted on Leave a comment

Scrambled Eggs and Carnitas

round glass meal prep containers with scrambled eggs, shredded pork, tomatoes, cilantro, and onions

Picture this: golden swirls of perfectly scrambled eggs embracing tender shreds of yesterday’s savory pork carnitas, all crowned with a vibrant pico de gallo flourish. This recipe isn’t just about fueling your day; it’s about savoring every bite. With its easy preparation, ingenious use of leftovers, restaurant-quality flavors, and a protein-packed punch to keep you energized until lunch, get ready to elevate your breakfast game to new heights. Breakfast just got a whole lot more exciting!

This post may contain affiliate links. Please see our privacy policy for details.

Calories: 262kcal | Carbohydrates: 19g | Protein: 19g | Fat: 13g | Saturated Fat: 4g | Polyunsaturated Fat: 2g | Monounsaturated Fat: 3g | Trans Fat: 0.04g | Cholesterol: 353mg | Sodium: 876mg | Potassium: 121mg | Sugar: 14g | Vitamin A: 830IU | Vitamin C: 4mg | Calcium: 79mg | Iron: 2mg

round plate with scrambled eggs, shredded pork, tomatoes, cilantro, and onions

The PrepYoSelf Newsletter

Here’s why you need to make this:

  • Effortless Elegance: This breakfast meal prep idea is a fantastic choice for those hectic mornings when time is of the essence. The straightforward instructions and minimal ingredients make it a breeze to whip up a breakfast that feels like it was crafted by a seasoned chef. In just a few easy steps, you can have a gourmet-style meal that’s as pleasing to the eyes as it is to the palate.
  • Leftovers Turned Gold: Transforming yesterday’s dinner into today’s breakfast not only reduces food waste but also adds a layer of rich, savory depth to your morning meal. The incorporation of leftover pork carnitas not only adds flavor but also ensures that every bite is a delicious reminder of a previous culinary triumph.
  • Restaurant-Quality Delight: Forget about breakfast monotony! With this meal prep, you’re bringing restaurant-quality flavors to your own kitchen. The combination of fluffy scrambled eggs, succulent carnitas, and vibrant pico de gallo creates a symphony of tastes that rivals your favorite breakfast spot. Who needs to dine out when you can create a gourmet experience right at home?
  • Protein Powerhouse: Kickstart your day with a protein-packed punch! The eggs and leftover pork carnitas team up to deliver a high-protein breakfast that will keep you fueled and satisfied until lunchtime. Protein is not only essential for muscle repair but also aids in maintaining a healthy metabolism, making this breakfast an ideal choice for those looking to power through their busy mornings.
  • Saves Time, Satisfies Cravings: By incorporating leftovers and keeping the prep simple, you’re not just saving time – you’re satisfying your breakfast cravings with a meal that checks all the boxes. The harmonious blend of textures and flavors ensures that your taste buds are treated to a delightful morning experience without the need for an extensive cooking session. It’s a win-win for both your schedule and your palate!

Ingredients & Pairing Tips

The ingredients are simple. All you need are eggs, leftover carnitas, and your choice of toppings. Check out our carnitas recipe here. Meal prepping is all about customization, so feel free to experiment with different pairings to suit your taste preferences and nutritional goals. Here’s some pairing tips for this meal prep: 

  • Fresh Fruit Medley: Balance the savory goodness of your scrambled eggs and pork carnitas with a side of fresh fruit. Berries, melon cubes, or citrus segments can add a refreshing touch to your breakfast.
  • Whole Grain Toast or Tortillas: Accompany your fiesta with whole grain toast or warm tortillas. Not only does this add a satisfying crunch, but it also introduces complex carbohydrates for a well-rounded meal.
  • Yogurt Parfait: Elevate your breakfast with a yogurt parfait. Layer Greek yogurt with granola and a drizzle of honey for a delightful contrast to the savory main course.
  • Green Goodness: Boost the nutritional content of your meal by serving a side of sautéed spinach or kale. The earthy greens complement the richness of the eggs and carnitas beautifully.

round plate with scrambled eggs, shredded pork, tomatoes, cilantro, and onions

How to Meal Prep Carnitas and Eggs

  1. First things first, let’s get our pan ready for the culinary magic. Add a splash of your favorite cooking oil to a pan, and let it heat up over medium heat. We’re setting the stage for the star of the show – our scrumptious scrambled eggs and pork carnitas fiesta!
  2. Now, it’s time for the eggs to take center stage. Crack those eggs into the pan and hear them sizzle. That’s the sound of egg-citement! Grab your trusty spatula and start stirring those eggs around. We’re looking for a perfect blend of fluffiness and flavor.
  3. Here comes the twist – the leftover pork carnitas! Throw those savory shreds of goodness into the pan and let them join the party. Watch as the aromas blend together, creating flavors that will have you salivating in no time. Give it a gentle stir, ensuring that they heat through.
  4. Get ready to top your creation with freshness – it’s pico de gallo time! Top off your scrambled eggs and pork carnitas masterpiece with generous scoops of this zesty salsa. The burst of colors and flavors will take your dish to a whole new level. Tomatoes, onions, cilantro, and a hint of lime – the perfect finishing touch!

Reference the recipe card below for detailed instructions.

round glass meal prep containers with scrambled eggs, shredded pork, tomatoes, cilantro, and onions

Meal Prep Tips:

  • Separate Storage for Pico de Gallo: Keep the pico de gallo separate until serving to maintain its freshness and prevent the other components from becoming soggy. Store it in a small container and add it to your dish just before reheating or serving.
  • Freeze for Future Delights: If you want to extend the longevity of your meal prep, consider freezing individual portions. Thaw in the refrigerator overnight, and voila – you’ve got a scrumptious breakfast that’s as good as fresh!
  • Customizable Toppings: Encourage creativity by providing various toppings on the side. Avocado slices, shredded cheese, or a dollop of sour cream can add extra layers of flavor and texture. Let each family member or meal prepper customize their breakfast to suit their taste.

round glass meal prep containers with scrambled eggs, shredded pork, tomatoes, cilantro, and onions

Plate with scrambled eggs topped with pork carnitas and pico de gallo

Scrambled Eggs and Pork Carnitas

Transform your mornings with these delightful Scrambled Eggs and Leftover Pork Carnitas, a flavorful fusion of fluffy eggs, savory carnitas, and zesty pico de gallo, effortlessly crafted for a restaurant-quality breakfast that keeps you satisfied until lunch!

No ratings yet

Prep Time 5 minutes
Cook Time 10 minutes

Course Breakfast
Cuisine American, Mexican

Servings 2
Calories 262 kcal

Equipment

  • saute pan

Ingredients


  • 4 large eggs
  • 1/2 cup pico de gallo
  • 1/2 cup pork carnitas (pre-cooked)

Instructions


  • Add oil to a pan on medium heat. Crack the eggs into the pan and stir the eggs around.
  • Next, add the pork carnitas to the pan until they heat through. Once the eggs firmly set, top it off with fresh pico de gallo!

Nutrition

Calories: 262kcalCarbohydrates: 19gProtein: 19gFat: 13gSaturated Fat: 4gPolyunsaturated Fat: 2gMonounsaturated Fat: 3gTrans Fat: 0.04gCholesterol: 353mgSodium: 876mgPotassium: 121mgSugar: 14gVitamin A: 830IUVitamin C: 4mgCalcium: 79mgIron: 2mg

Similar Recipes

fried egg and sausage hash

Fried Egg with Apple and Sausage Hash

Easy Cheese Omelette

easy sausage egg muffins

Sausage Egg Muffins with Strawberries

You Might Also Like

Frequently Asked Questions

Can I use any type of leftover meat for this recipe?

While pork carnitas add a unique flavor, you can absolutely experiment with other leftover meats like chicken, beef, or even tofu for a delicious variation.


Can I use fresh pork instead of leftover carnitas?

Absolutely! Cook fresh pork with your favorite spices or use other cooked proteins for a personalized twist.


Can I use a different type of salsa instead of pico de gallo?

Absolutely! Experiment with your favorite salsa varieties, whether it’s salsa verde, roja, or a fruity mango salsa, to tailor the flavor to your liking.

Posted on Leave a comment

Breakfast Bacon Egg Cups

round glass meal prep containers with bacon wrapped eggs and roasted tomato

Here’s a breakfast recipe that’s not only delicious but also ridiculously easy to whip up – Bacon Egg Cups with Roasted Tomato. These little cups of joy are the perfect way to start your day with a protein-packed punch and a burst of flavor. Let’s dive into the kitchen and get these eggs baking!

This post may contain affiliate links. Please see our privacy policy for details.

Calories: 333kcal | Carbohydrates: 2g | Protein: 17g | Fat: 28g | Saturated Fat: 9g | Polyunsaturated Fat: 5g | Monounsaturated Fat: 12g | Trans Fat: 0.1g | Cholesterol: 356mg | Sodium: 418mg | Potassium: 285mg | Fiber: 0.4g | Sugar: 1g | Vitamin A: 760IU | Vitamin C: 4mg | Calcium: 55mg | Iron: 2mg

round plate with bacon wrapped eggs and roasted tomato

The PrepYoSelf Newsletter

Here’s why you need to make this:

These Bacon Egg Cups with Roasted Tomato are not just a tasty treat but also a healthy indulgence that is perfect for meal prep, especially for busy individuals aiming to stay on track with their nutrition:

  • Excitement in Every Bite: Sticking to a meal plan can sometimes feel monotonous, but not with these bacon egg cups. The variety of textures – the crispy bacon, creamy eggs, and juicy tomatoes – along with the interplay of sweet and savory flavors, ensures that each bite is exciting. Meal prep shouldn’t be a chore; it should be an anticipation of delicious moments, and these cups deliver just that.
  • Flavor Harmony: The flavor combinations in these cups create a delightful symphony for your taste buds. The savory, smoky notes from the bacon perfectly complement the richness of the eggs. The roasted tomatoes add a burst of sweetness and acidity, balancing the dish. Topped with fresh green onions, you get a pop of brightness and a hint of freshness that ties everything together into a harmonious and satisfying flavor experience.
  • Portion Control and Satiety: Meal prepping these cups allows for easy portion control. Each cup is a perfectly sized, balanced serving, helping you manage your calorie intake.
  • Time-Efficient Meal Prep: For busy individuals, time is of the essence. These bacon egg cups are a brilliant solution. With just a few simple ingredients and minimal prep time, you can have a batch ready to go. Pop them in the oven, and while they bake, you can focus on other tasks, making it a time-efficient and hassle-free meal prep option.

Simple Ingredients You’ll Need

  • Eggs: We used whole eggs, but you can also swap this with egg whites. 
  • Bacon: Who can resist the allure of bacon? Those savory, crispy slices not only wrap our eggs like a cozy blanket but also infuse every bite with a smoky, salty goodness. Bacon adds that irresistible crunch and umami flavor that takes these cups to the next level. You can swap it with turkey bacon or even prosciutto.
  • Roma Tomato: Enter the burst of freshness! The roma tomato brings a juicy, sweet element to the dish. Roasting them intensifies their natural flavors, creating a delightful contrast to the savory bacon and creamy eggs. It’s the touch of brightness that makes each bite a flavor symphony.
  • Olive Oil: Olive oil plays a crucial role in roasting our tomatoes, adding a subtle earthiness and enhancing their natural sweetness. It also helps achieve that perfect golden crispiness in both the bacon and the edges of the eggs.
  • Green Onions: The vibrant finish! Chopped green onions are not just a garnish; they’re the final touch that brings a burst of freshness and a mild oniony kick. Their bright green color adds visual appeal, and their crisp texture provides a satisfying contrast to the softer components of the dish.
round glass meal prep containers with bacon wrapped eggs and roasted tomato

How to Meal Prep Bacon Egg Cups

  1. First things first, let’s get that oven preheated to a toasty 400°F (or approximately 200°C). This ensures that our bacon egg cups and roasted tomatoes get that perfect golden crispiness.
  2. Now, grab your muffin tin and let’s give these eggs a cozy bacon blanket. Take each bacon slice and wrap it in a circle inside the muffin tin cups. This not only adds a savory touch but also forms the perfect vessel for our eggs.
  3. Time to introduce the stars of the show – crack one large egg into each bacon-wrapped cup. Sprinkle a pinch of salt on top for that extra flavor kick.
  4. Let’s not forget about our roasted tomato companions! Cut that roma tomato in half and place each half in a muffin tin cup. Drizzle them with a teaspoon of olive oil and sprinkle a bit of salt to taste. These roasted tomatoes add a burst of juicy sweetness that pairs perfectly with the savory bacon and eggs.
  5. Pop your muffin tin into the preheated oven and let the magic happen. Bake for approximately 15 minutes or until the egg whites are set. You’ll know they’re ready when the bacon is crispy, and the eggs are cooked to your liking.
  6. Once the bacon egg cups and tomatoes are out of the oven, use a knife to gently loosen the edges of each cup.
  7. Now, let’s add a pop of color and freshness – sprinkle those bacon egg cups with a generous amount of chopped green onions. Not only do they look Instagram-worthy, but they also add a delightful crunch and a burst of oniony goodness.

Reference the recipe card below for detailed instructions.

round plate with bacon wrapped eggs and roasted tomato

Meal Prep Pairing Tips:

These bacon egg cups are not just limited to breakfast. They make a fantastic addition to brunch, lunch, or even a light dinner. Pair them with quinoa, couscous, or a simple green salad for a more substantial meal.

  • Fresh Greens: Serve these cups with a side of fresh greens or a simple salad to add a crunchy and refreshing element to your meal.
  • Avocado Slices: Creamy avocado slices are a perfect accompaniment. The richness of avocado complements the bacon and eggs beautifully.
  • Whole Grain Toast: Enjoy these cups with a side of whole grain toast for a satisfying crunch and additional fiber. It’s a great way to make the meal more filling.
  • Greek Yogurt with Berries: Balance the savory goodness with a sweet touch. A bowl of Greek yogurt topped with fresh berries adds a delightful contrast.
  • Salsa or Hot Sauce: Spice things up! A dollop of salsa or a dash of hot sauce can add a kick of flavor that enhances the overall experience.
round glass meal prep containers with bacon wrapped eggs and roasted tomato
round plate with bacon wrapped eggs and roasted tomato

Bacon Egg Cups with Roasted Tomato

Enjoy the savory symphony of flavor with these Bacon Egg Cups featuring crispy bacon, creamy eggs, and sweet roasted tomatoes, creating a delightful and nutritious meal prep option for any time of day!

No ratings yet

Prep Time 5 minutes
Cook Time 11 minutes

Course Breakfast
Cuisine American

Servings 2
Calories 333 kcal

Equipment

  • knife
  • cutting board
  • muffin
  • oven

Ingredients


  • 4 large eggs
  • 4 bacon slices
  • 1 roma tomato
  • 1 teaspoon olive oil
  • 1 teaspoon green onions (chopped)
  • salt (to taste)

Instructions


  • Pre-heat the oven to 400F. Place the bacon slices in the muffin tin by wrapping it in a circle. Crack an egg into each cup and sprinkle with salt.
  • Cut tomato in half and place each half in a muffin tin. Drizzle the tomatoes with olive oil and sprinkle with salt to taste.
  • Bake the bacon egg cups and tomatoes in the oven for 15 minutes until the egg whites set. Use a knife to loosen the edge of each cup. Garnish with chopped green onions

Notes

Nutrition information provided is an estimate. It will vary based on cooking method and specific ingredients used. Please consult with your healthcare provider for specific dietary needs. To gain a better understanding, explore our nutrition disclaimer here. 

Nutrition

Calories: 333kcalCarbohydrates: 2gProtein: 17gFat: 28gSaturated Fat: 9gPolyunsaturated Fat: 5gMonounsaturated Fat: 12gTrans Fat: 0.1gCholesterol: 356mgSodium: 418mgPotassium: 285mgFiber: 0.4gSugar: 1gVitamin A: 760IUVitamin C: 4mgCalcium: 55mgIron: 2mg

Similar Recipes

fried egg and sausage hash

Fried Egg with Apple and Sausage Hash

Easy Cheese Omelette

easy sausage egg muffins

Sausage Egg Muffins with Strawberries

You Might Also Like

Frequently Asked Questions

Can I add cheese to these egg cups?

Definitely! Feel free to sprinkle some shredded cheese on top of the eggs before baking. Cheddar, feta, or mozzarella would all be delicious choices.


What other vegetables can I add to these bacon egg cups?

Get creative! Spinach, bell peppers, mushrooms, or even diced zucchini would be fantastic additions. Just make sure to adjust the cooking time if adding more veggies.


Can I use a different type of tomato?

While Roma tomatoes work well, you can experiment with cherry tomatoes or grape tomatoes for a sweeter twist. Just adjust the baking time accordingly.

Posted on Leave a comment

Air Fryer Beef Egg Rolls

round plate with egg rolls, sliced green cucumber, and shredded red cabbage

If you’re a fan of savory, crispy, and oh-so-flavorful bites, you’re in for a treat. These mouthwatering egg rolls are not just about incredible taste; they’re a celebration of health and budget-friendliness. With lean ground beef, vibrant red cabbage, and a homemade sauce that’s both sweet and savory, we’re about to create a lunch meal prep masterpiece that’ll leave you excited for lunchtime all week long. So, roll up your sleeves, and let’s discover how to make these irresistible Air Fryer Beef Egg Rolls right at home!

This post may contain affiliate links. If you use these links to buy something we may earn a commission at no extra cost to you. Please read the disclosure policy.

Calories: 407kcal | Carbohydrates: 40g | Protein: 31g | Fat: 13g | Saturated Fat: 4g | Polyunsaturated Fat: 1g | Monounsaturated Fat: 8g | Trans Fat: 0.4g | Cholesterol: 74mg | Sodium: 1324mg | Potassium: 709mg | Fiber: 3g | Sugar: 13g | Vitamin A: 775IU | Vitamin C: 41mg | Calcium: 72mg | Iron: 5mg

round plate with egg rolls, sliced green cucumber, and shredded red cabbage

The PrepYoSelf Newsletter

Reasons You’ll Love This Lunch Meal Prep Recipe

  • When you prepare your own Air Fryer Beef Egg Rolls at home, you have complete control over the ingredients. Opting for lean ground beef, fresh veggies like red cabbage, and a homemade sauce means you can create a meal that’s lower in unhealthy fats, sodium, and additives often found in restaurant or takeout versions.
  • Meal prepping allows you to portion your meals according to your dietary needs and goals. By making these egg rolls at home, you can ensure that each roll contains the right balance of protein, fiber, and nutrients, helping you maintain portion control and stay on track with your health goals.
  • Dining out or ordering takeout can quickly add up, especially if you do it regularly. Preparing Air Fryer Beef Egg Rolls at home is significantly more budget-friendly. You can buy ingredients in bulk, take advantage of sales and discounts, and stretch your budget while still enjoying delicious, homemade lunch meal prep.
  • When you meal prep, you have the freedom to customize the flavors to your liking. Adjust the level of sweetness or spiciness in the sauce, add extra veggies, or experiment with different dipping sauces. This personalization ensures that your meals are not only healthy but also tailored to your taste preferences.
  • By cooking at home, you can track the nutritional content of your meals more accurately. You’ll know exactly what goes into your Air Fryer Beef Egg Rolls, making it easier to meet your dietary goals, whether you’re counting calories, watching your macros, or focusing on specific nutrients.
round plate with egg rolls, sliced green cucumber, and shredded red cabbage

Simple Air Fryer Egg Roll Ingredients

  • Lean Ground Beef: Opt for lean ground beef to keep your meal on the healthier side. It’s packed with protein and essential nutrients while being lower in fat.
  • Egg Roll Wrappers: These thin, light wrappers are the perfect vessel for our flavorful filling. They become wonderfully crispy in the Air Fryer.
  • Red Cabbage: Red cabbage not only adds a beautiful burst of color but also provides a wealth of vitamins, minerals, and antioxidants. It’s a crunchy and nutritious addition to our egg rolls.
  • White Onions: Onions add a delightful sweetness and depth of flavor to our filling when sautéed. They’re also rich in vitamins and fiber.
  • Sauce (Soy Sauce, Honey, Garlic Powder): The sauce is where the magic happens! Soy sauce adds savory depth, honey brings sweetness, and garlic powder provides that irresistible aroma. Plus, it’s a healthier alternative to store-bought sauces, which may contain added sugars and preservatives.
glass lunch meal prep containers with egg rolls, sliced green cucumber, and shredded red cabbage

How to Meal Prep Air Fryer Egg Rolls

  1. Sauté Onions: Start by heating a bit of oil in a pan over medium-high heat. Add finely chopped white onions and sauté until they soften and become translucent.
  2. Cook the Lean Ground Beef: Next, add the lean ground beef to the pan with the sautéed onions. Cook it for about 5 to 6 minutes until it’s fully cooked and nicely browned.
  3. Add Red Cabbage and Sauce: Now, toss in the red cabbage and pour in the delightful sauce mixture of soy sauce, honey, and garlic powder. Stir it all around until the cabbage softens and absorbs those fantastic flavors. Once done, remove the beef and cabbage mixture from the pan and let it cool to room temperature.
  4. Assemble the Egg Rolls: Lay each egg roll wrapper on a flat surface, resembling a diamond shape. Load approximately 2 to 3 tablespoons of your beef and cabbage filling into the center of each wrapper. Roll the corner closest to you over the filling and gently tuck it under the filling. Fold over the left and right sides towards the middle. Brush a bit of water on the top corner to help seal the roll, then roll it up towards the top corner.
  5. Air Fry until Golden Brown and Delicious: Place your beautifully assembled egg rolls in the Air Fryer basket. Give them a light spray with cooking spray to help them achieve that golden crispiness. Cook for 8 minutes at 400°F, or until they turn delightfully crispy and golden brown.
  6. Serve them up!: Pair your Air Fryer Beef Egg Rolls with fresh veggies and some extra cabbage for a healthy crunch. Don’t forget your choice of dressing for dipping!

Reference the recipe card below for detailed instructions.

glass lunch meal prep containers with egg rolls, sliced green cucumber, and shredded red cabbage

Meal Prep Tips for Air Fryer Egg Rolls

  • To Serve: If you want to store the egg rolls for an extended period, you can freeze them for future lunch meal prep. To do this, arrange the cooked and cooled egg rolls in a single layer on a baking sheet, ensuring they’re not touching each other. Once frozen individually, transfer them to a freezer-safe bag or container. This prevents them from sticking together during freezing.
  • To Reheat: When reheating refrigerated or frozen egg rolls, use the Air Fryer or oven for best results. Avoid microwaving them, as it can make them soggy. Reheat them until they are hot and crispy, which may take a few minutes in the Air Fryer or a moderate oven.
  • Ingredient Swaps: To make these egg rolls vegan or vegetarian, use plant-based protein sources like tofu or tempeh instead of meat and replace honey with maple syrup or agave nectar in the sauce. Add a kick of spice by incorporating chopped chili peppers, chili flakes, or hot sauce into the filling or dipping sauce. Elevate the flavor by adding fresh herbs like cilantro, basil, or mint to the filling for a burst of freshness.
round plate with egg rolls, cucumber, and cabbage

Air Fryer Beef Egg Rolls

Delight in homemade Air Fryer Beef Egg Rolls with lean ground beef, red cabbage, and a savory-sweet sauce for a crispy, healthy, and budget-friendly meal prep.

No ratings yet

Prep Time 5 minutes
Cook Time 20 minutes

Course Appetizer, dinner, lunch, Main Course
Cuisine American, Asian

Servings 2
Calories 407 kcal

Equipment

  • Air Fryer
  • saute pan
  • spatula

Ingredients


Beef Egg Roll

  • 8 oz lean ground beef
  • 6 egg roll wrappers
  • 1 cup red cabbage (shredded)
  • 1/4 cup white onions (diced)
  • 1 tablespoon olive oil

Sauce

  • 2 tablespoon soy sauce
  • 1 tablespoon honey
  • 1/4 teaspoon garlic powder

Sides

  • 1/2 cup red cabbage (sliced)
  • 1/2 cup cucumbers (sliced)

Instructions


  • Add oil to a pan on medium high heat and saute the onions until they soften.
  • Next, add the ground beef and cook it for about 5 to 6 minutes until it is fully cooked. Then, add the red cabbage and pour in the sauce. Stir it all around until the cabbage softens. Remove the meat from the pan and let it cool to room temperature.
  • Then, lay each egg roll wrapper on a flat service like a diamond and load about 2 to 3 tablespoons of beef mixture into the middle of teh wrapper. roll the corner closest to you over the filling and gently tuck it under the filling. Fold over the left and right sides towards the middle. Brush water at the top of the corner and roll the egg roll towards the top corner.
  • Spray the egg rolls with cooking spray and place them in the Air Fryer basket. Cook for 8 minutes at 400F until they are crispy, golden brown. Enjoy them with fresh veggies and cabbage with your chocie of dressing.

Notes

Nutrition information provided is an estimate. It will vary based on cooking method and specific ingredients used. Please consult with your healthcare provider for specific dietary needs. To gain a better understanding, explore our nutrition disclaimer here. 

Nutrition

Calories: 407kcalCarbohydrates: 40gProtein: 31gFat: 13gSaturated Fat: 4gPolyunsaturated Fat: 1gMonounsaturated Fat: 8gTrans Fat: 0.4gCholesterol: 74mgSodium: 1324mgPotassium: 709mgFiber: 3gSugar: 13gVitamin A: 775IUVitamin C: 41mgCalcium: 72mgIron: 5mg

Similar Recipes

peanut chicken

Peanut Chicken and Celery Stir Fry

beef and chinese broccoli

Garlicky Beef Stir Fry

tofu stir fry

Tofu and Veggie Stir Fry

You Might Also Like

Frequently Asked Questions

What other protein options can I use instead of beef?

You can use ground chicken, pork, shrimp, or even tofu for a protein variation.


What other vegetables can I add to the filling for extra nutrition?

Feel free to add vegetables like shredded carrots, bell peppers, or mushrooms for added nutrition and flavor.


What type of egg roll wrappers should I use, and where can I find them?

Look for egg roll wrappers in the refrigerated section of your local grocery store or at Asian supermarkets. They are usually labeled as “spring roll” or “egg roll” wrappers.

Posted on Leave a comment

Low Carb Prosciutto Wrapped Chicken Salad

round plate with prosciutto wrapped chicken tenderloins, boiled eggs, cherry tomatoes, and spring mix salad

In the hustle and bustle of daily life, finding time to prepare a wholesome yet quick lunch can be a challenge. That’s where our Prosciutto Wrapped Chicken Salad swoops in to save the day. Imagine tender, succulent chicken enveloped in the salty embrace of prosciutto, paired with creamy boiled eggs, juicy cherry tomatoes, and a bed of vibrant spring mix greens. This recipe is a testament to the idea that healthy eating doesn’t have to be complicated. With minimal effort and maximum taste, you’ll be savoring a satisfying meal that’s perfect for both your taste buds and your busy schedule. So, let’s dive into this culinary adventure and create a meal prep masterpiece that’s sure to become a lunchtime favorite!

This post may contain affiliate links. Please see our privacy policy for details.

round plate with prosciutto wrapped chicken tenderloins, boiled eggs, cherry tomatoes, and spring mix salad

Why Prosciutto Wrapped Chicken Salad is Perfect for Your Busy Lifestyle:

  • With just a few simple steps, you can have this delicious meal ready in no time, making it ideal for those hectic days when you’re juggling work and life.
  • This recipe is loaded with lean protein from chicken tenderloins, and it’s brimming with nutrients from fresh ingredients like spring mix and cherry tomatoes. Plus, it’s lower in calories and fat than other lunch options, helping you stay on your weight management journey.
  • Wrapping chicken tenderloins in prosciutto adds a burst of savory flavor without the need for elaborate seasoning. It’s a simple yet elegant touch that elevates your meal.
  • You can easily customize this low carb chicken salad to suit your taste. Add your favorite veggies, nuts, or cheese for an extra layer of flavor and texture.

The PrepYoSelf Newsletter

What You Need to Make This Low Carb Chicken Salad

  • Chicken Tenderloins: Lean and packed with protein, this will help you stay full until dinner time
  • Prosciutto: Adds a delightful salty flavor and a crispy texture to the chicken.
  • Boiled Eggs: Protein-packed and creamy, boiled eggs provide a rich contrast to the salad.
  • Cherry Tomatoes: Bursting with freshness and color, they add a juicy pop to every bite.
  • Spring Mix: A vibrant blend of baby lettuces and greens that serve as the perfect salad base.
round plate with prosciutto wrapped chicken tenderloins, boiled eggs, cherry tomatoes, and spring mix salad

Simple Basic Steps to Meal Prep this Prosciutto Chicken Salad

  1. Boil the eggs in a pot for about 8 to 10 minutes. Once cooked, let them cool before peeling and slicing them in half.
  2. Preheat your oven to 400°F (200°C). Season the chicken with paprika, garlic powder, and salt. Coat with olive oil and place on a sheet pan. Wrap each chicken tenderloin with slices of prosciutto.
  3. Bake in the oven for about 15-20 minutes until the chicken is fully cooked and reaches an internal temperature of 165°F (74°C).
  4. Meanwhile, In a small bowl, mix together the juice of the lemons with the olive oil, Dijon mustard, honey, and your favorite seasonings. Whisk until blended well.
  5. Serve the chicken and boiled eggs on top of the spring mix.
  6. Drizzle the salad with the homemade dressing and top it off with those fresh, juicy cherry tomatoes.

Reference the recipe card below for detailed instructions.

glass meal prep containers with prosciutto wrapped chicken tenderloins, boiled eggs, cherry tomatoes, and spring mix salad

Meal Prep Tips for Low Carb Prosciutto Chicken Salad

  • Storage Tips: Store your Prosciutto Wrapped Chicken Salad in an airtight container in the refrigerator. This dish can stay fresh for up to four days. Keep the salad dressing in a separate, small container or drizzle it over the salad just before serving to prevent the greens from wilting prematurely.
  • Reheating Tips: To reheat the chicken, place it in the microwave for about 1-2 minutes or until it’s warmed through. You can also use an oven or toaster oven at a low temperature (around 300°F or 150°C) to maintain its crispy prosciutto wrap.
  • Ingredient Swaps and Tips: Swap chicken for turkey tenderloins or even tofu for a vegetarian twist. Experiment with different greens like arugula or spinach. Add a handful of nuts or seeds for extra crunch.
glass meal prep containers with prosciutto wrapped chicken tenderloins, boiled eggs, cherry tomatoes, and spring mix salad
Chicken Salad

Prosciutto Wrapped Chicken Salad

A quick and easy meal prep lunch idea featuring savory chicken, crispy prosciutto, boiled eggs, cherry tomatoes, and fresh spring mix, drizzled with zesty homemade dressing!

No ratings yet

Prep Time 5 minutes
Cook Time 22 minutes

Course lunch, Main Course
Cuisine American, Italian

Servings 2

Equipment

  • knife
  • cutting board
  • boiling pot
  • sheet pan
  • oven

Ingredients


  • 12 oz chicken tenderloins
  • 1/4 tsp paprika
  • 1/4 tsp garlic powder
  • 1/4 tsp salt
  • 1 tbsp olive oil
  • 3 oz prosciutto
  • 2 each large eggs
  • 4 cups spring mix
  • 1 cup cherry tomatoes (sliced)

Salad Dressing

  • 2 each lemon (juiced)
  • 4 tbsp olive oil
  • 1 tbsp dijon mustard
  • 2 tbsp honey
  • 1/4 tsp garlic powder
  • 1/4 tsp salt

Instructions


Eggs

  • Boil the eggs in a pot for about 8 to 10 minutes. Once cooked, let it cool before peeling and slicing in half

Chicken & Prosciutto

  • Pre-heat oven to 400F. Season the chicken with paprika, garlic powder, and salt. Coat with olive oil and place on a sheet pan
  • Wrap the each chicken tenderloin with slices of prosciutto. Bake in the oven for about 15-20 minutes until it is fully cooked and reaches an internal temperature of 165F

Salad Dressing

  • Meanwhile, in a small bowl, mix together the juice of the lemons with the olive oil, dijon mustard, honey, and seasonings. Whisk until blended well
  • Serve the chicken and eggs on top of the spring mix
  • Drizzle the salad with the dressing and top it off with fresh tomatoes

Similar Recipes

italian chicken

Italian Chicken with Green Beans and Almonds

stuffed primavera chicken

Primavera Stuffed Chicken Breasts

cilantro chicken

Cilantro Lime Chicken Salad with Strawberry Salsa

You Might Also Like

Frequently Asked Questions

Can I use chicken breast instead of tenderloins?

Absolutely! Chicken breast can be used as a substitute. Just be sure to adjust the cooking time accordingly to ensure it’s fully cooked.


Is this salad suitable for weight management and healthy eating?

Absolutely! This salad is packed with lean protein, fresh greens, and wholesome ingredients, making it a great choice for those looking to manage their weight while enjoying a delicious meal.


Can I use store-bought salad dressing?

While homemade dressing helps you control the ingredients you put in, you can use your favorite store-bought dressing for convenience if you prefer. 

Posted on Leave a comment

Low Carb Meal Prepping

Low carb meal prepping is nothing new but sometimes it helps to have a refresher and perhaps learn some new things. Low carb diets and meal routines have been around for decades and for many reasons. Many people use them to lose weight while others use them to manage health conditions, either way incorporating low carb diets can be effective for some people who want to consider mixing it into their meal prep.

Low carb meal prepping can be especially difficult for people with busy schedules. Sandwiches are so easy. Classic American sides like potatoes and corn are fast. Busy schedules often push nutrition to the backseat. It’s important to learn and practice healthy eating, especially when you’re busy, to stay physically and mentally healthy. 

Not all carbs are created equal. Carbohydrates are a macronutrient found in many food sources and they come in different forms and can differ in nutritional value and have different effects on health. Many are found in a lot of forms such as simple sugars and starches. Many different foods provide carbs in these forms. From breads, milk, cookies, potatoes, soft drinks, corn and so much more. These types of high carb foods that come in simple carbohyrdate forms make up a big portion of American diets and consuming too many in an unbalanced diet can be unhealthy. 

whole grain bread for low carb meal prepping

Carbohydrates are one of your body’s primary sources of energy and not all are unhealthy, especially complex carbs. There is no need to avoid them completely, and knowing how to incorporate them into your diet in moderation is key. Knowing your body’s carbohydrate needs is important and discussing this with your doctor or nutritionist is a good idea. The type of carbs is important as well and can be more important than the volume. 

Healthy carbs that come in the form of complex carbohydrates can be found in minimally processed, more natural, foods such as whole grains, beans, vegetables, and fruit. These foods are a great source of fiber and other nutrients. These complex carbohydrates are digested more slowly and can help control your blood sugar to prevent spikes and also help keep you feeling full longer. The balance of carbs to other nutrients is great for these types of foods. Including whole grain options in a meal and pairing it with high protein and high fiber foods in a balanced meal makes it a healthier choice.

Unhealthy simple carbohydrates are essentially the opposite. Overly processed foods like white bread, pastries, and sodas. These foods contain far less nutrients and fiber and much more sugar and fat and are digested quickly and spike the blood sugar. 

fresh fruit and juice for low carb meal prepping

When picking out ingredients for your low carb meal prepping, pay attention to the first few ingredients on the back of the container and read the nutrition label to see and look for options with no added sugar. Just because the food claims to be low carb doesn’t mean that it actually is. For example, some items that appear to be healthy such as yogurt may have added sugar. Other examples include beef jerky or sausage, but some are flavored with added sugar. Instant oatmeal does not provide the same level of whole grain as an old fashioned oat or steel cut oat. Opt for fresh fruit instead of juices. Whole fruit contains significantly more fiber and less sugar than most juices.

Low carb meal prepping can be easy once you learn great low carb recipes or ingredient substitutions. Many recipes can be altered to include healthier options while retaining the same flavor. Another option is to find common foods made with vegetables.

  • Instead of traditional pasta: vegetable pastas, squash noodles
  • Instead of chips: cheese crisps, organic pork rinds, or vegetable chips
  • Instead of potatoes: mashed cauliflower, beans
  • Instead of sodas: flavored sparkling water
  • Instead of white bread: keto breads, lavash breads, almond flour breads
  • There are many low carb or keto versions of popular ingredients as well such as tortillas.

Numerous diets, particularly new trending ones, suggest replacing some carbs with fats which can be a healthy option if managed appropriately. If that is the case, the incorporation of healthy fats like avocados and nuts into your meals, can be a fantastic choice when approached mindfully. While it’s not advised to completely overhaul every single meal with this approach, it’s important to acknowledge that individual dietary needs vary, and what works wonderfully for one person might not suit another’s unique digestion and nutritional requirements.

Low Carb Meal Prepping Recipes

All Low Carb Meal Prepping recipes

wooden plate with sliced zucchini topped with ground beef, bell peppers, tomatoes, and shredded cheese

Beef Zucchini Nachos

Beef Zucchini Nachos, your new meal prep superheroes. It’s like getting all the joy of restaurant nachos without the guilt or the hit to your wallet. So go on, get cooking, and enjoy every delicious, crunchy, and flavor-packed bite! This post may contain affiliate links. Please see our privacy policy for details. Why We Love…

Continue Reading

Easy Air Fryer Steak Kebabs Recipe

Air fryer steak kebabs are such a fun and great meal that you can enjoy with friends or family. Everybody loves eating food on a stick, especially kiddos! It’s also a great way to pack flavor and healthy ingredients together on a skewer.  Ease of Making: Easy Kebabs are traditionally cooked on a skewer over…

Continue Reading

Posted on Leave a comment

Air Fryer Apricot Glazed Chicken with Broccoli

glass meal prep containers with air fryer chicken and broccoli

Air Fryer Apricot Glazed Chicken with Broccoli is a scrumptious, budget-friendly meal prep option designed for busy individuals seeking convenience without sacrificing flavor. This recipe features succulent chicken thighs marinated in a savory-sweet glaze made from a blend of soy sauce, apricot, honey, and aromatic spices. The magic of the air fryer ensures quick and crispy chicken perfection. Paired with air-fried broccoli seasoned with sesame oil, this dish delivers a delightful blend of flavors and textures that will satisfy your taste buds and simplify your meal prep routine.

This post may contain affiliate links. Please see our privacy policy for details.

round plate with air fryer chicken and broccoli

Why Choose Air Fryer Glazed Chicken with Broccoli for Meal Prep?

  • The succulent chicken thighs in this recipe are bathed in a delectable glaze made from soy sauce, apricot, honey, garlic powder, and ginger powder. This combination delivers a burst of sweet and savory flavors that will leave your taste buds dancing with delight.
  • Meal prepping with chicken thighs and broccoli is not only scrumptious but also gentle on your wallet. Chicken thighs are an economical choice, and with a little creativity, you can turn them into a gourmet meal. Plus, using simple ingredients like soy sauce, honey, and spices means you won’t break the bank.
  • With the magic of the air fryer, you’ll have your meals prepped in a breeze. The air fryer’s speedy cooking time and minimal cleanup make it a kitchen superhero for busy individuals who need to meal prep in a flash.

The PrepYoSelf Newsletter

To Make this Healthy Air Fryer Apricot Glazed Chicken, You’ll Need

  • Chicken Thighs: Chicken thighs are the star of this dish, and they’re a fantastic choice for meal prep. They’re more flavorful and juicier than chicken breasts, making them a preferred option for many. The dark meat of thighs is known for its tenderness and rich taste. Plus, they are typically more budget-friendly than chicken breasts.
  • Soy sauce: A staple in Asian cuisine and adds a depth of savory umami flavor to the dish. It’s made from fermented soybeans and wheat, which are brewed with salt and water. In this recipe, it not only enhances the chicken’s taste but also serves as a base for the glaze.
  • Apricots: This fruit provides a natural sweetness to balance out the savory components of the dish. They are also a great source of vitamins A and C, which can add a hint of fruity brightness to your glaze. When diced and blended, apricots create a smooth, luscious consistency.
  • Honey: It adds sweetness and a hint of floral flavor to the glaze. It’s not only a natural sweetener but also acts as a binding agent, helping the glaze stick to the chicken. Opt for local or raw honey if possible for a more complex flavor profile.
  • Ginger powder: This seasoning offers a warm, spicy, and slightly sweet taste to the glaze. Ginger is famous for its anti-inflammatory properties and distinctive flavor. In powdered form, it blends seamlessly into the glaze.
  • Sesame oil: This staple in Asian cooking and imparts a nutty, toasty flavor to the dish. Just a small amount goes a long way in adding depth and richness to both the glaze and the broccoli. Toasted sesame oil is particularly flavorful.
  • Broccoli: These florets are a versatile and nutritious vegetable. It’s rich in vitamins, minerals, and dietary fiber. When air-fried, broccoli becomes tender on the inside while developing a delightful crispy texture on the outside. It’s a perfect complement to the glazed chicken.
round plate with air fryer chicken and broccoli

How to Prepare Easy Air Fryer Apricot Glazed Chicken

  1. Remove the seed from the apricot and dice it into pieces. Add it to a blender with the soy sauce, honey, garlic powder, and ginger powder. Blend until the sauce is smooth and set it aside.
  2. Preheat your air fryer to 360°F (182°C). Once it’s hot, place the marinated chicken thighs in the air fryer basket. Cook for approximately 23 minutes, flipping them halfway through. Check the internal temperature with a thermometer to ensure it reaches 165°F
  3. While the chicken is cooking, prepare your broccoli. Place the broccoli florets in a bowl and drizzle with sesame oil. Sprinkle on your favorite seasonings for added flavor. Once the chicken is done, remove it from the air fryer and place the broccoli in. Cook at 360°F for about 5 minutes until it’s tender and slightly crispy.

Reference the recipe card below for detailed instructions.

glass meal prep containers with air fryer chicken and broccoli

Meal Prep Tips for Air Fryer Chicken

  • Storage: Store your prepared meals in airtight containers in the refrigerator for up to 4 days.
  • Reheating: To reheat, simply pop your meal in the microwave for 2-3 minutes, or you can use the air fryer at a lower temperature for a quick crisp-up.
  • Ingredient Swaps: Get creative with your glaze! Swap out the apricot for peach, pineapple, or even orange for a different twist of flavors. Don’t forget to adjust the honey accordingly for sweetness.
glass meal prep containers with air fryer chicken and broccoli
apricot chicken

Air Fryer Apricot Glazed Chicken with Broccoli

Air Fryer Glazed Chicken with Broccoli: A savory and sweet delight, this budget-friendly meal prep recipe combines succulent chicken thighs with a delectable apricot glaze, served alongside crispy air-fried broccoli.

No ratings yet

Prep Time 5 minutes
Cook Time 25 minutes

Course dinner, Main Course
Cuisine American, Asian

Servings 2

Equipment

  • mixing bowl
  • Air Fryer

Ingredients


Chicken and Marinade

  • 4 each bone in chicken thighs
  • 1/4 cup soy sauce
  • 1 each apricot
  • 1 tbsp honey
  • 1/2 tsp garlic powder
  • 1/2 tsp ginger powder
  • 1 tbsp sesame oil

Broccoli and Seasonings

  • 4 cups broccoli florets
  • 1/2 tsp garlic powder
  • 1/4 tsp salt
  • 1 tbsp sesame oil

Instructions


  • Remove the seed from the apricot and dice it into pieces. Add it to a blender with the soy sauce, honey, garlic powder, and ginger powder. Blend until the sauce is smooth
  • Place the chicken thighs in a mixing bowl and coat it with the marinade
  • Then, place the thighs in the air fryer and cook them at 360F for 23 minutes. After it cooks, check the temperature with a thermometer making sure it reaches an internal cook temperature of 165F
  • Next, remove the chicken and place the broccoli in the air fryer. Sprinkle with the seasonings and sesame oil and cook at 360F for 5 minutes

Notes

If you don’t have an air fryer, place the chicken on a sheet pan and bake it in the oven for 35-40 minutes at 400F. Bake the broccoli florets for 8-10 minutes.

Similar Recipes

chicken kale salad

Grilled Honey Dijon Chicken and Kale Salad

balsamic chicken salad

Oven Baked Balsamic Spinach and Strawberry Salad

chicken salad

Oven Baked Honey Mustard Glazed Chicken Salad

You Might Also Like

Frequently Asked Questions

Can I use chicken breasts instead of chicken thighs?

Absolutely! While chicken thighs are our preferred choice for their tenderness and flavor, you can substitute chicken breasts if you prefer them. Just be mindful that chicken breasts may cook a bit faster in the air fryer, so adjust the cooking time accordingly to avoid overcooking.


Can I make this recipe without an air fryer?

Yes, you can! If you don’t have an air fryer, you can bake the chicken and broccoli in a conventional oven. Bake the chicken at 400°F for about 25-30 minutes, and the broccoli at the same temperature for 10-15 minutes. Ensure the chicken reaches an internal temperature of 165°F.


Are there any other vegetable options besides broccoli?

Of course! While broccoli pairs wonderfully with the glaze, you can experiment with other vegetables like asparagus, green beans, or bell peppers. Just adjust the cooking time to ensure they are cooked to your preferred level of tenderness.

Posted on Leave a comment

Oven Roasted Honey Soy Glazed Salmon with Bok Choy and Butternut Squash

plate with salmon, bok choy, and diced butternut squash

This Oven Roasted Honey Soy Glazed Bok Choy and Butternut Squash paired with Baked Salmon will be your meal prep go-to. It is a meal prep marvel that’s not only a treat for your taste buds but also a smart choice for your health, wallet, and schedule. With a burst of flavors and the delight of convenience, enjoy meal prepping this dish for your busy workweek.

This post may contain affiliate links. Please see our privacy policy for details.

plate with salmon, bok choy, and diced butternut squash

Why This Recipe is Great for Meal Prep

This meal is a powerhouse of nutrients. The Baked Salmon brings a dose of heart-healthy omega-3 fatty acids, while the Bok Choy and Butternut Squash provide vitamins, minerals, and dietary fiber galore. It’s a guilt-free indulgence that’ll give you a health boost and have you feeling vibrant and alive.

Eating healthy doesn’t mean breaking the bank. Salmon might seem fancy, but purchasing frozen fillets can be a cost-effective way to get those omega-3s. Also, bok choy and butternut squash are quite affordable and not to mention nutritious sides.

With our busy lives, convenience is key. Prepare a batch of this dish, and you’ll have meals ready to go all week long. No more last-minute food choices that leave you feeling unsatisfied and guilty. Plus, the flavors meld together beautifully as they sit, making leftovers even tastier.

The PrepYoSelf Newsletter

To Prepare This Salmon Recipe You’ll Need

  • Baked Salmon Fillets: The star of the show, these salmon fillets are the epitome of tender, flaky goodness. When properly marinated and baked, they become a succulent delight that’s rich in omega-3 fatty acids, promoting heart health and overall well-being.
  • Soy Sauce: A savory and slightly salty sauce derived from soybeans, soy sauce adds depth of flavor and a hint of umami to the salmon. It’s a key component of the marinade that brings out the dish’s Asian-inspired essence.
  • Honey: This natural sweetener not only balances the savory notes of soy sauce and garlic but also contributes to the gorgeous caramelization of the salmon during baking. It imparts a subtle touch of sweetness that dances harmoniously with the other flavors.
  • Garlic: The aromatic powerhouse, garlic infuses the salmon with a pungent and earthy flavor profile. Minced and mixed into the marinade, it elevates the dish’s overall complexity and aromatic appeal.
  • Green Onions: These slender green onions, also known as scallions, bring a fresh and slightly sharp flavor to the marinade. Their vibrant color and mild onion essence provide a beautiful contrast to the other robust flavors.
  • Butternut Squash: This vibrant orange vegetable, once peeled, seeded, and diced, becomes a sweet and nutty delight when roasted. It’s a fantastic source of vitamins, minerals, and dietary fiber, adding a hearty and nutritious element to the dish.
  • Baby Bok Choy: These petite heads of bok choy offer a tender and slightly peppery bite. Sliced in half and well-rinsed, they bring a subtle bitterness and a vibrant green color to the ensemble.
  • Lemon Juice: The zesty and tangy juice of half a lemon adds a bright and refreshing element to the marinade. Its acidity not only balances the richness of the salmon but also helps tenderize the fillets.
  • Sesame Oil: This oil is a game-changer, infusing the salmon with a distinct nutty aroma and depth of flavor. Just a touch goes a long way in enhancing the overall Asian-inspired taste of the dish.
plate with salmon, bok choy, and diced butternut squash

Easy Recipe Steps to Make Oven Roasted Salmon

  1. In a bowl, create the marinade by whisking together soy sauce, honey, minced garlic, chopped green onions, sesame oil, half of the lemon juice, and a drizzle of olive oil. Season with salt and pepper. Let the flavors dance together.
  2. Rinse the baby bok choy halves thoroughly to ensure they’re dirt-free. No one wants extra crunch from the soil!
  3. Line a baking sheet with parchment paper. Lay down the marinated Baked Salmon fillets, bok choy halves, and diced butternut squash.
  4. Preheat your oven to 400°F (200°C). Place the baking sheet in the oven and let the ingredients roast to perfection for 10-15 minutes. The salmon should flake easily with a fork, and the veggies should be tender and slightly caramelized.
  5. Serve your Oven Roasted Honey Soy Glazed Bok Choy and Butternut Squash alongside the Baked Salmon. If you desire an extra tangy kick, squeeze the remaining lemon juice over the salmon and veggies, and garnish with fresh tomatoes.

Reference the recipe card below for detailed instructions.

plate with salmon, bok choy, and diced butternut squash

Meal Prep Tips

  • Storage: Once cooked, divide the dish into individual meal prep containers. Store them in the refrigerator for up to 3 days.
  • Reheating: To reheat, simply pop the container in the microwave or reheat in the oven at 350°F (175°C) until warmed through.
  • Ingredient Swaps: Feeling adventurous? Swap out the salmon for chicken, pork, or even tofu for a plant-based twist. Customize the marinade with your favorite herbs and spices.
plate with salmon, bok choy, and diced butternut squash
salmon and bok choy

Oven Roasted Honey Soy Glazed Salmon with Bok Choy and Butternut Squash

Oven Roasted Honey Soy Glazed Bok Choy and Butternut Squash with Baked Salmon is a dish with carefully chosen ingredients that come together to create a symphony of flavors and textures that are visually stunning and delightfully delicious.

No ratings yet

Prep Time 5 minutes
Cook Time 15 minutes

Course Main Course
Cuisine American, Asian

Servings 2

Equipment

  • knife
  • cutting board
  • sheet pan
  • oven

Ingredients


Salmon

  • 12 oz salmon
  • 2 tbsp soy sauce
  • 1 tbsp honey
  • 1 tbsp garlic (minced)
  • 2 tbsp green onions (chopped)
  • 1 tbsp sesame oil
  • 1/4 tsp pepper
  • 1 each lemon
  • 1 tbsp olive oil

Veggies

  • 2 cups butternut squash (diced)
  • 2 stalks baby bok choy
  • 1/2 cup cherry tomatoes (sliced)
  • 1/4 tsp garlic powder
  • 1/4 tsp salt
  • 1 tbsp olive oil

Instructions


Salmon

  • Pre-heat oven to 400F
  • Make the marinade by mixing together the soy sauce, honey, garlic, green onions, sesame oil, half of the lemon juice, and seasonings
  • Slice the baby bok choy in half and rinse well and remove the soil
  • Place the salmon, bok choy, and butternut squash on a sheet pan lined with parchment paper
  • Drizzle the marinade on top of the salmon and veggies
  • Bake everything in the oven for 10-15 minutes
  • Serve the salmon with fresh tomatoes and juice of the lemon if desired

Video

Similar Recipes

salmon beet salad

Citrus Ginger Salmon with Roasted Beets

salmon and watermelon salad

Grilled Salmon with Watermelon Salad

salmon salad

Salmon Stuffed Avocado Salad

You Might Also Like

Frequently Asked Questions

Can I use frozen salmon fillets for this recipe?

Absolutely! Using frozen salmon fillets can be a cost-effective and convenient option. Just make sure to thaw them properly in the refrigerator before marinating and cooking.


Can I use other types of fish for this recipe?

Absolutely! While salmon is the star of this recipe, you can experiment with other fish like trout, cod, or tilapia. Adjust the cooking time based on the thickness of the fillets.


Can I use a different type of squash instead of butternut squash?

Absolutely! Acorn squash, delicata squash, or even sweet potatoes can be great alternatives to butternut squash. Just make sure to adjust the coo

Posted on Leave a comment

Grilled Asian Skirt Steak with Roasted Bok Choy

round plate with grilled skirt steak and roasted bok choy and shiitake mushrooms

Grilled Asian Skirt Steak with Roasted Bok Choy and Mushrooms is your gateway to delicious, health-conscious, budget-friendly meals that won’t leave you chained to the stove. Embrace the convenience, revel in the flavors, and let this recipe elevate your meal prep game like never before. You’ll definitely indulge in the gratification of crafting this scrumptiuous dish and discover that meal prepping can be both an enjoyable journey and a rewarding destination.

This post may contain affiliate links. Please see our privacy policy for details.

round plate with grilled skirt steak and roasted bok choy and shiitake mushrooms

Why You’ll Enjoy This

  • This recipe streamlines meal preparation by combining marinated grilled steak with roasted veggies, ensuring a balanced and satisfying meal without requiring excessive hours in the kitchen.
  • The infusion of soy sauce, honey, and sesame oil imparts an Asian-inspired symphony of tastes that bursts with every bite, turning mundane meals into delightful culinary adventures.
  • This dish accommodates different dietary preferences by offering ingredient swaps – from protein sources to vegetable choices – making it an inclusive option for diverse tastes.
  • By prepping ahead, you transform mundane lunch breaks into delightful moments of savoring a home-cooked masterpiece. The ease of assembly and reheating ensures that you remain fueled and energized throughout your day.

The PrepYoSelf Newsletter

Ingredients You’ll Need

  • Juicy and tender skirt steak is marinated to perfection. The combination of soy sauce, honey, and sesame oil creates an irresistible umami flavor profile that will make your taste buds sing! Skirt steak, often celebrated for its rich flavor and tender texture, takes center stage in our Grilled Asian Skirt Steak recipe. Derived from the diaphragm muscle of the cow, this cut boasts a pronounced beefy taste that’s perfect for absorbing marinades and seasonings.
  • Baby bok choy, a staple in Asian cuisine, offers a delightful combination of crispness and mild sweetness. Its tender leaves and stalks are not only visually appealing but also add a refreshing element to the dish. This leafy green is a fantastic source of vitamins A and C, as well as minerals like calcium and iron. Incorporating bok choy into your meal prep adds a nutritious punch to your plate. In our recipe, roasting imbues it with a hint of caramelization while retaining its freshness.
  • Shiitake mushrooms, cherished for their distinct earthy flavor, complement the dish’s Asian theme beautifully. These fungi bring depth and complexity to the plate. Shiitakes are a powerhouse of umami, the fifth taste sensation that adds depth and savoriness to dishes. Their inclusion amplifies the overall flavor profile of the meal. These mushrooms have a meaty texture when cooked, offering a satisfying chewiness that pairs well with the tender steak and bok choy. Shiitakes are packed with essential nutrients, including B vitamins, fiber, and minerals. They contribute both flavor and nutritional benefits to the dish.
round plate with grilled skirt steak and roasted bok choy and shiitake mushrooms

How to Make Grilled Skirt Steak and Roasted Veggies

  1. To start, set your oven to a toasty 400°F (200°C). This initial step sets the stage for the culinary magic about to unfold.
  2. Trim the bottom stalk of the bok choy, separate those vibrant leaves, and give them a thorough rinse. Lay them out with the shiitake mushrooms on a trusty sheet pan.
  3. Drizzle the soy sauce, sesame oil, and a pinch of garlic powder over the bok choy and mushrooms. Now, let your oven do its thing, roasting them for 10-12 minutes until they’re golden and tender.
  4. While the veggies are getting cozy in the oven, let’s tend to that delectable skirt steak. Season it with soy sauce, honey, garlic powder, a pinch of salt, and more of that savory sesame oil.
  5. Fire up an indoor grill pan on medium-high heat. Sear your marinated steak for 4 to 5 minutes on each side, until it’s cooked to perfection. Aim for that ideal internal temperature of 145°F (63°C). Afterward, give your steak a moment to rest before slicing it into elegant, thin strips.

Reference the recipe card below for detailed instructions.

round plate with grilled skirt steak and roasted bok choy and shiitake mushrooms

Meal Prep Tips

  • Storing: Store your prepped portions in airtight containers to keep those flavors intact and your ingredients fresh.
  • Reheating: When you’re ready to savor your creation, a quick spin in the microwave or a brief stint on the stovetop will restore the magic.
  • Ingredient Swaps: Feel free to put your own spin on this recipe. Swap the steak for chicken, tofu, or your favorite protein. Broccoli and snow peas are also great alternatives for veggie swaps.
round plate with grilled skirt steak and roasted bok choy and shiitake mushrooms
steak and bok choy

Grilled Asian Skirt Steak with Roasted Bokchoy

Elevate your weekday dining with Grilled Asian Skirt Steak paired harmoniously with Roasted Bok Choy and Shiitake Mushrooms. This convenient, flavorful delight offers a burst of Asian-inspired tastes while providing a nutrient-rich, budget-friendly solution for busy schedules.

No ratings yet

Prep Time 5 minutes
Cook Time 20 minutes

Course dinner, Main Course
Cuisine American, Asian

Servings 2

Equipment

  • knife
  • cutting board
  • sheet pan
  • tongs
  • indoor grill pan
  • oven

Ingredients


Steak and Marinade

  • 12 oz skirt steak
  • 1 tbsp soy sauce
  • 1 tsp honey
  • 1/4 tsp garlic powder
  • 1/4 tsp salt
  • 1 tsp sesame oil

Roasted Bokchoy and Mushrooms

  • 2 stalks baby bokchoy
  • 2 cups shiitake mushrooms
  • 1 tbsp soy sauce
  • 1/4 tsp garlic powder
  • 1 tbsp sesame oil

Instructions


  • Pre-heat the oven to 400F
  • Cut 1/2 of an inch from the bottom stalk of the bok choy. Separate out the leaves and thoroughly rinse it
  • Place the bok choy and shiitake mushrooms on a sheet pan and drizzle it with the soy sauce, sesame oil, and garlic powder. Roast in the oven for 10-12 minutes
  • Meanwhile, season the steak with the soy sauce, honey, garlic powder, salt, and sesame oil
  • Heat an indoor grill pan on medium-high heat and sear the steak on each side for about 4 to 5 minutes until it is fully cooked and reaches an internal temperature of 145F. Let it rest before slicing it into thin strips
  • Serve the steak with the roasted vegetables

Similar Recipes

sweet potato blt

Sweet Potato BLT Sandwich

balsamic chicken salad

Oven Baked Balsamic Chicken Salad

chicken salad

Oven Baked Honey Mustard Glazed Chicken Salad

You Might Also Like

Frequently Asked Questions

Can I use a different type of steak for this recipe?

Absolutely! While skirt steak works wonderfully due to its tenderness and quick cooking time, you can experiment with other cuts like flank steak or sirloin. Adjust the cooking time accordingly to ensure your chosen cut is cooked to your liking.


Can I substitute the vegetables with others I have on hand?

Definitely! While roasted bok choy and shiitake mushrooms provide a wonderful Asian-inspired flair, you can swap them out for other roasted veggies like broccoli, bell peppers, or zucchini. Keep in mind that roasting times may vary, so adjust accordingly.


Can I use an outdoor grill instead of an indoor grill pan?

Of course! An outdoor grill will add a delightful smokiness to your steak. Preheat the grill to medium-high heat and follow the same grilling times as mentioned in the recipe. Keep an eye on the steak to prevent overcooking.

Posted on Leave a comment

Spinach Egg Quesadilla

round plate with spinach and egg quesadilla

The spinach and egg breakfast quesadilla is an exceptional choice for your meal prep repertoire. From its adaptability to its freezer-friendly nature and the convenience of being able to enjoy it anywhere, this recipe is truly a meal prepper’s dream come true! This breakfast meal prep option is nutritious, and it also utilizes pantry-friendly ingredients, making it a total win-win!

This post may contain affiliate links. Please see our privacy policy for details.

round plate with spinach and egg quesadilla

Why you’ll enjoy this Spinach Egg Breakfast Quesadilla:

Planning for a busy week ahead? Well, good news! These quesadillas are freezer-friendly champions. After assembling and cooking them, let them cool completely, then wrap them individually in parchment paper and store them in a freezer-safe bag. They can be your “emergency breakfast” that’s ready to be heated up in a jiffy, making those hectic mornings much smoother and more satisfying.

Let’s talk convenience. These breakfast quesadillas are a meal prep dream when it comes to portability. Imagine this: You’re rushing out the door, and there’s no time to whip up breakfast. Fear not, because you can grab a pre-made spinach and egg quesadilla, and it’s your nutritious, hand-held meal on the go. Whether you’re heading to work, the gym, or an outdoor adventure, your meal prep efforts have your back, ensuring you’re always equipped with a tasty and nourishing option.

In a world where food waste is a concern, this recipe shines. By using pantry-friendly staples like eggs, cheese, and tortillas, you’re making the most of what you already have on hand. This not only saves you money but also contributes to a more sustainable way of eating. Plus, if you’ve got leftover ingredients from other recipes, like a handful of spinach or that last bit of shredded cheese, this recipe offers a tasty way to use them up before they go to waste.

The PrepYoSelf Newsletter

Here are the Ingredients You’ll Need:

For this recipe for one, we will use simple ingredients to teach you the basics of how to make this breakfast quesadilla.

  • Low Carb Tortillas: These gems are not only a great source of fiber but also help keep the carb count in check. Plus, they’re the perfect vessel to hold all that deliciousness together.
  • Large Eggs: Eggs are your protein-packed BFFs. They’re loaded with essential amino acids and vitamins, including B12 and D, which are essential for bone health and energy production.
  • Baby Spinach: Popeye knew what he was talking about! Spinach adds a burst of vitamins and minerals, including iron, magnesium, and vitamin K, while bringing a satisfying texture and a touch of earthiness.
  • Shredded Mozzarella: Creamy, gooey, and oh-so-satisfying, mozzarella adds that irresistible cheese pull factor. It’s a good source of calcium and protein to keep you feeling full and satisfied.
round plate with spinach and egg quesadilla

How to Make an Egg Breakfast Quesadilla:

  1. Add 1 tbsp of olive oil to a pan on medium heat and crack those eggs into the pan.
  2. Gently stir the eggs as they cook until they’re firm and perfectly set.
  3. Introduce the baby spinach to the party and let them wilt into the egg goodness.
  4. Evenly spread the spinach and egg mixture onto half of the tortillas, then sprinkle that shredded mozzarella on top.
  5. Add the tortilla tops and place the quesadilla back into the pan. Toast both sides for about 2 minutes each, until they’re gorgeously golden brown and the cheese has melted to cheesy perfection.
  6. Slice and Savor: Time to cut those quesadillas into quarters – ready to dazzle your taste buds!

Reference the recipe card below for detailed instructions.

Meal Prep Tips for Spinach and Egg Quesadilla:

  • Storage and Reheating Tips: Allow your quesadillas to cool before storing them in an airtight container in the fridge for up to 3-4 days. To reheat, pop them in the microwave for about 30 seconds or re-crisp them in a skillet for that delightful crunch.
  • Ingredient Swaps:  One of the brilliant aspects of this recipe is its versatility. You can easily customize it to suit your taste preferences or dietary needs. Want to add a dash of hot sauce for a kick? Go for it! Prefer a plant-based option? Swap out the eggs for tofu or chickpea scramble. Craving extra veggies? Load up on colorful bell peppers, mushrooms, or zucchini. This flexibility ensures that you won’t get bored and can adapt the recipe to your changing cravings. Get creative! You can swap out the mozzarella for cheddar, feta, or even dairy-free cheese if you prefer. And don’t shy away from adding diced tomatoes, bell peppers, or onions for an extra veggie boost.
  • Balanced Meal Bliss: Want to take this meal up a notch? Pair your spinach and egg quesadilla with a side of fresh fruit, a dollop of Greek yogurt, or a small handful of nuts. Voila! A complete, balanced breakfast that will keep you fueled and ready to conquer the day.
square glass meal prep containers with spinach and egg quesadilla
Egg Quesadilla

Spinach And Egg Quesadilla

Get ready to embrace the Spinach and Egg Quesadilla recipe as your go-to choice for breakfast meal prep. It's not just highly nourishing but also cleverly makes use of pantry staples, resulting in an all-around advantageous option!

No ratings yet

Prep Time 5 minutes
Cook Time 10 minutes

Course Breakfast, Main Course
Cuisine American

Servings 2

Equipment

  • knife
  • cutting board
  • saute pan
  • spatula

Ingredients


  • 4 each low carb tortillas
  • 3 each large eggs
  • 2 cups baby spinach
  • 1/4 cup shredded mozzarella cheese
  • 1/4 tsp salt
  • 1 tbsp olive oil

Instructions


  • Add 1 tbsp of olive oil to a pan on medium heat and crack the eggs into the pan
  • Stir the eggs until they have cooked and firmly set
  • Next, add the spinach and cook until they have wilted
  • Evenly spread the egg mixture on half of the tortillas and sprinkle the top with cheese
  • Add the top layer of the tortillas and place the quesadilla back into the pan. Toast on each side for about 2 minutes until it has turned golden brown and the cheese has melted
  • Cut the tortillas in quarters

Similar Recipes

fried egg and sausage hash

Fried Egg with Apple and Sausage Hash

egg stuffed bell peppers

Oven Baked Breakfast Egg Stuffed Peppers

easy sausage egg muffins

Sausage Egg Muffins with Strawberries

You Might Also Like

Evolution Fresh Organic Pure 100% Cold-Pressed Orange Juice

Setton Farms Dry Roasted and Salted Pistachios

Filippo Berio Pesto, Classic Basil

Frequently Asked Questions

Can I add meat to this recipe?

Definitely! If you’re looking to up the protein content or enjoy a meaty twist, feel free to add cooked and diced chicken, turkey, or even some crispy bacon. Just ensure the meat is fully cooked before incorporating it into your quesadilla.


Can I add other seasonings or herbs?

Experiment with different seasonings to tailor the flavor to your liking. Fresh herbs like cilantro or chives can add a burst of freshness. You can also sprinkle in some smoked paprika, cumin, or chili powder for an extra layer of depth.


Can I add avocado to these quesadillas?

Avocado adds a creamy, nutrient-rich element to your quesadilla. You can either slice avocado and add it to the filling before folding or spread mashed avocado onto the tortilla before adding the egg mixture.