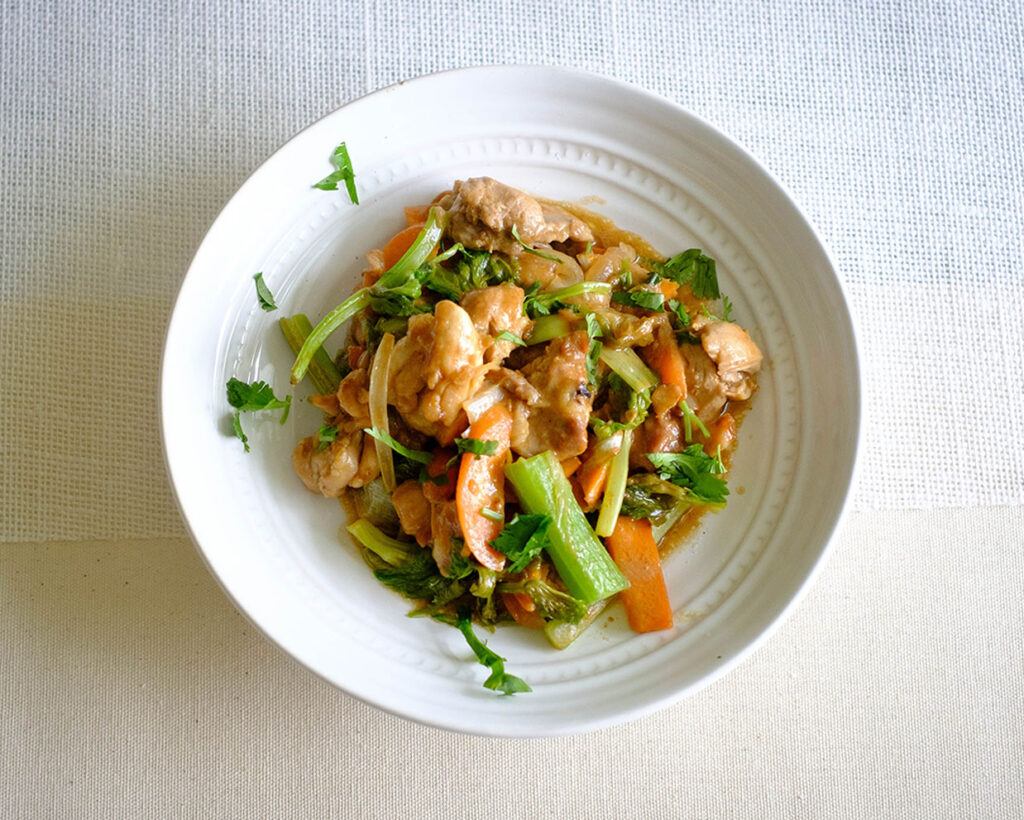
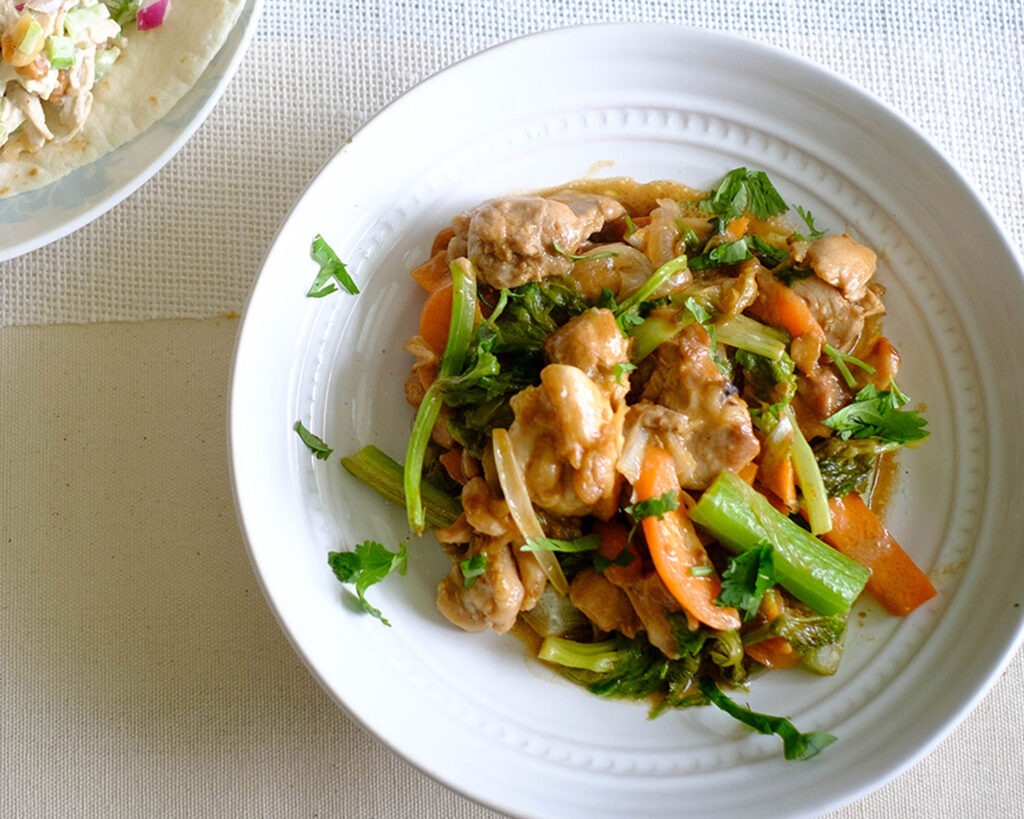
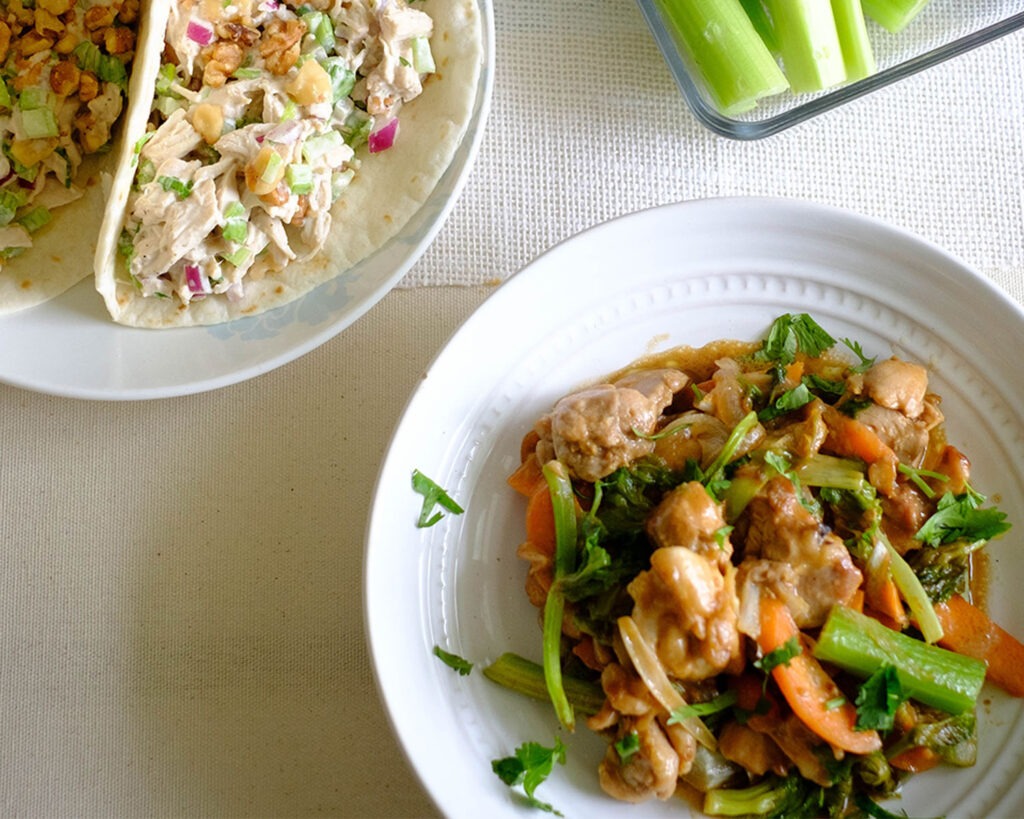
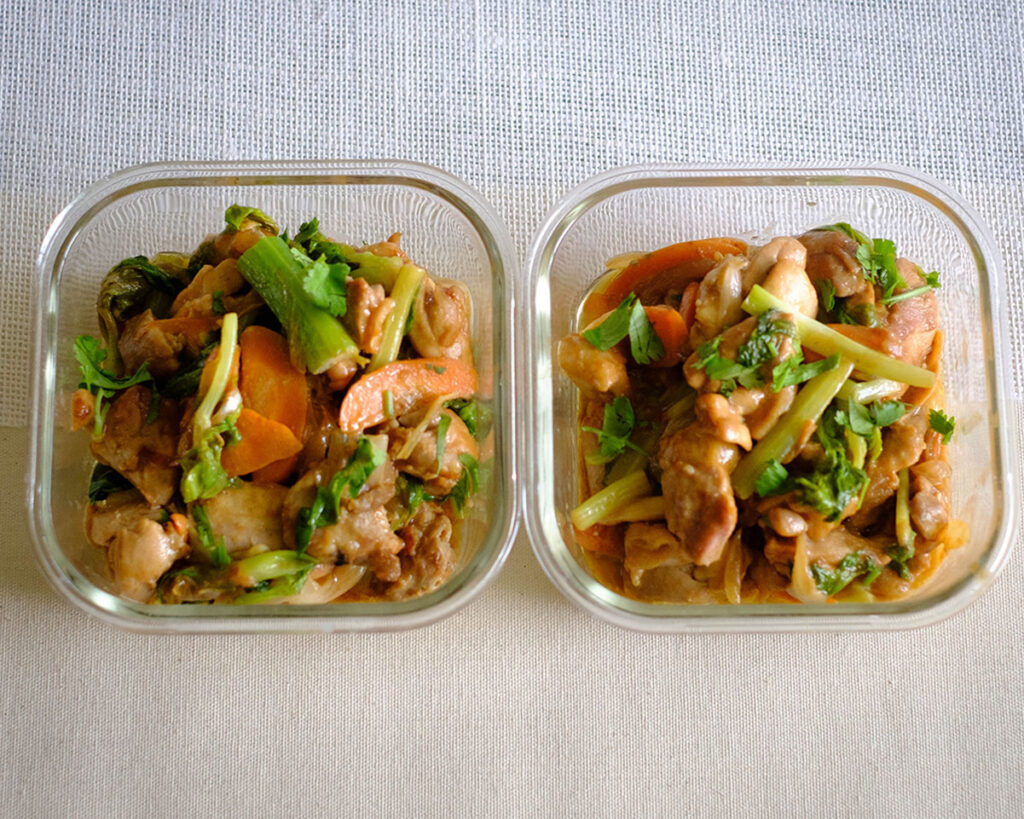
Posted on Leave a comment

Air Fryer Sweet and Sour Chicken Wings

sweet and sour chicken wings

Who says meal prep can’t be just as tasty as takeout? Try these tasty Crispy Air Fryer Chicken Wings coated in a sweet and sour sauce!

This post may contain affiliate links. Please see our privacy policy for details.

Round plate with chicken wings drizzled with sweet and sour sauce that includes pineapple chunks and red bell peppers.

Why We Love These Air Fryer Chicken Wings

The best part of this recipe is that the sauce can be easily made from common pantry staples. All you need is canned pineapple juice, ketchup, rice vinegar, soy sauce, and sugar.

Cooking the chicken wings in the Air Fryer is so simple and can be done in less than 30 minutes. You’ll have a healthier and tastier version of this classic sweet and sour-chicken take-out meal.

The PrepYoSelf Newsletter

Ingredients You’ll Need

  • Chicken: We used a mixture of chicken drummettes and flappers, but if you prefer boneless wings, you can use chicken tenderloins or chicken breast chunks.
  • Pineapple: Pineapple is often found in sweet and sour sauces because of its tangy flavors, but you can also use orange juice as a substitute.
  • Red Bell Pepper: You can use yellow or orange bell peppers as well.
  • Soy Sauce: This will help darken the sauce and add salty, savory flavors.
  • Ketchup: If you don’t have ketchup, you can use tomato paste or tomato sauce.
  • Honey: You’ll need a sweetener for the sauce. If you don’t have honey, you can also use brown sugar.
  • Cornstarch: The cornstarch will help thicken the sweet and sour sauce.
  • Garlic Powder: You can use minced garlic, but garlic powder will work just fine.
  • Olive oil: Coat the chicken with oil or spray with cooking spray so that it can get crispy in the Air Fryer.
Glass meal prep container with chicken wings drizzled with sweet and sour sauce that includes pineapple chunks and red bell peppers.

How to Make Sweet and Sour Chicken Wings

  1. In a small bowl, marinate the chicken wings with the soy sauce and garlic powder.
  2. Then, coat it with olive oil and place the chicken in the Air Fryer and cook it until it is fully cooked and crispy.
  3. Meanwhile, prepare the sweet and sour sauce on the stovetop. Add the bell peppers, pineapple chunks, pineapple juice, ketchup, soy sauce, and honey to a heated sauce pot and let it simmer for a few minutes.
  4. Add a cornstarch slurry to the sauce to thicken the sauce.
  5. After the chicken cooks in the Air Fryer, top them off with the sweet and sour sauce.

Reference the recipe card below for detailed instructions.

Glass meal prep container with chicken wings drizzled with sweet and sour sauce that includes pineapple chunks and red bell peppers.

Meal Prep Tips for Air Fryer Chicken Wings

  • Other cook methods: If you don’t have an Air Fryer, you can bake it in an oven at 425F until it is crispy
  • To serve: Serve with a side of steamed rice or noodles. You can also use cauliflower rice if you prefer a low-carb option.
  • Storage: Store in an airtight container in the refrigerator for up to 3 to 4 days for the best quality. You can also keep the sauce separate from the chicken until you are ready to eat the meal, then drizzle the sauce on top of the chicken.
  • To Reheat: Both the chicken wings and sauce can be reheated in the microwave.
  • Leftover pineapple: Use them up in morning smoothies or enjoy them as a snack throughout the day.
Glass meal prep container with chicken wings drizzled with sweet and sour sauce that includes pineapple chunks and red bell peppers.
sweet and sour chicken wings

Air Fryer Sweet and Sour Chicken Wings

Crispy Chicken Wings coated in a sticky, sweet, and sour sauce without hte mess of a deep fryer.
No ratings yet
Prep Time 5 minutes
Cook Time 25 minutes
Course dinner, Main Course
Cuisine American, Asian
Servings 2

Equipment

  • knife
  • cutting board
  • mixing bowl
  • Air Fryer

Ingredients
  

Chicken

  • 12 each chicken wings (flats or drumettes)
  • 1 tablespoon soy sauce
  • 1/2 teaspoon garlic powder
  • 1 tablespoon olive oil

Sweet and Sour Sauce

  • 1/2 cup canned pineapple (chunks)
  • 1/2 cup pineapple juice (from the can)
  • 1/4 cup ketchup
  • 1 tablespoon soy sauce
  • 2 tablespoons honey
  • 1/2 teaspoon garlic powder
  • 1 red bell pepper (cubed)

Corn starch slurry

  • 1 teaspoon cornstarch
  • 2 tablespoons water

Instructions
 

  • In a small mixing bowl, marinate the chicken wings with soy sauce, garlic powder, and olive oil. Place the chicken in the air fryer and cook for 20 minutes at 360F (flip the chicken wings halfway through the cooking process).
  • Meanwhile, prepare the sweet and sour sauce on the stovetop. Heat a saucepan on medium heat and add the red bell pepper, pineapple chunks, pineapple, juice, ketchup, soy sauce, honey, and garlic powder.
  • In a small bowl, mix together the corn starch with water to make a slurry. Add the slurry to the sauce pan and continue to heat the sauce until it thickens
  • After the chicken cooks, top it off with the sweet and sour sauce.

Notes

Note: If you do not have an air fryer, you can preheat an oven to 425F and line the wings on a sheet pan. Bake until crispy (about 35-40 minutes)

Similar Recipes

chicken fajitas

Sheet Pan Chicken Fajitas with Mango Salsa

sausage squash

Spaghetti Squash with Sausage and Peppers

pineapple bbq chicken

Oven Baked Pineapple BBQ Chicken

You Might Also Like

Frequently Asked Questions

Is sweet and sour chicken gluten-free?

Some traditional recipes first coat their chicken with flour, however, this recipe does not include flour and is a gluten-free recipe.


What can I serve with this recipe?

Pair it with steamed cauliflower rice or air fryer broccoli florets.


How can I make sweet and sour chicken wings without an air fryer?

If you don’t have an air fryer, you can bake the chicken wings in the oven for 40-45 minutes at 425F until they are golden, brown, and crispy.

Posted on Leave a comment

One Pot Mexican Chicken Soup

chicken soup

This Mexican Chicken Soup Recipe comes together quickly and is a flavorful and budget-friendly meal.

This post may contain affiliate links. Please see our privacy policy for details.

Round bowl of chicken soup with beans, vegetables, avocado, and cilantro

Not only is this Mexican Chicken Soup Recipe full of nutrients and high in protein, it is also made with pantry-friendly and budget-friendly ingredients.

Why is This Chicken Soup Recipe Great for Meal Prep?

  • It is a one-pot recipe that helps with clean-up duties.
  • You can use any part of the chicken that you have on hand.
  • The recipe includes pantry-friendly ingredients such as beans, tomato sauce, broth, and simple seasoning.
  • You can make a large batch and freeze it.
  • You can throw in extra veggies that you have on hand.

The PrepYoSelf Newsletter

Ingredients to Make This Mexican Chicken Soup

  • Chicken: Use any cut. We used lean chicken breast, but you can also use boneless chicken thighs, chicken tenderloins, and even ground chicken.
  • Beans: We used pinto beans, but you can also use kidney beans or black beans.
  • Tomato Sauce: If you don’t have tomato sauce, you can use leftover marinara sauce, tomato paste, or even freshly diced tomatoes.
  • Vegetables: The great thing about this recipe is that you can use any kind of vegetables you have on hand, whether they are fresh, frozen, or canned.
  • Broth: We used chicken broth, but you can also use vegetable broth.
  • Toppings: We topped ours off with sliced avocado for an added healthy fat and chopped cilantro for fresh herb flavors.

Round bowl of chicken soup with beans, vegetables, avocado, and cilantro

Simple Steps for this One Pot Mexican Chicken Soup

  1. Heat your soup pot and saute the onions until they soften.
  2. Next, add the chicken, tomato sauce, broth, ad seasonings.
  3. Bring the liquid to a boil. After it reaches a boil, lower the head and simmer with a cover on the pot.
  4. Simmer until the chicken is fully cooked and is fork tender.
  5. Remove the chicken from the broth and shred it into small pieces.
  6. Add the chicken back to the pot, along with the vegetables and beans and let it simmer for a few more minutes.
  7. Top off the soup with sliced avocado and fresh cilantro.

Reference the recipe card below for detailed instructions.

Glass meal prep container of chicken soup with beans, vegetables, avocado, and cilantro

Meal Prep Tips for One Pot Mexican Chicken Soup

  • Ingredient Swaps: Make it vegetarian/vegan by omitting the chicken and just adding more beans and using vegetable broth. Make it keto by eliminating the corn and using non-starchy vegetables such as celery, zucchini, or yellow squash.
  • Leftover Leverage: Leftover uncooked chicken breasts can be frozen and saved for another recipe. You can also use it as a salad topping or make it into a chicken salad. Cilantro can be used up in scrambled eggs or added to salsa.
  • Storage: Store in an airtight container in the refrigerator for up to 3 to 4 days for the best quality.

Glass meal prep containers of chicken soup with beans, vegetables, avocado, and cilantro

chicken soup

One Pot Mexican Chicken Soup

Hearty and filling Mexican Chicken Soup Recipe that can be made ready in less than 30 minutes!
No ratings yet
Prep Time 5 minutes
Cook Time 30 minutes
Course lunch, Main Course
Cuisine American, Mexican
Servings 2

Equipment

  • knife
  • cutting board
  • spatula
  • soup pan

Ingredients
  

  • 1 tbsp olive oil
  • 1/4 cup red onions (diced)
  • 6 oz chicken breasts
  • 1 cup tomato sauce
  • 2 cups chicken broth
  • 1 cup corn (frozen)
  • 2 cups pinto beans (drained)
  • 1 red bell pepper (diced)
  • 1/4 teaspoon chili powder
  • 1/4 teaspoon paprika
  • 1/4 teaspoon garlic powder
  • 1/4 teaspoon salt
  • 1/4 teaspoon pepper
  • 2 avocado (sliced)
  • 2 tablespoons cilantro (chopped)

Instructions
 

  • Add oil to a soup pan on medium high heat and saute the onions until they soften. Next, add the chicken, tomato sauce, broth, and seasonings.
  • Bring the liquid to a boil. Once it boils, lower the heat to low medium and cover the pot with a lid. Let it simmer for 25 minutes until the chicken it is fork tender and shreds easily.
  • After the 25 minutes, scoop out the chicken onto another plate and use two forks to shred the chicken apart.
  • Place the shredded chicken back into the soup pot, along with the corn, pinto beans, and bell peppers. Serve the soup with sliced avocados and chopped cilantro.

Similar Recipes

turkey soup

One Pot Turkey Toscana Soup

chicken fajitas

Sheet Pan Chicken Fajitas with Mango Salsa

pork carnitas

Instant Pot Pork Carnitas Tostadas

You Might Also Like

Frequently Asked Questions

What toppings can I add to the soup?

For this soup recipe, you can add shredded cheese, crushed tortilla chips, and even sour cream


Can I use chicken stock in place of chicken broth?

Yes, both can be used interchangeably. The only difference is that broth is made from meat and vegetables, but stock is made with bones. For this recipe, either one will work just fine.


Can I use leftover rotisserie chicken?

Absolutely, however, you still want the soup to simmer for at least 12 to 15 minutes so that all the flavors and seasonings blend well together to give you a delicious broth.

Posted on Leave a comment

Baked Cilantro Lime Chicken with Strawberry Salsa

cilantro chicken

Let’s keep your basic baked chicken breasts from being boring for your next meal prep. We’re keeping it tasty with this cilantro lime pesto marinade, paired with perfect sides and condiments. Great for lunch or a chicken dinner with style.

This post may contain affiliate links. Please see our privacy policy for details.

Round plate with cilantro marinated chicken topped with strawberry salsa, black beans.

Not only do you get a good protein source from the chicken, but you also get an additional protein and fiber load from the tasty black beans.

To top it off, your tastebuds are going to be feeling fresh with the sweet and savory strawberry salsa.

Now we know what you are thinking…” Wow, that’s a lot to meal prep!”. Don’t worry, we’ll show you how to make this beautiful dish in no time.

The PrepYoSelf Newsletter

Gather the Following Ingredients

Ingredients For the Chicken and Cilantro Lime Pesto:

  • Chicken: We used boneless chicken thighs, but you can also use chicken breasts or chicken tenderloins.
  • Fresh Cilantro: If you don’t have cilantro, you can swap it out with green onions
  • Lime: You can also use oranges or lemons
  • Pine Nuts: If you don’t have pine nuts, you can use whatever nuts you have on hand
  • Garlic: We used fresh garlic, but you can also use garlic paste or garlic powder

Round plate with cilantro marinated chicken topped with strawberry salsa, black beans.

Ingredients For the Strawberry Salsa and Salad Mix:

  • Strawberries: Mango or pineapple are also good fruits to use in salsa
  • Cherry Tomatoes: We like cherry tomatoes because they are easy to slice into small pieces, but feel free to use regular tomatoes
  • Red Onions: Use whatever onions you have on hand, including shallots
  • Cilantro: You can also use green onions
  • Lime: Oranges or lemon can also be used
  • Spring Mix: Choose any kind of lettuce mix you like
  • Black Beans: Pinto beans will also work

Round plate with cilantro marinated chicken topped with strawberry salsa, black beans.

How to Bake Cilantro Lime Chicken:

  1. Make the Cilantro Pesto: In a blender, add the cilantro, pine nuts, juice of a lime, olive oil, garlic, and salt. Blend until smooth.
  2. Marinate the Chicken: Place the chicken in a mixing bowl. Pour in the cilantro pesto that you just blended. Marinate the chicken for at least 10 minutes.
  3. Bake the Chicken: Place the chicken on a sheet pan. Bake the chicken in the oven for 25-30 minutes until it is fully cooked. Meanwhile, prepare the strawberry salsa, salad, and black beans.

Reference the recipe card below for detailed instructions.

Glass meal prep container with cilantro marinated chicken topped with strawberry salsa, black beans.

Meal Prep Tips for Baked Cilantro Lime Chicken Dinner

  • Cook method variations: You can also cook the chicken in a small toaster oven or in the Air Fryer (cook at 360F for 20-25 minutes). Another option is to grill it on an outdoor grill or on an indoor grill pan which will give it a nice char and caramelized flavor.
  • To Serve: After the chicken cooks, let it rest for a few minutes before slicing it into bite-size pieces. This chicken dinner brings so much color and excitement to the plate.
  • To Store: Store it in an airtight container for up to 3 to 4 days in the refrigerator. Keep the salsa and beans separate from the spring mix to prevent the spring mix from getting soggy.
  • To Reheat: You can serve this meal chilled, but if want to reheat the chicken, you can warm it up in the microwave until it is heated through.

Cilantro Chicken

Oven Baked Cilantro Lime Chicken with Strawberry Salsa and Black Bean Salad

Cilantro Lime Marinated Chicken served with a light and refreshing strawberry salsa.
No ratings yet
Prep Time 5 minutes
Course lunch, Main Course
Cuisine American, Mexican
Servings 2

Equipment

  • knife
  • cutting board
  • blender
  • sheet pan
  • oven
  • mixing bowls

Ingredients
  

Chicken and Pesto

  • 12 oz boneless chicken thighs
  • 1 cup cilantro (chopped)
  • 1 lime (juiced)
  • 1/4 cup olive oil
  • 2 tablespoons pine nuts
  • 2 garlic cloves (peeled)
  • 1/4 teaspoon salt

Salad and Black Beans

  • 4 cups spring mix salad
  • 1 cup black beans (drained and rinsed)

Strawberry Salsa

  • 1/2 cup strawberries (diced)
  • 1/2 cup cherry tomatoes (sliced)
  • 1/4 cup red onions (diced)
  • 1/4 cup cilantro (chopped)
  • 1 lime (juiced)
  • 1/4 teaspoon salt

Instructions
 

  • Preheat the oven to 400F. Place the cilantro, pine nuts, juice of a lime, olive oil, garlic, and salt in a blender and blend until smooth.
  • Place the chicken in a mixing bowl and pour in the cilantro pesto. Marinate the chicken for about 10 minutes.
  • Next, place the chicken on a sheet pan and bake it in the oven for about 25-30 minutes until it reaches an internal temperature of 165F (half way through, flip over the chicken)
  • Meanwhile, rinse the strawberries and remove the stems. Cut them into quarters. Add them to another mixing bowl with the cherry tomatoes, red onions, cilantro, lime juice, and salt. Mix it all together.
  • After the chicken cooks, top it off with the strawberry salsa and enjoy it with a side of black beans and a side salad.

Notes

Instead of baking the chicken, you can also grill the chicken on an indoor grill pan for about 6 to 7 minutes on each side until it is fully cooked and reaches an internal temperature of 165F

Similar Recipes

bean and corn taco

Vegetarian Black Bean and Corn Soft Tacos

chicken salad

Oven Baked Honey Mustard Glazed Chicken Salad

balsamic chicken salad

Oven Baked Balsamic Chicken Salad with Strawberries

You Might Also Like

Frequently Asked Questions

What to serve with cilantro lime chicken?

If you have extra cilantro, you can make cilantro lime rice or serve the chicken with flour or corn tortillas.


Can you use lemon juice instead of lime juice?

Yes, they can be used interchangeably in this recipe.


How long can you keep marinated chicken in the refrigerator?

You can keep it for 24 hours, after that, any uncooked marinade should also be discarded.

Posted on Leave a comment

Air Fryer Orange Soy Glazed Chicken with Broccoli

orange chicken

This sweet and tangy Air Fryer Chicken Thigh recipe is a healthier version of one of our favorite take-out meals.

This post may contain affiliate links. Please see our privacy policy for details.

Round plate with golden brown chicken thighs and crispy broccoli florets.

You can’t go wrong with ordering Orange Soy Chicken for take-out. Those bite-sized chicken pieces, dredged in fried, golden, and crispy batter tossed in a sweet orange sauce are just so full of flavor.

However, it’s also a lot of work making it at home, not to mention the guilt of loaded calories!

But we don’t want to miss out on those great flavors during our weekly meal prep, so we opted for an easier, more budget-friendly version, but with all the same great flavors.

For this recipe, we wanted to keep the crispy textures and decided to prep Air Fryer Chicken Thighs glazed in an orange soy marinade and paired it with broccoli florets.

The PrepYoSelf Newsletter

To Make this Healthy Air Fryer Orange Chicken, You’ll Need

  • Chicken Thighs: This may not be the leanest cut of chicken, but it’s a lower-calorie version than the chicken pieces dredged in flour and deep-fried in oil. But if you really want to keep it clean and lean, you can still make this recipe with chicken breasts or chicken tenderloins.
  • Marinade: We used a mixture of soy sauce, orange juice, honey, garlic powder, and sesame oil.
  • Broccoli: We love chicken and broccoli together, but you can also use other vegetables such as green beans, bok choy, or bell peppers.

Round plate with golden brown chicken thighs and crispy broccoli florets.

How to Prepare Easy Air Fryer Orange Soy Chicken

  1. Mix together your marinade in a bowl, then add the chicken. Make sure the chicken gets fully coated with the marinade.
  2. Next, place the chicken thighs in the Air Fryer and cook them for about 23 to 25 minutes at 360F.
  3. After the chicken cooks, remove it from the Air Fryer and place the broccoli in the Air Fryer. Sprinkle them with seasonings and coat them with sesame oil. Roast at 360F for 5 minutes.

Reference the recipe card below for detailed instructions.

Glass meal prep container with golden brown chicken thighs and crispy broccoli florets.

Meal Prep Tips for Air Fryer Orange Chicken

  • Other cook methods: If you don’t have an Air Fryer, you can bake it in an oven at 425F until it is crispy.
  • To serve: Serve with a side of grains such as brown rice pilaf or soba noodles.
  • Storage: Store in an airtight container in the refrigerator for up to 3 to 4 days for the best quality.
  • To Reheat: Both the chicken and broccoli can be reheated in the microwave.
  • Larger Batch: If you make a larger batch, you can shred the chicken and serve it on top of lettuce or in a lettuce wrap with Asian slaw.

Glass meal prep container with golden brown chicken thighs and crispy broccoli florets.

orange chicken

Air Fryer Orange Soy Glazed Chicken with Broccoli

Here's a home cooked version of tasty orange soy glazed chicken made right in the Air Fryer.
No ratings yet
Prep Time 5 minutes
Cook Time 25 minutes
Course dinner, Main Course
Cuisine American, Asian
Servings 2

Equipment

  • mixing bowl
  • Air Fryer

Ingredients
  

Chicken and Marinade

  • 4 bone in chicken thighs
  • 1/4 cup soy sauce
  • 1 orange (juiced)
  • 1 tablespoon honey
  • 1/2 teaspoon garlic powder
  • 1 tablespoon sesame oil

Broccoli and Seasonings

  • 4 cups broccoli florets
  • 1/2 teaspoon garlic powder
  • 1/4 teaspoon salt
  • 1 tablespoon sesame oil

Instructions
 

  • Place the chicken thighs in a mixing bowl and add the soy sauce, juice of an orange, honey, garlic powder, and sesame oil. Mix it all together making sure the chicken is fully coated.
  • Then, place the thighs in the Air Fryer and cook them at 360F for 23 to 25 minutes (you'll want to make sure it gets nice and crispy). After it cooks, check the temperature with a thermometer making sure it reaches an internal cook temperature of 165F.
  • Next, remove the chicken and place the broccoli in the air fryer. Sprinkle with the seasonings and sesame oil and cook at 360F for 5 minutes.

Notes

If you don’t have an air fryer, place the chicken on a sheet pan and bake it in the oven for 35-40 minutes at 400F. Bake the broccoli florets for 8-10 minutes.

Similar Recipes

chicken kale salad

Grilled Honey Dijon Chicken and Kale Salad

balsamic chicken salad

Oven Baked Balsamic Spinach and Strawberry Salad

chicken salad

Oven Baked Honey Mustard Glazed Chicken Salad

You Might Also Like

Frequently Asked Questions

Can I make orange soy glazed chicken in the oven?

If you don’t have an Air Fryer, you can also bake the chicken in the oven for 35-40 minutes at 400F until it reaches an internal temperature of 165F. Bake the broccoli florets for 8-10 minutes.


Is this recipe gluten-free?

Yes, we do not use any flour in this recipe like the classic take-out recipes use.


How long do chicken thighs take in the Air Fryer?

If you are cooking it at 360F, it typically takes 23-25 minutes, depending on how thick your chicken thighs are. Use a thermometer to check that it is fully cooked to an internal temperature of 165F.

Posted on Leave a comment

Oven Baked Chicken Fajitas with Mango Salsa

chicken fajitas

This post may contain affiliate links. Please see our privacy policy for details.

Sheet pan chicken fajitas are the fastest dinner you can make with tender chicken, and colorful veggies, and it’s an easy clean-up!

Plate with chicken fajitas, mango salsa, and colorful bell peppers and onions served with tortillas.

Why We Love This Oven Baked Chicken Fajitas

  • There is no need to spend extra dollars at a restaurant for your weeknight dinner.
  • This easy fajita dinner is budget-friendly and super tasty.
  • You can bake everything in one pan and you get juicy chicken with sweet roasted peppers and onions, and the oven does all the work.

The PrepYoSelf Newsletter

To Make Easy Baked Chicken Fajitas, You’ll Need

  • Chicken Tenderloins: You can also use chicken breasts or boneless chicken thighs
  • Bell Peppers and Onions: These ingredients add flavor and lots of color to the dish
  • Fajita Seasoning: We made our own mixture, however, you can also use pre-mixed seasonings
  • Tortillas: Serve it up with your flour tortillas or corn tortillas. There are also low-carb options and vegetable options such as jicama tortillas if you are keeping it keto-friendly
  • Mango Salsa: We love adding fruit to our salsa, especially if we have extra on hand. Other tasty toppings you can add are guacamole, pico de gallo, cheese, or sour cream

Plate with chicken fajitas, mango salsa, and colorful bell peppers and onions served with tortillas.

How to Cook Chicken Fajitas in the Oven

  1. Preheat the oven to 400F.
  2. Mix together your seasonings in a small bowl.
  3. Place the chicken tenderloins on one side of the sheet pan and the sliced peppers and onions on the other side.
  4. Coat all the ingredients with olive oil and sprinkle them with the seasonings.
  5. Bake everything in the oven until the chicken is fully cooked.
  6. Meanwhile, prepare the Mango Salsa and other toppings.

Reference the recipe card below for detailed instructions.

Glass meal prep container with chicken fajitas, mango salsa, and colorful bell peppers and onions served with tortillas.

Meal Prep Tips for Baked Chicken Fajitas

  • Large Batches: If you decide to increase the batch size, you can serve the fajita chicken and veggies on top of a salad or serve it in a lettuce wrap or with a side of Spanish rice and beans.
  • Other Recipe Ideas: You can also add veggie fajitas with breakfast tacos. Make pasta with the chicken and bell peppers simply by adding them to penne pasta, and adding shredded parmesan cheese.
  • Storage: Store in an airtight container in the refrigerator for up to 3 to 4 days for the best quality.

Glass meal prep containers with chicken fajitas, mango salsa, and colorful bell peppers and onions served with tortillas.

chicken fajitas

Oven Baked Chicken Fajitas with Mango Salsa

Budget-Friendly and flavorful chicken fajitas baked in the oven in less than 30 minutes!
No ratings yet
Prep Time 5 minutes
Cook Time 20 minutes
Course lunch, Main Course
Cuisine Mexican
Servings 2

Equipment

  • knife
  • cutting board
  • sheet pan
  • oven

Ingredients
  

Chicken & Seasoning

  • 12 oz chicken tenderloins
  • 1/4 teaspoon chili powder
  • 1/4 teaspoon cumin
  • 1/4 teaspoon garlic powder
  • 1/4 teaspoon paprika
  • 1/4 teaspoon salt
  • 1 tablespoon olive oil
  • 4 low carb tortillas

Fajita Veggies & Seasoning

  • 1 red bell pepper (sliced)
  • 1/4 cup red onions (sliced)
  • 1/4 teaspoon paprika
  • 1/4 teaspoon garlic powder
  • 1/4 teaspoon salt
  • 1 tablespoon olive oil

Mango Salsa

  • 1 mango (peeled and diced)
  • 1/4 cup cilantro (chopped)
  • 1/4 cup red onions (diced)
  • 1 cup cherry tomatoes (sliced)
  • 1 lime (juiced)
  • 1/4 teaspoon garlic powder
  • 1/4 teaspoon salt

Instructions
 

  • Pre-heat the oven to 400F. Place the chicken tenderloins, sliced bell peppers, and sliced onions on a sheet pan. Sprinkle them with the seasonings and coat them with olive oil
  • Bake in the oven for 20 minutes until the chicken is fully cooked and reaches an internal temperature of 165F. (cook for an additional 5 minutes until it reaches the internal temperature of 165F)
  • Meanwhile, add the diced mango, cilantro, red onion, and cherry tomatoes in a mixing bowl. Add the seasonings, juice of a lime, and mix everything together
  • After the chicken cooks, layer the chicken tenderloins in the middle of the tortillas and top it off with the fajita veggies and fresh mango salsa. Enjoy this beautiful colorful and tasty dish!

Similar Recipes

cilantro chicken

Cilantro Lime Chicken Salad with Strawberry Salsa

sweet and sour chicken wings

Air Fryer Sweet and Sour Chicken Wings

stuffed primavera chicken

Primavera Stuffed Chicken Breasts

You Might Also Like

Frequently Asked Questions

Is chicken fajita healthy?

Yes, baking it in the oven is one of the healthiest ways to make chicken fajitas because this recipe uses healthy fat, lean meat, and healthy vegetables.


What goes well with fajitas?

Serve it with a cilantro corn salad, avocado salad, or baked black beans.


How do you cut chicken breast for fajitas?

If you are using chicken breasts instead of tenderloins, you will want to let the cooked chicken rest before slicing it into thin strips. Slice it the chicken breasts horizontally into ½-inch thick slices.

Posted on

Balsamic Baked Chicken

This balsamic baked chicken recipe combines succulent bone-in chicken thighs with a flavorful marinade for a delicious and easy-to-make dish. The marinade, consisting of balsamic dressing, honey, olive oil, rosemary, garlic powder, salt, and pepper, infuses the chicken with rich and aromatic flavors. To prepare, preheat the oven to 425°F and whisk together the marinade ingredients. Arrange the chicken thighs in a baking dish, coat them with half of the marinade, and bake for 20 minutes. Then, add the remaining marinade and continue baking for 10-15 minutes until the chicken reaches a golden brown color and an internal temperature of 165°F. Once cooked, transfer the chicken to a serving dish and enjoy, pairing it with a side salad or roasted vegetables for a complete meal.

balsamic chicken

Honey Balsamic Baked Chicken

No ratings yet

Prep Time 5 minutes
Cook Time 32 minutes

Course dinner, Main Course
Cuisine American, Italian

Servings 4

Equipment

  • mixing bowl
  • sheet pan
  • oven

Ingredients


  • 4 each bone in chicken thighs
  • 1/2 cup balsamic dressing
  • 2 tbsp honey
  • 1 tbsp olive oil
  • 1 tbsp rosemary (fresh, finley chopped)
  • 1/2 tsp garlic powder
  • 1/4 tsp salt
  • 1/4 tsp pepper

Instructions


  • Preheat the oven to 425F degrees
  • In a small bowl, whisk together the balsamic dressing, honey, garlic, salt, pepper, and rosemary
  • Place the chicken thighs in a baking dish and pour half of the balsamic marinade over the chicken and make sure it is fully coated
  • Cook the chicken for 20 minutes
  • After 20 minutes, pour the rest of the balsamic marinade on top and cook for another 10-15 minutes until the chicken is golden brown and fully cooked to an internal temperature of 165
  • Remove from the oven and place it on a serving dish and enjoy! Serve with a side salad or roasted veggies

Notes

Note: After the chicken cooks, you can split the recipe in half and shred half of the chicken meat, and use it as your protein for a lunch salad or in a sandwich.
Posted on Leave a comment

Grilled Honey Dijon Chicken Kale Salad

chicken kale salad

This delicious and gorgeous roasted sweet potato and kale salad with grilled chicken is full of flavor. It’s a nutrient-packed lunch for the week.

This post may contain affiliate links. Please see our privacy policy for details.

Plate with chicken served on top of baby kale salad with sweet potato, cranberries, and pecans.

Why This Kale Salad is Healthy

  • Complete Meal: This recipe has lean protein, complex carbs, vegetables, fruit, and healthy fats.
  • Benefits of Kale: Kale is a green, leafy, cruciferous veggie that is rich in nutrients such as fiber, antioxidants, calcium, Vitamin C, K, and Iron.
  • Benefits of Sweet Potato: This sweet and starchy root vegetable is great for meal prep because it comes in a variety of sizes and colors. It is also a great source of fiber, vitamins, and minerals that help promote gut health.

The PrepYoSelf Newsletter

Ingredients You’ll Need

  • Chicken and Marinade: For this recipe, we used chicken tenderloins because they cook fast, but you can also use boneless chicken thighs or chicken breast. We also marinated the chicken in a honey dijon sauce before grilling it.
  • Sweet Potato & Seasonings: Other orange vegetable options you can use are diced butternut squash or acorn squash.
  • Salad Ingredients: For our salad mix, we incorporated a dark leafy green such as baby kale mix, but you can also use baby spinach.
  • Toppings: We topped off the salad with crunchy components such as pecan halves and dried cranberries.
  • Salad Dressing: To streamline the ingredients, we made our own homemade vinaigrette using the same ingredients used for the chicken marinade.
Plate with chicken served on top of baby kale salad with sweet potato, cranberries, and pecans.

How to Prepare Grilled Honey Dijon Chicken Kale Salad

  1. Preheat the oven to 400F.
  2. Cut the sweet potato into small pieces and place them on a baking sheet. Season the diced sweet potato and coat with olive oil.
  3. Bake the sweet potato in the oven until they are tender and golden brown.
  4. Meanwhile, marinate the chicken and cook it on the indoor grill.
  5. Afterward, toss together the chicken with the baby kale salad, sweet potatoes, dried fruit, and nuts, and drizzle the salad dressing on top.

Reference the recipe card below for detailed instructions.

Plate with chicken served on top of baby kale salad with sweet potato, cranberries, and pecans.

Meal Prep Tips for Kale Salad

  • Other Flavors: To make kale taste good, add citrus flavors. Kale leaves are crunchy and have a strong taste. Therefore, acidic flavors can cut through the tough flavors of raw kale.
  • Ingredient Variations: You can also a balsamic vinaigrette or Italian dressing to marinate your chicken if you don’t want to make your own homemade dressing.
  • Storage: Store in an airtight container in the refrigerator for up to 3 to 4 days for the best quality.
Glass meal prep containers with chicken served on top of baby kale salad with sweet potato, cranberries, and pecans.
chicken kale salad

Grilled Honey Dijon Chicken Kale Salad

Here's a nutrient packed salad filled with lean protein, dark leafy kale mix, and roasted sweet potato tossed in a sweet and tangy honey dijon vinaigrette dressing
No ratings yet
Prep Time 5 minutes
Cook Time 15 minutes
Course lunch
Cuisine American
Servings 2

Equipment

  • knife
  • cutting board
  • mixing bowls
  • tongs
  • sheet pan
  • indoor grill
  • oven

Ingredients
  

Chicken and Marinade

  • 12 oz chicken tenderloins
  • 2 tablespoons worcestershire sauce
  • 1 tablespoon dijon mustard
  • 2 tablespoons honey
  • 1/4 teaspoon paprika
  • 1/4 teaspoon garlic powder
  • 1/4 teaspoon salt
  • 1 tablespoon olive oil

Sweet Potato & Seasonings

  • 1 sweet potato
  • 1/4 teaspoon garlic powder
  • 1/4 teaspoon onion powder
  • 1/4 teaspoon salt
  • 1 tablespoon olive oil

Salad Ingredients

  • 4 cups baby kale
  • 2 tablespoons pecan halves
  • 2 tablespoons dried cranberries

Honey Dijon Vinaigrette

  • 3 tablespoons olive oil
  • 1 tablespoon dijon mustard
  • 2 tablespoons honey
  • 2 tablespoons apple cider vinegar
  • 1/2 teaspoon garlic powder
  • 1/2 teaspoon salt

Instructions
 

  • Preheat the oven to 400F. Peel the sweet potato and cut it into small dices. Place the sweet potato on a sheet pan and sprinkle them with the seasonings. Coat the sweet potato with olive oil. Bake in the oven for 15 minutes.
  • Meanwhile, in a mixing bowl, mix together the chicken marinade. Add the chicken in the bowl and make sure it is fully coated with the marinade.
  • Heat an indoor grill on medium high heat and grill the chicken tenders on each side for about 4 to 5 minutes until they are fully cooked and reach an internal temperature of 165F.
  • Enjoy the grilled chicken tenders with the baby kale salad topped with the roasted sweet potatoes, dried cranberries, pecan halves, and a drizzle of the vinaigrette.

Similar Recipes

cilantro chicken

Cilantro Lime Chicken Salad with Strawberry Salsa

stuffed primavera chicken

Primavera Stuffed Chicken Breasts

chicken fajitas

Sheet Pan Chicken Fajitas with Mango Salsa

You Might Also Like

Frequently Asked Questions

How to store kale?

Bagged kale can keep in the fridge for up to 5 to 7 days


What is massaged kale?

Massaging kale usually involves adding an acid such as lemon juice with olive oil to chopped kale. Use your hands to massage it for a few minutes to soften the leaves. It results in a glossed and reduced volume. Massaging kale helps break down the tough cell structure and allows for a softer texture and a more appetizing flavor. 


Is it better to eat kale raw or cooked?

 Raw kale is more beneficial than cooked, however, some people find it hard to digest and dislike the bittern flavors, therefore heating it softens some of the tough fibers and make it more appealing to consume.

Posted on Leave a comment

Celery Chicken Salad Wrap

round plate with celery chicken salad wrapped in flour tortilla

Here’s a twist on the classic chicken salad. We’ve got shredded chicken tossed in a creamy and tangy mayo and dijon mustard dressing with crisp, diced veggies and crunchy nuts.

This post may contain affiliate links. Please see our privacy policy for details.

Round plate with celery chicken salad served in tortilla wraps.

Reasons We Love This Chicken Salad With Celery

  • It is filling and full of fresh and bright ingredients
  • It is high in protein
  • You can make it into a healthy wrap or serve it as a healthy chicken salad topping with baby spinach or spring mix

The PrepYoSelf Newsletter

Chicken salad is usually a blank canvas for whatever you want to add to it. Our goal was to make it easy with basic ingredients that you can easily have on hand.

To make this easy chicken salad recipe, you’ll need

  • Shredded Chicken: You can use leftover chicken breast from a pre-cooked rotisserie chicken or boil it yourself.
  • Celery: This ingredient adds a nice crisp, fresh texture to the salad. If you don’t like celery, you can use other crips veggies such as diced bell peppers.
  • Red Onions: You can use any kind of onions.
  • Green Onions: You can other herbs such as tarragon or basil.
  • Walnuts: Use any kind of nuts that you have such as pecans or almonds.
  • Mayo: If you want more added protein you can also use greek yogurt.
  • Dijon Mustard: You can also use regular mustard or spicy mustard.
  • Sugar: The sweetness adds a balance to the savory flavors of this dish.
  • Flour Tortillas: Use any kind of tortilla for your wrap. You can also use lettuce wraps for a low-carb option

Round plate with celery chicken salad served in tortilla wraps.

Basic Steps to Prepare Celery Chicken Salad

  1. In a mixing bowl, add the shredded chicken, diced vegetables, nuts, mayo, dijon mustard, salt, pepper, and sugar.
  2. Mix it all together until the ingredients are well blended.
  3. Scoop small portions of the chicken salad into each tortilla wrap (about 1/2 cup scoop per tortilla).

Reference the recipe card below for detailed instructions.

Glass meal prep containers storing celery chicken salad served in tortilla wraps.

Meal Prep Tips for A Celery Chicken Salad Wrap

  • Other Cook Methods: If you don’t have pre-cooked rotisserie chicken, you can boil chicken breasts for about 15 to 20 minutes. After it cooks, use two forks to shred the chicken and let it cool.
  • Ingredient Variations: Instead of using shredded chicken, you can use boiled eggs or canned tuna.
  • Additional Ingredients: In addition to vegetables and herbs, you can also add common fruits such as sliced grapes, diced pears or apples, and even dried fruit such as dried cranberries.
  • Storage: Store in an airtight container in the refrigerator for up to 3 to 4 days for the best quality. If you’re not eating the meal right away, keep the tortillas separate from the chicken salad mixture to prevent the tortillas from getting soggy.

Glass meal prep containers storing celery chicken salad served in tortilla wraps.

round plate with celery chicken salad wrapped in flour tortilla

Celery Chicken Salad Wrap

This serving of chicken salad is great to utilize leftover chicken from another meal. It's filled with fresh veggies, crunchy nuts, and a creamy dressing.
No ratings yet
Prep Time 5 minutes
Cook Time 15 minutes
Course lunch, Main Course
Cuisine American
Servings 2

Equipment

  • knife
  • cutting board
  • mixing bowl

Ingredients
  

  • 1.5 cups shredded chicken (pre-cooked)
  • 2 tablespoons mayo
  • 2 tablespoons dijon mustard
  • 2 tablespoons green onions (chopped)
  • 1/2 cup celery (diced)
  • 1/4 cup red onions (diced)
  • 1/4 cup walnuts (chopped)
  • 1 teaspoon salt
  • 1/4 teaspoon pepper
  • 1 teaspoon sugar
  • 4 flour tortillas

Instructions
 

  • In a bowl, mix together the chicken, green onions, celery, red onions, walnuts, mayo, dijon mustard, salt, pepper, and sugar.
  • Scoop the chicken salad into a tortilla wrap.

Notes

Note: if you don’t have pre-cooked chicken, bring water to a boil and boil chicken breast in a pot for about 20 minutes until it fully cooks. Once it cooks, use two forks to shred it into pieces. Let it cool before mixing it with the other ingredients.

Similar Recipes

chicken kale salad

Grilled Honey Dijon Chicken and Kale Salad

chicken fajitas

Sheet Pan Chicken Fajitas with Mango Salsa

peanut chicken

Peanut Chicken Stir Fry

You Might Also Like

Frequently Asked Questions

What to eat with chicken salad?

You can serve this with sandwich bread, in a croissant, or with lettuce wraps.


What can I use instead of celery in chicken salad?

If you need a crunch, you can use jicama, carrots, and even radish.


Can I use grilled chicken for chicken salad?

Yes! Any leftover cooked chicken works well. Just be sure to chop it up into small pieces so that it can mix well with the other ingredients.

Posted on Leave a comment

Oven Baked Balsamic Chicken with Strawberries

balsamic chicken salad

Juicy and tender chicken breast baked in sweet honey and tangy balsamic glaze. This delicious salad makes for an easy chicken lunch meal prep or weeknight dinner meal.

This post may contain affiliate links. Please see our privacy policy for details.

White round plate with baked balsamic chicken served with spinach, strawberries, and walnuts.

Why You’ll Enjoy This Tasty Balsamic Marinade

  • You can use this marinade for any kind of protein. It goes well with grilled pork or makes a great glaze for an Air Fryer Salmon
  • You can drizzle the marinade on top of pasta or salad
  • It also helps give a caramelized flavor to roasted veggies

The PrepYoSelf Newsletter

What You Need to Make This Balsamic Glazed Chicken

  • Chicken: We use boneless chicken breasts, but you can swap it out with other cuts of chicken such as boneless chicken thighs or chicken tenderloins.
  • Balsamic Glaze: You can find this glaze either in the condiment aisle near the salad dressings or vinegar.
  • Soy Sauce: Adding a little bit of soy sauce gives a savory and salty flavor, but you can also substitute it with regular salt.
  • Strawberries: Balsamic vinegar pairs well with strawberries giving it a sweet and tangy combination
  • Walnuts: Adding nuts to your meals is a great opportunity to add healthy fat and also provides a nice crunchy component to the salad
  • Spinach: These dark leafy greens are such a superfood that provides great nutrients and vitamins. You can also use baby kale or arugula.
  • Olive oil: You can also swap this out with avocado oil.

White round plate with baked balsamic chicken served with spinach, strawberries, and walnuts.

Simple Basic Steps to Make this Oven Baked Balsamic Chicken Breast

  1. Preheat the oven to 400F.
  2. In a bowl, mix together the ingredients for the marinade. Add the chicken to the bowl and let it marinate for at least 10 minutes.
  3. Meanwhile, prepare your salad ingredients. After the oven pre-heats, place the chicken on a sheet pan and bake it in the oven, flipping it over halfway through the process.
  4. After it cooks, let it rest before cutting them into thin strips.
  5. Enjoy the chicken with fresh spinach salad, topped with strawberries and walnuts.

Reference the recipe card below for detailed instructions.

Glass meal prep containers storing baked balsamic chicken served with spinach, strawberries, and walnuts.

Meal Prep Tips for Baked Balsamic Chicken Salad

  • Cook Method Options: You can also bake the chicken in a small toaster oven or cook it in the Air Fryer (cook at 360F for 20 minutes). You can also grill the chicken on an indoor grill. Just be sure to monitor the heat level because the balsamic glaze will burn fast and may create some smoke.
  • Prep Tips: If you don’t want to wait 10 minutes to marinate the chicken, you can always marinate it the night before. Place it in the refrigerator overnight. The longer you marinate the chicken, the more flavorful and tender it will be.
  • Storage: Cooked chicken can be stored in an air-tight container in the refrigerator for up to 3 to 4 days. You can also store the chicken in a freezer-safe container or bag for up to 3 months for the best quality.
  • To Reheat: Heat them in the microwave until they warm through. However, you can also enjoy the chicken chilled.
  • Extra Ingredients: If you have leftover strawberries, freeze them and save them for smoothies or use them as a topping for your breakfast yogurt or oatmeal. Walnuts can also be eaten for afternoon snacks or you can add them to baked goods and granola.

Glass meal prep containers storing baked balsamic chicken served with spinach, strawberries, and walnuts.

baked chicken salad

Oven Baked Balsamic Chicken with Strawberries and Walnuts

This simple balsamic marinated chicken is perfect on top of a salad, with roasted veggies, or a side of rice pilaf.
No ratings yet
Prep Time 10 minutes
Cook Time 30 minutes
Course lunch, Main Course
Cuisine American, Italian
Servings 2

Equipment

  • knife
  • cutting board
  • mixing bowl
  • sheet pan
  • oven

Ingredients
  

Chicken and Marinade

  • 12 oz chicken breasts
  • 2 tabelspoons balsamic glaze
  • 1 tablespoon soy sauce
  • 1/4 teaspoon garlic powder
  • 1/4 teaspoon onion powder
  • 1/4 teaspoon italian seasoning
  • 1 tablespoon olive oil

Salad Ingredients

  • 4 cups baby spinach
  • 1/2 cup cherry tomatoes (sliced)
  • 2 tablespoon walnuts (chopped)

Balsamic Vinaigrette

  • 3 tablespoons olive oil
  • 2 tablespoons balsamic glaze
  • 1 tablespoon honey
  • 1 tablespoon apple cider vinegar
  • 1/2 teaspoon garlic powder
  • 1/2 teaspoon salt

Instructions
 

  • Preheat the oven to 400F. In a mixing bowl, whisk together the chicken marinade until well blended. Add the chicken breast into the bowl and marinate the chicken for at least 10 minutes.
  • Meanwhile, wash the strawberries, remove the green stems, and cut the strawberries into quarters. Go ahead and blend together the balsamic vinaigrette in a small bowl.
  • After the oven has pre-heated, place the chicken on a sheet pan and bake in the oven for 25-30 minutes until it reaches an internal temperature of 165F.
  • After the chicken cooks, let it rest and cool for a few minutes before slicing it into bite-size pieces. Enjoy the chicken with the spinach salad, topped with strawberries and walnuts, and a drizzle of the vinaigrette.

Similar Recipes

italian chicken

Italian Chicken with Green Beans and Almonds

stuffed primavera chicken

Primavera Stuffed Chicken Breasts

cilantro chicken

Cilantro Lime Chicken Salad with Strawberry Salsa

You Might Also Like

Frequently Asked Questions

Is there a difference between balsamic glaze and balsamic vinegar?

Balsamic glaze is the reduction of balsamic vinegar. This is done by simmering the vinegar in a saucepan until it thickens and reduces in half to achieve the thick consistency of syrup.


What else can I use balsamic glaze on?

You can drizzle balsamic glaze on slices of bruschetta, Caprese salads, roasted veggies, and even on summer berries or vanilla ice cream.


What does balsamic glaze taste like?

It has an intense sweet and tangy flavor, therefore, ad it slowly to recipes because just a little bit goes a long way.

Posted on Leave a comment

Sauteed Pesto Chicken with Artichokes and Peppers

chicken pesto

This Keto-Friendly Pesto Chicken meal prep recipe can’t get any easier. It’s flavored with basil pesto sauce and pairs perfectly with the sweetness of the red peppers and filled with “meaty” artichokes.

This post may contain affiliate links. Please see our privacy policy for details.

Round plate with sauteed chicken, red bell peppers, and artichokes tossed in a basil pesto sauce.

Why We love this Pesto Chicken

  • This meal can be ready in less than 20 minutes
  • It uses budget-friendly ingredients
  • It is packed with lots of flavors

Why is Pesto Sauce Great for Meal Prep?

  • When you need something easy to boost flavor for weekly meal prep, use pesto sauce. It’s a great way to boost flavor with simple and fresh ingredients
  • Pesto sauce is a healthy way to season your dishes because it contains herbs, garlic, lemon, nuts, cheese, and oil

The PrepYoSelf Newsletter

To Make this Easy Pesto Chicken, You’ll Need

  • Chicken Tenderloins: You can also use chicken breast chunks or cut up boneless chicken thighs into one-inch cubes
  • Bell Peppers: Use any color, but we prefer red because they are sweeter
  • Artichokes: You can use frozen or canned artichokes
  • Pesto Sauce: Make your own homemade pesto in a blender, but there are many options in the grocery store. You can always refrigerate it or freeze it for later use

Round plate with sauteed chicken, red bell peppers, and artichokes tossed in a basil pesto sauce.

Basic Steps to Make Sauteed Pesto Chicken

  1. Thaw out the frozen artichokes according to the packaging instructions or drain the artichokes if you are using canned.
  2. Cut the bell peppers and chicken into one-inch chunks
  3. Next, add oil to a saute pan on medium-high heat and saute the chicken for a few minutes until they are golden brown and fully cooked.
  4. Then, add the bell peppers and artichokes and cook until they are tender.
  5. At the end, add the basil pesto and mix it all together until it is fully coated with the sauce.

Reference the recipe card below for detailed instructions.

Round plate with sauteed chicken, red bell peppers, and artichokes tossed in a basil pesto sauce.

Meal Prep Tips for Pesto Chicken

  • Other Cook Methods: You can also grill the chicken and vegetables on an indoor grill pan or you can cook it in an Air Fryer
  • To reheat: Reheat it in the microwave until it is warm
  • Storage: Store in an airtight container in the refrigerator for up to 3 to 4 days for the best quality.
  • To freeze: If you want to freeze this meal, you can store it in freezer bags in the freezer for up to 3 months for the best quality. Just be sure to thaw it out in the refrigerator before reheating it

Glass meal prep containers with sauteed chicken, red bell peppers, and artichokes tossed in a basil pesto sauce.

chicken pesto

Sauteed Pesto Chicken with Artichokes and Bell Peppers

Keep a batch of pesto sauce on hand and use it in your next chicken meal prep for an easy and tasty meal solution.
No ratings yet
Prep Time 5 minutes
Cook Time 15 minutes
Course dinner
Cuisine American, Italian
Servings 2

Equipment

  • knife
  • cutting board
  • spatula
  • saute pan

Ingredients
  

  • 12 oz boneless chicken thighs
  • 1 red bell pepper
  • 2 cups artichoke hearts (frozen)
  • 3 tablespoons basil pesto sauce
  • 1 tablespoon olive oil

Instructions
 

  • Defrost the frozen artichoke hearts according to the packaging instructions or drain them if you purchased canned artichokes. Cut the bell peppers into cubes and dice the chicken in 1 inch chunks.
  • Add oil to a saute pan on medium high heat and saute the chicken for about 5 to 6 minutes until it is golden brown and fully cooked.
  • Next, add the bell peppers and artichoke hearts and let them heat through for about 2 to 3 minutes. Finish by adding the basil pesto and mixing everything well until the chicken is coated with the sauce.

Similar Recipes

sweet and sour chicken wings

Air Fryer Sweet and Sour Chicken Wings

chicken pesto wrap

Chicken Pesto Wrap with Hummus

peanut chicken

Peanut Chicken and Celery Stir Fry

You Might Also Like

Frequently Asked Questions

What kind of pesto do I use?

The most common pre-made pestos found in grocery stores are basil pesto or tomato pesto. Either flavor will work well for this recipe.


What can I serve with this pesto chicken recipe?

If you want to keep it low carb, you can serve it with cauliflower rice, otherwise, it goes well with pasta noodles or even pita bread.


Can I freeze pesto chicken?

Yes, store it in an airtight freezer bag and freeze for up to 3 months for the best quality.