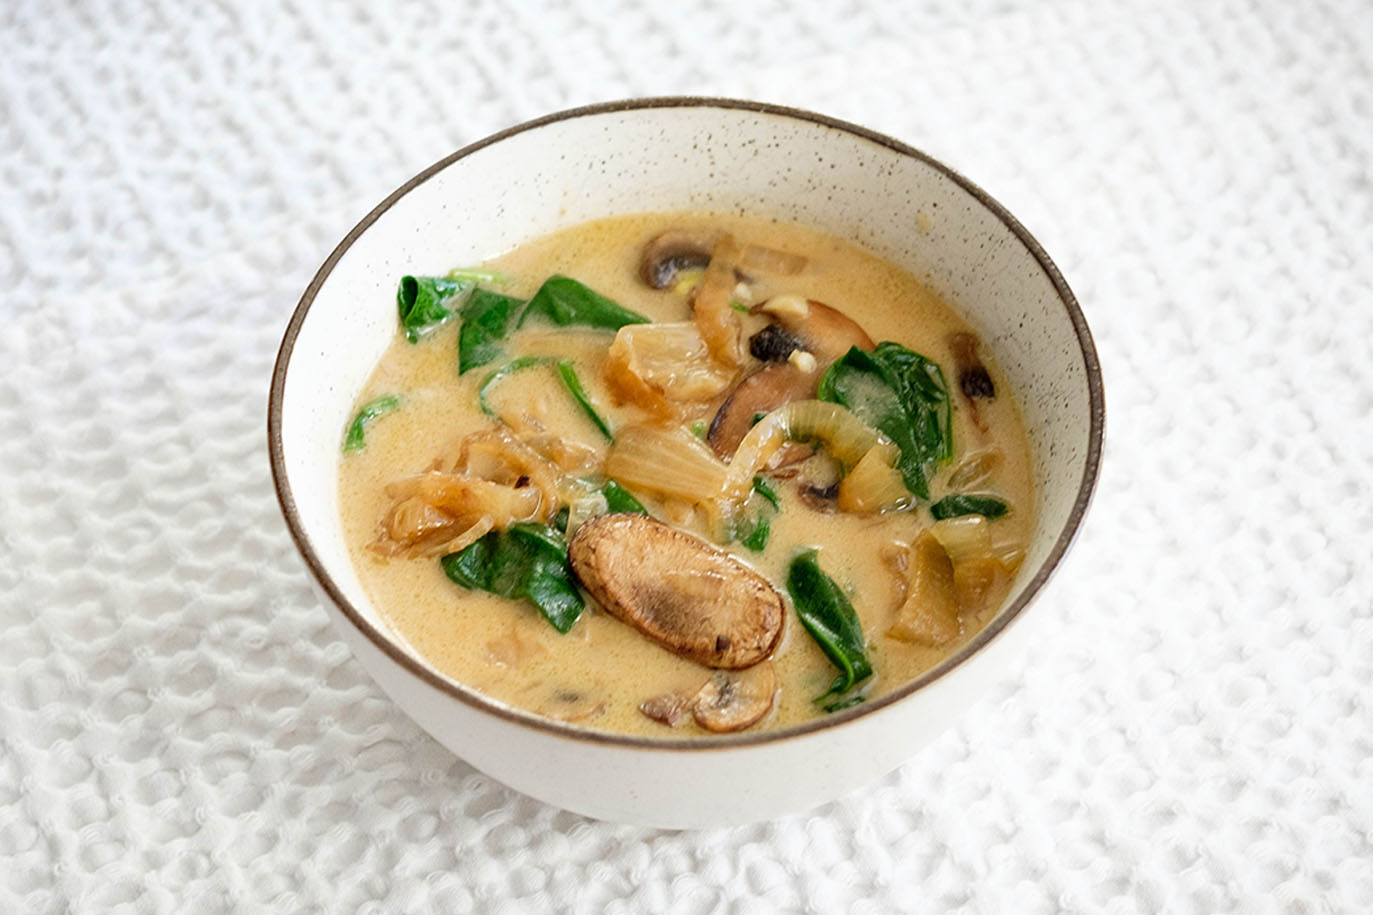
Posted on Leave a comment

Roasted Vegetable and Ricotta Puff Pastry Tarts

vegetable puff pastry

Transform your holiday table with these Roasted Vegetable and Ricotta Puff Pastry Tarts—a perfect blend of simplicity and elegance. With flaky puff pastry, creamy ricotta, and vibrant veggies, this dish is as delicious as it is stunning. Whether you’re hosting Thanksgiving or want a quick midweek treat, this recipe delivers on all fronts.

This post may contain affiliate links. Please see our privacy policy for details.

Calories: 507kcal | Carbohydrates: 34g | Protein: 13g | Fat: 36g | Saturated Fat: 12g | Polyunsaturated Fat: 4g | Monounsaturated Fat: 18g | Trans Fat: 0.01g | Cholesterol: 72mg | Sodium: 461mg | Potassium: 231mg | Fiber: 2g | Sugar: 2g | Vitamin A: 2794IU | Vitamin C: 5mg | Calcium: 161mg | Iron: 2mg

vegetable puff pastry

Why This Recipe is a Holiday Treat

  • Elegant Yet Easy: The puff pastry creates a restaurant-quality appearance without complicated techniques.
  • Budget-Friendly Ingredients: With simple pantry staples like ricotta, puff pastry, and seasonal veggies, this tart is both affordable and accessible.
  • A Burst of Color: The vibrant layers of vegetables add a pop of color that looks stunning on any holiday table.
  • Customizable to Your Taste: Swap in your favorite vegetables or seasonings to make it your own.
  • Perfect for Sharing: Cut it into bite-sized squares for a crowd-pleasing appetizer or serve whole as a side dish.
  • Quick Prep Time: With minimal chopping (thank you, mandoline!), this dish is oven-ready in just minutes.
  • Great Make-Ahead Option: Assemble ahead of time and pop it in the oven before guests arrive for a stress-free hosting experience.

The PrepYoSelf Newsletter

Why These Ingredients Shine Together

  • Puff Pastry: The puff pastry is the backbone of this tart. Its flaky, buttery layers provide a light and crispy base that complements the creamy and savory toppings. As it bakes, the pastry puffs up to create a golden, elegant frame, making it both functional and visually stunning.
  • Ricotta Cheese: Ricotta adds a creamy, mild layer that serves as the perfect blank canvas for the vegetables. Its soft texture and subtle tang balance the flaky richness of the puff pastry. The ricotta also helps hold the vegetables in place, acting as a “glue” while adding a luxurious mouthfeel to every bite.
  • Feta Crumbles: Topping this tart with feta crumbles adds a tangy, salty punch that perfectly complements the creamy ricotta and sweet roasted vegetables. The crumbly texture of feta provides a delightful contrast to the soft veggies and flaky puff pastry, while its bold flavor enhances the savory and herbaceous notes of the dish.
  • Egg: The egg is mixed with the ricotta to enhance its creaminess and stability. It helps bind the ricotta mixture, ensuring it sets slightly during baking, so it doesn’t run or become too watery. Additionally, if used as an egg wash, it adds a shiny, golden finish to the pastry edges.
  • Garlic Powder: Garlic powder introduces a savory, aromatic element that amplifies the flavor of the ricotta mixture without overwhelming the dish. Its subtle garlicky note ties the ingredients together, enhancing the overall taste profile.
  • Thyme: Thyme brings a fresh, earthy flavor to the tart. Its herbaceous aroma complements the vegetables and adds depth to the ricotta mixture, giving the dish a hint of sophistication.
  • Sweet Potato: Sweet potato is the sweet and hearty element in this dish. Its natural sugars caramelize slightly in the oven, adding a touch of sweetness that contrasts beautifully with the savory ricotta and thyme. The vibrant orange color also adds to the visual appeal.
  • Zucchini: Zucchini provides a delicate, slightly grassy flavor and a soft texture that pairs well with the other ingredients. Its mild taste allows the other flavors to shine, and its bright green color adds another pop of vibrancy to the tart.
  • Tomato: Tomatoes add juiciness and a tangy sweetness, balancing the richness of the ricotta and the buttery puff pastry. Their acidity brightens the dish, creating a refreshing contrast to the other ingredients.
vegetable puff pastry

How to Make Roasted Vegetable and Ricotta Puff Pastry

  1. Prep Your Vegetables: Start by washing your sweet potato, zucchini, and tomato thoroughly. Using a mandoline slicer, carefully slice each vegetable into very thin pieces. This helps them cook evenly in the oven. If you don’t have a mandoline, you can use a sharp knife—just take your time to ensure the slices are thin. Feel free to use other vegetables like bell peppers or mushrooms if you prefer.
  2. Make the Ricotta Mixture: In a small mixing bowl, combine the ricotta cheese, 1 large egg, ¼ teaspoon garlic powder, ¼ teaspoon salt, and 1 teaspoon thyme. Stir everything together with a spoon or whisk until the mixture is smooth and creamy. This will be your flavorful base layer for the tart.
  3. Prepare the Puff Pastry Base: Unfold your puff pastry sheet and place it on a baking sheet lined with parchment paper to prevent sticking. If the pastry feels stiff, let it sit at room temperature for a few minutes to soften. Once it’s easy to handle, use a sharp knife to trim ½ inch off each edge. Set these strips aside—you’ll use them later. Using a spatula or the back of a spoon, spread the ricotta mixture evenly across the center of the puff pastry, leaving a small border around the edges.
  4. Add the Veggies: Now it’s time to decorate your tart! Arrange the vegetable slices on top of the ricotta layer in a pattern of your choice. For example, you can alternate colors (sweet potato, zucchini, tomato) to create a beautiful, festive design. Make sure the vegetables are placed close together so that each bite is flavorful.
  5. Top with Feta Crumbles: Sprinkle feta crumbles over the arranged veggies for a tangy, salty kick that complements the creamy and savory flavors.
  6. Create a Puff Edge: Take the reserved pastry strips and lay them along the edges of the tart to create a raised border. This step adds a professional touch and helps frame the tart. If you’d like a glossy, golden finish on the edges, whisk an extra egg and lightly brush it over the puff pastry border with a pastry brush.
  7. Bake to Perfection: Preheat your oven to 350°F. Place the baking sheet with your tart in the oven and bake for 20–25 minutes. Keep an eye on it—the puff pastry should rise and turn a golden brown, while the vegetables become tender. When it’s ready, carefully remove the tart from the oven and let it cool for a few minutes before serving.

Reference the recipe card below for detailed instructions.

vegetable puff pastry

Meal Prep Tips:

  • Thaw Puff Pastry Properly: If your puff pastry is frozen, thaw it overnight in the fridge or at room temperature for 30–40 minutes. Don’t leave it out too long, as it can become too soft and sticky to handle.
  • Assemble Ahead of Time: You can assemble the tart a few hours before baking. Cover it with plastic wrap and store it in the fridge. Bake it fresh to ensure the puff pastry stays flaky and doesn’t get soggy.
  • Serve with a Salad: Pair this tart with a fresh arugula or mixed greens salad dressed with a lemon vinaigrette. The acidity of the salad complements the richness of the tart.
  • Cheese Platter: Offer a cheese platter with soft and hard cheeses, nuts, and fruits alongside the tart for a complete appetizer spread.
  • Vegetables: Swap sweet potato for butternut squash or carrots for a similar sweetness.Replace zucchini with thinly sliced eggplant or asparagus for a different texture. Use red bell pepper, mushrooms, or red onion for a more robust flavor.
  • Cheese: Instead of ricotta, try goat cheese for a tangier flavor or cream cheese for a richer texture. Feta or mascarpone can also be excellent substitutes.
vegetable puff pastry

Roasted Vegetable and Ricotta Puff Pastry

This roasted vegetable and ricotta puff pastry tart is a simple yet elegant dish featuring creamy ricotta, savory herbs, and colorful veggies on a flaky puff pastry base, perfect for holiday gatherings or easy weeknight meals.
No ratings yet
Prep Time 5 minutes
Cook Time 25 minutes
Course Appetizer
Cuisine American
Servings 4
Calories 507 kcal

Equipment

  • mandolin
  • sheet pan
  • oven

Ingredients
  

  • 1 sheet puff pastry
  • 3/4 cup ricotta cheese
  • 2 tablespoons feta crumbles
  • 1 egg
  • 1/4 teaspoon garlic powder
  • 1/4 teaspoon salt
  • 1 teaspoon thyme
  • 1/2 cup sweet potato (thinly sliced)
  • 1/2 cup zucchini (thinly sliced)
  • 1/4 cup tomato (thinly sliced)
  • 1 tablespoon olive oil

Instructions
 

  • Prep Your Vegetables: Use a mandoline to thinly slice the sweet potato, zucchini, and tomato. (Feel free to swap in other favorites like bell peppers or mushrooms!) Thin slices ensure quick, even cooking.
  • Make the Ricotta Mixture: In a small bowl, mix together the ricotta cheese, egg, garlic powder, salt, and thyme until smooth and creamy.
  • Prepare the Puff Pastry Base: Roll out the puff pastry onto a baking sheet. Trim ½ inch off the edges to create strips and set them aside. Spread the ricotta mixture evenly over the pastry base.
  • Add the Veggies: Arrange the sliced veggies in a decorative pattern on top of the ricotta layer—alternating colors for a festive look. Drizzle the vegetables with a little bit of olive oil and a sprinkle of salt.
  • Top with Feta Crumbles:Sprinkle feta crumbles over the arranged veggies for a tangy, salty kick that complements the creamy and savory flavors.
  • Create a Puff Edge: Use the reserved pastry strips to frame the tart edges. Optional: brush the edges with egg wash for a golden brown finish.
  • Bake to Perfection: Preheat your oven to 350°F and bake for 20–25 minutes, or until the pastry is puffed and golden, and the veggies are tender.

Notes

Nutrition information provided is an estimate. It will vary based on cooking method and specific ingredients used. Please consult with your healthcare provider for specific dietary needs. To gain a better understanding, explore our nutrition disclaimer here. 

Nutrition

Calories: 507kcalCarbohydrates: 34gProtein: 13gFat: 36gSaturated Fat: 12gPolyunsaturated Fat: 4gMonounsaturated Fat: 18gTrans Fat: 0.01gCholesterol: 72mgSodium: 461mgPotassium: 231mgFiber: 2gSugar: 2gVitamin A: 2794IUVitamin C: 5mgCalcium: 161mgIron: 2mg

Similar Recipes

baked oatmeal

Oven Baked Oats with Apricots and Berries

ricotta apple

Oven Baked Apple with Ricotta and Walnuts

french toast 2

Oven Baked French Toast Muffins with Strawberries

You Might Also Like

Smartfruit Mellow Mango + Immunity, 100% Real Fruit Purée

Trader Joe’s Unsalted, Dry Toasted Slivered Almonds

Trader Joe’s the Dark Chocolate Lover’s Chocolate Bar

Frequently Asked Questions

Can I use frozen vegetables?

It’s better to use fresh vegetables for this recipe, as frozen ones can release too much moisture, making the puff pastry soggy. However, if you must use frozen vegetables, thaw them completely and pat them dry with a paper towel before using


How do I prevent my puff pastry from getting soggy?

Make sure the vegetables are thinly sliced and not too wet. Pat them dry before placing them on the tart. Don’t overdo the ricotta mixture—spread it thinly and evenly. Bake the tart on parchment paper or a baking mat for better airflow and even cooking.


What if I don’t have puff pastry?

You can use phyllo dough as a substitute, layering several sheets with a light brush of olive oil or butter in between. Alternatively, try a pre-made pizza dough or pie crust for a different texture.

Posted on Leave a comment

Pomegranate, Apple, and Pear Crisp

pear, apple, and pomegranate crisp dessert

This Apple, Pear, and Pomegranate Crisp is a warm, inviting dessert that combines the best of fall’s bountiful harvest into a single dish. Perfectly spiced with cinnamon, brightened with orange zest, and topped with a buttery oat streusel, it’s an easy, pantry-friendly treat that’s sure to wow at any holiday gathering or cozy night in.

This post may contain affiliate links. Please see our privacy policy for details.

Calories: 401kcal | Carbohydrates: 71g | Protein: 4g | Fat: 13g | Saturated Fat: 7g | Polyunsaturated Fat: 1g | Monounsaturated Fat: 3g | Trans Fat: 0.5g | Cholesterol: 30mg | Sodium: 155mg | Potassium: 398mg | Fiber: 8g | Sugar: 48g | Vitamin A: 470IU | Vitamin C: 31mg | Calcium: 55mg | Iron: 1mg

pear, apple, and pomegranate crisp dessert

Reasons This Crisp is a Fall Favorite

  • Showcases Seasonal Produce: This recipe highlights fall’s best fruits—apples, pears, and pomegranates—which are at their peak for flavor and freshness.
  • Perfectly Spiced: Cinnamon brings warmth to the dish, evoking the comforting essence of autumn. Paired with citrusy orange zest, it’s a flavor combination that feels both cozy and refreshing.
  • Simple, Pantry-Friendly Ingredients: Using staples like oats, flour, butter, and sugar, this dessert is easy to whip up without a lengthy grocery list.
  • Easy to Make, Easy to Love: With just a few steps and minimal equipment, this recipe is stress-free, making it ideal for busy weeknights or last-minute holiday desserts.
  • Holiday-Ready: It’s the perfect dessert for gatherings, offering vibrant colors and flavors that complement festive meals. Plus, it’s easy to transport if you’re bringing it to a potluck.
  • Customizable and Crowd-Pleasing: Serve the crisp warm with a scoop of vanilla ice cream or a dollop of freshly whipped cream. The cool, creamy topping complements the warm, spiced filling beautifully. Sprinkle chopped nuts like walnuts or pecans over the crisp just before serving for added texture and a nutty flavor boost.

The PrepYoSelf Newsletter

Simple Ingredients for this Crisp

  • Apple: Apples bring a classic sweetness with a hint of tartness, depending on the variety you choose. They are a quintessential fall fruit that adds familiarity to the dish. When baked, apples become tender yet hold their shape, offering a firm bite amidst the softer elements of the filling.
  • Pear: Pears provide a mild, honeyed sweetness that complements the tartness of the apple without overwhelming the dish.
  • Pomegranate Seeds: Pomegranate seeds add bright, tangy bursts of flavor that cut through the sweetness of the apples and pears, making the filling more vibrant. Their juicy, crisp texture provides a delightful contrast to the tender fruit and crunchy streusel.
  • Ground Cinnamon: Cinnamon adds warmth and depth, amplifying the autumnal flavors of the apples and pears. Its subtle spice brings complexity to the sweetness of the dish.
  • Orange Zest and Juice: The zest and juice provide a pop of citrusy brightness that balances the richness of the fruit and butter. The orange also enhances the overall flavor, making the dessert taste fresh and light.
  • Rolled Oats: Oats add a hearty, chewy crunch to the streusel, ensuring the topping has a satisfying bite. Their nutty, earthy flavor complements the sweetness of the fruit and sugar.
  • Unsalted Butter: Butter is the magic ingredient that creates a crisp, crumbly streusel.Its creamy richness binds the topping and adds a luxurious depth to the dessert.
  • Honey Drizzle: Honey adds a glossy finish and a floral sweetness that complements both the fruit and the streusel, elevating the dessert into something truly special.

pear, apple, and pomegranate crisp dessert

Instructions for Apple, Pear, and Pomegranate Crisp

  1. Preheat and Prepare Your Baking Dish. Preheat your oven to 350°F (175°C). Lightly grease a small baking dish, about 4×8 inches, with butter or nonstick spray. This will prevent the crisp from sticking to the pan as it bakes.
  2. Prepare the Fruit Filling: Carefully slice the apple and pear thinly using a mandolin for even slices or a sharp knife if you don’t have one. Place the slices in a large mixing bowl. Use a fine grater or zester to remove the orange’s outer peel (zest) and sprinkle it over the fruit. Then cut the orange in half and squeeze the juice directly into the bowl. The orange adds brightness and keeps the fruit from browning.
  3. Mix the Filling Ingredients: Sprinkle the sugar, cinnamon, and cornstarch over the fruit. Add the pomegranate seeds and stir gently until everything is well-coated and combined. The cornstarch will help thicken the juices as the fruit cooks.
  4. Transfer to the Baking Dish: Pour the fruit mixture into your greased baking dish, including any juices from the bowl. Spread it out evenly so it cooks uniformly.
  5. Make the Streusel Topping: In a medium-sized bowl, mix the oats, flour, brown sugar, cinnamon, and salt. These dry ingredients will form the base of the streusel. Cut the butter into small cubes (this makes it easier to mix) and add them to the bowl. Use a fork or your fingers to combine the butter with the dry ingredients. Press and pinch the mixture until it forms crumbs about the size of peas. The butter should be evenly distributed to ensure a crispy topping.
  6. Assemble and Bake: Evenly sprinkle the streusel mixture over the fruit filling in the baking dish, covering as much of the fruit as possible. Place the dish in the preheated oven and bake for 25–30 minutes. You’ll know it’s ready when the fruit filling is bubbling around the edges, and the streusel is golden brown and crispy.
  7. Serve and Enjoy: Let the crisp cool for about 5–10 minutes. This allows the juices to thicken further and makes it easier to serve. For a finishing touch, sprinkle fresh pomegranate seeds on top and drizzle with honey for extra flavor. Serve warm with a scoop of vanilla ice cream or whipped cream for a truly indulgent treat.

Reference the recipe card below for detailed instructions.

pear, apple, and pomegranate crisp dessert

Benefits of Using a Mandolin Slicer for This Recipe:

  • Even Slices for Consistent Cooking: A mandolin ensures uniformly thin slices of apples and pears, which cook evenly in the oven. This avoids undercooked or overly mushy fruit in the filling.
  • Saves Time and Effort: Mandolins are incredibly efficient, allowing you to slice fruit quickly and with minimal effort. This is especially helpful when prepping for multiple servings or larger batches.
  • Professional Presentation: The even slices create a polished, professional look in the finished dessert, especially if you’re layering the fruit neatly in individual ramekins.
  • Enhanced Flavor Distribution: Thin, consistent slices allow the orange juice, zest, and spices to coat the fruit more evenly, ensuring balanced flavors in every bite.
  • Versatility Beyond This Recipe: Investing in a mandolin pays off for other recipes too—use it for slicing vegetables for gratins, salads, or chips, and fruits for tarts or pies.
  • Perfect for Beginners: A mandolin is straightforward to use and delivers professional-quality results, making it a great tool for cooks of any skill level.

pear, apple, and pomegranate crisp dessert

pear, apple, and pomegranate crisp dessert

Pomegranate, Apple, and Pear Crisp

Serve this crisp warm with a scoop of vanilla ice cream or a dollop of whipped cream, and watch as it becomes a fall dessert favorite!
No ratings yet
Prep Time 5 minutes
Cook Time 30 minutes
Course Dessert
Cuisine American
Servings 4
Calories 401 kcal

Equipment

  • mandolin slicer
  • baking dish

Ingredients
  

Fruit Filling

  • 1 apple
  • 1 pear
  • 1 pomegranate
  • 1/4 cup white sugar
  • 1 tablespoon cornstarch
  • 1/2 teaspoon ground cinnamon
  • 1 tablespoon orange zest
  • 1 orange (juiced)

Streusel Topping

  • 1/2 cup oats
  • 1/4 cup flour
  • 1/4 cup brown sugar
  • 1/4 teaspoon ground cinnamon
  • 1/4 teaspoon salt
  • 1/2 stick unsalted butter

Instructions
 

  • Preheat and Prep: Preheat your oven to 350°F. Grease a small baking dish (4×8 inches works perfectly) and set aside.
  • Prepare the Fruit Filling: Use a mandolin or knife to slice the apple and pear thinly. Place the slices in a bowl. Add the zest and juice of one orange, mixing well to coat the fruit. Sprinkle in the sugar, cinnamon, and cornstarch. Add the pomegranate seeds and stir until combined. The fruit will start releasing its natural juices. Transfer the fruit mixture to the prepared baking dish, pouring the juices over the top.
  • Make the Streusel: In another bowl, combine the oats, flour, brown sugar, cinnamon, and salt. Add chunks of butter and use a fork to work it into the dry ingredients until the mixture is crumbly, with pea-sized pieces of butter.
  • Assemble and Bake: Evenly sprinkle the streusel over the fruit filling. Bake in the oven for 25–30 minutes, or until the filling is bubbling and the topping is golden and crisp.
  • Serve and Enjoy: Let the crisp cool slightly before serving. Garnish with fresh pomegranate seeds and a drizzle of honey for an extra touch of sweetness.

Notes

Nutrition information provided is an estimate. It will vary based on cooking method and specific ingredients used. Please consult with your healthcare provider for specific dietary needs. To gain a better understanding, explore our nutrition disclaimer here. 

Nutrition

Calories: 401kcalCarbohydrates: 71gProtein: 4gFat: 13gSaturated Fat: 7gPolyunsaturated Fat: 1gMonounsaturated Fat: 3gTrans Fat: 0.5gCholesterol: 30mgSodium: 155mgPotassium: 398mgFiber: 8gSugar: 48gVitamin A: 470IUVitamin C: 31mgCalcium: 55mgIron: 1mg

Similar Recipes

baked oatmeal

Oven Baked Oats with Apricots and Berries

ricotta apple

Oven Baked Apple with Ricotta and Walnuts

french toast 2

Oven Baked French Toast Muffins with Strawberries

You Might Also Like

Smartfruit Mellow Mango + Immunity, 100% Real Fruit Purée

Trader Joe’s Unsalted, Dry Toasted Slivered Almonds

Trader Joe’s the Dark Chocolate Lover’s Chocolate Bar

Frequently Asked Questions

Can I use different fruits for the filling?

Yes! This recipe is versatile. Substitute or add other fruits like peaches, plums, or berries. Keep in mind that softer fruits like berries may release more juice, so consider adding an extra teaspoon of cornstarch to thicken the filling.


Can I use canned or frozen fruit?

Absolutely. For canned fruit, drain the syrup or juice to avoid an overly watery filling. When using frozen fruit, thaw the fruit and pat it dry to minimize excess moisture.


What if I don’t have a mandolin slicer?

A sharp knife works fine! Slice the apples and pears as thinly as possible to ensure they cook evenly. A food processor with a slicing attachment can also be a great alternative.

Posted on Leave a comment

Moroccan Inspired Chicken with Couscous

moroccan chicken with couscous

Experience the warmth and richness of Moroccan cuisine with this delightful chicken and couscous recipe. Infused with aromatic spices like cinnamon and paprika, tender boneless chicken thighs come together with sweet raisins and crunchy almonds for a dish that’s both comforting and exciting.

This post may contain affiliate links. Please see our privacy policy for details.

moroccan chicken with couscous
Screenshot

Why This Recipe is a Must-Try:

  • Warm Fall Spices: The cinnamon and paprika in this dish give it a comforting warmth that’s perfect for cooler weather. These spices add a subtle richness to the chicken, making it taste like fall in every bite.
  • Aromatic and Flavorful: Fresh ginger and garlic make the dish incredibly aromatic. As they cook, they fill your kitchen with a cozy scent that instantly feels comforting, making it a joy to cook as well as to eat!
  • Nourishing Ingredients: With tender chicken, raisins for a touch of sweetness, and almonds for crunch, this dish offers a satisfying mix of textures and flavors. It’s the kind of nourishing meal that feels hearty yet light, perfect for this season.
  • Meal Prep Magic: This recipe is an excellent choice for meal prep because the flavors actually get better over time. As the spices meld with the chicken and couscous, each meal becomes even more flavorful, giving you something delicious to look forward to every day.
  • Autumnal Hues: The warm colors from the paprika, golden couscous, and vibrant green onions look just as good as they taste. This visually appealing meal adds a festive touch to your meal prep containers.
  • Easy but Impressive: Moroccan-inspired flavors make this dish feel gourmet without being complicated. It’s an easy way to spice up your weekly meal prep routine and impress anyone you’re sharing a meal with!
  • Balanced and Satisfying: The combination of protein, whole grains, and healthy fats (from almonds) makes this dish balanced and filling. It provides sustained energy for busy days, keeping you cozy and well-fueled through crisp fall afternoons.

The PrepYoSelf Newsletter

Vibrant and Flavorful Ingredients:

  • Boneless Chicken Thighs: Chicken thighs are tender, juicy, and slightly richer in flavor than chicken breasts, making them a great base for the bold spices in this recipe. They soak up all the aromatics and seasonings beautifully, delivering juicy bites that carry the dish’s warm, savory essence.
  • White and Green Onions: White onions provide a strong, slightly sweet base flavor, while green onions add a fresh, mild sharpness. Together, they offer both depth and brightness, creating a balance in each bite. They also add subtle color and texture variation to the dish.
  • Minced Garlic and Ginger: These two aromatics are essential for building flavor. Garlic brings a rich, savory undertone, while ginger adds a hint of warmth and a slight spiciness that complements the sweet and savory spices. Together, they create an aroma that fills the kitchen with coziness, setting the stage for the Moroccan-inspired flavors to come.
  • Roma Tomato: Diced roma tomatoes add a juicy, slightly acidic note that cuts through the richness of the chicken and spices. They also add a pop of color and moisture, helping to balance the dish by adding a hint of freshness amidst the warm spices.
  • Cinnamon and Paprika: These two spices are the heart of the Moroccan flavor profile. Cinnamon adds warmth and a hint of sweetness, enhancing the cozy, fall-inspired flavor. Paprika provides an earthy smokiness and a gentle heat, creating depth that perfectly complements the richness of the chicken.
  • Raisins: Raisins bring a subtle sweetness that contrasts with the savory, spiced chicken. They add a chewy texture that makes each bite more interesting and play off the cinnamon in the dish, enhancing its Moroccan flair.
  • Sliced Almonds: Almonds add a delightful crunch and nutty richness, complementing the warmth of the spices and the sweetness of the raisins. They’re a final touch of texture and flavor that makes the dish feel complete and satisfying.
  • Couscous: Couscous is the perfect canvas for this flavorful chicken. It’s light, fluffy, and neutral, soaking up the sauce and juices from the chicken without overpowering it. Couscous also brings a subtle nuttiness that pairs well with the almonds and spices, creating a complete and harmonious dish.

moroccan chicken with couscous

Easy Recipe Steps:

  1. Sauté the Aromatics: Heat oil in a large sauté pan over medium-high heat. Add diced white onions and chopped green onions, stirring for about 2-3 minutes until they soften and start to caramelize.
  2. Cook the Chicken: Add the cubed chicken thighs to the pan along with cinnamon, paprika, and salt. Stir well, cooking for 7-8 minutes until the chicken is browned and fully cooked through. Pour in 1/4 cup of water to deglaze, scraping up any delicious bits at the bottom of the pan for extra flavor.
  3. Add Garlic, Ginger, and Tomatoes: Toss in minced garlic, ginger, and diced roma tomato. Stir everything together and cook for another 2-3 minutes until the tomatoes soften and the flavors meld.
  4. Prepare the Couscous: While the chicken finishes cooking, prepare the couscous according to package directions. Typically, bring water to a boil, then add the couscous, cover, and turn off the heat. Let it sit for 5 minutes, then fluff with a fork.
  5. Combine and Garnish: Add raisins and sliced almonds to the chicken mixture, stirring well to combine. Serve the savory, fragrant chicken over a bed of fluffy couscous, and enjoy!

Reference the recipe card below for detailed instructions.

moroccan chicken with couscous

Meal Prep Recipe Tips

  • Flavors Enhance Over Time: Allow the dish to sit for a day in the refrigerator before eating. The spices and flavors will deepen and become even more delicious!
  • Freezing for Later:If you want to save portions for  later, this dish freezes well. Make sure to cool the chicken and couscous completely before transferring to freezer-safe containers. Label with the date, and it can last for up to three months.
  • Nuts: Swap sliced almonds for walnuts, pistachios, or cashews for a different flavor and texture.
  • Fruits: Use dried apricots or cranberries instead of raisins to switch up the sweetness and add new flavors.
  • Fresh Herbs: Garnish with fresh cilantro or parsley for added freshness and color.Different Meats: You can also use shrimp, or even fish like salmon, adjusting cooking times as necessary.

moroccan chicken with couscous
Screenshot

white round plate with moroccan chicken and couscous.

Moroccan Chicken and Couscous

No ratings yet
Prep Time 5 minutes
Cook Time 20 minutes
Course dinner, Main Course
Cuisine Moroccan
Servings 2

Equipment

  • knife
  • cutting board
  • saute pan
  • soup pot

Ingredients
  

  • 12 oz boneless chicken thighs (cut into 1 inch cubes)
  • 1/4 cup white onions (diced)
  • 1/4 cup green onions (chopped)
  • 1 tbsp minced garlic
  • 1 tbsp minced ginger
  • 1 roma tomato (diced)
  • 1/4 tsp cinnamon
  • 1/4 tsp paprika
  • 1/4 tsp salt
  • 1 oz raisins
  • 2 tbsp sliced almonds
  • 3/4 cup couscous

Instructions
 

  • Add oil to a saute pan on medium-high heat and saute the onions and green onions until they soften (2 to 3 minutes)
  • Then, add the diced chicken and seasonings and stir for about 7 to 8 minutes until it is fully cooked. Add 1/4 cup of water to deglaze the pan and stir the bottom of the pan to get the bits at the bottom. Add the minced garlic, ginger, and diced tomatoes and stir well.
  • In another pot, cook the couscous according to the packaged instructions. You will typically boil the water. Once the water boils, you add the couscous, cover the pot with the lid, and turn off the heat. After 5 minutes, the couscous should be cooked and you can fluff it with a fork.
  • Enjoy the chicken with fluffy couscous.

Similar Recipes

orange chicken

Air Fryer Orange Soy Glazed Chicken and Broccoli

roasted chicken and rutabaga

Roasted Lemon Italian Chicken with Rutabaga

rosemary chicken

Rosemary Baked Chicken and Potatoes

You Might Also Like

Frequently Asked Questions

Can I use chicken breast instead of chicken thighs?

Yes, you can substitute chicken breasts for chicken thighs. However, keep in mind that chicken breasts are leaner and can dry out more quickly, so be sure to monitor cooking time closely to avoid overcooking.


What can I substitute for couscous?

If you’re looking for a gluten-free option, consider using quinoa or rice. Both will provide a similar texture and can soak up the flavors of the dish. Adjust the cooking method according to the grain you choose.


Can I add more vegetables to the recipe?

Absolutely! You can add bell peppers, zucchini, or carrots for extra nutrition and flavor. Just make sure to adjust the cooking time to ensure the vegetables are tender but not mushy.

Posted on Leave a comment

One Pot Cherry Chipotle Beef Chili

beef chili with cornbread muffins

A Cozy, High-Protein Fall Meal Prep Idea. As the weather turns crisp and the days get shorter, there’s nothing more comforting than a warm bowl of chili to get you through fall. But this isn’t your typical chili—this Cherry Chipotle Beef Chili recipe brings a delightful twist by combining the smoky heat of chipotle peppers with the sweet burst of cherries. It’s not only hearty and flavorful, but also packed with protein, making it a perfect meal prep dish for busy weeks.

This post may contain affiliate links. Please see our privacy policy for details.

Calories: 346kcal | Carbohydrates: 33g | Protein: 26g | Fat: 13g | Saturated Fat: 4g | Polyunsaturated Fat: 1g | Monounsaturated Fat: 8g | Trans Fat: 0.4g | Cholesterol: 70mg | Sodium: 386mg | Potassium: 863mg | Fiber: 6g | Sugar: 24g | Vitamin A: 430IU | Vitamin C: 20mg | Calcium: 72mg | Iron: 5mg

beef chili with cornbread muffins

Why This Chili is the Ultimate Fall Meal Prep

  • Protein Powerhouse: Lean ground beef provides an excellent source of protein, perfect for keeping you full and energized throughout the day. This chili is a high-protein option to fuel busy workdays or after-workout recovery.
  • Unique Flavor Combo: The surprising sweetness from cherries pairs beautifully with the smoky, spicy chipotle peppers. It’s a fun, unexpected twist that elevates this chili far beyond the standard recipe.
  • Meal Prep Hero: This chili stores wonderfully in the fridge or freezer, making it ideal for meal prep. Make a large batch and portion it out for easy grab-and-go lunches or dinner during the week.
  • Comfort in a Bowl: With hearty ingredients like beef, carrots, and tomatoes, it’s a warm and comforting dish perfect for those chilly fall nights. Pair it with cornbread or crackers for extra comfort-food vibes.
  • Nutrient-Rich: Cherries are packed with antioxidants and vitamins, while carrots and tomatoes add a wealth of fiber, vitamins, and minerals to the mix. This chili isn’t just tasty—it’s packed with health benefits.
  • Satisfies Your Sweet & Spicy Cravings: The balance of sweet cherries and honey with the fiery kick of chipotle peppers creates a flavor profile that hits all the right notes. Every spoonful is a dance of bold, contrasting flavors that’ll make your tastebuds happy.
  • Perfect for Fall Gatherings: This chili is great for more than just meal prep. It’s a crowd-pleasing dish to bring to potlucks, football watch parties, or family dinners, offering a unique and delicious alternative to classic chili.

The PrepYoSelf Newsletter

Suprising Ingredients That Work Well Together

  • Frozen Cherries: Cherries might seem like an unusual ingredient for chili, but they’re the secret star of this recipe. Their natural sweetness balances the smokiness and heat from the chipotle peppers, creating a beautiful contrast. As they simmer, the cherries break down and release their juices, adding a subtle sweetness that enhances the overall flavor without being overpowering.
  • Chipotle Peppers in Adobo Sauce: These smoky, spicy peppers bring the heat to this chili. The rich, smoky flavor of the chipotle peppers works beautifully with the beef, giving the chili a deep, savory base. Their heat is balanced by the sweetness of the cherries and honey, ensuring that the chili has a complex flavor without being overwhelmingly spicy.
  • Lean Ground Beef: The foundation of any chili, lean ground beef provides the dish with a hearty texture and rich flavor. Its meaty base allows it to carry the bold spices and sweetness of the other ingredients without being overwhelming. Lean beef is a great option because it gives you all the flavor of beef without excessive fat, making this a lighter yet satisfying chili.
  • Carrots: Carrots add a subtle sweetness and a bit of crunch to balance the spiciness of the chipotle peppers. When cooked, they soften and absorb the smoky flavors, giving you a pleasant contrast to the heat in each bite. Their natural sugars also complement the cherries, creating a nice harmony between sweet and savory.
  • Red Onions: Red onions are slightly sweeter and milder than yellow or white onions, which makes them ideal for this chili. When sautéed, they release a natural sweetness that enhances the flavor of the beef and adds depth to the dish. Their sweetness also complements the honey and cherries, providing a balanced backdrop to the spicy elements.
  • Canned Diced Tomatoes with Green Chiles: The diced tomatoes add moisture and a slight acidity to the dish, which helps cut through the richness of the beef. The green chiles in the can introduce an additional mild heat that blends well with the chipotle peppers, creating layers of spicy, smoky, and tangy flavors. The tomatoes also help thicken the chili as it simmers, giving it a hearty texture.
  • Honey: Honey serves as a natural sweetener to complement the cherries and soften the spice from the chipotle peppers. Just a tablespoon is enough to round out the bold flavors and bring harmony to the dish. It adds a smooth sweetness without making the chili overly sugary, creating a balanced flavor profile that makes the chili feel warm and comforting.

beef chili with cornbread muffins

Basic Steps to Meal Prep Beef Chili

  1. Prep Your Ingredients: Before you start cooking, make sure to dice the carrot and red onion into small pieces. If you’re using whole chipotle peppers in adobo sauce, finely chop them or blend them into a smooth puree. Defrost the cherries by leaving them at room temperature or microwaving them for about 30 seconds.
  2. Sauté the Vegetables: In a large sauté pan, heat 1 tablespoon of olive oil over medium-high heat. Once the oil is hot (you should see a slight shimmer), add the diced red onions and carrots. Stir the vegetables occasionally so they cook evenly, and let them cook for about 5 minutes, or until they begin to soften and the onions become translucent (meaning you can almost see through them). This step helps bring out the sweetness and flavor of the vegetables.
  3. Brown the Ground Beef: Add the ground beef directly into the pan with the softened vegetables. As the beef starts to cook, use a spatula or spoon to break it into smaller pieces so it cooks evenly. Sprinkle in the garlic powder and salt. Stir the beef frequently to make sure all the pieces brown and cook thoroughly. This should take about 5-7 minutes, and the beef should be fully browned with no pink remaining.
  4. Add the Flavorful Ingredients: Once the beef is cooked, it’s time to add the bold flavors! Pour in the chopped chipotle peppers (or puree), the can of diced tomatoes with green chiles (including the liquid), the water, honey, and the defrosted cherries. Stir everything together so the ingredients are well combined. The cherries will add a touch of sweetness, while the chipotle peppers bring a smoky heat to the dish.
  5. Simmer and Let the Flavors Meld: Turn the heat down to low or medium-low. You want the chili to gently simmer, not boil. Cover the pan with a lid (or partially cover if you want it to reduce a little). Let it cook for about 20 minutes, stirring occasionally to make sure nothing sticks to the bottom. During this time, the flavors will blend together, and the chili will thicken slightly.
  6. Serve and Garnish: Once the chili is done simmering, taste it to check if it needs any more salt or seasoning. Spoon the chili into bowls and garnish with chopped cilantro for extra freshness. You can also serve it with cornbread or crackers on the side for a complete, cozy meal.

Reference the recipe card below for detailed instructions.

beef chili with cornbread muffins

Meal Prep Tips for Cherry Chipotle Beef Chili

  • Make a Big Batch: Double or triple the recipe and store portions in individual containers. This way, you have ready-to-go lunches or dinners for the entire week. Chili stores well in both the fridge and freezer, so you can plan for multiple meals in advance.
  • Freeze for Later: Chili freezes beautifully! Once cooled, divide the chili into airtight freezer containers or resealable freezer bags. Label and date them for easy grab-and-go meals. When you’re ready to eat, just thaw in the fridge overnight and reheat on the stovetop or microwave.
  • Pair with Sides: Make your meal more complete by prepping sides like cornbread, crackers, or a simple green salad. You can even bake cornbread muffins ahead of time and store them in the freezer alongside your chili.
  • Mix Up the Garnishes: Change up your chili by prepping a variety of garnishes like avocado slices, shredded cheese, sour cream, or even a dollop of Greek yogurt. Have these on hand to add something fresh and fun to each serving.
  • Ground Turkey or Chicken: Swap out the lean ground beef for ground turkey or chicken for a lighter version. Both options still pack plenty of protein while offering a slightly different flavor profile.
  • Chili-Stuffed Baked Potatoes: For a fun twist, serve this chili over baked sweet potatoes or regular baked potatoes. It’s a filling and delicious way to enjoy your meal while adding extra fiber.
  • Chili Tacos: Serve the chili inside soft tortillas or taco shells for a quick and easy taco night. Garnish with your favorite taco toppings like shredded lettuce, cheese, or guacamole.

beef chili with cornbread muffins

cherry chili

Cherry Chipotle Beef Chili

With its rich flavors, nutritional punch, and ease of preparation, this Cherry Chipotle Beef Chili is a fantastic dish to keep in your fall meal rotation.
No ratings yet
Prep Time 5 minutes
Cook Time 30 minutes
Course Main Course
Cuisine American
Servings 2
Calories 346 kcal

Equipment

  • medium soup pot
  • knife
  • cutting board
  • spatula

Ingredients
  

  • 8 oz lean ground beef
  • 1 each small carrot (diced)
  • 1/4 cup red onions (diced)
  • 1/4 cup chipotle peppers in adobo sauce (finley chopped or pureed)
  • 10 oz canned diced tomatoes with green chiles
  • 1/2 cup water
  • 1 cup frozen cherries (defrosted)
  • 1/4 cup cilantro (chopped)
  • 1 tbsp honey
  • 1/4 tsp salt
  • 1/4 tsp garlic powder
  • 1 tbsp olive oil

Instructions
 

  • Sauté the Vegetables: Heat 1 tablespoon of olive oil in a sauté pan over medium-high heat. Add the diced red onions and carrots. Cook until they soften, stirring occasionally, for about 5 minutes.
  • Cook the Beef: Add the ground beef to the pan. Sprinkle in the garlic powder and salt, breaking up the beef as it cooks. Stir and brown the meat for about 5-7 minutes until it's fully cooked.
  • Add Bold Flavors: Stir in the chipotle peppers, canned diced tomatoes with green chiles, water, honey, and defrosted cherries. Mix everything together and bring it to a simmer.
  • Simmer: Turn the heat to low-medium and let the chili simmer for about 20 minutes, allowing the flavors to meld beautifully.
  • Serve and Garnish: Once done, garnish with chopped cilantro and enjoy with a side of warm cornbread or crunchy crackers.

Notes

Nutrition information provided is an estimate. It will vary based on cooking method and specific ingredients used. Please consult with your healthcare provider for specific dietary needs. To gain a better understanding, explore our nutrition disclaimer here. 

Nutrition

Calories: 346kcalCarbohydrates: 33gProtein: 26gFat: 13gSaturated Fat: 4gPolyunsaturated Fat: 1gMonounsaturated Fat: 8gTrans Fat: 0.4gCholesterol: 70mgSodium: 386mgPotassium: 863mgFiber: 6gSugar: 24gVitamin A: 430IUVitamin C: 20mgCalcium: 72mgIron: 5mg

Similar Recipes

chicken soup

One Pot Mexican Chicken Soup

beef cabbage stir fry

One Pot Ground Beef Cabbage Stir Fry

chicken pesto

Skillet Chicken Pesto and Peppers

You Might Also Like

Frequently Asked Questions

What can I substitute for ground beef?

You can use ground turkey, chicken, or even ground pork as a substitute. For a vegetarian option, try plant-based crumbles, lentils, or black beans. All will work well in this recipe while maintaining the hearty feel of chili.


Can I add beans to this chili?

Absolutely! Adding a can of beans like kidney beans, black beans, or pinto beans will increase the fiber content and make the chili even heartier. Simply drain and rinse the beans before stirring them in with the other ingredients.


Can I use fresh cherries instead of frozen?

Yes, you can use fresh cherries if they are in season. Just pit and chop them before adding to the chili. Fresh cherries will provide an even more intense sweetness compared to frozen ones.

Posted on Leave a comment

Chicken and Spinach Spaghetti Squash Alfredo

ground chicken alfredo with spaghetti squash

Chicken and Spinach Spaghetti Squash Alfredo, A Healthier Twist on a Comfort Classic. As we head into the cooler months, there’s nothing quite like indulging in your favorite comfort foods. But what if you could enjoy those cozy, creamy dishes without the guilt? Enter Chicken and Spinach Spaghetti Squash Alfredo—a deliciously creamy yet lighter version of traditional Chicken Alfredo. This dish swaps out heavy pasta for spaghetti squash, while keeping all the flavors you love!

This post may contain affiliate links. Please see our privacy policy for details.

Calories: 431kcal | Carbohydrates: 19g | Protein: 25g | Fat: 30g | Saturated Fat: 12g | Polyunsaturated Fat: 4g | Monounsaturated Fat: 12g | Trans Fat: 0.1g | Cholesterol: 135mg | Sodium: 526mg | Potassium: 1016mg | Fiber: 4g | Sugar: 8g | Vitamin A: 2888IU | Vitamin C: 12mg | Calcium: 181mg | Iron: 2mg

ground chicken alfredo with spaghetti squash

Why You’ll Love This Recipe:

  • Guilt-Free Comfort – You get all the creamy, cheesy flavors of Chicken Alfredo, but with fewer carbs and calories by using spaghetti squash instead of traditional pasta.
  • Packed with Nutrients – Spinach and spaghetti squash bring vitamins, fiber, and antioxidants to the plate, making this meal both delicious and nourishing.
  • Balanced Indulgence – You’ll still enjoy that rich Alfredo sauce, but with a lighter twist, so you can indulge in your cravings without compromising your health goals.
  • Easy to Make – This dish is simple enough to prepare after a long day, giving you a healthy, home-cooked meal with minimal fuss.
  • Great for Meal Prep – The components of this dish can easily be made ahead and stored, so you can enjoy it throughout the week without the hassle of cooking each night.
  • Low Carb & Satisfying – For those looking to reduce carbs without sacrificing taste, spaghetti squash is a perfect pasta alternative. It’s light, yet satisfying and filling!
  • Perfect for the Cooler Weather – As fall arrives, this warm, creamy dish is the ultimate comfort food to cozy up with—without the heaviness of a traditional Alfredo.

The PrepYoSelf Newsletter

Balanced and Flavorful Ingredients:

  • Ground Chicken: The lean ground chicken provides a hearty, protein-rich base for the dish, keeping it light compared to traditional Alfredo made with heavier cuts of meat like chicken breasts or thighs. Its mild flavor allows the creamy sauce and seasonings to shine.
  • Heavy Cream: While heavy cream gives the sauce its rich, velvety texture, it’s used sparingly to maintain the creaminess you crave from Alfredo without overloading the dish. This ingredient balances richness with a smooth, indulgent sauce.
  • Parmesan Cheese: Parmesan adds sharp, salty notes to the sauce, giving it depth and umami flavor. Its distinct nuttiness complements the cream, creating that signature Alfredo taste with a smaller amount compared to other cheeses.
  • Italian Seasoning: A blend of herbs like oregano, basil, and thyme, Italian seasoning infuses the sauce with a warm, aromatic flavor. It elevates the dish without overpowering the other ingredients.
  • Garlic Powder: Garlic powder adds a subtle, savory bite to the sauce, enhancing the flavor profile without the fuss of peeling and mincing fresh garlic. It pairs beautifully with the cream and parmesan.
  • Baby Spinach: This superfood is not only rich in nutrients like vitamins A and C but also adds a fresh, slightly earthy flavor. The spinach wilts perfectly into the sauce, adding a pop of color and lightness that balances the richness of the cream and cheese.
  • Olive Oil: Olive oil is used to sauté the chicken and helps the squash bake to a perfect texture. Its subtle fruity flavor adds richness without the heaviness of butter, keeping the dish heart-healthy.
  • Spaghetti Squash: The star of the recipe! Spaghetti squash is a low-carb, nutrient-packed alternative to pasta. Its slightly sweet, neutral flavor absorbs the creamy Alfredo sauce beautifully, while its spaghetti-like strands provide the perfect texture for a satisfying bite.

ground chicken alfredo

Quick and Easy Recipe Steps:

For the Spaghetti Squash:

  1. Carefully cut the spaghetti squash in half lengthwise (from top to bottom) and scoop out the seeds with a spoon.
  2. Brush the inside of each half with olive oil and sprinkle with salt.
  3. Place the squash halves face down on a baking sheet and bake for 35-40 minutes, until they’re soft when poked with a fork.
  4. Let the squash cool for a few minutes, then use a fork to scrape out the inside, which will look like spaghetti.

For the Chicken Alfredo:

  1. Heat 1 tablespoon of olive oil in a pan over medium-high heat.
  2. Add the ground chicken and cook until it’s fully browned, stirring often.
  3. Pour in the heavy cream, add the parmesan cheese, Italian seasoning, garlic powder, and salt. Stir everything together until the sauce thickens.
  4. Add the baby spinach and stir until it wilts down and mixes into the sauce.
  5. Serve the creamy chicken and sauce on top of the spaghetti squash strands.

Reference the recipe card below for detailed instructions.

ground chicken alfredo with spaghetti squash

Meal Prep Recipe Tips

  • Cook the Spaghetti Squash in Advance: Bake the spaghetti squash ahead of time and store the strands in an airtight container. It will keep in the fridge for up to 5 days. When you’re ready to assemble the meal, simply reheat the squash in the microwave or a skillet for a couple of minutes.
  • Store Sauce Separately: If you want to keep your meal fresh, store the chicken Alfredo mixture separately from the spaghetti squash. This prevents the squash from soaking up too much sauce and becoming soggy. Combine them just before reheating.
  • Lighten It Up: To make this dish even lighter, swap the heavy cream for half-and-half or a plant-based milk like unsweetened almond or cashew milk. You can thicken it with a little extra parmesan or by reducing the sauce.
  • Swap Ground Chicken:Ground turkey or lean ground beef can easily replace ground chicken. These options still keep the dish high in protein, but with different flavor profiles. You can even use shredded rotisserie chicken for convenience.
  • Add More Veggies: Bulk up the dish by adding mushrooms, bell peppers, or zucchini to the Alfredo sauce. These vegetables sauté well and bring extra fiber, vitamins, and texture to the meal.
  • Use Zoodles: If you can’t find spaghetti squash, zucchini noodles (zoodles) are a great alternative. They’re quick to cook and have a similar light, pasta-like texture.
  • Go Dairy-Free:If you’re looking for a dairy-free option, swap the heavy cream for a dairy-free alternative like coconut cream, and use nutritional yeast in place of parmesan for a cheesy flavor without the dairy.

ground chicken alfredo
Screenshot

ground chicken alfredo with spaghetti squash

Chicken and Spinach Spaghetti Squash Aflredo

Enjoy a lighter, healthier twist on a classic comfort dish with this creamy Chicken and Spinach Spaghetti Squash Alfredo, packed with flavor and perfect for satisfying cravings.
No ratings yet
Prep Time 5 minutes
Cook Time 20 minutes
Course dinner, Main Course
Cuisine American, Italian
Servings 4
Calories 431 kcal

Equipment

  • knife
  • cutting board
  • saute pan
  • oven

Ingredients
  

Chicken Alfredo Mixture

  • 1 lb ground chicken
  • 1/2 cup heavy cream
  • 1/4 cup shredded parmesan cheese
  • 1/4 teaspoon Italian seasoning
  • 1/4 teaspoon garlic powder
  • 3 cups baby spinach
  • 1/4 teaspoon salt
  • 1 tablespoon olive oil

Spaghetti Squash

  • 1 spaghetti squash
  • 1 tablespoon olive oil
  • 1/4 teaspoon salt

Instructions
 

Spaghetti Squash

  • Preheat the oven to 400°F. Cut the spaghetti squash in half lengthwise and scoop out the seeds.
  • Brush the inside of the squash with olive oil and sprinkle with salt.
  • Place the squash cut-side down on a baking sheet and bake for 35-40 minutes, or until tender.
  • Let it cool slightly, then use a fork to pull out the spaghetti-like strands.

Chicken Alfredo

  • Heat 1 tablespoon of olive oil in a sauté pan over medium-high heat. Add the ground chicken and cook until browned and cooked through.
  • Add the heavy cream, parmesan cheese, Italian seasoning, garlic powder, and salt. Stir well, allowing the sauce to thicken.
  • Toss in the baby spinach and stir until it wilts and becomes tender.
  • Serve the creamy chicken alfredo mixture over the spaghetti squash strands

Notes

Nutrition information provided is an estimate. It will vary based on cooking method and specific ingredients used. Please consult with your healthcare provider for specific dietary needs. To gain a better understanding, explore our nutrition disclaimer here. 

Nutrition

Calories: 431kcalCarbohydrates: 19gProtein: 25gFat: 30gSaturated Fat: 12gPolyunsaturated Fat: 4gMonounsaturated Fat: 12gTrans Fat: 0.1gCholesterol: 135mgSodium: 526mgPotassium: 1016mgFiber: 4gSugar: 8gVitamin A: 2888IUVitamin C: 12mgCalcium: 181mgIron: 2mg

Similar Recipes

orange chicken

Air Fryer Orange Soy Glazed Chicken and Broccoli

roasted chicken and rutabaga

Roasted Lemon Italian Chicken with Rutabaga

rosemary chicken

Rosemary Baked Chicken and Potatoes

You Might Also Like

Frequently Asked Questions

How do I know when the spaghetti squash is fully cooked?

You’ll know the squash is ready when you can easily pierce the skin with a fork, and the flesh pulls away in spaghetti-like strands. If it’s still hard to scrape, give it a few more minutes in the oven.


What can I use instead of parmesan cheese for a different flavor?

If you want to switch up the cheese, you could try Romano cheese for a saltier bite or Pecorino for a sharper, tangier flavor. For a more mild option, mozzarella will create a gooey texture.


Can I use frozen spinach instead of fresh baby spinach?

thaw it first and squeeze out any excess water before adding it to the sauce. This prevents the sauce from becoming watery.

Posted on Leave a comment

Spinach and Feta Turkey Burgers with Air Fryer Yellow Squash Fries

turkey burger with air fryer yellow squash fries

If you’re craving fast food but want to stick to healthier choices, I’ve got the perfect reimagined meal for you—Spinach and Feta Turkey Burgers with crispy Air Fryer Yellow Squash Fries! This dish gives you all the comfort food feels without the guilt, and it’s super meal-prep friendly too. Let’s dive into this mouthwatering, simple recipe that’s packed with protein, flavor, and fun!

This post may contain affiliate links. Please see our privacy policy for details.

Calories: 335kcal | Carbohydrates: 12g | Protein: 32g | Fat: 18g | Saturated Fat: 6g | Polyunsaturated Fat: 4g | Monounsaturated Fat: 5g | Trans Fat: 0.1g | Cholesterol: 223mg | Sodium: 899mg | Potassium: 614mg | Fiber: 2g | Sugar: 2g | Vitamin A: 5042IU | Vitamin C: 12mg | Calcium: 242mg | Iron: 3mg

turkey burger with air fryer yellow squash fries

Reasons Why This Recipe is Perfect for Meal Prep (Especially When Craving Fast Food Comfort!):

  • Healthier than Takeout: These turkey burgers are lean and protein-packed, while the air-fried squash fries have the crispy goodness of regular fries, but with way fewer calories!
  • Quick and Easy to Make: You can whip up these turkey patties and fries in less than 30 minutes, making it perfect for meal prep days or busy weeknights.
  • Refrigerates and Freezes Well: Both the burgers and squash fries store beautifully! Make a batch, and you’ve got delicious grab-and-go meals for the whole week.
  • Balanced and Nutritious: The turkey burgers are loaded with lean protein, spinach adds a veggie boost, and the feta adds a satisfying creaminess without being heavy. The fries are a fun way to sneak in more vegetables too!
  • Comfort Food Vibes: Craving that burger-and-fries combo? This recipe satisfies those cravings but with healthier, feel-good ingredients that fuel you, not slow you down.
  • Customizable: You can make this meal your own—swap the yellow squash for zucchini or sweet potatoes, and adjust the seasonings to your taste. Perfect for keeping meal prep exciting!
  • Saves You Money: Skip the fast food drive-thru! This recipe is budget-friendly and uses staple ingredients you probably already have at home.

The PrepYoSelf Newsletter

Why These Ingredients Work So Well Together

  • Ground Turkey (93% Lean): The lean turkey is the star of the show, providing a solid source of protein while keeping things light. It’s a great canvas for absorbing the flavors of the seasonings and feta without being greasy like higher-fat meats. The 93% lean ratio gives you enough moisture to keep the burger juicy but still healthy.
  • Frozen Spinach (Thawed and Squeezed Dry): Spinach is a powerhouse of nutrients, adding fiber, vitamins, and minerals without overwhelming the flavor. Since spinach has a mild taste, it complements the turkey beautifully while adding moisture and a touch of green goodness to the patties.
  • Crumbled Feta: Feta cheese brings a tangy, salty bite that gives these turkey burgers a Mediterranean twist. Its creaminess melts slightly during cooking, adding moisture and a burst of flavor in every bite.
  • Panko Breadcrumbs: Panko breadcrumbs act as a binder, helping the turkey mixture hold together while keeping the patties light and airy. They also soak up the moisture from the spinach and egg, so the burgers stay juicy without becoming mushy.
  • Egg: The egg serves as a binder, holding all the ingredients together. It helps the patties maintain their shape during cooking and adds a bit of richness to the mix.
  • Minced Garlic: Garlic adds a punch of flavor and aromatic depth. Its savory notes enhance the overall taste of the burger, balancing the tanginess of the feta and seasoning the turkey.
  • Onion Powder: Onion powder brings a subtle sweetness and mild onion flavor without the texture of fresh onions, making it easy for beginner cooks to use and ensuring the burgers aren’t too wet.
  • Garlic Powder: A little extra garlic powder intensifies the flavor without being overpowering. It’s a great way to boost flavor without adding more fresh ingredients that could make the mix too moist.
  • Italian Seasoning: This blend of herbs like basil, oregano, and thyme gives the burgers an earthy, aromatic flavor, adding depth and a hint of herbaceousness that pairs well with the feta and garlic.
  • Pepper and Salt: These seasonings bring balance to the dish. Salt enhances the flavors of the turkey, feta, and spinach, while the pepper adds just a bit of warmth and spice without overpowering the other flavors.

turkey burger with air fryer yellow squash fries

Turkey Burger Recipe Instructions:

  1. Mix the Ingredients: In a large bowl, add the ground turkey, spinach, feta cheese, breadcrumbs, egg, and all the seasonings. Gently mix everything together with your hands or a spoon. Don’t worry about mixing it perfectly—just make sure everything is combined without mashing the meat too much.
  2. Shape the Patties: Once mixed, divide the turkey mixture into four even portions and shape them into round patties using your hands.
  3. Cook the Patties: Heat a pan over medium heat. Place the patties in the pan and cook for 4 to 5 minutes on one side. Flip them over and cook for another 3 to 4 minutes. Make sure the inside temperature reaches 165°F to ensure they’re fully cooked.
  4. Serve and Enjoy: Pair your delicious turkey burgers with the crispy air fryer yellow squash fries and enjoy your meal!

Air Fryer Squash Fries Recipe Instructions:

  • Prepare the Squash: Take the yellow squash and cut it into long strips, about 5 inches long and ½ inch thick, like thick fries.
  • Coat the Squash: In one shallow bowl, beat the eggs with a fork. In a separate bowl or plate, mix together the breadcrumbs, parmesan cheese, oregano, garlic powder, and salt. First, dip each squash strip into the egg, then coat it in the breadcrumb mixture, making sure each piece is fully covered.
  • Air Fry the Squash: Place the coated squash strips in a single layer in your air fryer basket (don’t overlap them). Spray them lightly with cooking spray. Set the air fryer to 375°F and cook for about 8 minutes, or until the squash fries are golden brown and crispy.
  • Serve and Enjoy: Serve your crispy squash fries hot alongside your turkey burger for a healthy and delicious “burger and fries” combo!

Reference the recipe card below for detailed instructions.

turkey burger with air fryer yellow squash fries

Meal Prep Tips:

  • Make Patties Ahead: Form the turkey burger patties ahead of time and store them in an airtight container in the fridge for up to 3 days. You can also freeze them between sheets of parchment paper for longer storage (up to 3 months), so you can quickly cook them later.
  • Batch Cook the Fries: Prep the yellow squash fries in bulk, air fry them, and let them cool before storing. They’ll stay fresh in the fridge for up to 3 days, and you can reheat them in the air fryer for a few minutes to regain their crispy texture.
  • Pre-Chop and Store Ingredients: Save time by thawing and squeezing out the spinach, crumbling the feta, and measuring out your seasonings and breadcrumbs in advance. Keep these prepped ingredients in small containers or bags, ready to mix when needed.
  • Separate Storage: Store the cooked burgers and squash fries in separate meal prep containers to keep the fries from getting soggy. If reheating, keep the fries uncovered for a crispier texture.
  • Serving Tip: Serve the burgers on a whole wheat bun or lettuce wrap for a lower-carb option, and pair them with a side of Greek yogurt dip or hummus for added flavor and protein!

turkey burger with air fryer yellow squash fries

Spinach and Feta Turkey Burgers with Air Fryer Yellow Squash Fries

Enjoy a juicy spinach and feta turkey burger paired with crispy air-fried yellow squash fries for a healthy, flavorful take on a classic comfort meal!
No ratings yet
Prep Time 10 minutes
Cook Time 20 minutes
Course dinner, Main Course
Cuisine American
Servings 4
Calories 335 kcal

Equipment

  • knife
  • cutting board
  • Air Fryer
  • saute pan

Ingredients
  

Turkey Burger Ingredients

  • 1 lb lean ground turkey (93%)
  • 1 cup frozen spinach (thawed and excess water squeezed out)
  • 1/3 cup feta crumbles
  • 1/4 cup panko breadcrumbs
  • 1 egg
  • 2 tablespoons minced garlic
  • 1/2 teaspoon onion powder
  • 1/2 teaspoon garlic powder
  • 1/4 teaspoon Italian seasoning
  • 1/4 teaspoon pepper
  • 1/2 teaspoon salt

Air Fryer Yellow Squash Fries Ingredients

  • 1 yellow squash
  • 2 eggs
  • 1/4 cup panko breadcrumbs
  • 1/4 cup grated parmesan cheese
  • 1/4 teaspoon onion powder
  • 1/4 teaspoon garlic powder
  • 1/4 teaspoon salt
  • cooking spray

Instructions
 

Turkey Burger Patties

  • Mix It Up: In a large mixing bowl, combine the ground turkey, spinach, feta, panko, egg, and seasonings. Mix until just combined (don’t overwork the meat!).
  • Shape the Patties: Form the mixture into 4 large patties.
  • Cook It: Heat a pan over medium heat. Add a little bit of olive oil or use cooking spray. Cook each patty for 4-5 minutes on one side, then flip and cook for another 3-4 minutes until the internal temperature reaches 165°F.

Air Fryer Yellow Squash Fries

  • Prep the Squash: Cut the yellow squash into 5-inch long strips about ½ inch thick.
  • Coat the Fries: In one shallow bowl, whisk the eggs. In another, mix breadcrumbs, parmesan, oregano, garlic powder, and salt. Dip the squash strips into the egg mixture, then coat them with the breadcrumb mix.
  • Air Fry: Place the coated squash in a single layer in your air fryer basket, spray with cooking spray, and air fry at 375°F for 8 minutes until golden brown.
  • Enjoy! Serve them hot alongside your turkey burger for a healthy "fries and burger" experience!

Notes

Nutrition information provided is an estimate. It will vary based on cooking method and specific ingredients used. Please consult with your healthcare provider for specific dietary needs. To gain a better understanding, explore our nutrition disclaimer here.

Nutrition

Calories: 335kcalCarbohydrates: 12gProtein: 32gFat: 18gSaturated Fat: 6gPolyunsaturated Fat: 4gMonounsaturated Fat: 5gTrans Fat: 0.1gCholesterol: 223mgSodium: 899mgPotassium: 614mgFiber: 2gSugar: 2gVitamin A: 5042IUVitamin C: 12mgCalcium: 242mgIron: 3mg

Similar Recipes

bean and corn taco

Vegetarian Black Bean and Corn Soft Tacos

chicken salad

Oven Baked Honey Mustard Glazed Chicken Salad

balsamic chicken salad

Oven Baked Balsamic Chicken Salad with Strawberries

You Might Also Like

Frequently Asked Questions

Can I use fresh spinach instead of frozen spinach?

Yes! Just sauté fresh spinach until wilted, then squeeze out any excess water before adding it to the turkey burger mix.


Can I cook the turkey burgers in the oven instead of a pan?

Absolutely! Preheat your oven to 375°F and bake the patties on a baking sheet for about 20-25 minutes, flipping halfway through, until the internal temperature reaches 165°F.


Can I substitute another cheese for feta?

Yes, you can use goat cheese, shredded mozzarella, or even cheddar for a different flavor. Just note that feta adds a unique tangy taste to the burgers.

Posted on Leave a comment

Air Fryer Hoisin Salmon Bites

salmon bites with stir fry vegeteables

These Air Fryer Hoisin Salmon Bites with Stir Fry Veggies are perfect for meal prep because the recipe combines two efficient cooking methods—air frying and stir-frying—allowing you to make a restaurant-quality meal in less than 20 minutes. It’s nutrient-dense, packed with flavor, and helps you stay on track with your health goals, making it a convenient and delicious option for busy days.

This post may contain affiliate links. Please see our privacy policy for details.

Calories: 370kcal | Carbohydrates: 17g | Protein: 33g | Fat: 19g | Saturated Fat: 3g | Polyunsaturated Fat: 6g | Monounsaturated Fat: 9g | Cholesterol: 78mg | Sodium: 1040mg | Potassium: 1168mg | Fiber: 4g | Sugar: 7g | Vitamin A: 891IU | Vitamin C: 123mg | Calcium: 87mg | Iron: 3mg

salmon bites with stir fry vegeteables

Why This Recipe is a Meal Prep Game-Changer:

  • Efficient Cooking Methods: By using both the air fryer and stir-fry techniques, you can cook salmon and veggies simultaneously, cutting down on prep and cook time.
  • Quick and Easy: The entire recipe is ready in less than 20 minutes, making it perfect for busy schedules and quick weeknight dinners.
  • Restaurant-Quality Flavor: Despite the simplicity, the hoisin and sriracha marinade gives the salmon a sweet and spicy kick, elevating the dish to restaurant-level flavor.
  • Nutrient-Dense: Packed with lean protein from the salmon and fiber-rich veggies, this dish fuels your body with essential nutrients, keeping you full and energized.
  • Portion Control Made Simple: The recipe can easily be divided into meal prep containers, helping you stay on track with portion sizes and balanced meals throughout the week.
  • Easy Reheating: Both the salmon bites and veggies reheat well, maintaining their texture and flavor for several days, making them perfect for make-ahead meals.
  • Customizable for Variety: You can swap out the veggies or adjust the seasonings to keep the meals exciting throughout the week without spending extra time in the kitchen.

The PrepYoSelf Newsletter

To Meal Prep This Salmon Recipe You’ll Need

  • Salmon: Salmon is rich in omega-3 fatty acids, providing heart-healthy fats and a good source of protein. Its buttery texture pairs perfectly with the sweet and savory flavors of hoisin sauce, while its slightly crisp exterior (thanks to the air fryer) gives it a delightful contrast to the tender inside. You can swap salmon with other fish like cod or tilapia. For a non-seafood option, chicken breast or tofu also work well and absorb the marinade beautifully.
  • Hoisin Sauce: Hoisin sauce is a sweet and tangy condiment that brings depth of flavor to the salmon, balancing the heat from the sriracha. Its sticky texture helps coat the salmon evenly, making it ideal for air frying. For a different flavor, try teriyaki sauce, BBQ sauce, or even soy sauce with honey for a similar sweet-savory balance.
  • Sriracha: Sriracha adds a subtle heat that complements the sweetness of the hoisin sauce. It’s not overpowering but gives just the right amount of kick to make the dish exciting. You can replace sriracha with chili garlic sauce, hot sauce, or leave it out altogether if you prefer a milder flavor.
  • Pre-Cut Stir Fry Veggies: Pre-cut veggies make meal prep a breeze. They provide fiber, vitamins, and minerals while adding vibrant color and crunch to the dish, balancing the soft texture of the salmon. Use any fresh or frozen veggies you have on hand—broccoli, bell peppers, snap peas, zucchini, or even mushrooms. You can also use pre-washed salad greens like spinach or kale if you want a lighter side.
  • Soy Sauce: Soy sauce adds a salty umami flavor to the veggies, which complements the slightly sweet and spicy salmon. It also adds a touch of moisture to the stir-fry, helping the veggies cook evenly. Coconut aminos are a great soy-free substitute with a milder flavor, or use a low-sodium soy sauce for a lighter option.
  • Sesame Oil: Sesame oil has a nutty, toasty flavor that brings richness to the veggies, tying the dish together with an authentic stir-fry taste.

salmon bites with stir fry vegeteables

Easy Recipe Steps for Air Fryer Salmon Bites

  1. Prepare the Salmon: First, cut the salmon into small cubes, about 1 inch in size. In a medium bowl, mix the hoisin sauce, sriracha, garlic powder, and olive oil. Add the salmon cubes to the bowl and gently stir them around to coat each piece with the sauce. Set the bowl aside while you get the air fryer ready.
  2. Cook the Salmon: Turn on your air fryer and set it to 400°F. Let it heat up for about 2 minutes. Once it’s ready, place the marinated salmon cubes in the air fryer basket in a single layer. Cook them for 6 to 9 minutes, turning them over halfway through, until the salmon is golden and slightly crispy on the outside.
  3. Make the Veggies: While the salmon is cooking, heat a little sesame oil in a pan over medium-high heat. Add your pre-cut stir fry vegetables to the pan and cook them for 4 to 5 minutes, stirring occasionally, until they are just starting to soften but still a bit crunchy. Add the soy sauce and garlic powder, stirring again to coat the veggies in flavor.
  4. Serve & Enjoy: Now, serve the salmon bites with the stir-fried veggies for a delicious, balanced meal. If you’re making this ahead for meal prep, divide the salmon and veggies into containers for easy meals throughout the week!

Reference the recipe card below for detailed instructions.

salmon bites with stir fry vegeteables

Meal Prep Pairing Tips

  • Grains for Balance: Pair the salmon and veggies with a hearty grain such as brown rice, quinoa, or even soba noodles to round out the meal and keep you fuller for longer. 
  • Fresh Herbs for Garnish: Brighten up your meal with fresh herbs such as cilantro, thai basil for an authentic Asian flair, green onions for a mild, oniony bite, or mint for an unexpected, refreshing contrast.
  • Fruit for Sweetness: Pair your savory salmon and veggies with a side of fresh fruit such as pineapple slices or mango chunks which can add a natural sweetness that complements the bold flavors of hoisin and sriracha. Orange segments or grapefruit can provide a citrusy, bright pairing.

salmon bites with stir fry vegeteables

salmon bites with stir fry vegeteables

Air Fryer Hoisin Salmon Bites with Stir Fry Veggies

Air fryer hoisin salmon bites paired with stir-fried veggies make a quick, flavorful, and easy meal that's perfect for meal prep or a healthy weeknight dinner.
No ratings yet
Prep Time 5 minutes
Cook Time 15 minutes
Course dinner, lunch
Cuisine Asian
Servings 2
Calories 370 kcal

Equipment

  • Air Fryer
  • wok

Ingredients
  

Salmon and marinade

  • 10 oz salmon
  • 2 tbsp hoisin sauce
  • 1 tbsp sriracha
  • 1/4 tsp garlic powder
  • 1 tbsp olive oil

Stir Fry

  • 3 cups pre-cut stir fry veggies
  • 1 tablespoon soy sauce
  • 1/4 tsp garlic powder
  • 1 tsp sesame oil

Instructions
 

  • Prep the Salmon: Start by cutting your salmon into 1-inch cubes. In a medium-sized bowl, combine the hoisin sauce, sriracha, garlic powder, and olive oil. Toss the salmon cubes in the marinade, making sure each piece is well coated. Let it sit while you preheat the air fryer.
  • Air Fry the Salmon Bites: Preheat your air fryer to 400°F for 2 minutes. Once heated, place the marinated salmon bites in a single layer in the air fryer basket. Cook for 6 to 9 minutes, flipping halfway through, until the salmon is crispy on the outside and tender on the inside.
  • Stir Fry the Veggies: While the salmon is air frying, heat sesame oil in a pan over medium-high heat. Add your pre-cut stir fry veggies to the pan and sauté for 4 to 5 minutes, or until they’re slightly tender but still crisp. Season with soy sauce and garlic powder to bring out their natural flavor.
  • Serve & Enjoy: Plate your air fryer hoisin salmon bites with the sautéed stir fry veggies for a balanced meal. If you're prepping for the week, divide the salmon and veggies into meal prep containers for easy grab-and-go lunches or dinners!
  • Note: If you do not have an Air Fryer, you can also bake this recipe in the oven for 12-15 minutes at 400F

Notes

Nutrition information provided is an estimate. It will vary based on cooking method and specific ingredients used. Please consult with your healthcare provider for specific dietary needs. To gain a better understanding, explore our nutrition disclaimer here. 

Nutrition

Calories: 370kcalCarbohydrates: 17gProtein: 33gFat: 19gSaturated Fat: 3gPolyunsaturated Fat: 6gMonounsaturated Fat: 9gCholesterol: 78mgSodium: 1040mgPotassium: 1168mgFiber: 4gSugar: 7gVitamin A: 891IUVitamin C: 123mgCalcium: 87mgIron: 3mg

Similar Recipes

salmon beet salad

Citrus Ginger Salmon with Roasted Beets

salmon and watermelon salad

Grilled Salmon with Watermelon Salad

salmon salad

Salmon Stuffed Avocado Salad

You Might Also Like

Frequently Asked Questions

Can I use frozen salmon?

Yes! Just make sure to thaw the salmon completely in the fridge before marinating. This helps the marinade absorb better and ensures even cooking.


What if I don’t have an air fryer?

No problem! You can bake the salmon bites in the oven at 400°F for about 10-12 minutes or until they’re crispy on the outside and tender inside.


Can I cook the salmon without oil?

If you want to skip the olive oil, the air fryer will still cook the salmon to a nice crisp. However, the oil helps achieve better caramelization and prevents the salmon from sticking. You can use a light spray of cooking oil if preferred.

Posted on Leave a comment

Pan-Seared Cod in Sour Cream Sauce

cod with spinach

This Pan-Fried Cod in Sour Cream Sauce with Sautéed Spinach is the perfect weeknight dish for anyone who wants to eat well without sacrificing flavor. With tender, flaky cod paired with a creamy, tangy sauce and nutrient-packed spinach, this recipe is a total win!

This post may contain affiliate links. Read the disclosure policy.

Calories: 337kcal | Carbohydrates: 11g | Protein: 29g | Fat: 21g | Saturated Fat: 5g | Polyunsaturated Fat: 2g | Monounsaturated Fat: 12g | Cholesterol: 78mg | Sodium: 857mg | Potassium: 1207mg | Fiber: 4g | Sugar: 3g | Vitamin A: 8750IU | Vitamin C: 56mg | Calcium: 156mg | Iron: 3mg

cod with spinach

Why This Recipe is Heart-Healthy

  • Heart-Healthy Goodness: Cod is a lean protein rich in omega-3 fatty acids, which are amazing for heart health. These good fats help lower blood pressure, reduce the risk of heart disease, and keep your arteries happy. Plus, the spinach brings in a ton of antioxidants and vitamins like A, C, and K, all of which help support cardiovascular health.
  • Light and Flavorful: The creamy sour cream sauce adds a luxurious feel to this dish without being heavy. It’s tangy, smooth, and pairs beautifully with the mild flavor of the cod. The bright squeeze of lemon at the end gives a burst of freshness that’ll leave you wanting more.
  • Quick and Easy: You can make this meal in under 20 minutes, making it a great option for busy weeknights or meal prep. The cod and spinach can easily be stored in the fridge for up to 3 days, meaning you can prep ahead and enjoy healthy, delicious meals throughout the week.
  • Low-Calorie, High Nutrition: Both the cod and spinach are nutrient-dense but low in calories, making this meal filling without being too heavy. You’ll get a boost of lean protein, fiber, and plenty of vitamins in each bite!

The PrepYoSelf Newsletter

Here’s What You Need

  • Cod Fillets: Cod is a mild, flaky white fish with a subtle sweetness that makes it the perfect canvas for bold flavors. It cooks quickly and absorbs seasonings beautifully, providing a light protein base for this meal. Its delicate texture pairs wonderfully with the creamy sauce.
  • Garlic Powder: Garlic adds a savory, aromatic element without overpowering the dish. Garlic powder is an easy way to distribute flavor evenly across both the cod and spinach, adding depth without the harshness of raw garlic.
  • Salt: A little salt is key for enhancing the natural flavors of the fish and spinach. It also helps balance the richness of the sauce, ensuring each bite is well-seasoned.
  • Sour Cream: The sour cream brings creaminess and tang, creating a luscious sauce that perfectly complements the cod’s light, flaky texture. Its slight acidity cuts through the richness and adds a smooth contrast to the fish.
  • Vegetable Broth: Broth adds moisture and helps thin out the sour cream, creating a silky sauce. It also adds extra layers of savory flavor that melds beautifully with the tangy sour cream and the seasoning on the cod.
  • Chives: Chopped chives add a fresh, slightly oniony brightness to the dish, balancing the richness of the sour cream sauce and adding a pop of color to the presentation.
  • Olive Oil: This heart-healthy fat is used to sear the cod and sauté the spinach. Olive oil’s subtle flavor complements the fish and helps everything cook evenly, while adding a lovely golden color to the cod fillets.
  • Lemon: A squeeze of fresh lemon juice brings brightness and a burst of acidity, which enhances the flavors of the dish while cutting through the richness of the sauce. It also elevates the spinach, making it more vibrant.
  • Baby Spinach: Spinach adds a nutritious, earthy element to the dish. Its slight bitterness contrasts beautifully with the creamy, tangy sauce and the sweet, mild fish. It also wilts down quickly, making it an easy and quick side dish that complements the main flavors.

cod with spinach

How to Meal Prep Pan-Seared Cod

  1. 1. Prep the Cod: Start by seasoning your cod fillets with garlic powder and salt. Make sure to sprinkle the seasoning evenly on both sides of the fillets to really enhance the flavor. Don’t be afraid to use your hands to gently pat the seasoning into the fish—it helps the flavor stick!
  2. 2. Pan-Fry the Cod: Heat 1 tablespoon of olive oil in a large pan over medium-high heat. To test if the oil is ready, carefully splash a tiny bit of water in the pan—if it sizzles, you’re good to go! Place the cod fillets in the pan and sear them for 4-5 minutes on each side. You’ll know they’re ready to flip when the fish easily releases from the pan. The goal is to get a golden, crispy outside while the inside stays tender and flaky.
  3. 3. Make the Creamy Sauce: Once the cod is done, gently move it to one side of the pan (or onto a plate if that’s easier). Reduce the heat to low and pour in the vegetable broth and sour cream. Stir continuously with a spoon or spatula to combine the ingredients. Let the sauce simmer for 2-3 minutes until it thickens to a smooth, creamy texture. If the sauce gets too thick, just add a splash more broth!
  4. 4. Sauté the Spinach: In another pan, heat 1 tablespoon of olive oil over medium-high heat. Once the oil is hot, toss in your baby spinach along with the garlic powder and salt. Stir frequently with a spatula to make sure all the spinach wilts evenly—this should take about 2-3 minutes. Keep an eye on it because spinach cooks down very quickly!
  5. 5. Serve & Garnish: Plate your cooked cod fillets and spoon some of the sour cream sauce on top. Arrange the sautéed spinach on the side. Finish by squeezing fresh lemon juice over the dish for a zesty kick, and sprinkle chopped chives on top to add a burst of color and flavor. Enjoy!

Reference the recipe card below for detailed instructions.

cod with spinach

Pairing Tips for Pan-Seared Cod

  • Grains: Pair the cod with quinoa, wild rice, or couscous to add extra fiber and texture. These grains are easy to prep in advance and absorb the delicious sauce, making each bite satisfying.
  • Roasted Veggies: Add some roasted veggies like carrots, zucchini, or asparagus for extra variety and color on your plate. Their earthy flavors go beautifully with the tangy sauce and sautéed spinach.
  • Crusty Bread: Serve with a slice of crusty whole grain bread or a whole wheat dinner roll to soak up the rich sour cream sauce. This is a comforting option, especially for dinner.
  • Side Salad: For a light and refreshing addition, serve the dish alongside a mixed greens salad with a simple vinaigrette. The salad adds crunch and acidity to balance the rich sauce.

cod with spinach

cod with spinach

Pan-Fried Cod in Sour Cream Sauce with Sauteed Spinach

A quick and delicious dish featuring pan-fried cod in a tangy sour cream sauce, paired with garlicky sautéed spinach, perfect for a heart-healthy meal.
No ratings yet
Prep Time 5 minutes
Cook Time 20 minutes
Course dinner, Main Course
Cuisine American
Servings 2
Calories 337 kcal

Equipment

  • knife
  • cutting board
  • sautee pan

Ingredients
  

Cod with Sour Cream Sauce

  • 10 oz cod
  • 1/4 teaspoon garlic powder
  • 1/4 teaspoon salt
  • 1/4 cup sour cream
  • 1/4 cup vegetable broth
  • 1 tablespoon olive oil
  • 1 lemon

Sauteed Spinach

  • 6 cups baby spinach
  • 1/4 teaspoon garlic powder
  • 1/4 teaspoon salt
  • 1 tablespoon olive oil

Instructions
 

  • Prep the Cod: Start by seasoning your cod fillets with garlic powder and salt. This simple seasoning enhances the natural flavors of the fish without overpowering it.
  • Pan-Fry the Cod: Heat olive oil in a pan over medium-high heat. Once hot, add the cod fillets and sear them for 4-5 minutes per side until golden brown and cooked through. You want that perfect crispy outside and tender inside!
  • Make the Creamy Sauce: Slide the cod to the side of the pan, lower the heat, and pour in your vegetable broth and sour cream. Stir them together, letting the sauce simmer for 2-3 minutes until it thickens into a smooth, velvety consistency. This sauce is everything—it adds a tangy richness to the fish!
  • Sauté the Spinach: In a separate pan, heat olive oil over medium-high heat. Add the baby spinach, garlic powder, and salt, stirring until the spinach wilts down—this should only take about 2-3 minutes.
  • Serve & Garnish: Plate your cod fillets with the sautéed spinach on the side, then squeeze fresh lemon juice over everything. Don’t forget to sprinkle those chopped chives on top for a pop of color and freshness!

Notes

Nutrition information provided is an estimate. It will vary based on cooking method and specific ingredients used. Please consult with your healthcare provider for specific dietary needs. To gain a better understanding, explore our nutrition disclaimer here.

Nutrition

Calories: 337kcalCarbohydrates: 11gProtein: 29gFat: 21gSaturated Fat: 5gPolyunsaturated Fat: 2gMonounsaturated Fat: 12gCholesterol: 78mgSodium: 857mgPotassium: 1207mgFiber: 4gSugar: 3gVitamin A: 8750IUVitamin C: 56mgCalcium: 156mgIron: 3mg

Similar Recipes

ginger salmon

Oven Baked Orange Ginger Salmon and Snow Peas

shrimp and asparagus

Oven Baked Shrimp with Panko Breaded Asparagus

salmon beet salad

Citrus Ginger Salmon Spinach Salad with Roasted Beets

You Might Also Like

Frequently Asked Questions

How can I prevent the fish from sticking to the pan?

Ensure your pan is fully heated before adding the olive oil, and wait for the oil to shimmer before placing the cod fillets in the pan. This helps create a barrier between the fish and the pan. Avoid moving the fish too soon—let it sear and naturally release from the pan before flipping.


What if my cod fillets fall apart while cooking?

Cod can be delicate and might break if handled too much. Use a wide, flat spatula to carefully flip the fillets and handle them gently. If they do break, don’t worry—they’ll still taste delicious!


Can I add more vegetables to this recipe?

Definitely! You can toss in vegetables like cherry tomatoes, bell peppers, or mushrooms when sautéing the spinach. They’ll add extra nutrients, flavor, and color to the dish.

Posted on Leave a comment

One Pot Green Chile Chicken Soup

green chile chicken soup

Looking for a cozy meal that’s quick, easy, and perfect for prepping ahead? My One-Pot Green Chili Chicken Soup is packed with flavor and takes minimal effort! Let’s dive right into this creamy, hearty, and spicy delight that’s perfect for a busy weeknight or meal prepping for the week ahead.

This post may contain affiliate links. Please see our privacy policy for details.

Calories: 531kcal | Carbohydrates: 37g | Protein: 41g | Fat: 24g | Saturated Fat: 9g | Polyunsaturated Fat: 2g | Monounsaturated Fat: 9g | Cholesterol: 135mg | Sodium: 1417mg | Potassium: 948mg | Fiber: 5g | Sugar: 9g | Vitamin A: 16991IU | Vitamin C: 27mg | Calcium: 119mg | Iron: 3mg

green chile chicken soup

Why You’ll Love It:

Each ingredient in this one pot soup contributes something unique, whether it’s the sweet, creamy, spicy, or savory element. Together, they create a balanced soup that hits all the right notes: a creamy base from the heavy cream, sweetness from the sweet potatoes, and a smoky, spicy kick from the green chili. The chicken adds heartiness, while the optional garnishes provide texture, freshness, and color to round out the dish.

  • Meal Prep Friendly: Make a big batch and store in airtight containers. It reheats beautifully for a comforting lunch or dinner throughout the week.
  • Balanced Nutrition: Packed with protein from the chicken and healthy carbs from sweet potatoes makes this soup is both hearty and nutritious.
  • One Pot Wonder: Less cleanup means more time to relax and enjoy your delicious meal!

The PrepYoSelf Newsletter

Ingredients That Work Well Together

  • Onion serves as the foundation for many soups, bringing a slightly sweet, savory depth of flavor. When sautéed, it softens and caramelizes, adding complexity to the dish. It complements the sweetness of the sweet potato while balancing the richness of the cream.
  • Garlic is the ultimate flavor enhancer. Its aromatic, pungent notes intensify as it cooks, adding warmth and depth to the soup. Garlic’s strong, sharp flavor pairs beautifully with the earthy sweetness of the sweet potato and the spice of green chili, making the overall dish more fragrant and savory.
  • Sweet potato adds natural sweetness and creaminess, which pairs perfectly with the heat from the green chili. As it cooks, it breaks down, creating a smooth texture that thickens the soup. The subtle sweetness balances the spiciness, creating a well-rounded flavor profile.
  • Green chili provides that smoky, spicy kick, giving the soup its signature bold flavor. It adds just the right amount of heat without overpowering the other ingredients, and its mild spice works well with the creamy broth, creating a harmonious, balanced heat.
  • The chicken adds a hearty, protein-rich element, making the soup filling and satisfying. Since the chicken is already cooked, it soaks up all the wonderful flavors from the broth and spices as it simmers, ensuring every bite is packed with flavor. The chicken’s neutral taste allows the bolder ingredients—like green chili and garlic—to shine.
  • Chicken broth forms the liquid base of the soup and adds savory, umami depth. It ties all the ingredients together, carrying their flavors throughout the dish. The broth is light but flavorful, allowing the sweet potato and green chili to meld while adding moisture and richness.
  • Heavy cream adds richness and a velvety texture to the soup. It balances the heat from the green chili and garlic, creating a creamy, indulgent mouthfeel. The creaminess makes the soup feel more luxurious and comforting, while still allowing the natural sweetness of the sweet potato and the spice of the green chili to come through.
  • Fresh tomatoes add a burst of acidity and brightness to the creamy soup, cutting through the richness and adding a fresh contrast. Cilantro’s fresh, citrusy flavor lifts the soup’s heavier elements, adding a herbaceous note that brightens the whole dish. Fresh jalapeño slices add a crisp, sharp spice, making the soup even bolder.
  • Tortilla Strips add a crunchy texture, creating a delightful contrast to the creamy soup. The strips also soak up the broth slightly, enhancing its flavor while adding a satisfying crunch.

green chile chicken soup

Basic Steps to Meal Prep Green Chicken Chile Soup

  1. Heat It Up: Drizzle a little oil into a large soup pan over medium-high heat. Once hot, toss in the diced onion, garlic, and sweet potato. Sauté for 5 minutes until fragrant and the sweet potatoes start to soften.
  2. Spice It Right: Season your sizzling mix with garlic powder, salt, and pepper to taste. Then, add the diced green chili for that smoky heat. Stir to combine.
  3. Build the Soup: Now, add your pre-cooked chicken, chicken broth, and heavy cream to the pot. Bring everything to a boil, then lower the heat to a simmer. Let it cook for 10-15 minutes, stirring occasionally until the sweet potatoes are tender and the flavors have melded together.
  4. Garnish & Enjoy: Ladle your soup into bowls and top with your favorite garnishes—diced Roma tomatoes, fresh cilantro, sliced jalapeño for a kick, and tortilla strips for that extra crunch.

Reference the recipe card below for detailed instructions.

green chile chicken soup

Meal Prep Tips for Green Chile Chicken Soup

  • Pre-Cut Ingredients: To save time, you can dice the onion, sweet potato, garlic, and green chili ahead of time. Store them in a sealed container in the fridge. You can even use pre-minced garlic and frozen diced onions to shave off prep time.
  • Shred Chicken Ahead: Buy a rotisserie chicken or cook chicken breasts in bulk earlier in the week. Shred it and store it in the fridge, so you have pre-cooked chicken ready to go when making this soup. You can also use leftover chicken from another meal.
  • Sweet Potato Substitute: If you’re not a fan of sweet potatoes, swap them with regular potatoes, butternut squash, or even cauliflower. These alternatives will still add a hearty texture to the soup while maintaining a mild flavor.
  • Green Chili Substitute: Can’t find green chilis? Use poblano peppers, jalapeños, or even a small can of diced tomatoes with green chilies for a similar flavor with a bit more tang. If you want to dial down the heat, use mild bell peppers instead.
  • Chicken Substitute: For a vegetarian option, skip the chicken and use canned beans like white beans or chickpeas. You could also use tofu or tempeh for a plant-based protein source. If you prefer beef, try adding ground beef or shredded pork as a substitute for chicken.
  • Heavy Cream Substitute: To lighten up the soup, replace heavy cream with coconut milk (for a dairy-free version) or Greek yogurt. You can also use half-and-half for a slightly lighter, creamy texture without sacrificing richness.

green chile chicken soup

green chile chicken soup

One Pot Green Chile Chicken Soup

A creamy, savory blend of chicken, green chili, and sweet potatoes, simmered to perfection in one pot for an easy, flavorful meal prep option.
No ratings yet
Prep Time 5 minutes
Cook Time 15 minutes
Course Main Course
Cuisine American, Mexican
Servings 2
Calories 531 kcal

Equipment

  • knife
  • cutting board
  • soup pot

Ingredients
  

  • 8 oz pre-cooked chicken breasts (sliced)
  • 1/4 cup white onions (diced)
  • 3 tablespoons garlic (minced)
  • 1 sweet potato (peeled, diced)
  • 1/4 cup diced green chiles
  • 2 cups chicken broth
  • 1/4 cup heavy cream
  • 1/4 teaspoon garlic powder
  • 1/4 teaspoon salt
  • 1/4 teaspoon pepper
  • 1 tablespoon olive oil

optional garnish

  • 1 roma tomato (diced)
  • 1/4 cup cilantro (chopped)
  • 1 jalapeno (sliced)
  • 4 tablespoons tortilla strips

Instructions
 

  • Heat things up by adding oil to a soup pan over medium-high heat. Get those onions, garlic, and diced sweet potato sizzling!
  • Sprinkle in the seasonings and toss in the diced green chili, chicken, chicken broth, and heavy cream.
  • Bring it to a boil, then let it simmer for 10-15 minutes. Finish it off with a vibrant garnish of diced tomatoes, chopped cilantro, sliced jalapeno, and crunchy tortilla strips. Enjoy!

Notes

Nutrition information provided is an estimate. It will vary based on cooking method and specific ingredients used. Please consult with your healthcare provider for specific dietary needs. To gain a better understanding, explore our nutrition disclaimer here. 

Nutrition

Calories: 531kcalCarbohydrates: 37gProtein: 41gFat: 24gSaturated Fat: 9gPolyunsaturated Fat: 2gMonounsaturated Fat: 9gCholesterol: 135mgSodium: 1417mgPotassium: 948mgFiber: 5gSugar: 9gVitamin A: 16991IUVitamin C: 27mgCalcium: 119mgIron: 3mg

Similar Recipes

chicken soup

One Pot Mexican Chicken Soup

beef cabbage stir fry

One Pot Ground Beef Cabbage Stir Fry

chicken pesto

Skillet Chicken Pesto and Peppers

You Might Also Like

Frequently Asked Questions

Can I freeze this soup?

Yes! This soup freezes beautifully. Let it cool completely before transferring it to freezer-safe containers or bags. Label them with the date, and it will keep for up to 3 months. When ready to eat, thaw it in the fridge overnight and reheat as usual.


Can I use raw chicken instead of pre-cooked chicken?

Yes! If you only have raw chicken, you can cook it directly in the soup. Dice the chicken and add it along with the broth. Let it simmer for about 20 minutes or until the chicken is fully cooked through. You can also poach or sauté the chicken separately and add it toward the end.


How spicy is the green chili in this soup?

The green chili adds a mild, smoky heat, but it won’t overwhelm the dish. If you prefer more spice, you can add additional green chilis, diced jalapeños, or a pinch of cayenne pepper. For a milder version, you can use bell peppers instead.

Posted on Leave a comment

Easy Salmon Burger Lettuce Wraps with Crispy Sweet Potato Cubes

salmon burger lettuce wraps with sweet potato cubes

If you’re looking for a quick, healthy, and heart-healthy meal, these Salmon Burger Lettuce Wraps with Crispy Roasted Sweet Potatoes recipe are a perfect fit. With just a few simple ingredients, you can whip up a delicious, low-carb dish in under 20 minutes. We’re using Trader Joe’s pre-formed salmon patties to help speed up the meal prep process! The tender, omega-3-rich salmon patties pair perfectly with crisp iceberg lettuce and juicy tomatoes, while roasted sweet potato cubes add a satisfying crunch and sweetness. This meal is not only flavorful but also customizable with easy ingredient swaps, making it ideal for busy weeknights or meal prep for the week ahead.

This post may contain affiliate links. Please see our privacy policy for details.

salmon burger lettuce wraps with sweet potato cubes

Why This Recipe Works for Busy Individuals:

This recipe is the perfect weekday meal for those who want something heart-healthy, quick, and easy to prep. The air fryer does most of the work, and you’ll have a balanced, delicious meal ready in under 20 minutes! With protein-rich salmon, fresh lettuce, and sweet potato cubes for a dose of fiber and vitamins, it’s not just filling but also great for meal prepping. You can cook extra salmon patties and potatoes to enjoy later in the week, making it a time-saver for anyone looking to stay on track with their healthy eating goals

The PrepYoSelf Newsletter

Why These Ingredients Work Together:

  • Trader Joe’s Salmon Patties: These salmon patties are packed with heart-healthy omega-3 fatty acids and protein, making them a nutritious choice for busy individuals. The mild flavor of the salmon pairs well with many ingredients, and because they’re pre-seasoned, they require minimal effort. If you don’t have salmon patties, you can easily swap them for grilled chicken breasts, veggie burgers, or even a turkey patty for a similar protein boost.
  • Iceberg Lettuce Wraps: Iceberg lettuce is a great low-carb, crunchy alternative to bread or buns, and its mild taste allows the salmon and other flavors to shine. The crisp texture contrasts nicely with the tender salmon. If you want more nutrients or a sturdier wrap, you can swap iceberg for romaine lettuce, butter lettuce, or even collard greens.
  • Roma Tomato: Sliced Roma tomatoes add a juicy freshness and a subtle sweetness to balance the savory flavors of the salmon. The acidity in the tomato also enhances the overall taste of the dish. If you’re out of Roma tomatoes, you can easily substitute with cherry tomatoes, a beefsteak tomato, or even sliced cucumbers for a bit of crunch.
  • Sweet Potato: Sweet potatoes are rich in fiber, vitamins, and antioxidants, making them a nutrient-dense side dish. The natural sweetness of the roasted sweet potatoes complements the savory and slightly salty flavor of the salmon patties. You can swap sweet potatoes for regular potatoes, carrots, or even roasted butternut squash if you prefer a different flavor profile.
  • Olive Oil: Olive oil is used to coat the sweet potato cubes, helping them roast evenly and adding a touch of healthy fats. It also enhances the flavor of the spices and creates a golden, crispy texture on the potatoes. If you don’t have olive oil, feel free to use avocado oil, coconut oil, or even melted butter for similar results.
  • Seasonings (Salt, Paprika, Garlic Powder): These spices are simple but effective. Salt brings out the natural flavors of the ingredients, while paprika adds a smoky warmth, and garlic powder lends a savory depth. You can easily swap these seasonings to fit your taste preferences—try using chili powder for heat, rosemary for an earthy flavor, or cumin for a warm, spiced twist.

salmon burger lettuce wraps with sweet potato cubes

Easy Recipe Steps to Make Salmon Lettuce Wraps

  1. Cook the Salmon Patties: Remove the salmon patties from their packaging and place them in the air fryer basket. Set the temperature to 400°F and cook for 8 to 10 minutes. Check that they reach an internal temperature of 145°F using a food thermometer. If they aren’t quite there, cook for an extra 2 to 3 minutes until fully cooked through.
  2. Roast the Sweet Potatoes: While the salmon is cooking, peel the sweet potato and cut it into ½ inch cubes. Place the cubes in a bowl, drizzle with olive oil, and sprinkle on the salt, paprika, and garlic powder. After the salmon is done, add the sweet potato cubes to the air fryer and cook at 400°F for 8 to 10 minutes, shaking the basket halfway. For extra crispiness, cook for an additional 2 to 3 minutes until golden.
  3. Prepare the Lettuce Wraps: While the sweet potatoes cook, take the iceberg lettuce and carefully cut out the leaves to create wraps. Rinse them under cold water and pat dry. Slice the Roma tomato into thin rounds so everything is ready to go.
  4. Assemble the Lettuce Wraps: Take a cooked salmon patty and place it between two lettuce leaves. Add a couple of tomato slices on top. Feel free to customize with cheese, avocado, or your favorite sauce. Serve alongside the crispy sweet potato cubes for a complete meal.

Reference the recipe card below for detailed instructions.

salmon burger lettuce wraps with sweet potato cubes

Pairing Tips

  • Side Salad: A light cucumber and tomato salad with lemon vinaigrette complements the rich flavors of the salmon patties.
  • Whole Grain: For a more filling meal, pair the wraps with a side of quinoa, brown rice, or farro.
  • Toppings and Dips: Pair your wraps with a simple tahini or yogurt dip for added creaminess and flavor. Enjoy with slides of avocado.
  • Fruit Salad: A fresh fruit salad of berries or citrus slices adds a light, refreshing contrast to the meal.

salmon burger lettuce wraps with sweet potato cubes

salmon burger lettuce wraps with sweet potato cubes

Easy Weekday Recipe: Trader Joe’s Salmon Burger Lettuce Wraps with Crispy Roasted Sweet Potato Cubes

Quick and heart-healthy, these salmon lettuce wraps paired with crispy roasted sweet potatoes are a delicious and easy meal perfect for busy weeknights or meal prep.
No ratings yet
Prep Time 5 minutes
Cook Time 20 minutes
Course lunch, Main Course
Cuisine American
Servings 2

Equipment

  • knife
  • cutting board
  • Air Fryer

Ingredients
  

  • 6 oz salmon patties (Trader Joe's frozen patties)
  • 6 iceberg lettuce wraps
  • 1 roma tomato (sliced)
  • 1/2 lb sweet potato (peeled and diced)
  • 1/4 teaspoon paprika
  • 1/4 teaspoon garlic powder
  • 1/4 teaspoon salt
  • 1 tablespoon olive oil

Instructions
 

  • Cook the Salmon Patties: Remove the salmon patties from the packaging and air fry them at 400°F for 8 to 10 minutes, until they reach an internal temperature of 145°F. If needed, cook for an additional 2 to 3 minutes to ensure they are perfectly cooked.
  • Roast the Sweet Potatoes: While the salmon cooks, peel and dice the sweet potato into ½ inch cubes. Toss the cubes with olive oil, salt, paprika, and garlic powder. Once the salmon is done, place the seasoned sweet potato cubes in the air fryer and cook at 400°F for 8 to 10 minutes, shaking halfway through. If you want them crispier, cook in 2 to 3 minute increments until golden and crunchy.
  • Prepare the Lettuce Wraps: While the potatoes cook, cut and rinse the iceberg lettuce leaves, then pat them dry. Arrange the sliced Roma tomatoes to have them ready for assembly.
  • Assemble the Lettuce Wraps: Place each salmon patty between two lettuce wraps and top with sliced tomatoes. You can add a slice of cheese, avocado, or your favorite condiment for extra flavor. Serve with the crispy roasted sweet potato cubes on the side.

Similar Recipes

salmon beet salad

Citrus Ginger Salmon with Roasted Beets

salmon and watermelon salad

Grilled Salmon with Watermelon Salad

salmon salad

Salmon Stuffed Avocado Salad

You Might Also Like

Frequently Asked Questions

Can I cook the salmon patties from frozen?

Yes! You can air fry, pan-sear, bake, or grill the salmon patties directly from frozen. Cooking times will be slightly longer than thawed patties. Just ensure the internal temperature reaches 145°F.


How long can I store leftovers?

Cooked salmon patties and roasted sweet potatoes can be stored in an airtight container in the fridge for up to 3 days. For best results, store the lettuce and toppings separately to keep everything fresh.


What’s an easy swap for iceberg lettuce?

Romaine, butter lettuce, or collard greens make excellent alternatives for wraps. If you want a grain-based option, use whole wheat tortillas or pita bread.