Posted on

Asian Glazed Salmon With Kale and Squash

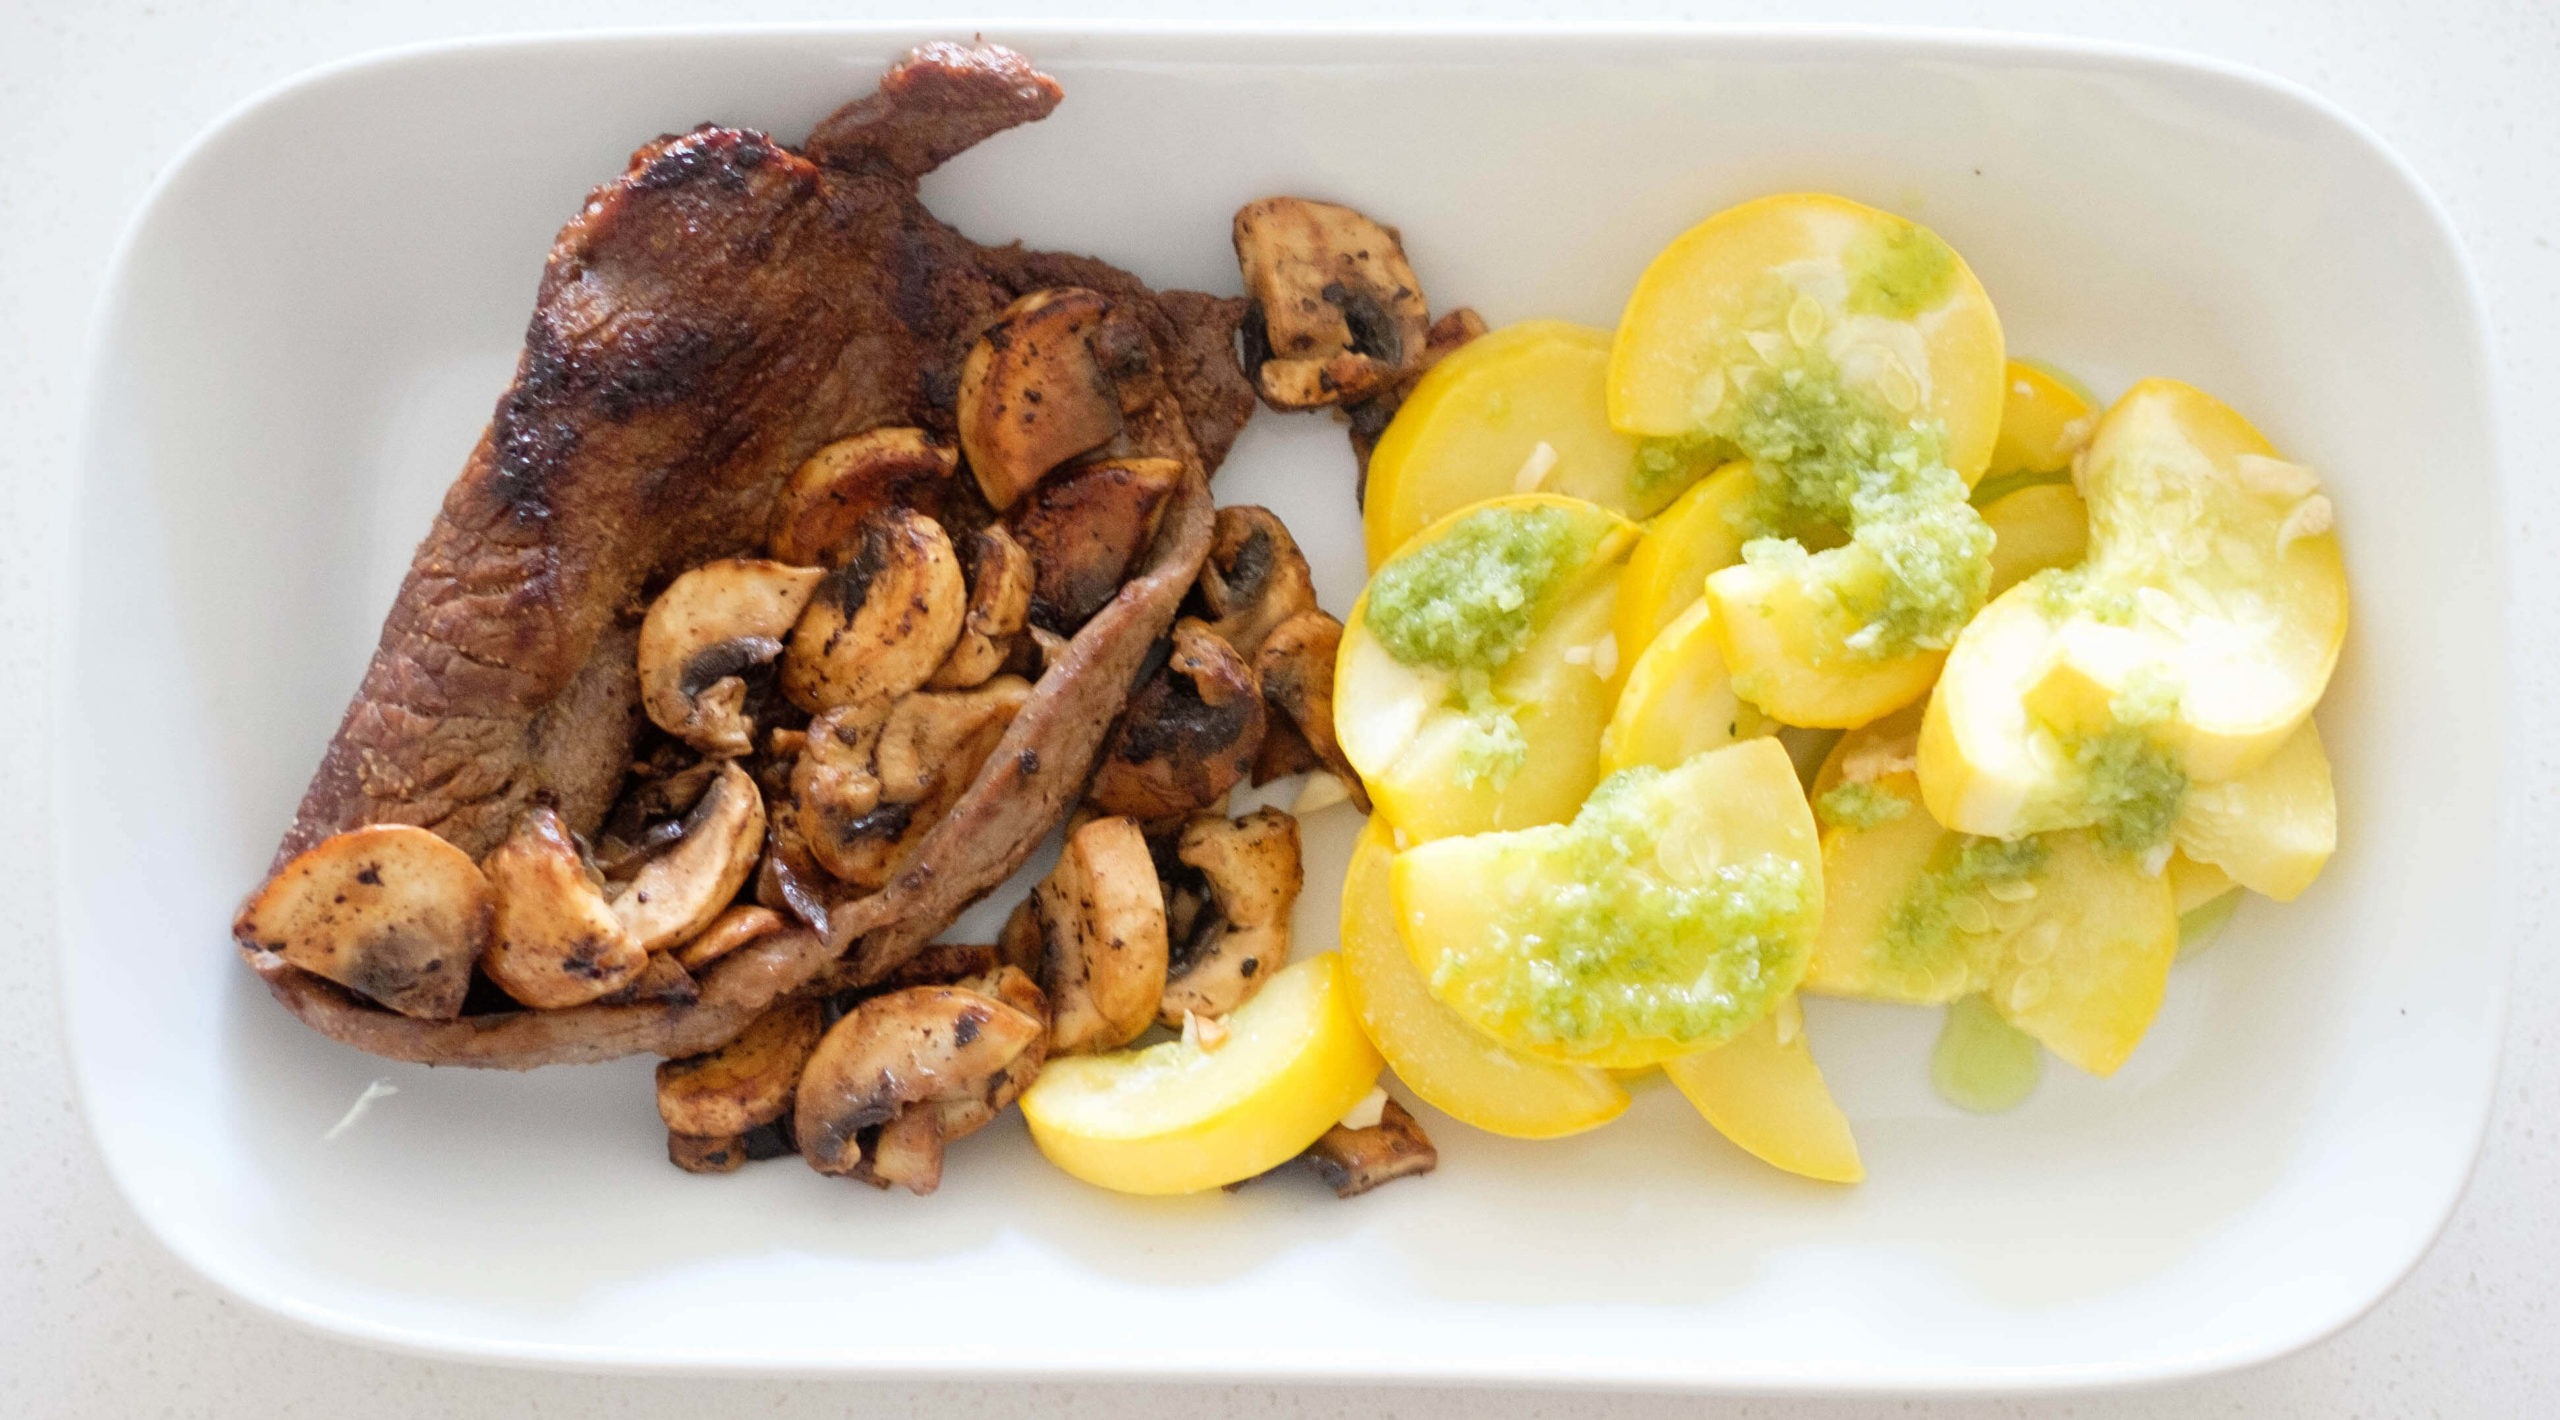
There are many recipes you can use to prepare salmon, but one that never disappoints is an Asian baked salmon recipe. Our version of this is a baked sesame ginger salmon. The marinated salmon soaks up the flavors of the ginger sesame dressing and it is then baked to perfection in the oven alongside seasoned kale and butternut squash. This quick-and-easy salmon recipe also only uses one pan, which may be an even better benefit than the high sources of fiber and healthy fats you’ll find throughout this dish. We’ll take our Omega-3s with a clean kitchen any day. 

Ease of Making: Easy

All jokes aside, there truly are countless nutritional benefits to this meal. Salmon is packed with omega-3s, protein, B vitamins, potassium and more. It has also been known to reduce your risk of cancer, heart disease, joint problems and other medical issues or conditions. 

Then we have our kale and butternut squash, each nutrient dense on their own. Kale is known as one of the healthiest and nutritious foods on the planet, due to its low calorie content and high volume of vitamins and antioxidants. Kale has been linked to protection against diabetes, cancer, and heart disease and benefits digestion, skin, hair, eyes and more. 

Butternut squash didn’t want kale and salmon to have all the fun when it comes to benefiting your health, this winter vegetable is a great source of fiber, vitamins (A,C, B, E), calcium, magnesium and zinc

How to Cook Salmon

Salmon can be cooked in a multitude of ways; oven, stovetop, air fryer, broiled, etc. Each recipe may call for a different variation of cooking method. However, no matter the cooking method here’s a guide for getting your ideal doneness on the inside of the fish.

Salmon Temperature Guide

CookInternal Temperature
Rare120℉
Medium Rare125℉
Medium130℉
Medium Well135℉
Well Done140℉
Please note that the USDA recommends that salmon reaches an internal temperature of 145F to ensure food safety (measured with a cooking thermometer in the thickest part of the filet). Consuming salmon that does not reach the internal temperature of 145F can increase the risk of being exposed to foodborne illness. 

Salmon FAQ

What is a good side dish with salmon?

If kale and butternut squash doesn’t do the trick for you, try our Roasted Rainbow Carrots and Green Beans or Sautéed Brussel Sprouts.

What is the healthiest way to cook salmon?

Broiling is one of the healthiest ways to cook salmon, unlike some other fish, salmon’s natural oils prevent the fish from drying out when cooked this way. This cooking method also doesn’t require the addition of any fats like oil. 

Do you rinse salmon before cooking?

Depending on the freshness of your fish you may want to rinse it and pat dry. Fresh or hardly aged salmon is fine without a rinse. 

Do you season salmon before cooking?

Yes, but you want to season immediately before baking as salt can start to break down the proteins and draw out the moisture in salmon if it sits too long. 

Butternut Squash and Kale FAQ

How long to cook?

Cooking Time for Butternut Squash at 400F

CutTime
Butternut squash halved50-60 minutes
Butternut squash cubed35-45 minutes
Butternut squash diced15-20 minutes

Can you eat butternut squash without cooking it?

Yes, butternut squash can be consumed raw. Many people find that they like putting it in salads or smoothies. However, butternut squash contains a lot of beta-carotene which is easier to absorb once heated. 

Do I need to peel butternut squash before roasting?

Depending on the recipe you may not need to peel the butternut squash before roasting. This recipe calls for dicing the squash in small portions so that it can cook at the same pace as the salmon and kale, so it will need to be peeled.

How long does cooked butternut squash last?

Cooked squash can last 3-4 days in the refrigerator and up to 3-4 months in the freezer for best quality.

How long does fresh butternut squash last?

A whole butternut squash with the skin still on should be kept outside of the refrigerator and can last an entire month in the right conditions. 

What is kale good for?

Besides this recipe, kale makes a perfect addition to salads, smoothies, omelets, breakfast scrambles and more. 

How many calories are in kale?

There are 8 calories in one cup of chopped raw kale, and 33 calories in one cup of cooked kale. 

How much protein in kale?

There are 0.7 grams of protein in one cup of chopped raw kale, and 2.5 grams  in one cup of cooked kale. 

How to tell if kale is bad?

As kale ages you will notice the leaves start to wilt and turn brown. If the decomposition goes further, your kale will turn into a liquid brown mush and likely start to leak out it’s bag. 

Meal prep tips for Baked Sesame Ginger Salmon 

  • Switch up your sides – if there are just too many nutrient-dense ingredients in this recipe for you, try switching up the sides. Rice and broccoli would make perfect pairs with this salmon. 
  • Broil it – If you like your salmon to have a nice crisp outer layer, try broiling it for the last five minutes of the baking process.

Baked Sesame Ginger Salmon with Kale & Butternut Squash

An easy, heart-healthy recipe featuring omega 3 rich salmon, alongside butternut squash and kale
No ratings yet
Prep Time 5 minutes
Cook Time 15 minutes
Course Main Course
Cuisine Asian
Servings 2

Ingredients
  

  • 12 oz salmon
  • 5 oz baby kale
  • 5 oz butternut squash (diced small)
  • 3 tbsp sesame ginger salad dressing
  • 1 tbsp olive oil
  • 1/2 tsp garlic powder
  • 1/2 tsp salt

Instructions
 

Pre-Cook (Mise En Place):

  • Gather your equipment: sheet pan, parchment paper, cutting board, knife, mixing bowl, tongs
  • Pre-heat oven to 400F
  • if needed: dice butternut squash into small pieces
  • line sheet pan with parchment paper

Cooking Method:

  • Place salmon on a sheet pan. Marinate it with 1 tbsp of the sesame ginger salad dressing
  • In a mixing bowl, add the baby kale and squash. Add 2 tbsp of sesame ginger salad dressing, 1 tbsp of olive oil, garlic powder, and salt. Mix well until everything is fully coated.
  • Place the baby kale mix on the same sheet pan and spread it out evenly.
  • Bake everything in the oven for 10-15 minutes until the salmon has fully cooked.
  • Remove from the oven. Eat and enjoy!

If you love this recipe, check out these other recipes we know you’ll love too:

Posted on

Roasted Chicken with Green Bean Casserole

chicken and green beans

Roasted chicken and green bean casserole are two classic American dishes in and of themselves but together the two provide a nutrient-packed meal with a fantastic balance of protein, carbs, and fats. Many people often look to French’s or Campbell’s green bean casserole recipes but we prefer our, made from scratch cream base coupled with fresh oven-roasted chicken to bring delight to our weekly meal prep menu.

Green beans are a fantastic addition to your diet, providing large amounts of Vitamin C, A, and K, in addition to other valuable minerals. Green beans are also great for a heart healthy diet considering they have zero cholesterol, low sodium (6.6mg per 1 cup) and soluble fiber. 

Ease of Making: Medium

How to Cook Green Bean Casserole From Scratch

It’s easy to make our recipe for green bean casserole ahead, all you need to do is follow a few simple steps:

  1. Cook the onions, mushrooms and garlic until softened
  2. Make your roux, with butter and milk and add to onion and mushroom mixture
  3. Stir in the rest of your ingredients, except green beans and cook until the concoction has thickened
  4. Add in your green beans and stir well
  5. Finally, add to a baking dish and top with cheese to bake

Meal Prep Tips for Roasted Chicken with Green Bean Casserole

How long does roasted chicken last in the fridge?

Roasted chicken can last up to 4 days in the fridge. It can also lend itself to many other easy recipes as well like: buffalo chicken salad, regular chicken salad or add it to the top of your lunchtime greens for a quick protein.

How long to roast a chicken?

Roast times depend on the cut of chicken you are using, in this recipe we are using chicken quarters. We suggest roasting at 425° for 35 minutes or until it reaches an internal temperature of 165F.

What can I substitute for cream of mushroom soup in a green bean casserole?

  • In our green bean casserole recipe we make our cream base from scratch instead of a can but you could certainly use either.  If you’re wondering, what to substitute for cream of mushroom soup in a green bean casserole,  look no further. You’ve got several options for substitutions and can still be known for the best green bean casserole in town.
    • 1 can of cream of celery soup
    • 1 can of cream of chicken soup
    • 1 cup of sour cream
    • 4 ounces of light cream cheese, 1 12-oz pack of mushrooms sliced, 2tbls butter, and 1 cup of milk
    • 1 cup of milk and 4 oz of cream cheese
    • Play around with your favorite substitutions until you get your flavor right. You can even add chicken broth to get a chicken forward flavor if that’s what you’re looking for.

How to steam green beans for homemade green bean casserole:

Our recipe calls for fresh, not steamed green beans for our green bean casserole. This allows for the green beans to bake in the oven in the mix of the other ingredients, absorbing flavors without becoming soggy. 

How do you thicken green bean casserole?

If you notice your green bean casserole is a bit on the runny side, you can add in a cornstarch slurry (cornstarch mixed with a little bit of water), one tablespoon at a time until your mix reaches your desired consistency. 

How to freeze green bean casserole: (Does it freeze well)

Our easy green bean casserole is perfect for freezing. Should you decide to make an extra, or freeze what you have on hand, you’ll find that green bean casserole freezes well. When you’re ready to reheat your frozen casserole, simply pop it up in the oven for 40 minutes at 350°. Cook times may vary depending on the size and type of your dish.   

What to do with leftover green bean casserole

Not everyone or every family can put down an entire casserole dish of green beans in one sitting, so it’s understandable that you may be wondering what you can do with your leftovers. Here are a few ideas:

  • Potpie
  • Stuffed mushrooms
  • Add to hash
  • Soup
chicken and green beans

Roasted Chicken with Green Bean Casserole

This Roasted Chicken and Green Bean Casserole is family favorite and a Holiday crowd pleaser.
No ratings yet
Prep Time 5 minutes
Cook Time 35 minutes
Course Main Course
Cuisine American
Servings 4

Equipment

  • knife
  • cutting board
  • sheet pan
  • casserole baking dish
  • oven

Ingredients
  

Chicken Thighs and Seasonings

  • 4 each chicken leg quarters
  • 1/4 tsp oregano
  • 1/4 tsp thyme
  • 1/4 tsp paprika
  • 1/4 tsp garlic powder
  • 1/4 tsp salt
  • 1/4 tsp pepper
  • 1 tbsp olive oil

Green Bean Casserole

  • 12 oz fresh green beans
  • 1/4 cups small white onions (diced)
  • 8 oz mushrooms (sliced)
  • 1 each garlic clove (minced)
  • 1 tbsp butter
  • 1 tbsp flour
  • 1/2 cup shredded cheddar cheese
  • 1 cup heavy cream
  • 1/4 tsp paprika
  • 1/4 tsp garlic powder
  • 1/4 tsp onion powder
  • 1/4 tsp salt

Instructions
 

  • Pre-Heat oven to 425F

Chicken Thighs

  • Season chicken with oregano, thyme, paprika, garlic powder, salt, and pepper. Drizzle with olive oil. Place it in a baking dish lined with parchment paper
  • Place the chicken in the oven and bake at 425 for 30-35 minutes until it reaches an internal temperature of 165F

Green Bean Casserole

  • Meanwhile, add oil to a saute pan on medium-high heat. Saute the onions, mushrooms, and garlic until they soften (about 3 to 5 minutes)
  • Then, add butter and flour to make a roux (paste). Stir until it is completely mixed (about 2 to 3 minutes)
  • Next, add heavy cream. Season with garlic powder, onion powder, and salt. Stir it all together
  • Simmer until it thickens into half the amount.
  • Place the green beans in a baking dish that has been greased. Pour the heavy cream mixture over the green beans. Top it off with the shredded cheddar cheese
  • Bake in the oven for 15-20 minutes.
  • Carefully remove from the oven once all items have cooked. Eat and enjoy!

If you love this recipe, check out these other recipes we know you’ll love too:

Posted on

Homemade Chicken Fried Chicken With Mashed Potatoes and Gravy

There isn’t a dish that screams comfort meal more than our crispy homemade chicken fried chicken with mashed potatoes and gravy. This southern classic serves up all the flavor, is quick to make, and can easily be doubled or tripled to feed a crowd. You might be asking yourself “what is chicken fried chicken?”, if that’s the case, you’ve missed out on life until now. Chicken fried chicken is not much different than regular fried chicken, in fact the battering process is the same. However, chicken fried chicken uses a thinner, boneless cut of meat than a traditional fried piece of chicken and is typically served with a gravy.  Using a thinner slice of chicken allows for more golden crispy outside to chicken inside per bite, yum!

Ease of Making: Medium

Ironically chicken fried chicken got its name from it’s beef predecessor the Chicken Fried Steak, which was named for its similarity in preparation and cook to fried chicken. 

Our mashed potatoes and gravy go perfectly with this chicken, providing a creamy and rich counterpart to the crispiness of the chicken. 

How to Make Chicken Fried Chicken

Making chicken fried chicken from scratch is actually much easier than most people think. The recipe calls for standard pantry items that most people would have on hand like flour, breadcrumbs and eggs. 

How do you cut the chicken for fried chicken?

The chicken that is traditionally used in chicken fried chicken is thin chicken breast. You can typically buy thinly sliced chicken breast from your local supermarket or you may choose to filet your chicken breasts or pound out a full chicken breast flat with a mallet (or rolling pin, frying pan, whatever you have on hand). 

Fileting your chicken breast is the process of slicing your chicken breast in half sideways. Do this by laying your chicken breast flat on your cutting board and with your knife parallel to the board, slice the chicken until you have two even slices of chicken. Fileting is great because you can extend your number of servings by cutting the breasts in half. Two large breasts can be made into four separate servings versus two.

How to batter chicken fried chicken?

First prepare your chicken batter by mixing flour, ice cold water and an egg. Then you will want to prepare your seasoned breadcrumbs. Set up two separate bowls that are next to each other so you can dip your chicken in the batter, followed by your seasoned breadcrumbs and then easily move to the pan. 

Batter Tips:

  • It’s easier to work in small batches if preparing multiple chicken breasts. 
  • Try and keep one hand wet and one hand dry as you are moving the chicken from batter to breadcrumb. This helps reduce the mess and give you a free hand that isn’t batter-covered if your phone starts to ring. 

 What type of flour is best for fried chicken?

All-purpose flour is the most popular in making fried chicken. It’s neutral flavor allows you to spice it up anyway you want. It can also withstand the heat and provides a consistent golden glow. 

 How to cook chicken fried chicken?

Check to ensure your oil is hot enough for your chicken breasts. You can do this by dropping a dime size amount of batter into your oil to see if it sizzles. If it does you’re good to go. If the pan doesn’t sizzle when you drop in your batter, wait until the pan has heated more. Once your pan reaches it’s “sizzle point,” start dredging your breasts in the batter and breadcrumbs.

Once your chicken has been dredged in your batter and breadcrumbs and your oil is up to temp, pan fry the breasts on each side for about 5-7 minutes on each side or it reaches an internal temperature of 165℉.  Remove from the pan but remember to save all of the scrapings from the pan to make the gravy.

How to Make Mashed Potatoes and Southern Gravy

Our southern side of mashed potatoes and gravy is the most traditional, and most delicious pairing for our homemade chicken fried chicken. Using the oil and leftover bits from the fried chicken, there’s no need to use store bought gravy when this gravy can be made from scratch in just a few minutes. 

How to cook homemade mashed potatoes

While your chicken is cooking, throw your baby potatoes in a pot of boiling water and cook until fork-tender, about 20 minutes. You want the potatoes to easily be punctured by the fork but they shouldn’t fall apart at the touch. When the potatoes are done cooking, drain and add in milk, sour cream, butter, and salt. Mash until you reach your desired consistency. We like ours somewhere between chunky and creamy. 

How to cook gravy for mashed potatoes?

To make the mashed potato gravy, use the same pan that you fried your chicken in and toss in your peppers and onions. You’ll want to saute these until soft. Then add in your mushrooms and cook until soft and golden brown. Thoroughly mix in your seasonings and follow with the butter and flour to make a roux*.  Finally, add in your heavy cream and chicken broth and let it simmer until thickened to a gravy consistency. 

Meal prep tips for Chicken Fried Chicken with Mashed Potatoes

  • Buy a 10lb bag of potatoes at the beginning of the month and prep cubes, mashed potatoes, french fries, and sliced potatoes to blanch and store in the freezer. This way you can grab the type of potato you need when cooking in an effort to reduce prep and cook times. 
  • Filet your chicken to double the servings, extend your protein, and reduce budgets.
chicken and mashed potatoes

Chicken Fried Chicken with Mashed Potatoes and Gravy

A delicious southern classic, our easy Chicken Fried Chicken will have you in a full on food coma in no time.
No ratings yet
Prep Time 10 minutes
Cook Time 30 minutes
Course Main Course
Cuisine American
Servings 4

Ingredients
  

  • 4 each chicken breasts (thinly sliced)
  • 1 each large egg
  • 1/2 cup flour
  • 1/2 cup ice cold water
  • 1 cup breadcrumbs
  • 1 lb baby potatoes
  • 1/4 cup onion (diced)
  • 1 each green bell pepper
  • 8 oz sliced mushrooms
  • 4 tbsp butter
  • 1 tbsp flour (for roux in gravy)
  • 1/2 cup heavy cream
  • 1/4 cup sour cream
  • 2 cups chicken broth
  • 3 tbsp olive oil
  • 1 tsp paprika
  • 1 tsp onion powder
  • 1 tsp garlic powder
  • 1 tsp salt

Instructions
 

Pre-Cook (Mise En Place):

  • Gather your equipment: cutting board, knife, bowls, plates, skillet, large pot, tongs spatula
  • Dice onions and bell peppers, and slice mushrooms. Cut baby potatoes in half.
  • If you can't find thinly sliced chicken breast, filet your chicken breast and slice it in half sideways. If you want it even flatter and thinner, lay it in between two layers of plastic wrap and use a meat pounder or a small frying pan to pound it out flat. This will help the chicken cook faster.
  • Prepare the batter: In a bowl, mix together the flour, ice cold water, and egg
  • Prepare the breadcrumbs: In a bowl, add half the paprika, garlic powder, onion, and salt to the breadcrumbs

Cooking Method:

  • Pre-heat a skillet with 2 tbsp of olive oil on medium high heat. Then dip the chicken breast into the batter and dredge it in the bread crumbs. When the pan is heated, pan fry the chicken breast on each side until golden brown and fully cooked (about 5 to 7 minutes on each side-check for an internal temperature of 165F).
  • Meanwhile, start boiling the potatoes in a large pot. Boil for about 20-25 minutes. When they're cooked, a fork should easily slide into the potatoes, and the potatoes should almost, but not totally, fall apart.
  • Once the chicken is fully cooked, remove it from the pan. Using the same pan, add the onions and bell peppers. Saute until they soften. Then add the mushrooms and stir until they soften and turn golden brown. Add the remainder of the seasonings and mix thoroughly.
  • Next, add the butter and flour and mix until it makes a roux (a paste). Then add the heavy cream and chicken broth. Simmer until the gravy thickens.
  • Once the potatoes are boiled, add sour cream, butter, and salt. Mash the potatoes until you have reached a creamy consistency.
  • Serve the chicken and mashed potatoes with the gravy. Eat and enjoy!

If you love this recipe, check out these other recipes we know you’ll love too:

Posted on

Homemade Lemongrass Beef Stew Recipe

beef stew

Instant Pot’s can be a lifesaver when you’re short on time but want to pack big flavors into a meal. It does just that with this Vietnamese inspired lemongrass beef stew. This quick to prepare and painless to cook meal is vibrating with the flavors of lemongrass (obviously), garlic, anise, clove and bay leaves and other spices. Arguably, the instant pot is the best way to make beef stew from scratch, but if you have more time, you can make this in a clay pot or a dutch oven and let it slow cook as well. 

Ease of Making: Easy

How to Make Lemongrass Beef Stew

A take on a Vietnamese classic, Bo Kho (Vietnamese beef stew), this instant pot stew may just become an instant pot classic in your kitchen. Beef stews are known for their deeply braised beef and aromatic flavors. Traditionally they would be prepared in a clay pot that helps enrich the soup with the savory and sweet flavors. However, we will use an instant pot in this recipe. Instant pots cut the cooking time for beef from hours to under an hour. 

How to Cook Lemongrass Beef Stew

There’s not a whole lot you have to do to cook this lemongrass stew with the exception of layering in the beef, seasonings, and water. Close the lid and turn your sealing knob to the locked position. Let the soup cook for 35 minutes before turning off the heat and giving your instant pot time to release, about 10 more minutes. Add in your bok choy and other veggies or toppings you might like and serve or portion in containers to use throughout the week, 

How can I make my stew more flavorful?

Bland stew got you down? We use the Instant Pot to enrich deep flavor into our soup. Using a pressure cooker helps speed up the process of building depth. 

Meal Prep Tips for Lemongrass Beef Stew Recipe

  • Serve over noodles or rice for added heartiness or carbs needed to reach your goals. 
  • Use the beef to make a sort of beef banh mi sandwich with some pickled veggies like cucumber and carrots. 
  • Serve over a salad for a lighter variation of the meal. 
beef stew

Instant Pot Lemongrass Beef Stew

No ratings yet
Prep Time 5 minutes
Cook Time 40 minutes
Course Main Course
Cuisine Asian, Vietnamese
Servings 4

Equipment

  • knife
  • cutting board
  • mallet
  • Instant Pot

Ingredients
  

  • 1.5 lbs chuck roast chunks
  • 8 oz mushrooms (sliced)
  • 1 bunch fresh basil leaves
  • 1 bunch bok choy (rinsed, cut into chunks)
  • 1.5 cups water
  • 3 each garlic cloves (peeled)
  • 1-2 sticks lemongrass (4 inch length)
  • 1 each onion (sliced)
  • 1 each clove
  • 1 each star anise
  • 2 each bay leaves
  • 1/4 tsp cinnamon
  • 1/2 tsp garlic powder
  • 1/2 tsp onion powder
  • 1/4 tsp pepper
  • 2 tsp salt or fish sauce

Instructions
 

  • Place the beef at the bottom of the pan. Use a mallet to crush the lemon grass stick and place it in the pan
  • Next, add the bay leaves, seasonings, onions, garlic, mushrooms, and fresh basil leaves.
  • Then, pour over the water.
  • Close the lid, turning the venting knob to the sealing position. Cook on high pressure for 35 minutes.
  • After it has cooked, allow 10 minutes for natural release before doing a quick release. Carefully remove the lid.
  • Then, add the bok choy into the stew. Stir until it has wilted. Top it off with any other fresh veggies and sauces such as sriracha or hoisin sauce. Eat and enjoy!

If you love this recipe, check out these other recipes we know you’ll love too:

Posted on

Crispy Chicken With Cajun Squash Spirals

crispy chicken and squash

Crispy Chicken With Cajun Squash Spirals

No ratings yet
Prep Time 5 minutes
Cook Time 20 minutes
Course dinner, Main Course
Cuisine American, Cajun
Servings 2

Equipment

  • knife
  • cutting board
  • mallet
  • mixing bowl
  • tongs
  • spatula
  • saute pan

Ingredients
  

  • 12 oz chicken breasts
  • 1 each large egg
  • 1/4 cup flour
  • 1/4 cup ice cold water
  • 1/2 cup breadcrumbs
  • 2 cups butternut squash spirals
  • 1/4 cup white onions (diced)
  • 1 tbsp garlic (minced)
  • 1 each green bell pepper (diced)
  • 1 cup mushrooms (sliced)
  • 1/2 cup corn kernels
  • 1 tbsp butter (extra for squash spirals)
  • 1 tbsp flour (extra for squash spirals)
  • 1/4 cup heavy cream
  • 1/4 cup parmesan cheese
  • 1 tbsp oil
  • 1/4 tsp paprika
  • 1/4 tsp dried oregano
  • 1/4 tsp dried thyme
  • 1/4 tsp onion powder
  • 1/4 tsp salt

Instructions
 

  • Prepare the cajun seasoning by mixing all the spices together (paprika, oregano, thyme, onion powder, salt)
  • Then prepare the chicken: Place plastic wrap on top of the chicken breast. Pound it flat with the flat side of a mallet (meat tenderizer), working from the inside out, until it is about 1/4 inch thick. Repeat with the remaining chicken breasts
  • Prepare the batter: In a bowl, mix together the flour, ice cold water, and egg
  • Prepare the breadcrumbs: In a bowl, add half of the cajun seasonings to the bread crumbs. Save the other half of the seasonings for the squash spirals
  • Pre-heat a skillet with olive oil on medium-high heat. Then dip the chicken breast into the batter and dredge it in the breadcrumbs. When the pan is heated, pan fry the chicken breast on each side until golden brown and fully cooked (about 3 to 5 minutes on each side).
  • Once the chicken is fully cooked, remove it from the pan. Using the same pan, add the onions and bell peppers. Saute until they soften. Then add the mushrooms and stir until they soften and turn golden brown. Add the cajun seasonings and mix thoroughly.
  • Next, add the corn. Add butter and flour and mix well until the flour turns into a paste.
  • Then, add heavy cream and let it simmer until it thickens.
  • Sprinkle in parmesan cheese and add the butternut squash spirals.
  • Mix well until the sauce completely covers the butternut squash spirals. Cook for another 4 to 5 minutes until the squash gets tender
  • Slice the chicken into bite size pieces and serve with the squash spirals. Eat and enjoy!
Posted on

How To Make Beef Tamale Casserole

beef tamale

Tamales are a common and popular dish among Spanish, Mexican, and Latin cultures. Typically they are corn-filled dough that is filled with various meats and vegetables. Beef tamales are most notably the fan-favorite and let us say, we are fans. Making individual, traditional tamales can not only be time-consuming but it is also difficult. We thought we’d take these classic tamale flavors and turn them into a flavor-packed beef tamale casserole that is easy to prep and portion for your busy week ahead. 

Ease of Making: Medium

How to Make Beef Tamale Casserole

Beef tamale casserole is typically made by layering cornbread, tamale sauce and seasoned ground beef in a way that mimics the traditional tamale. Casseroles make for easy dishes to feed a family, to make ahead and freeze or to keep for the week and have a warm hearty meal every day. Casseroles are popular because you can put a variety of items in the deep baking dishes and quickly pop it in the oven. If you find that you aren’t a fan of ground beef, you can easily sub in ground chicken, turkey, or any other protein in this dish and make it to your liking. We like our dishes to be quick, easy and flexible for your cooking needs. 

Our beef tamale casserole can also be topped with some of your favorite Mexican inspired ingredients like jalapenos, sour cream, lettuce, tomatoes, salsa, or pico de gallo! 

There are three main components of a casserole: pieces of meat, vegetables, and some sort of starchy binder. Each component serves a purpose of its own. 

  • Starch  – We use a cornbread base to hold up to the flavors of the seasoned meat and vegetables but you can use a variety of starches in casseroles. Potatoes, pasta, rice, or any other grain can serve as an excellent starch in your casserole to bring it together.
  • Pieces of meat – Ground beef is used in this beef tamale casserole but when making a casserole you can use practically any type of protein. Have fun and experiment!
  • Vegetables – There’s no limit to the types of vegetables you can put inside a casserole and oftentimes, casseroles are packed with veggies and you won’t even know it. 

How to Cook Beef Tamale Casserole

Start by preheating your oven, we cook our beef tamale casserole at 400℉. Next, you will want to prep the cornbread layer of your dish, your base. Once mixed add your cornbread mixture to a greased baking dish that is deep enough to hold the rest of the casserole and bake for 20-25 minutes.

It is necessary to brown meat before stewing so that the meat is not raw when you cook and add it to the cooked cornbread layer. While the cornbread bakes, you will add your onions to a hot saute pan with oil and cook until softened. Add in the ground beef and cook until browned, breaking up into smaller pieces as it cooks. After the meat has cooked, add in your seasonings and sauce.

Remove your cornbread from the oven and carefully layer on your beef and sauce mixture, followed by the remaining vegetables and a layer of cheese to the cooked cornbread and return to the oven to finish baking. This should only take about 5-10 minutes for your cheese to melt. Once your cheese is melted on top, remove your casserole from the oven and serve.  

Meal Prep Tips for Beef Tamale Casserole

  • Reheat your casserole prep in the oven by covering tightly with foil and heating for 20 minutes at 400℉.
  • If at any point you notice your casserole getting too brown or starting to burn, you can cover your dish with tin foil for the remainder of the baking process. This helps protect the top layer of the dish and prevent scorched meat and cheese. 
beef tamale

Beef Tamale Casserole

Layers of cornbread, tamale sauce, and seasoned beef make this the perfect comfort food dish for you and your family.
No ratings yet
Prep Time 5 minutes
Cook Time 40 minutes
Course dinner, Main Course
Cuisine American, Mexican
Servings 4

Equipment

  • knife
  • cutting board
  • spatula
  • saute pan
  • baking dish

Ingredients
  

  • 1 lb lean ground beef
  • 1/2 each small white onion (diced)
  • 1 each green bell pepper (diced)
  • 1 each roma tomato (diced)
  • 1/4 cup green onions (chopped)
  • 1/2 cup shredded cheddar cheese
  • 8 oz tomato sauce
  • 1/2 tsp chili powder
  • 1/2 tsp cumin
  • 1/2 tsp paprika
  • 1/2 tsp onion powder
  • 1/2 tsp garlic powder
  • 1/4 tsp salt
  • 1 tbsp olive oil

Cornbread batter recipe:

  • 1 cup flour
  • 1 cup yellow cornmeal
  • 2/3 cup white sugar
  • 3 tsp baking powder
  • 1 cup yogurt
  • 1/3 cup oil
  • 1/3 cup water

Instructions
 

  • Pre-heat oven to 400F
  • First, prepare the cornbread. In a mixing bowl, add the egg, sugar, yogurt, and vegetable oil. Stir, until thoroughly mixed.
  • Then, add the baking powder, flour, and cornmeal. (best to mix in the dry ingredients in batches so that the mixture does not clump)
  • Place the batter in a greased baking dish and bake in the oven for 20-25 minutes until the center is fully cooked.
  • Next, prepare the taco meat. Add oil to a heated pan on medium high heat. Saute the onions until they soften.
  • Add the ground beef and break into smaller pieces. Continue to cook until it has turned golden brown. Then add the spices and tomato sauce. Continue to stir the beef until it is fully cooked.
  • Remove the cornbread from the oven. Carefully add the ground beef mixture on top. Then, layer the rest of the vegetables on top.
  • Finally, add shredded cheese on top and place it back into the oven for 5 to 10 minutes until the cheese has melted.
  • Remove from the oven, and carefully scoop out a serving. Eat and enjoy!

If you love this recipe, check out these other recipes we know you’ll love too:

Posted on

How To Make Pineapple Chicken Stir Fry

pineapple chicken stir fry

Stir-frys are a weekday favorite no matter what you put inside. They are great because you can typically take items that you have on hand, throw them in a pan to get cooking and have a quick, full meal in a matter of minutes. For this stir fry recipe, we opted to go with a tangy pineapple chicken combo that features peppers as well. Pineapple and red peppers are too flavors you see a lot together, think chicken kebabs. 

Ease of Making: Easy

Stir-frys are also great for substitutions if you don’t have one of the ingredients in your fridge or freezer. No chicken? No problem! Sub in any protein like beef, shrimp, tofu, etc to pull this dish together. 

Some of our other favorite stir fry recipes include: Soba Noodle Chicken Stir Fry, Ground Beef Stir Fry and Sheet Pan Chicken Stir Fry. 

How To Make Pineapple Chicken Stir Fry

Making chicken stir fry from scratch is as easy as throwing the chicken and vegetable you’ve got lying around in a pan and cooking until perfection. Diced chicken breast is commonly found in stir frys but we’ve opted to use a chicken thigh to impart more flavor and tenderness in our dish. 

How to Cook Pineapple Chicken Stir Fry

First, start by seasoning your chicken and cut it into small pieces. Then cook until lightly browned on all sides, about 5-7 minutes. Next, you’ll want to add in the stir fry sauce from the next step, top with your bell peppers and sesame oil and enjoy. 

How to Make Homemade Stir Fry Sauce

Making stir fry sauce from scratch is as easy as combining several classic Asian pantry items together in your dishes like hoisin, soy sauce, and sesame oil. Hoisin is a thick Chinese sauce that is salty and sweet in flavor. Many people use it to make Chinese inspired sauces or as a dipping sauce for proteins and vegetables. Sesame oil is extremely powerful in taste so it’s best to add in small amounts or you’ll end up what tastes overwhelming like sesame and coat your mouth in the oil. 

To make the sauce: simply add your hoisin and soy sauce to the pan of cooking chicken and bring to a boil while it thickens. 

Meal Prep Tips for Pineapple Chicken Stir Fry

  • Serve up our pineapple chicken stir fry with a variety of sides like rice, cauliflower rice, noodles or even put it in a lettuce wrap for a fantastic low carb option. 
  • Cut all your vegetables the same size to ensure even cooking.
  • Use a thinly cut piece of chicken or chunks of chicken. This helps reduce cook time and gets those warm pineapple bits of stir fry to your mouth even sooner. 
  • Use canned or fresh pineapple in this recipe instead of frozen. 
pineapple chicken stir fry

Pineapple Chicken Stir Fry

No ratings yet
Prep Time 5 minutes
Cook Time 15 minutes
Course dinner, Main Course
Cuisine American, Asian
Servings 2

Equipment

  • knife
  • cutting board
  • spatula
  • wok

Ingredients
  

  • 12 pz boneless chicken thighs
  • 1 each red bell pepper (diced)
  • 1/4 cup red onion (diced)
  • 1 cup pineapple chunks
  • 1 tbsp soy sauce
  • 2 tbsp hoisin sauce
  • 1 tsp sesame oil
  • 1 tbsp olive oil
  • 1/4 tsp garlic
  • 1/8 tsp salt

Instructions
 

  • Cut your chicken into 1 inch cubes
  • Add oil to a heated pan on medium high heat and add the onions. Saute the onions until they softne
  • Next, add the chicken and season with garlic powder and salt.
  • Continue to stir the chicken until it turns golden brown on all sides. (cook for 5 to 7 minutes) Then, add the soy sauce and hoisin sauce and fully coat the chicken
  • At the end, add the red bell peppers and pineapple. Sprinkle with sesame oil and mix well.
  • Enjoy with rice or noodles (use cauliflower rice or squash spirals for low carb option). You could also serve this on top of a lettuce wrap.

If you love this recipe, check out these other recipes we know you’ll love too:

Posted on

Easy Steak And Mushrooms Recipe

Steak and Squash

Our steak and mushrooms with squash and chive pesto recipe, isn’t only a mouthful to say but also to eat. This well rounded meal is perfect for summer or fall when you have access to beautiful squash. If you live somewhere where you can get good quality squash year round, lucky you, you can make this recipe all year. Not only is this recipe healthy, quick and easy to make but it’s also budget friendly. Our recipe accommodates any type of beef steak you’d like. We like to stock up on good roasts when they are on sale and then slice and freeze them individually. Depending on your freezer, steak can last 4-12 months when frozen. 

Ease of Making: Easy

How to Make Steak and Mushrooms with Squash and Chive Pesto

Steak and mushrooms are two common flavors that you’ve likely seen before for most meals. You can find this combination on breakfast menus, in burgers or at your favorite steak house. To bring the flavors home and give yourself a hearty treat, we’ve paired our steak and mushrooms with a bright and refreshing zucchini squash and chive pesto. 

How to Cook Steak and Mushrooms

First, start by seasoning your steak with garlic powder and salt and add to a pan with oil. Cooking at medium high heat. For this recipe, we opt to sear the steak on both sides and then cook until done.

To cook the mushrooms for steak, remove cooked beef from the pan and place on a serving dish. Using the same pan add more oil and saute the mushrooms until brown.

How to Tell if Your Steak is Done

Nailing the perfect cook on your steak is something most chefs aim to do in the kitchen. After all, nobody who prefers their steak well done is going to be okay with a still mooing piece of rare steak when served. To test out where your steak is in the cooking process, take your finger and press firmly into the steak and look for these qualities:

  • Rare – a rare steak is extremely soft and will keep an indent after you’ve touched it with a finger.
  • Medium rare – these steaks will feel soft and springy
  • Medium – touch your steak to see if it springs back to the touch, if it has a quick spring back you’ve nailed the medium cook. 
  • Medium well – a medium-well steak will be mostly firm with a hardly noticeable spring left in it when you touch it. 
  • Well done – steaks that are completely cooked through will be firm to the touch. 

Or use a meat thermometer:

  • Rare- 140℉
  • Medium rare – 145℉
  • Medium – 160℉
  • Medium well – 165℉
  • Well done – 170℉

Please note that the USDA recommends cooking to at last 145F to avoid increased risk of food borne illness. 

How to Prepare Squash

Squash is a delicate vegetable that can get soggy when sliced too thin or combined with too much oil. We like to slice our squash into half circles that are about a quarter inch thick. Do this by trimming the ends of your squash and slicing lengthwise through the vegetable until you have two even halves. Then you’ll slice widthwise along your squash to make the half coin.

Place your squash on a baking sheet and season with garlic powder and salt. Drizzle with olive oil and bake for 10-15 minutes.

How to Make Chive Pesto

Pestos are an easy to make sauce that traditionally are found with pine nuts, salt, basil, and garlic. To make our chive pesto, add chives, garlic, olive oil, and 1 tsp of salt to a blender. Puree until smooth. If you notice the pesto is too thick you can add more olive oil and blend until you reach your desired consistency. When finished, add to your cooked squash. 

Meal Prep Tips for Steak and Mushrooms

  • If you want to spice up your steak with pepper or additional seasonings, do it after the sear to ensure the spices do not burn. 
  • Pat the steak dry before cooking to get a nice crust. 
  • Have your meat thermometer handy to prevent any overcooking. 
Steak and Squash

Steak & Mushrooms With Squash and Chive Pesto

No ratings yet
Prep Time 5 minutes
Cook Time 20 minutes
Course Main Course
Cuisine American
Servings 2

Equipment

  • knife
  • cutting board
  • tongs
  • spatula
  • blender
  • saute pan
  • indoor grill pan

Ingredients
  

Steak and vegetables

  • 12 oz sirloin steak (recommend thinly sliced)
  • 1/4 tsp garlic powder
  • 1/4 tsp salt
  • 1/4 tsp pepper
  • 1 each yellow squash (sliced)
  • 1 cup mushrooms (sliced)

Chive Pesto

  • 1 bunch chives
  • 3 cloves garlic (peeled)
  • 1 each lemon
  • 1/4 cup olive oil
  • 1 tsp garlic powder
  • 1 tsp salt

Instructions
 

  • Pre-heat oven to 400F
  • Slice squash into half coins (1/4 inch thick). Place on a sheet pan and season with a pinch of salt and garlic powder. Drizzle with 1 tbsp of olive oil
  • Place squash in the oven and bake for 10-15 minutes.
  • Meanwhile, season the steak with garlic powder, salt, and pepper. Coat it with olive oil
  • Pre-heat the indoor grill pan on medium-high heat and sear the steak on each side for about 3 to 5 minutes until it reaches your desired doneness
  • After the steak cooks, remove it from the indoor grill pan. Add the sliced mushrooms and grill them until they soften (about 3 to 5 minutes). Toss them around so that it fully cooks

Chive Pesto

  • Add chopped chives, garlic, lemon juice, olive oil, and salt to a blender. Puree until smooth. Add more olive oil if it is too thick. Add salt to preferred taste. Then, spoon some of the sauce on top of your veggies and use it as a dip for your steak

If you love this recipe, check out these other recipes we know you’ll love too:

Posted on

How To Make Thai Red Beef Curry

red beef curry

Oftentimes on weeknights we crave Asian food and the thought of ordering out definitely crosses our minds. However, with our easy Thai red beef curry recipe, we can skip the delivery fees and have a yummy Asian inspired meal in no time. Combining flavors of red curry paste, coconut milk and basil, this recipe is sure to satisfy those delivery food cravings and provide a much healthier option. 

How to Make Thai Red Beef Curry

We love a one-pot dish and this Thai red beef curry is definitely one of our favorites. By simmering the ingredients at a lower temperature for a longer period of time, you are able to break down the beef and make it super tender. The combination of sweet and heat flavors make this seriously delicious. 

Currys are also great because you can throw in whatever vegetables you have on hand and make this meal even more nutritious. This recipe doesn’t call it for it but we do like adding in green beans or squash if we’ve got it on hand. 

How to Cook Thai Red Beef Curry

Start by prepping your ingredients: slice  beef, onions and bell peppers into thin strips and mince your garlic. Once that is done, add oil to a soup pot on medium high heat and cook your onions until soft and translucent. Next, add your beef and garlic and stir well. Cook all of this for two to three minutes until golden brown. 

Once your beef is golden brown, pour in the coconut milk, brown sugar, red curry paste, and fish sauce. Ensure that everything is mixed extremely well and bring the pot to a boil, stirring carefully for one to two minutes to minimize an overflow. After your mixture has started to boil, reduce the heat and simmer your curry for another 20-30 minutes until your meat is tender.

When your steak is tender, mix in the basil leaves and top it off with fresh bell peppers. Serve with rice or cauliflower rice and the  juice of a lime wedge. 

Meal Prep Tips for Thai Red Beef Curry

  • Substitute in cauliflower rice for a lower-carb option. 
  • Double the batch and freeze it for future use when those delivery cravings hit and you’re short on time. 
red beef curry

Thai Red Beef Curry

Our Thai Red Beef Curry is fresh, flavorful, and full of healthy ingredients. A great option if you're craving take out but want to save on the ordering fees.
No ratings yet
Prep Time 5 minutes
Cook Time 35 minutes
Course Main Course
Cuisine Asian, Thai
Servings 4

Equipment

  • knife
  • cutting board
  • soup pot
  • spatula

Ingredients
  

  • 12 oz beef (any kind) thinly sliced
  • 1/4 cup white onions (sliced)
  • 1 each red bell pepper (sliced)
  • 1 each garlic cloves (minced)
  • 1 cup coconut milk
  • 2 tsp fish sauce
  • 2 tsp brown sugar
  • 1/2 cup basil leaves
  • 2 tbsp red curry paste
  • 1 each lime

Instructions
 

  • Add oil to a soup pot on medium-high heat. Saute the onions until they soften and turn translucent (about 2 to 3 minutes)
  • Next, add the beef and garlic and stir it around until they become golden brown (about 4 to 5 minutes)
  • Then, pour in the coconut milk, brown sugar, and red curry paste, and fish sauce.
  • Mix everything really well. Bring the pot to a boil and carefully continue to stir for 1 to 2 minutes (making sure it doesn't overflow)
  • Once it reaches a rolling boil, bring it down to a simmer and cook for another 20-30 minutes until meat is tender.
  • At the very end, mix in the basil leaves and top it off with fresh bell peppers. Serve with rice and juice of a lime wedge

If you love this recipe, check out these other recipes we know you’ll love too:

Posted on

Easy Balsamic Baked Chicken Recipe With Zucchini

Easy Balsamic Baked Chicken Recipe With Zucchini

There’s something about the sweet tang of a balsamic glazed chicken breast that really gets our mouth watering. Our balsamic baked chicken with zucchini is easy to make and even easier to enjoy. You’ll also only use one bowl and a sheet pan when cooking which helps to keep the kitchen clean and the chef happy. Most people love to cook but we’ve never met someone that actually enjoys washing the dishes, which is why we turn to sheet pan meals quite frequently. Check these other ideas out:

Easy of Making: Easy

This baked balsamic chicken will be an instant staple in your kitchen once you get a taste of our sticky glaze, that is baked onto the chicken and caramelized. 

How to Make Balsamic Baked Chicken with Zucchini

Our juicy and tender balsamic chicken is a fan favorite and can be thrown together in a matter of minutes, giving you time to enjoy time with your family or catch up on your favorite tv show. Served alongside zucchini and roasted cherry tomatoes that will have your mouth bursting with flavor, this dish is sure to please even the pickiest of taste buds.

 How to Cook Balsamic Baked Chicken

Start by seasoning you chicken in a bowl with thyme, garlic powder, salt, and coat with olive oil. Mix well and place in a baking dish. Bake for 30 minutes and remove chicken from the oven. 

Using a basting brush, paint the chicken with balsamic glaze. For this recipe, you can use a store bought balsamic glaze or make your own. To make your own, simply simmer balsamic vinegar in a separate pan and reduce until thick enough to coat the back of a spoon. 

Once your chicken is coated, put it back in the oven to bake for another 15 minutes until the chicken reaches an internal temperature of 165F. Remove from the oven and enjoy!

How to Cook Zucchini and Roasted Tomatoes

Slice zucchini into 1/4 inch half coins or circles, by slicing the squash in half lengthwise. When you have two even halves, slice quarter inch slices across the width of the zucchini. After your zucchini is prepped, slice cherry tomatoes in half and mince your garlic. 

Add the zucchini, tomatoes, and garlic combination to the top of the chicken once you’ve removed it from the oven the first time and basted it with the balsamic glaze. 

Meal Prep Tips for Balsamic Baked Chicken with Zucchini

  • Save some of your balsamic glaze to put on top of your meal before you reheat it throughout the week. 
  • Add a starch like rice, quinoa or even cauliflower rice to round out the meal.
Easy Balsamic Baked Chicken Recipe With Zucchini

Balsamic Baked Chicken With Roasted Zucchini

Sheet-pan balsamic chicken makes for a quick, flavorful and easy meal no matter the day of the week.
No ratings yet
Prep Time 5 minutes
Cook Time 40 minutes
Course Main Course
Cuisine American, Italian
Servings 4

Equipment

  • knife
  • cutting board
  • baking dish

Ingredients
  

  • 4 each chicken thighs
  • 1 each zucchini
  • 1 cup cherry tomatoes
  • 3 cloves garlic
  • 2 tbsp balsamic glaze
  • 1 tsp dried thyme
  • 1 tsp garlic powder
  • 1 tsp salt
  • 1 tbsp olive oil

Instructions
 

  • Pre-heat oven to 425F
  • Slice zucchini into 1/4 inch half coins, slice cherry tomatoes in half, mince garlic
  • In a bowl, season chicken with thyme, garlic powder, salt, and coat with olive oil. Mix well and place in a baking dish.
  • Bake in the oven for 30 minutes. After 30 minutes remove it from the oven.
  • Using a brush, carefully baste the chicken with balsamic glaze. Add zucchinis, cherry tomatoes, and garlic on top. Season with salt.
  • Place it back in the oven to cook for another 15 minutes until the chicken reaches an internal temperature of 165F.
  • Remove from the oven. Eat and enjoy!

Notes

Note: After the chicken cooks, you can split the recipe in half and shred half of the chicken meat, and use it as your protein for a lunch salad or in a sandwich.

If you love this recipe, check out these other recipes we know you’ll love too: