Posted on Leave a comment

Beef Zucchini Nachos

wooden plate with sliced zucchini topped with ground beef, bell peppers, tomatoes, and shredded cheese

Beef Zucchini Nachos, your new meal prep superheroes. It’s like getting all the joy of restaurant nachos without the guilt or the hit to your wallet. So go on, get cooking, and enjoy every delicious, crunchy, and flavor-packed bite!

This post may contain affiliate links. Please see our privacy policy for details.

Plate with chicken fajitas, mango salsa, and colorful bell peppers and onions served with tortillas.

Why We Love These Beef Zucchini ‘Nachos’

Say hello to the marvelously delicious Beef Zucchini Nachos – your new go-to for meal prep magic! These babies are so incredible, you won’t even be tempted by those takeout temptations anymore.

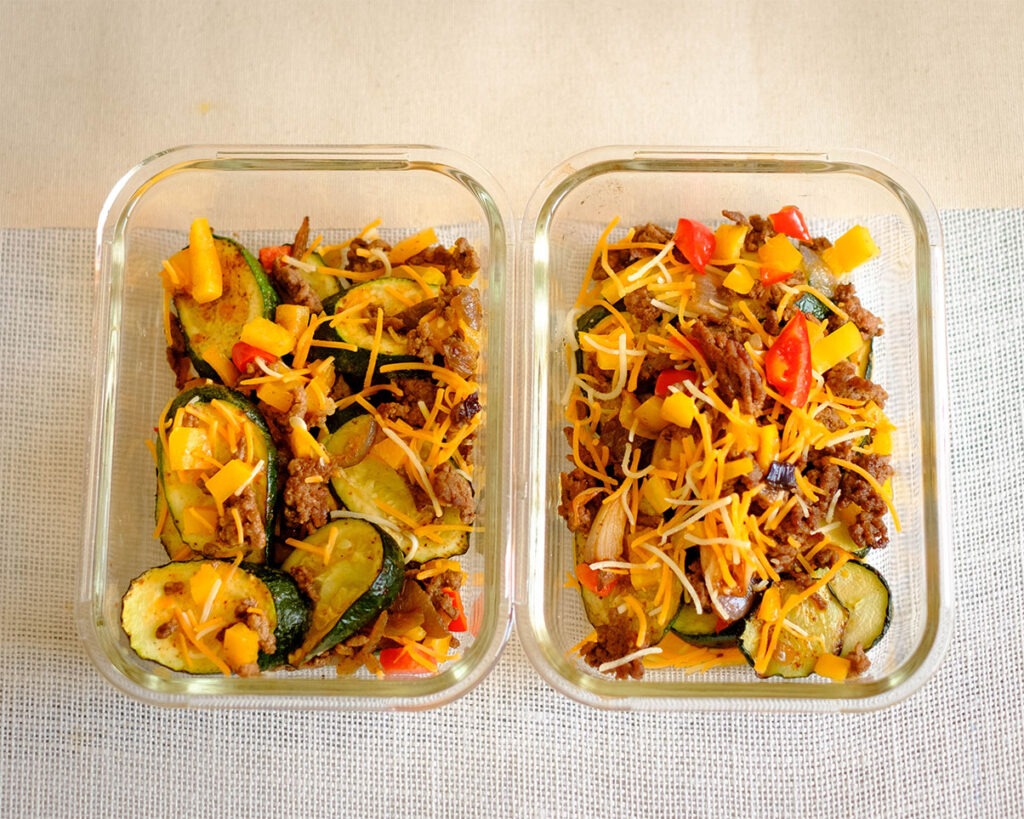
Picture this: layers of flavor-packed ground beef, sautéed white onions and yellow bell peppers, and the vibrant pop of cherry tomatoes. Oh, and let’s not forget the star of the show – sliced zucchini, standing in as your crispy, guilt-free “chips.” And guess what? They taste just as good, if not better, than your favorite restaurant nachos.

The PrepYoSelf Newsletter

Simple Ingredients You’ll Need

  • Ground Beef: The hearty foundation of our nachos, bringing a savory kick to the party.
  • White Onions & Yellow Bell Peppers: Sautéed to perfection, these guys add a sweet crunch and a colorful twist.
  • Cherry Tomatoes: Bursting with juiciness and freshness, they add a delightful pop of flavor.
  •  Shredded Cheddar Cheese: Melted and ooey-gooey, this cheese takes your nachos to a whole new level.
  • Sliced Zucchini: The brilliant stand-in for traditional chips – crispy, satisfying, and oh-so-healthy.
  • Seasonings (Chili Powder, Cumin, Paprika, Garlic Powder, Salt, Olive Oil): This powerhouse combo is like a party in your mouth, turning every bite into a fiesta!
wooden plate with sliced zucchini topped with ground beef, bell peppers, tomatoes, and shredded cheese

Easy Step-by-Step Process:

  1. Preheat the Oven: Crank it up to 400°F (200°C) and let it get all warm and cozy.
  2. Slice & Season: Grab your zucchinis and slice them into 1/4 inch thick rounds. Sprinkle them with a dash of garlic powder and salt, then give them a loving coat of olive oil.
  3. Bake the Zucchini Slices: Lay those seasoned zucchini rounds onto a baking sheet and slide them into the preheated oven. Let them bake for about 12 to 15 minutes, until they’re golden and crisp.
  4. Sauté Veggies: While your zucchinis are getting their crunch on, heat up a sauté pan on medium-high and add a dash of olive oil. Toss in those onions and bell peppers, giving them a quick sauté for 2 to 3 minutes until they’re tender.
  5. Add Beef & Seasonings: Time to introduce the ground beef to the pan. Sprinkle in your magnificent mix of chili powder, cumin, paprika, garlic powder, and salt. Give it all a sauté dance until the beef turns a beautiful golden brown, about 6 to 7 minutes.
  6. Build the Magic: Take your zucchini slices out of the oven – they’re probably dancing with excitement now. Arrange them on a plate or serving dish, then heap on that glorious seasoned beef. Shower it all with shredded cheddar cheese and the vibrant cherry tomatoes.

Reference the recipe card below for detailed instructions.

wooden plate with sliced zucchini topped with ground beef, bell peppers, tomatoes, and shredded cheese

Meal Prep Tips for Baked Chicken Fajitas

  • Storage: If you somehow have leftovers (they’re so good, it’s a rare occurrence), store the components separately. Keep the beef and veggies in an airtight container in the fridge, and the zucchini slices in a separate container.
  • Reheating: To experience the nacho joy all over again, simply reheat the beef and veggies in a pan over medium heat until warm. As for the zucchini “chips,” a quick pop in the toaster oven will bring back their crispy charm.
  • Veggie Swap: Feeling adventurous? Swap out the ground beef for ground turkey or even black beans for a vegetarian twist. And don’t hesitate to toss in some sliced jalapeños for an extra kick of spice!
glass rectangular meal prep containers with sliced zucchini topped with ground beef, bell peppers, tomatoes, and shredded cheese
zucchini nachos

Beef Zucchini Nachos

These low carb zucchini nachos are delicious, crunchy, and have a flavor-packed bite!
No ratings yet
Prep Time 5 minutes
Cook Time 20 minutes
Course lunch, Main Course
Cuisine American, Mexican
Servings 2

Equipment

  • knife
  • cutting board
  • spatula
  • saute pan
  • sheet pan
  • oven

Ingredients
  

  • 10 oz ground beef
  • 2 each zucchini
  • 1/4 cup white onions (diced)
  • 1 each yellow bell pepper (diced)
  • 1/4 cup cherry tomatoes (sliced)
  • 1/2 cup shredded cheddar cheese
  • 1/8 tsp chili powder
  • 1/8 tsp cumin
  • 1/8 tsp paprika
  • 1/8 tsp garlic powder
  • 1/4 tsp salt
  • 1 tbsp olive oil

Zucchini

  • 1/4 tsp garlic powder
  • 1/4 tsp salt
  • 1 tbsp olive oil

Instructions
 

  • Pre-heat the oven to 400F
  • Slice the zucchini into 1/4 inch thick rounds. Season with garlic powder and salt. Coat with olive oil
  • Place the zucchini slices on a sheet pan and bake them in the oven for 12 to 15 minutes
  • Meanwhile, add olive oil to a saute pan on medium-high heat. Saute the onions and bell peppers until they soften (about 2 to 3 minutes)
  • Next, add the ground beef and seasonings and saute until it is fully cooked and golden brown (about 6 to 7 minutes)
  • Remove the zucchini slices from the oven and top them off with the taco meat. Top it off with shredded cheese and cherry tomatoes

Similar Recipes

cilantro chicken

Cilantro Lime Chicken Salad with Strawberry Salsa

sweet and sour chicken wings

Air Fryer Sweet and Sour Chicken Wings

stuffed primavera chicken

Primavera Stuffed Chicken Breasts

You Might Also Like

Frequently Asked Questions

Can I use a different type of meat?

Of course! While the original recipe features ground beef, you can easily switch it up. Try ground turkey, chicken, or even plant-based alternatives like crumbled tofu or tempeh for a vegetarian version.


Can I use pre-made taco seasoning?

Absolutely, using pre-made taco seasoning can save you time and effort. However, making your own seasoning blend from scratch as mentioned in the recipe allows you to customize the flavors to your liking.


Can I use different vegetables for sautéing?

Absolutely. The sautéed onions and bell peppers can be swapped with other veggies you enjoy, such as mushrooms, spinach, or even grated carrots. The goal is to add flavor and texture, so feel free to get creative!

Posted on Leave a comment

Pan-Seared Salmon with Creamy Sun-Dried Tomato Sauce

round plate with salmon with creamy sun-dried tomato sauce and asparagus

Pan-Seared Salmon with Creamy Sun-Dried Tomato Sauce and Roasted Asparagus is a fantastic meal prep easy salmon recipe option that brings the flavors of a high-end restaurant right to your own dining table. With its combination of succulent salmon, tangy sun-dried tomatoes, creamy sauce, and crispy asparagus, this dish is a true winner.

This post may contain affiliate links. Please see our privacy policy for details.

round plate with salmon with creamy sun-dried tomato sauce and asparagus

Why This Recipe is Great for Meal Prep

Balanced Macronutrients: This dish contains a good balance of healthy fats, lean protein, and complex carbohydrates from the vegetables. Such balanced meals help regulate blood sugar levels, keep you satisfied, and prevent energy crashes.

Home-Cooked Control: Preparing this dish at home allows you to control the ingredients and portion sizes. It gives you the power to reduce sodium, unhealthy fats, and unnecessary additives often found in restaurant dishes.

Meal Prep Convenience: Preparing this dish in advance ensures you have a healthy and delicious option readily available during busy days. Having pre-portioned meals can help you avoid making less healthy choices when you’re short on time.

The PrepYoSelf Newsletter

To Prepare This Salmon Recipe You’ll Need

  • To start off, you’ll need some glorious salmon fillets. Opt for fresh, high-quality salmon that’s been sustainably sourced for the best flavor.
  • Next up, we’ve got garlic, the aromatic hero that adds a delightful punch to any dish.
  • Sun-dried tomatoes bring their unique tanginess to the table, infusing the creamy sauce with their concentrated flavor.
  • Speaking of the sauce, we’ll be incorporating some luxurious heavy cream to create a velvety texture that will make you feel like you’re dining in a five-star restaurant.
  • And to add a touch of vibrant green, we’ll toss in some fresh spinach, which beautifully complements the creaminess of the sauce.
  • Now, let’s not forget our lovely asparagus, a wonderful vegetable that roasts to perfection. It adds a delightful crunch and earthy flavor to this dish, making it a well-rounded and nutritious option.

round plate with salmon with creamy sun-dried tomato sauce and asparagus

Easy Recipe Steps to Make Pan-Seared Salmon

  1. Begin by searing the salmon fillets in a hot pan, achieving that perfect golden crust while keeping the fish moist and flaky on the inside.
  2. Next, remove it from the pan and set the salmon aside.
  3. In the same pan, sauté garlic until fragrant, then add the sun-dried tomatoes and heavy cream. Then, add the salmon back to the sauce to finish cooking. Allow the sauce to simmer and thicken, infusing it with the irresistible flavors of garlic and tomatoes.
  4. Lastly, toss in the spinach, letting it wilt gently into the creamy goodness.
  5. Meanwhile, roast the asparagus in the oven.

Reference the recipe card below for detailed instructions.

round plate with salmon with creamy sun-dried tomato sauce and asparagus

Meal Prep Tips

  • Now, let’s talk about meal prep and storage tips. This dish is a wonderful option for preparing in advance, allowing you to enjoy a restaurant-quality meal throughout the week. Once cooked, divide the salmon, sauce, and roasted asparagus into individual meal-sized portions.
  • Store them in airtight containers in the refrigerator for up to 3 days, or freeze them for longer-term storage.
  • To elevate this meal even further, consider pairing it with some fluffy quinoa or fragrant jasmine rice. The grains will soak up the luscious sauce, creating an irresistible combination. Additionally, a fresh side salad with a zesty vinaigrette will provide a refreshing contrast to the creamy flavors of the dish.
  • Reheating: When ready to enjoy, gently reheat the salmon and asparagus in the oven at a low temperature to retain their texture and flavors. Alternatively, you can microwave them briefly, taking care not to overcook them.

glass containers with salmon with creamy sun-dried tomato sauce and asparagus

Salmon and Asparagus

Pan-Seared Salmon with Creamy Sun-Dried Tomato Sauce and Asparagus

This salmon recipe is a combination of succulent salmon, tangy sun-dried tomatoes, creamy sauce, and crispy asparagus.

No ratings yet

Prep Time 5 minutes
Cook Time 20 minutes

Course dinner, Main Course
Cuisine American, Italian

Servings 2

Equipment

  • knife
  • cutting board
  • saute pan
  • spatula
  • sheet pan
  • oven

Ingredients


Salmon and Seasoning

  • 12 oz salmon
  • 1/4 tsp garlic powder
  • 1/4 tsp salt
  • 1 tbsp olive oil

Sun-Dried Tomato Sauce

  • 2 each garlic cloves (minced)
  • 1/4 cup sun-dried tomatoes (sliced)
  • 1/2 cup heavy cream
  • 1/4 tsp garlic powder
  • 1/4 tsp salt
  • 4 cups baby spinach

Asparagus and Seasonings

  • 12 each asparagus spears
  • 1/4 tsp garlic powder
  • 1/4 tsp salt
  • 1 tbs olive oil

Instructions


Asparagus

  • Pre-heat the oven to 400F
  • Place the asparagus on a sheet pan. Sprinkle the asparagus with the seasonings and drizzle with olive oil
  • Bake in the oven for 10-12 minutes

Salmon and Sauce

  • Season the salmon and add oil to a saute pan on medium high heat. Sear the salmon, flesh side down first, and sear for about 2 to 3 minutes
  • Next, flip it over, skin side down, and sear for another 2 to 3 minutes. Then, remove the salmon from the pan and set it aside on a plate
  • Add the sliced garlic cloves and sliced sun-dried tomatoes and stir for about 30 seconds
  • Then, pour in the heavy cream and season with garlic and salt
  • Place the salmon back in the sauce, skin side down, and simmer on low medium heat for about 10 minutes
  • Finally, add the baby spinach and mix it in the sauce until it wilts
  • Serve the salmon and sauce with the roasted asparagus

Similar Recipes

salmon beet salad

Citrus Ginger Salmon with Roasted Beets

salmon and watermelon salad

Grilled Salmon with Watermelon Salad

salmon salad

Salmon Stuffed Avocado Salad

You Might Also Like

Frequently Asked Questions

Can I use frozen salmon fillets for this recipe?

Absolutely! While fresh salmon is ideal, you can definitely use frozen fillets. Just make sure to thaw them thoroughly before cooking to ensure even cooking and optimal texture.


Can I substitute the heavy cream with a lighter alternative?

Yes, you can! If you prefer a lighter version, you can substitute heavy cream with alternatives like half-and-half or Greek yogurt. Keep in mind that the sauce’s texture and richness may vary slightly.


How do I know when the salmon is cooked through?

The cooking time for salmon will depend on the thickness of the fillets. As a general guideline, salmon is cooked through when it flakes easily with a fork and reaches an internal temperature of 145°F (63°C)

Posted on Leave a comment

Breakfast Turkey Sausage and Veggie Scramble

round white plate with scrambled eggs, tomatoes, onions, green onions, and turkey sausage

So, whether you’re a busy bee on the go or simply looking for a scrumptious breakfast idea to kickstart your day, the Breakfast Turkey Sausage and Veggie Scramble Egg is a winner in every aspect. It’s hearty, filling, and bursting with flavors that will put a smile on your face. Happy cooking, and bon appétit!

This post may contain affiliate links. Please see our privacy policy for details.

round white plate with scrambled eggs, tomatoes, onions, green onions, and turkey sausage

Why this scramble egg is great for weight loss

Now, let’s talk health benefits because this recipe is not only delicious but also good for you. The scramble eggs bring a significant protein punch, promoting muscle growth and keeping you feeling fuller for longer. Meanwhile, turkey breakfast sausage is a leaner alternative to pork sausage, reducing the fat content while maintaining its savory goodness.

Tomatoes bring a burst of vitamin C and lycopene, which supports heart health and may even help protect against certain types of cancer. Red onions offer a dose of antioxidants, while green onions add a pop of flavor and essential nutrients. It’s a nutrient-packed party on your plate!

The PrepYoSelf Newsletter

Simple Ingredients

Let’s dive right into the ingredients that make this recipe an absolute winner. First up, we have scramble eggs – the superstar of breakfast dishes. Packed with protein, vitamins, and minerals, these humble little gems provide a solid nutritional foundation. Combined with the savory touch of turkey breakfast sausage, we’re in for a protein-packed party! 

Next on the list, we add some vibrant ingredients to elevate the flavor profile. Picture this: juicy tomatoes bursting with freshness, followed by the mild crunch of red onions and the gentle zing of green onions. With every bite, your taste buds will be dancing in joy!

round white plate with scrambled eggs, tomatoes, onions, green onions, and turkey sausage

Here are the basic steps for making egg muffins:

  1. Whisk the eggs in a mixing bowl.
  2. Saute the ground turkey breakfast sausage until it is fully cooked and golden brown (about 4 to 5 minutes)
  3. Next, pour in the eggs and stir for about 3 minutes until the eggs start to be firmly set.
  4. Finally, top it off with fresh tomatoes, red onions, and green onions

Reference the recipe card below for detailed instructions.

round plates with scrambled eggs, tomatoes, onions, green onions, and turkey sausage

Meal Prep Tips for Turkey Sausage Scramble Eggs:

  • This recipe is a meal prepper’s dream come true. You can easily whip up a big batch of this Breakfast Turkey Sausage and Veggie Scramble Eggs, divide it into individual portions, and store it in airtight containers. Pop them in the fridge, and you’ve got hassle-free breakfasts ready to go for the week ahead. Talk about convenience and time-saving!
  • Now, let’s talk about pairing this delightful dish with other food items. If you want to keep things light, a side of fresh fruit or a mixed green salad would be a refreshing accompaniment. If you’re looking for a heartier option, you could serve it with whole-grain toast or a fluffy biscuit. And for those who enjoy a little heat, a sprinkle of hot sauce or a dollop of salsa will take this breakfast creation to the next level of deliciousness. The possibilities are endless, my friends!
round plates with scrambled eggs, tomatoes, onions, green onions, and turkey sausage
scrambled eggs

Turkey and Veggie Scramble

This Turkey and Veggie scramble is a sensational breakfast recipe that will keep you going strong throughout the day.

No ratings yet

Prep Time 5 minutes
Cook Time 5 minutes

Course Breakfast
Cuisine American

Servings 2

Equipment

  • knife
  • cutting board
  • mixing bowl
  • whisk
  • spatula
  • saute pan

Ingredients


  • 4 each large eggs
  • 4 oz ground turkey breakfast sausage
  • 1 each roma tomato (diced)
  • 1/4 cup red onions (diced)
  • 2 tbsp green onions (chopped)
  • 1 tbsp olive oil
  • 1/4 tsp salt
  • 1/4 tsp garlic powder

Instructions


  • Whisk the eggs in a mixing bowl
  • Add oil to a saute pan on medium heat
  • Saute the ground turkey breakfast sausage until it is fully cooked and golden brown (about 4 to 5 minutes)
  • Next, pour in the eggs and stir for about 3 minutes until the eggs start to firmly set
  • Sprinkle in the salt and garlic powder and continue to stir
  • Finally, top it off with fresh tomatoes, red onions, and green onions

Similar Recipes

Easy Cheese Omelette

fried egg and sausage hash

Fried Egg with Apple and Sausage Hash

egg stuffed bell peppers

Oven Baked Breakfast Egg Stuffed Peppers

You Might Also Like

Frequently Asked Questions

Can I substitute the turkey breakfast sausage with another type of meat?

Of course! While turkey breakfast sausage adds a lean and flavorful touch to this recipe, you can experiment with other types of sausage, such as chicken or even vegetarian sausage, depending on your dietary preferences.


Can I customize the vegetables in this scramble?

Absolutely! Feel free to get creative and add or substitute vegetables based on your preferences. Spinach, mushrooms, or zucchini are excellent options that can add even more color, flavor, and nutrition to your scramble.


Can I make this recipe vegan?

While this particular recipe includes eggs and turkey breakfast sausage, you can modify it to make it vegan-friendly. Replace the eggs with tofu and swap the turkey sausage for plant-based sausage or crumbled tofu seasoned with your favorite spices.

Posted on Leave a comment

Tuna Stuffed Deviled Eggs

round plate with deviled eggs and arugula salad

Greetings, food enthusiasts! Today, I’m excited to share with you a fabulous recipe that not only adds a burst of flavor to your meal prep routine but also offers numerous health and cost benefits. Get ready to indulge in the delectable goodness of Tuna Stuffed Deviled Eggs, a low carb meal that will keep your taste buds dancing throughout the week!

This post may contain affiliate links. Please see our privacy policy for details.

round plate with deviled eggs and arugula salad for a low carb meal

Why We Love This Recipe

  1. Health Benefits: When it comes to meal prep, it’s essential to choose recipes that offer a balance of nutrition and taste and a low carb meal. Tuna Stuffed Deviled Eggs perfectly fit the bill. Eggs are a fantastic source of protein, providing you with the energy you need to conquer your day. Additionally, eggs are rich in vitamins such as B12, selenium, and choline, which promote brain health and help maintain a healthy nervous system.
  2. The inclusion of canned tuna takes the nutritional profile up a notch. Tuna is packed with omega-3 fatty acids, which have been linked to numerous health benefits, including reducing the risk of heart disease and promoting brain function. It is also an excellent source of lean protein, making it an ideal choice for those aiming to build or maintain muscle mass.
  3. Cost Benefits: One of the major advantages of this recipe is its cost-effectiveness. Eggs and canned tuna are incredibly affordable and readily available in most grocery stores. By utilizing these budget-friendly ingredients, you can create a delicious and satisfying meal prep option without breaking the bank.

The PrepYoSelf Newsletter

Let’s delve into the simple ingredients that make Tuna Stuffed Deviled Eggs shine:

  • Eggs: A versatile and nutrient-dense ingredient, eggs provide protein, vitamins, and minerals essential for overall health and well-being. They form the sturdy base for the delightful filling.
  • Canned Tuna: Canned tuna adds a burst of umami flavor and contributes heart-healthy omega-3 fatty acids. Opt for sustainable and responsibly sourced tuna for the best quality.
  • Red Onions: You can use any kind of onions.
  • Mayonnaise: Creamy and luscious mayonnaise binds the filling together while imparting a smooth texture. Choose a high-quality mayonnaise or consider using a lighter alternative like Greek yogurt or avocado mayo.
  • Lemon: Fresh lemon juice brightens up
round plate with deviled eggs and arugula salad for a low carb meal

Basic Steps to Prepare Tuna Deviled Eggs

  1. Boil the eggs for 6 to 8 minutes. Meanwhile, in a small bowl mix together the lemon juice, dijon mustard, olive oil, garlic powder, and salt until well blended
  2. In a bowl, add the tuna and half of the egg yolks (discard the rest). Then, mix in the mayonnaise, lemon juice, green onions, salt, and mix until all the ingredients have mixed well
  3. Use a small spoon to stuff the tuna egg salad mixture back into the center of the egg whites.

Reference the recipe card below for detailed instructions.

glass meal prep containers with deviled eggs and arugula salad for a low carb meal

Low Carb Meal Prep Tips for A Tuna Stuffed Deviled Eggs

  • To ensure your Tuna Stuffed Deviled Eggs stay fresh and flavorful, here are some storage tips: Store the deviled eggs in an airtight container in the refrigerator. They can be kept for up to 3-4 days.If you plan to eat them later in the week, consider storing the filling and the egg whites separately. Assemble them just before eating to maintain the perfect texture.
  •  Freezing the deviled eggs is not recommended, as the texture and consistency may be compromised.
  • Pairing Suggestions: While Tuna Stuffed Deviled Eggs are delicious on their own, they can be paired with various sides to create a well-rounded meal. Here are some ideas: 1) Crisp salad greens with a tangy vinaigrette. 2) Sliced avocado for a creamy and nutritious addition. 3) Whole-grain bread or crackers for a satisfying crunch. 4)Pickles or olives to add a touch of brininess.
glass meal prep containers with deviled eggs and arugula salad for a low carb meal
eggs

Tuna Stuffed Deviled Eggs

The combination of creamy tua filling and the natural richness of eggs creates a savory flavor that you can enjoy for lunch!

No ratings yet

Prep Time 5 minutes
Cook Time 15 minutes

Course lunch, Main Course
Cuisine American

Servings 2

Equipment

  • knife
  • cutting board
  • boiling pot
  • mixing bowl
  • spoon

Ingredients


  • 6 each large eggs
  • 2.6 oz canned tuna
  • 2 tbsp mayonnaise
  • 1 each lemon (juiced)
  • 1 tbsp green onions
  • 1/4 tsp garlic powder
  • 4 cups arugula

Lemon Dressing

  • 1 each lemon (juiced)
  • 4 tbsp olive oil
  • 1 tbsp dijon mustard
  • 1/4 tsp salt
  • 1/4 tsp garlic powder

Instructions


  • Boil the eggs for 6 to 8 minutes
  • Meanwhile, in a small bowl mix together the lemon juice, dijon mustard, olive oil, garlic powder, and salt until well blended
  • Once the eggs have cooked, let them cool in ice water
  • Then peel the eggs and slice the eggs in half and remove the egg yolk
  • In a bowl, add the tuna and half of the egg yolks (discard the rest). Then, mix in the mayonnaise, lemon juice, green onions, salt and mix until all the ingredients have mixed well
  • Use a small spoon to stuff the tuna egg salad mixture back into the center of the egg whites
  • Toss the arugula in the lemon dressing and serve it with the tuna stuffed eggs

Similar Recipes

chicken kale salad

Grilled Honey Dijon Chicken and Kale Salad

chicken fajitas

Sheet Pan Chicken Fajitas with Mango Salsa

peanut chicken

Peanut Chicken Stir Fry

You Might Also Like

Frequently Asked Questions

Can I substitute mayonnaise with a healthier alternative?

Absolutely! If you’re looking for a healthier option, you can replace mayonnaise with Greek yogurt, avocado mayo, or even mashed avocado. These alternatives provide a creamy texture while reducing the overall calorie and fat content.


Can I add additional ingredients to the filling?

Certainly! Feel free to get creative and personalize the recipe to your liking. You can add ingredients like diced celery, chopped herbs (such as dill or parsley), minced garlic, or a touch of spicy mustard to elevate the flavor profile of the filling.


How can I make the deviled eggs spicier?

If you prefer a spicier kick, you can add ingredients such as hot sauce, cayenne pepper, or finely chopped jalapeños to the filling. Adjust the amount according to your desired level of heat.

Posted on Leave a comment

Baked Asparagus and Tomato Egg Frittata

white rectangular baking dish with asparagus and tomato egg frittata

Hello, my breakfast-loving friends! Let’s talk about the sheer ease of making this delightful Asparagus and Tomato Egg Frittata. With just a handful of ingredients and a few simple steps, you’ll be on your way to a delicious and satisfying meal. Get ready to savor every bite and start your day on a scrumptious note! Happy Prepping!

This post may contain affiliate links. Please see our privacy policy for details.

white rectangular baking dish with asparagus and tomato egg frittata

The PrepYoSelf Newsletter

Why This Recipe Is a Great Low-Carb Friendly Dish

This recipe also caters to those with diabetes or anyone looking to maintain a balanced blood sugar level. With its low-carb profile and nutrient-packed ingredients, the Baked Asparagus and Tomato Egg Frittata won’t send your glucose levels on a rollercoaster ride. Asparagus is a superstar vegetable with a low glycemic index, meaning it won’t cause drastic spikes in blood sugar. Combined with juicy tomatoes and protein-rich eggs, this frittata strikes the perfect balance to keep you feeling energized and satisfied throughout the day.

Simple Ingredients for Vegetarian Egg Frittata

It’s effortless to make this frittata, bursting with the goodness of asparagus, tomatoes, and eggs, and perfect for a single serving. Now let’s explore the amazing benefits of these ingredients in this recipe.

  • Asparagus, oh how I adore thee! Not only does asparagus bring a delightful crunch and vibrant green color to the frittata, but it’s also packed with essential nutrients. It’s a fantastic source of folate, vitamin C, and vitamin K, all of which contribute to a healthy and happy you.
  • Next up, tomatoes. These juicy gems add a burst of freshness to the frittata, and they’re loaded with powerful antioxidants that may help protect against certain types of cancer. Plus, they bring a delightful tartness that complements the asparagus and eggs oh-so-perfectly.
  • Speaking of eggs, they are the glue that holds everything together in this frittata extravaganza. Eggs are a fantastic source of high-quality protein, essential vitamins, and minerals. They provide a satiating boost to keep you energized throughout the day.
white rectangular baking dish with asparagus and tomato egg frittata

How to Make Breakfast Vegetarian Egg Frittata

  1. Preheat the oven to 400F.
  2. Chop the asparagus and tomatoes into small pieces.
  3. Whisk the eggs in a mixing bowl and add the veggies and cheese.
  4. Bake in the oven until the egg whites are firmly set.

Reference the recipe card below for detailed instructions.

white rectangular baking dish with asparagus and tomato egg frittata

Meal Prep Tips for Egg Frittata:

  • When it comes to storage, serving, and freezing, we’ve got you covered. Once you’ve baked the frittata, allow it to cool completely before transferring it to an airtight container. Pop it in the fridge, and it’ll stay fresh for up to four days. When you’re ready to enjoy it, you can reheat it gently in the microwave or even enjoy it cold if you prefer.
  • If you want to freeze portions for future meals, here’s a nifty tip. Slice the frittata into individual servings and wrap each piece tightly in plastic wrap or foil. Place them in a freezer-safe container or bag, and they’ll stay good for up to three months. To thaw and reheat, simply defrost it in the fridge overnight and warm it up in the oven or microwave when you’re ready to savor the goodness.
  • Now, let’s talk about what else you can serve alongside this delectable frittata. Personally, I love to pair it with a side of fresh mixed greens tossed in a zesty vinaigrette. The crispness of the salad beautifully balances the richness of the frittata. You can also serve it with some whole-grain toast or a dollop of creamy avocado for an extra dose of yumminess.
white rectangular baking dish with asparagus and tomato egg frittata
asparagus frittata

Asparagus & Tomato Egg Frittata

No ratings yet

Prep Time 5 minutes
Cook Time 15 minutes

Course Breakfast
Cuisine American

Servings 2

Equipment

  • knife
  • cutting board
  • whisk
  • mixing bowl
  • baking dish
  • oven

Ingredients


  • 4 each large eggs
  • 1/4 cup cherry tomatoes (sliced)
  • 4 each asparagus spears
  • 1/4 cup shredded cheddar cheese
  • 1 tbsp olive oil
  • 1/4 tsp salt

Instructions


  • Pre-heat the oven to 400F
  • Chop the asparagus into 1 inch pieces
  • Whisk the eggs in a mixing bowl and add the sliced tomatoes, chopped asparagus, and cheese. Mix well
  • Grease the baking dish with olive oil
  • Pour in the egg mixture and bake in the oven for 12 to 15 minutes until the eggs are firmly set

Similar Recipes

fried egg and sausage hash

Fried Egg with Apple and Sausage Hash

Easy Cheese Omelette

easy sausage egg muffins

Sausage Egg Muffins with Strawberries

You Might Also Like

Frequently Asked Questions

Can I use egg substitutes or egg whites instead of whole eggs?

Certainly! If you prefer to reduce the fat or cholesterol content, you can use egg substitutes or a combination of whole eggs and egg whites. However, keep in mind that the texture and taste may vary slightly from using whole eggs alone.


Do I need to pre-cook the vegetables before adding them to the frittata?

n most cases, pre-cooking the vegetables is not necessary. The frittata bakes in the oven for a sufficient amount of time, allowing the vegetables to cook and soften. However, if you’re using vegetables that take longer to cook, such as potatoes or carrots, it’s advisable to partially cook them beforehand to ensure they are tender.


How do I know when my frittata is fully cooked?

A good indication that your frittata is fully cooked is when the edges are set and golden brown, and the center is firm to the touch. You can also insert a toothpick or a knife into the center of the frittata, and if it comes out clean, it’s ready to be removed from the oven.

Posted on Leave a comment

Baked Pistachio Crusted Salmon and Asparagus

Hello, my foodie friends, unleash your inner chef and get ready to turn up your culinary game because we are jumping into the realm of delectable dinners with a showstopper recipe: Crusted Pistachio Salmon with Asparagus in the oven. Get ready to elevate your meal prep game and indulge in a restaurant-quality dinner right at home! This dish is not only packed with flavor and nutrition, but it’s also the epitome of convenience. So, let’s get started and uncover why this recipe is a must-try for your next meal prep session!

This post may contain affiliate links. Please see our privacy policy for details.

Calories: 474kcal | Carbohydrates: 8g | Protein: 38g | Fat: 32g | Saturated Fat: 5g | Polyunsaturated Fat: 8g | Monounsaturated Fat: 18g | Cholesterol: 94mg | Sodium: 823mg | Potassium: 1059mg | Fiber: 3g | Sugar: 2g | Vitamin A: 189IU | Vitamin C: 4mg | Calcium: 63mg | Iron: 3mg

Baked Pistachio Crusted Salmon and Asparagus cooked on a plate

Recipe Magic

Now, let’s talk about the magic of this recipe: the restaurant-quality experience. The combination of the moist and tender salmon, the crunchy and flavorful pistachio crust, and the perfectly roasted asparagus creates a harmony of flavors and textures that rival any high-end restaurant dish. You’ll be amazed at how easily you can recreate the same level of elegance and taste right in your own kitchen.

Pistachios are delightful nuts that bring a delightful crunch and rich flavor to the salmon crust. But that’s not all—pistachios are also loaded with heart-healthy fats, protein, fiber, and an array of vitamins and minerals. By incorporating pistachios into this dish, we’re adding a nutritional boost that pairs perfectly with the omega-3 fatty acids found in salmon.

Speaking of salmon, this recipe is a fantastic option for a filling, low-carb dinner. Salmon is a great source of high-quality protein and healthy fats, making it an ideal choice for those looking to enjoy a filling meal. The pistachio crust adds an additional layer of texture and flavor, transforming an already incredible protein into a culinary masterpiece.

The PrepYoSelf Newsletter

To Prepare This Baked Salmon Recipe You’ll Need

  • Salmon: Use fresh salmon or frozen filets. If using frozen filets, be sure you thaw them out in the refrigerator in advance prior to baking.
  • Pistachios: If you can’t find pistachios, you can use pine nuts
  • Dijon Mustard: Dijon mustard adds a nice spice to the dish, but you can also use regular mustard or even mayo.
  • Asparagus: Add minced garlic and a drizzle of olive oil to add flavor
Baked Pistachio Crusted Salmon and Asparagus ready to cook

Easy Recipe Steps to Make Pistachio-Crusted Salmon

  1. Preheat the oven to 400F.
  2. Use a knife or a food processor to finely chop the pistachios.
  3. Place the salmon and asparagus on a sheet pan.
  4. Spread the Dijon mustard on the salmon and sprinkle with garlic powder and salt. Then, sprinkle the chopped pistachios on the top of the salmon making sure it is fully coated.
  5. Season the asparagus with salt, minced garlic, and drizzle it with olive oil.
  6. Bake everything in the oven for 12 to 15 minutes.
  7. Squeeze lemon juice on top of the salmon and asparagus for added citrus flavors.

Reference the recipe card below for detailed instructions.

Baked Pistachio Crusted Salmon and Asparagus on a plate with fork and knife next to it

Meal Prep Tips

  • To prevent the pistachio crust from burning, you can cover the salmon loosely with foil during the initial part of the baking process. This will allow the salmon to cook through while protecting the crust. Towards the end, remove the foil to let the crust develop a beautiful golden color.
  • You can use frozen salmon for this recipe. Thaw the salmon fillets in the refrigerator overnight before proceeding with the recipe. It’s important to ensure the salmon is completely thawed before applying the pistachio crust and baking.
  • Storage: Once the salmon and asparagus are cooked and cooled, store them separately in airtight containers in the refrigerator. You can keep them for up to three days.
  • Reheating: When ready to enjoy, gently reheat the salmon and asparagus in the oven at a low temperature to retain their texture and flavors. Alternatively, you can microwave them briefly, taking care not to overcook them.
  • Serving Suggestions: Serve the Baked Pistachio Crusted Salmon with Asparagus alongside a fresh salad, quinoa, or roasted potatoes for a complete and balanced meal. Squeeze a bit of lemon juice over the salmon just before serving to brighten the flavors.
Baked Pistachio Crusted Salmon and Asparagus in meal prep containers
salmon and asparagus

Oven Baked Pistachio Crusted Salmon with Roasted Asparagus

With its restaurant-quality appeal, this Pistachio Crusted Salmon and Asparagus recipe will make you feel like a culinary superstar. Tender salmon, with a crunch pistachio crust and perfectly roasted asparagus rivals any high-end restaurant dish.

No ratings yet

Prep Time 5 minutes
Cook Time 15 minutes

Course dinner, lunch
Cuisine American

Servings 2
Calories 474 kcal

Equipment

  • knife
  • cutting board
  • sheet pan
  • oven

Ingredients


Salmon and Pistachio Crust

  • 12 oz salmon
  • 1/4 cup pistachios (shelled)
  • 2 tbsp dijon mustard
  • 1 tbsp garlic cloves (minced)
  • 1/4 tsp salt
  • 1 tbsp olive oil

Asparagus

  • 12 each asparagus spears
  • 1 tbsp garlic (minced)
  • 1/4 tsp salt
  • 1 tbsp olive oil
  • 1 each lemon

Instructions


  • Pre-heat the oven to 400F.
  • Finely chop the pistachios with a knife (or you can use a food processor)
  • Place the salmon and asparagus on a sheet pan.
  • Use a spoon to spread the Dijon mustard on the salmon. Season the salmon and asparagus with minced garlic and salt. Then, sprinkle the pistachio crust on top of the salmon making sure it is fully coated.
  • Next drizzle the salmon and asparagus with olive oil.
  • Bake everything in the oven for 12 to 15 minutes until the salmon is fully cooked to an internal temperature of 145F
  • Cut the lemon in wedges and squeeze lemon juice on top of the fish and asparagus

Notes

Nutrition information provided is an estimate. It will vary based on cooking method and specific ingredients used. Please consult with your healthcare provider for specific dietary needs. To gain a better understanding, explore our nutrition disclaimer here. 

Nutrition

Calories: 474kcalCarbohydrates: 8gProtein: 38gFat: 32gSaturated Fat: 5gPolyunsaturated Fat: 8gMonounsaturated Fat: 18gCholesterol: 94mgSodium: 823mgPotassium: 1059mgFiber: 3gSugar: 2gVitamin A: 189IUVitamin C: 4mgCalcium: 63mgIron: 3mg

Similar Recipes

salmon beet salad

Citrus Ginger Salmon with Roasted Beets

salmon and watermelon salad

Grilled Salmon with Watermelon Salad

salmon salad

Salmon Stuffed Avocado Salad

You Might Also Like

Frequently Asked Questions

Can I use a different type of fish instead of salmon?

Certainly! While the recipe calls for salmon, you can experiment with other fish varieties such as trout, cod, or halibut. Keep in mind that cooking times may vary depending on the thickness of the fish, so adjust accordingly.


Can I make the pistachio crust in advance?

Absolutely! You can prepare the pistachio crust ahead of time and store it in an airtight container or sealable bag. When you’re ready to cook, simply coat the salmon fillets with the crust mixture and proceed with the recipe as directed.


Can I substitute the asparagus with another vegetable?

While asparagus pairs wonderfully with the pistachio-crusted salmon, you can swap it with other vegetables such as green beans, broccoli, or Brussels sprouts. Just adjust the cooking time accordingly to ensure they are roasted to perfection.

Posted on Leave a comment

Portobello Mushroom Egg Bake

Hey there, breakfast lovers! I’m here to share with you an absolutely scrumptious recipe that will make your taste buds dance with joy: the Portobello Mushroom Egg Bake! Trust me, this dish is a game-changer when it comes to easy, tasty, and nutritious breakfasts that are perfect for meal prep. This breakfast dish is also a fantastic low-carb option for breakfast that will keep you feeling satisfied until lunchtime.

This post may contain affiliate links. Please see our privacy policy for details.

round plate with portobello mushroom baked with a egg and topped with sun-dried tomato slices and fresh basil.

Why this meal is a great low-carb breakfast option:

By choosing a low-carb breakfast option like the Portobello Mushroom Egg Bake, you’re fueling your body with the right nutrients to keep you feeling satisfied and energized until lunchtime. It’s a delicious way to kickstart your day while keeping your carb intake in check, and here’s why:

  • Portobello mushrooms are naturally low in carbohydrates, making them an excellent choice for those following a low-carb or keto lifestyle. By using mushrooms as the base of the egg bake instead of bread or other high-carb ingredients, you can enjoy a delicious and filling breakfast without the excess carbs.
  • Eggs are an excellent source of high-quality protein. Protein is known to promote feelings of fullness and can help curb cravings throughout the day. 
  • The Portobello mushrooms used in this recipe are not only low in carbs but also high in dietary fiber. Fiber adds bulk to your meal, slows down digestion, and helps you feel fuller for longer. This means that incorporating mushrooms into your breakfast will not only provide great flavor and texture but also contribute to keeping you satiated throughout the morning.
  • If you choose to add some healthy fats to your Portobello Mushroom Egg Bake, such as a drizzle of olive oil or sliced avocados, they can further enhance the satiety factor. Fats take longer to digest, providing a sustained release of energy and helping to keep hunger at bay.
  • The balance of low carbs, high protein, and healthy fats in the Portobello Mushroom Egg Bake creates a well-rounded and balanced meal that can help maintain steady blood sugar levels, which can help prevent energy crashes and cravings later in the day.

The PrepYoSelf Newsletter

Simple Ingredients You’ll Need

  • Portobello Mushrooms: This ingredient is the star of this recipe. These earthy delights are not only bursting with flavor but also packed with essential nutrients. Plus, their hearty texture and savory taste make them a perfect replacement for meat in vegetarian meals.
  • Eggs: Feel free to use 2 eggs per mushroom if you prefer more protein
  • Sun-dried tomatoes: We used harissa to add some heat and smoky flavors, but you can easily use another kind of chili sauce such as sriracha. 
  • Fresh Basil Leaves: We made our pistachio pesto from scratch, however, you can use any kind of store-bought pesto such as basil pesto.
round glass prep bowls with portobello mushroom baked with a egg and topped with sun-dried tomato slices and fresh basil.

How to Make Portobello Mushroom Egg Bake

Now, let’s talk about why this Portobello Mushroom Egg Bake is a fantastic option for meal prep, especially for those who prefer single-serving portions. First and foremost, this recipe is incredibly easy to make. You can whip it up in no time, and it requires only a handful of simple ingredients that you probably already have in your kitchen. Convenience is key when it comes to meal prep, right?

Here’s how to make this easy breakfast dish.

  1. Preheat the oven to 400F.
  2. Wipe the portobello mushrooms clean with a wet paper towel. Use a spoon to scrape out the inside ribs.
  3. Coat the portobello mushrooms with a little bit of olive oil and place the mushroom caps on a sheet pan with the flesh facing up.
  4. Crack an egg in the middle of the portobello mushrooms and season with salt.
  5. Bake the mushrooms in the oven for 12 to 15 minutes until the egg whites are set.
  6. Once they are cooked, garnish them with sliced sun-dried tomatoes and basil leaves for added flavor.

Reference the recipe card below for detailed instructions.

round glass prep bowls with portobello mushroom baked with a egg and topped with sun-dried tomato slices and fresh basil.

Meal Prep Tips for This Breakfast Dish

  • The beauty of this recipe lies in its versatility. You can prepare multiple portions of the Portobello Mushroom Egg Bake ahead of time, storing them in the refrigerator for up to four days. When you’re ready to enjoy a delicious and hassle-free breakfast, simply pop a portion in the microwave or oven to reheat. 
  • When it comes to serving, feel free to get creative! You can enjoy the Portobello Mushroom Egg Bake as is, or pair it with your favorite sides. Try adding a side of avocado slices, a dollop of Greek yogurt, or a sprinkle of fresh herbs to elevate the flavors. The possibilities are endless, so don’t be afraid to experiment and make it your own!
  • Now, let me share one last tip with you. If you’re a busy bee like me, prepping the mushrooms ahead of time can be a time-saver. Clean and slice your portobello mushrooms in advance, storing them in a container in the refrigerator. This way, you’ll have them ready to go whenever you want to whip up another batch of this fantastic Portobello Mushroom Egg Bake.
round plate with portobello mushroom baked with a egg and topped with sun-dried tomato slices and fresh basil.
Mushroom and Eggs

Oven Baked Egg and Portobello Mushrooms

No ratings yet

Prep Time 5 minutes
Cook Time 15 minutes

Course Breakfast
Cuisine American

Servings 2

Equipment

  • knife
  • cutting board
  • sheet pan
  • oven

Ingredients


  • 2 each large eggs
  • 2 each portobello mushrooms
  • 2 tbsp sun-dried tomatoes (sliced)
  • 1/8 tsp salt
  • 2 each fresh basil leaves (thinly sliced)
  • 1 tbsp olive oil

Instructions


  • Pre-heat oven to 400F. Wipe the portobello mushrooms clean with a wet paper towel. Use a spoon to scrape out the inside ribs
  • Coat the portobello mushrooms with the olive oil and place the portobolello mushrooms on a sheet pan. Crack an egg into each portobello and season with salt
  • Bake in the oven for 12 to 15 minutes until the egg whites set
  • Top it off with sliced sun-dried tomatoes and sliced basil leaves

Similar Recipes

fried egg and sausage hash

Fried Egg with Apple and Sausage Hash

Easy Cheese Omelette

easy sausage egg muffins

Sausage Egg Muffins with Strawberries

You Might Also Like

Frequently Asked Questions

Can I use regular mushrooms instead of Portobello mushrooms?

Absolutely! While the recipe is specifically designed for Portobello mushrooms, you can definitely substitute them with regular mushrooms if that’s what you have on hand. Just keep in mind that the texture and flavor may vary slightly.


Can I freeze the Portobello Mushroom Egg Bake?

While it’s technically possible to freeze this dish, the texture of the mushrooms and eggs may change upon thawing and reheating. For the best taste and texture, it’s recommended to store the Portobello Mushroom Egg Bake in the refrigerator for up to four days rather than freezing it.


Can I use egg substitutes or egg whites instead of whole eggs?

Yes, you can! If you prefer to use egg substitutes or egg whites, feel free to make the swap. The cooking time may be slightly different, so keep an eye on the bake to ensure the eggs are cooked through.

Posted on Leave a comment

Asian Lettuce Wraps with Beef and Fresh Basil

Hey there fellow meal-prepping enthusiasts, I am so excited to share with you one of my go-to recipes for Asian Ground Beef Lettuce Wraps! This dish is not only delicious, but it’s also healthy, low-carb, and perfect for weekly meal prep.

One of the meal prep hacks to making this dish truly tasty is by adding fresh herbs. Not only do they add a pop of color and freshness to your dish, but they also add an incredible depth of flavor. For this recipe, I highly recommend adding fresh basil to your ground beef filling. The combination of this fresh herb with the juicy ground beef and flavorful sauce is simply irresistible.

This post may contain affiliate links. If you use these links to buy something we may earn a commission at no extra cost to you. Please read the disclosure policy.

With a little bit of planning and preparation, you can enjoy restaurant-quality flavors at home all week long. 

asian beef lettuce wraps on a wooden bowl

The PrepYoSelf Newsletter

Now, let’s talk about the nutritional benefits of this dish. By using lettuce wraps you’re cutting out lots of calories. Plus, ground beef is a great source of protein and the addition of vegetables like bell peppers and onions adds fiber and important vitamins and minerals. And let’s not forget about the incredible flavors and textures that make this dish so satisfying.

I’m going to show you how to make Asian Flavored Ground Beef Lettuce Wraps that taste just as good as your favorite takeout but with the added convenience of being able to prepare it in advance for the week ahead.

asian beef lettuce wraps on a wooden bowl

Simple Keto-Friendly, Low-Carb Ingredients

Firstly, let’s talk about how to make this dish taste absolutely amazing. The key is to season your ground beef well with Asian spices like garlic, ginger, and soy sauce. You can also add a little sweetness with honey or brown sugar, and some heat with red pepper flakes or chili paste. The combination of these flavors will make your taste buds dance with delight!

  • Ground Beef: We used ground beef, but you can easily swap in ground pork, ground turkey, or ground chicken for your protein
  • Red Onions: We used diced red onions, but chopped green onions are also a great choice.
  • Lettuce Wraps: We used butter lettuce leaves, but you can also use romaine lettuce leaves
  • Bell Peppers: This will add freshness to the dish and also bright colors
  • Herbs: We used basil leaves, but you can easily swap them with cilantro
  • Soy Sauce: Soy sauce adds great savory flavors to stir fry, but you can also use other sauces such as hoisin sauce, gyoza sauce, or oyster sauce.
  • Oils: We stir fry with olive oil, but then drizzle in a little bit of sesame oil for extra flavor in the end.
asian beef lettuce wraps in meal prep containers

How to Make Ground Beef Lettuce Wraps

  • Add 1 tbsp olive oil to a saute pan on medium-high heat. Saute the onions until they soften (about 2 to 3 minutes)
  • Next, add the ground beef and saute for about 5 to 6 minutes until the beef is fully cooked and golden brown
  • Then, add seasonings, bell peppers, and chopped fresh basil leaves and mix it all together
  • Serve the beef on top of the lettuce wraps

Reference the recipe card below for detailed instructions.

asian beef lettuce wraps in meal prep containers

Meal Prep Tips for Basil Beef Lettuce Wraps

  • Now, let’s talk about what side dishes would pair well with this recipe. I recommend serving these lettuce wraps with some pickled ginger or onions, which will help balance out the flavors. You could also enjoy it with a side of fruit like sliced oranges for added nutrition and citrus flavors.
  • When it comes to storing and reheating this dish for the week, it’s important to separate the lettuce wraps from the ground beef filling and store them separately. This will help keep the lettuce wraps crips and fresh and prevent them from getting soggy.
  • To reheat, you could also heat up the filling in a skillet with a little oil to crisp it up or just simply microwave the filling until heated through and then assemble the lettuce wraps. 
Beef lettuce wraps

Basil Ground Beef Lettuce Wraps with Bell Peppers

No ratings yet

Prep Time 5 minutes
Cook Time 15 minutes

Course lunch, Main Course
Cuisine American, Asian

Servings 2

Equipment

  • knife
  • cutting board
  • spatula
  • saute pan

Ingredients


  • 12 oz ground beef
  • 1/4 cup red onions (diced)
  • 1 each red bell pepper (sliced)
  • 4 each fresh basil leaves (thinly sliced)
  • 2 tbsp soy sauce
  • 1 tbsp honey
  • 1 tsp sesame oil
  • 1/4 tsp garlic powder
  • 4 each large lettuce leaves

Instructions


  • Add 1 tbsp olive oil to a saute pan on medium high heat. Saute the onions until they soften (about 2 to 3 minutes)
  • Next, add the ground beef and saute for about 5 to 6 minutes until the beef is fully cooked and golden brown
  • Then, add seasonings, bell peppers, and chopped fresh basil leaves and mix it all together
  • Serve the beef on top of the lettuce wraps

Similar Recipes

peanut chicken

Peanut Chicken and Celery Stir Fry

beef and chinese broccoli

Garlicky Beef Stir Fry

tofu stir fry

Tofu and Veggie Stir Fry

You Might Also Like

Frequently Asked Questions

Can I add vegetables to the filling?

Absolutely! Adding vegetables like broccoli, carrots, and mushrooms will not only add more nutrition to the dish but also add texture and flavor.


How can I make sure the lettuce stays fresh for meal prepping?

To keep the lettuce fresh for meal prepping, I recommend storing the lettuce leaves separately from the filling. Place a damp paper towel at the bottom of the container and then layer the lettuce leaves on top. This will help keep the lettuce fresh and crisp.


Can I freeze ground beef lettuce wraps?

I do not recommend freezing the lettuce wraps as the lettuce will become wilted and soggy when thawed. However, you can freeze the cooked ground beef filling for up to three months.

Posted on Leave a comment

Tofu and Veggie Stir Fry

tofu stir fry

Crispy crunchy tofu flavored in a soy-ginger sauce and stir-fried with a bright and colorful mixture of vegetables.

This post may contain affiliate links. Please see our privacy policy for details.

Round plate with tofu stir fry with broccoli, red bell peppers, and cashew nuts.

Tofu tends to have a bad reputation for being bland. However, with the right combination of sauce and seasonings, it can soak up all the flavor and make for a delicious meal. Add fresh and colorful veggies and you get a fast and healthy dinner

The PrepYoSelf Newsletter

Prepare This Easy Tofu Stir Fry with Simple Ingredients

  • Tofu: We used firm tofu because it has less moisture and easier to get it crispy during the cooking process
  • Aromatics: We used red onions and garlic to round out the flavors of this dish, but you can also use green onions or shallots
  • Vegetables: We used a combination of colorful vegetables such as carrots, green beans, broccoli, and red bell peppers
  • Cashew: You can also use peanuts which are found in many stir fry recipes
  • Seasonings: We seasoned this dish with a honey soy sauce, along with sesame seeds and sesame oil which are traditional in Asian-inspired dishes
Round plate with tofu stir fry with broccoli, red bell peppers, and cashew nuts.

How to Make Easy Tofu Stir Fry

  1. Press the moisture out of your tofu.
  2. Cut the tofu into cubes.
  3. Add oil to a heated wok and sear the tofu cubes on each side until golden brown.
  4. Remove the tofu, and add the vegetables.
  5. Stir until the vegetables are tender.
  6. Add back the tofu and pour in the stir-fry sauce.
  7. Top it off with cashews and sesame seeds.

Reference the recipe card below for detailed instructions.

Saute pan with tofu stir fry with broccoli, red bell peppers, and cashew nuts.

Meal Prep Tips for Tofu Stir Fry

  • Ingredients Options: To save time on prep, you can buy pre-washed and cut vegetables. There are fresh and frozen options available at the grocery store
  • Cook Methods: You can also turn this into a “sheet pan” stir fry recipe and cook it in the oven or your Air Fryer. Just coat the tofu and vegetables in oil and sprinkle with garlic powder and salt. Roast in the oven at 400F for 12 to 15 minutes or cook it in the Air Fryer at 360F for 8 to 10 minutes. In the end, drizzle it with the stir-fry sauce.
  • To Serve: You can enjoy this meal with a side of steamed rice or cauliflower rice if you want to keep it low-carb
  • To Store: Store in an airtight container in the refrigerator for up to 3 to 4 days.
  • To Reheat: The meal can be reheated in the microwave
Glass meal prep container with tofu stir fry with broccoli, red bell peppers, and cashew nuts.
Tofu Stir Fry

Tofu and Veggie Stir Fry

Flavorful, crispy tofu tossed with fresh and colorful vegetables are perfect for a quick and healthy vegetarian dinner.

No ratings yet

Prep Time 5 minutes
Cook Time 15 minutes

Course dinner, Main Course
Cuisine American, Asian

Servings 2

Equipment

  • knife
  • cutting board
  • mixing bowl
  • spatula
  • saute pan

Ingredients


  • 12 oz tofu (firm)
  • 1/4 cup red onions (sliced)
  • 1/4 cup shredded carrots
  • 1 cup green beans (washed and trimmed)
  • 1 cup broccoli florets
  • 1 red bell pepper
  • 2 tablespoons cashews
  • 1/2 teaspoon sesame seeds
  • 1 tablespoon olive oil

Stir Fry Sauce

  • 2 tablespoon soy sauce
  • 1 tablespoon rice vinegar
  • 1 tablespoon honey
  • 1 teaspoon sesame oil
  • 1/4 teaspoon garlic powder
  • 1/4 teaspoon red chili flakes

Instructions


  • Prep the veggies: Cut the bell peppers into one inch cubes, dice the red onions, cut the green beans into one inch pieces, and make sure the florets are cut in half.
  • Make the stir fry sauce: In a mixing bowl, mix together the stir fry sauce until it is well blended.
  • Prep the tofu: Next, cut the tofu block in half and place each block in between several paper towels. Press down on the tofu to remove the excess moisture. Cut the tofu into one inch cubes.
  • Cook the tofu: Add oil to a skillet on medium high heat and sear the tofu cubes on each side until it is completely golden brown all around (about 2 to 3 minutes each side)
  • Cook the veggies: Next, remove the tofu from the skillet. Add the onions and carrots and saute until they soften. Then, add the green beans, red bell peppers, and broccoli florets. Add the stir fry sauce and mix it around for 3 to 4 minutes until the veggies are tender.
  • Combine it all together: At the end, add the tofu back into the pan and top it off with the cashews and sesame seeds.

Similar Recipes

cauliflower rice

Cauliflower Fried Rice

broccoli beef

Ground Beef and Broccoli Vegetable Stir Fry

peanut chicken

Peanut Chicken and Celery Vegetable Stir Fry

You Might Also Like

Joel Gott Sauvignon Blanc White Wine

Amazon Brand – Happy Belly Roasted and Salted Peanuts

Trader joe’s Chili Onion Crunch

Frequently Asked Questions

How long can you keep this in the fridge?

You can store it in an airtight container for up to 3 to 4 days.


What else can I serve with this tofu stir fry?

Enjoy this recipe with steamed rice, lo mein noodles, or even with quinoa.


What can I substitute cashews with?

Regular peanuts or pine nuts are great tasty options!

Posted on Leave a comment

Italian Chicken Recipe with Green Beans and Almonds

italian chicken

This Grilled Italian Marinated Chicken recipe is so easy to make and it results in a delicious and juicy chicken dish.

This post may contain affiliate links. Please see our privacy policy for details.

Round plate with grilled chicken and green beans with almonds.

We love marinating our meats to add flavor and also keep it juicy during the cooking process. Sometimes, we don’t have the time or energy to make our marinades homemade.

So one of our favorite meal prep hacks is using salad dressings!

The PrepYoSelf Newsletter

Did you know salad dressing can be used for more than just salads?

Most salad dressings make for tasty marinades, in particular, vinaigrettes. So If you’re new to cooking and feel like it may be too much work to make your own from scratch, vinaigrettes are a great way to flavor up your proteins.

For example, in this recipe, we used an Italian vinaigrette that we already had on hand and marinated the chicken, and also used a balsamic glaze to flavor our green beans.

Several dishes including chicken with green beans and salmon with watermelon salad.

Ingredients You’ll Need

  • Protein: We used boneless chicken thighs but you can also use chicken breasts or chicken tenderloins
  • Italian salad dressing: We used this to marinate the chicken
  • Green Beans: You can also use asparagus or cauliflower
  • Almonds: You can also use pecans or walnuts
  • Balsamic Glaze: This is used to season the green beans
Glass meal prep containers storing grilled chicken, green beans, and almonds.

How to Make Grilled Italian Chicken

  • Preheat the oven to 400F.
  • Marinate the chicken with the Italian salad dressing.
  • Meanwhile, heat a grill pan on medium-high heat and grill the chicken on each side for a few minutes until it gets a good char.
  • Then, transfer the chicken to a sheet pan and let it finish baking in the oven.

How to Saute Balsamic Green Beans

  • While the chicken is cooking, boil the green beans for a few minutes to help them get tender. Then remove them from the pot with a slotted spoon.
  • Add oil to a heated pan and add the green beans and almonds.
  • Then, drizzle it with balsamic glaze and mix it all together.

Reference the recipe card below for detailed instructions.

Glass meal prep containers storing grilled chicken, green beans, and almonds.

Meal Prep Tips for Marinades

  • Most vinaigrette salad dressings contain an acidic component such as vinegar or lemon juice. The acid will help tenderize tougher cuts.
  • So you can marinate your tougher cuts for a few hours or overnight in a refrigerator in a sealed plastic bag.
  • For more tender cuts such as fish, you just need to brush them with a marinade right before cooking to add flavor.
Chicken & Green Beans

Italian Chicken with Green Beans and Almonds

Grilled and Juicy Italian Chicken that is so easy to throw together and serve in a variety of ways.

No ratings yet

Prep Time 5 minutes
Cook Time 30 minutes

Course dinner, Main Course
Cuisine American, Italian

Servings 2

Equipment

  • mixing bowl
  • indoor grill pan
  • saute pan
  • large pots
  • tongs
  • sheet pan
  • oven

Ingredients


  • 12 oz boneless chicken thighs
  • 1/2 cup italian salad dressing
  • 8 oz green beans
  • 2 tablespoons almonds
  • 1 tablespoon balsamic concentrate
  • 1 tablespoon olive oil
  • 1/4 teaspoon garlic powder
  • 1/4 teaspoon salt

Instructions


  • Preheat the oven to 400F. In a mixing bowl, marinate the chicken with the italian dressing for at least 10 minutes.
  • Heat a grill pan on medium-high heat and grill the chicken on each side for about 3 to 4 minutes. Then, transfer the chicken to a sheet pan and finish baking it in the oven for about 20 minutes until it reaches an internal temperature of 165F and is fully cooked.
  • Meanwhile, bring a pot of water to a boil and place the green beans in the pot for about 4 to 5 minutes. Use a slotted spoon to remove the green beans from the boiling water.
  • Then, add oil to a pan on medium high heat and add the green beans and almonds. Season with balsamic concentrate, garlic powder, and salt. Stir it all around until the green beans are fully coated with the sauce.

Similar Recipes

balsamic chicken salad

Oven Baked Balsamic Chicken with Strawberries

balsamic steak

Grilled Balsamic Steak with Sweet Potato Wedges

salmon and watermelon salad

Grilled Salmon with Watermelon Salad

You Might Also Like

Frequently Asked Questions

How long should I marinate the chicken?

it’s best to marinate your chicken overnight, but if you’re on a time crunch, marinate it for at least 10 minutes.


How to serve grilled chicken?

Grilled chicken is great because you can serve it with basically anything. Slice it into bite-size pieces and serve it over salads, in pasta, or in tortillas.


Can I bake my marinated chicken without grilling it?

Yes, absolutely. Place it in a baking dish and bake it for at least 25 minutes until it fully cooks and reaches an internal temperature of 165F. We like to grill our chicken for a few minutes before we transfer it to a sheet pan just to get a nice golden brown color, but it’s not necessary and will still taste delicious!