
This Grilled Hoisin Chicken with Soba Noodles recipe is the perfect balance of flavor, nutrition, and convenience. It’s a must-try for anyone looking to add a little global flavor to their weekly meal prep. Enjoy your busy week knowing you’ve got a delicious, home-cooked meal ready to go!
This post may contain affiliate links. Please see our privacy policy for details.


Why You’ll Love This:
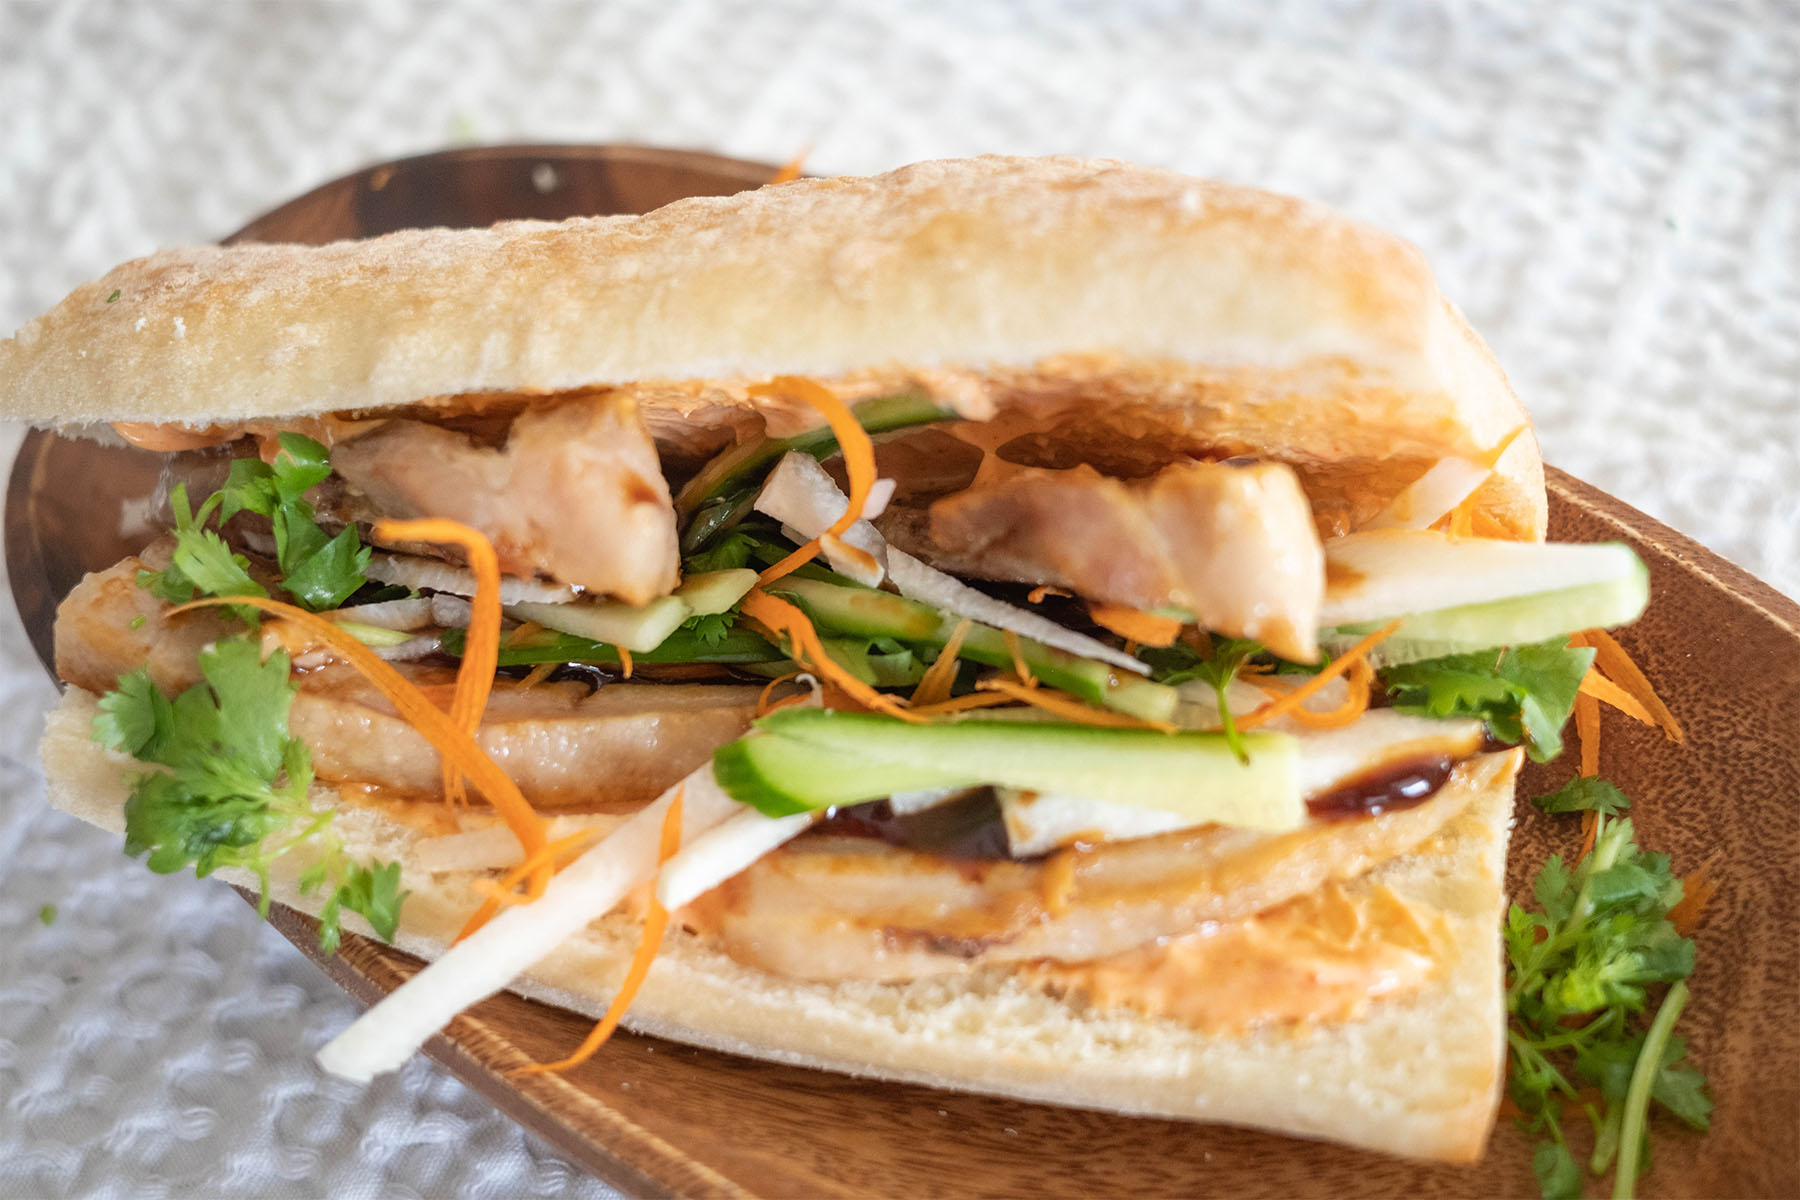
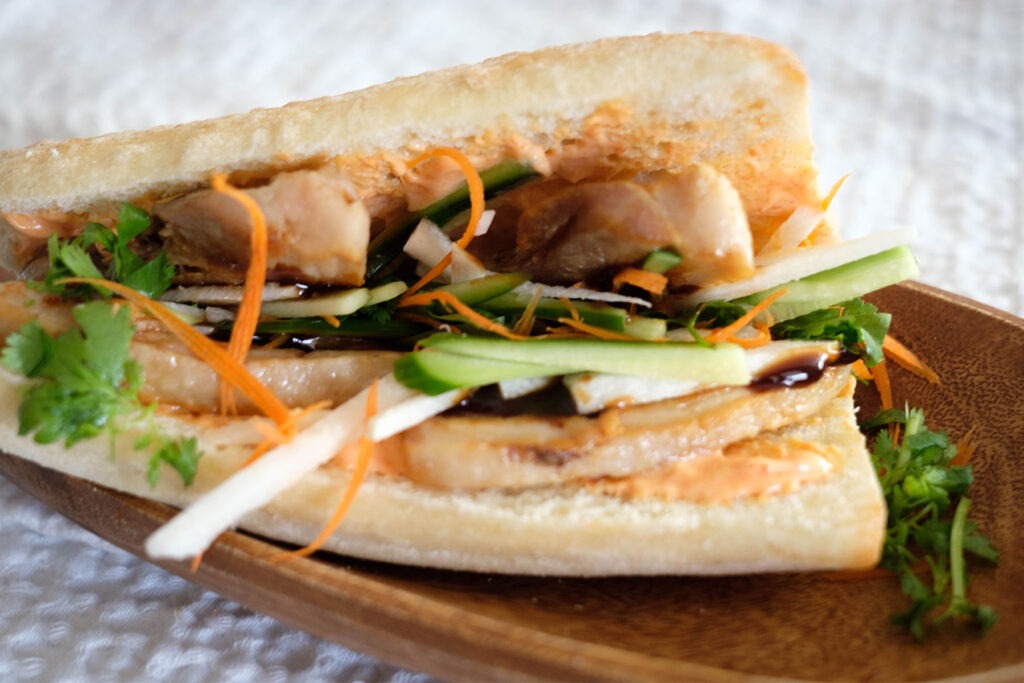
This recipe brings together the bold and delicious flavors of hoisin sauce, soy sauce, and sriracha with tender grilled chicken. Paired with fresh veggies like cucumbers, carrots, and jicama, and served over soba noodles, you’ve got a satisfying meal that will transport your taste buds straight to the heart of global cuisine! Plus, the ingredients are affordable and easy to find, making this dish a winner for your meal prep routine.
- Minimal Ingredients: This dish uses simple ingredients that you probably already have in your pantry or can easily grab at the grocery store.
- Quick Prep: The marinade comes together in minutes, and grilling the chicken takes less than 15 minutes. Boiling soba noodles is a breeze!
- Meal Prep-Friendly: You can make this ahead of time, portion it out into containers, and you’re set for lunches or dinners all week. Just reheat and enjoy!
- Global Flair: It’s a taste of Asian cuisine that’s not only delicious but also brings variety to your meal rotation.
- Healthy and Balanced: Packed with protein, fiber, and vitamins, this meal fuels your day while keeping you on track with your healthy lifestyle.
- Make It Your Way: Adjust the spiciness by adding more or less sriracha, or swap out the veggies based on what you have on hand!

Ingredient Breakdown: Why These Flavors Shine Together
- Chicken: Chicken is a lean, protein-packed base that soaks up all the flavors of the marinade beautifully. Grilling it adds a delicious smoky char that complements the sweet, savory, and spicy notes in the dish. Plus, chicken is a versatile and budget-friendly protein, making it perfect for meal prep.
- Hoisin Sauce: Hoisin sauce is a thick, fragrant sauce that’s sweet, savory, and slightly tangy. It’s made from a blend of soybeans, garlic, vinegar, and spices. In this recipe, hoisin sauce adds a rich depth of flavor to the chicken, giving it a classic Asian-inspired taste with a touch of sweetness that balances out the spiciness of the sriracha.
- Soy Sauce: Soy sauce is the ultimate umami bomb. It enhances the overall savoriness of the dish, adding complexity and a salty depth that ties everything together. It’s the backbone of the marinade, giving the chicken a rich, well-rounded flavor.
- Sriracha Sauce: Sriracha brings the heat! This spicy chili sauce adds a punch of flavor that wakes up the dish. The hint of garlic in sriracha also complements the hoisin and soy sauce, creating a balanced marinade that’s spicy but not overwhelming. You can adjust the amount of sriracha to control the spice level based on your preference.
- Sesame Oil: Sesame oil has a toasty, nutty flavor that adds warmth and richness to the marinade. A little goes a long way, and it really elevates the overall taste of the dish. The nuttiness of the sesame oil pairs perfectly with the sweetness of the hoisin sauce and the umami of the soy sauce.
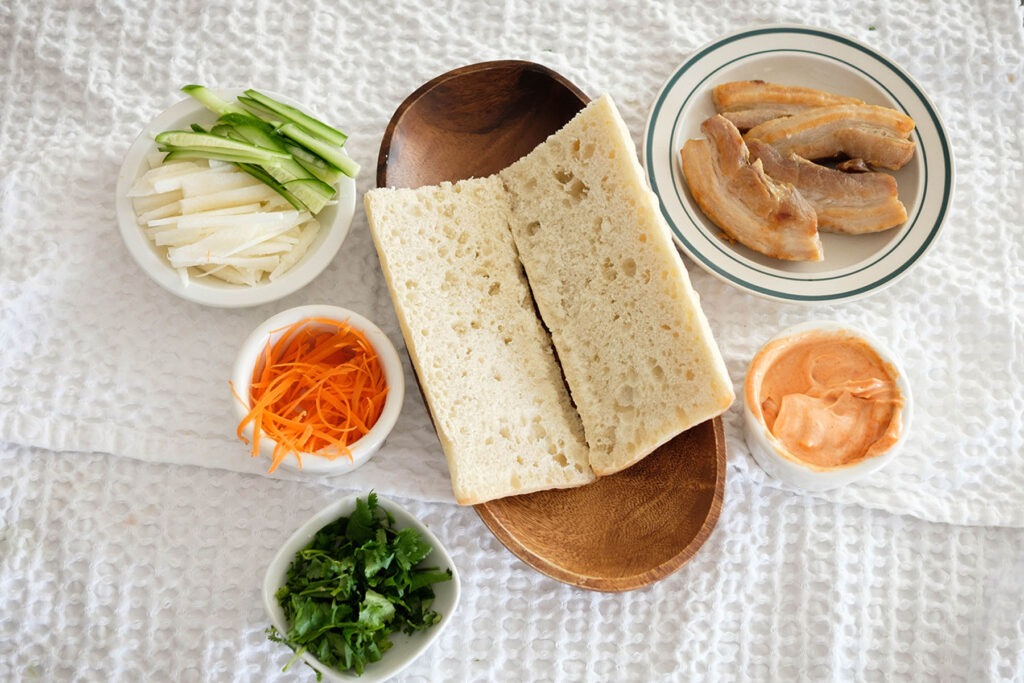
- Soba Noodles: Soba noodles are made from buckwheat, giving them a slightly nutty flavor and a chewy texture that complements the tender chicken and crunchy veggies. They’re a great base for this dish because they soak up the flavors of the chicken and the optional dressings without getting soggy, making them ideal for meal prep. Plus, soba noodles are lighter than traditional pasta, so you won’t feel weighed down after eating.
- Cucumber: Cucumber adds a cool, crisp contrast to the warm, savory chicken and noodles. Its fresh, hydrating crunch balances out the richness of the marinade and the heat from the sriracha, adding a refreshing element to the dish.
- Carrots: Carrots bring a natural sweetness and a vibrant pop of color to the dish. They add a crunchy texture that contrasts nicely with the tender chicken and soft noodles. Plus, shredded carrots are easy to incorporate into meal prep because they hold up well and add a subtle sweetness that complements the spicy and savory flavors.
- Jicama: Jicama is a crunchy, mildly sweet root vegetable with a texture similar to an apple or water chestnut. It adds a unique crunch to the dish and pairs well with the other fresh veggies. Its slight sweetness balances out the savory and spicy components of the dish, and it adds an exciting texture that keeps every bite interesting.
- Cilantro: Cilantro brings a bright, citrusy note that lightens up the dish. It cuts through the richness of the marinade and adds a burst of fresh, herbal flavor that complements the Asian-inspired ingredients. If you’re a fan of cilantro, this ingredient will really enhance the overall flavor profile of the meal.
- Sesame Seeds: Sesame seeds add a subtle nuttiness and a bit of crunch to the dish. They also enhance the flavor of the sesame oil in the marinade, tying the whole dish together with a toasty finish. Plus, they’re a simple way to add visual appeal to the dish, making it look as good as it tastes.

Easy Recipe Steps
- Marinate the Chicken: Combine the hoisin sauce, soy sauce, sriracha, and sesame oil in a bowl. Add the chicken, making sure it’s well-coated. Let it marinate overnight or for at least 30 minutes for maximum flavor.
- Cook the Soba Noodles: While the chicken marinates, boil the soba noodles according to the package instructions. Drain and set them aside.
- Grill the Chicken: Heat an indoor grill pan on medium-high heat. Grill the marinated chicken for 5 to 6 minutes on each side until fully cooked and it reaches an internal temperature of 165°F. Let the chicken rest for a few minutes before slicing it into bite-sized pieces.
- Assemble the Bowl: Divide the soba noodles into meal prep containers. Top each portion with grilled chicken, sliced cucumber, shredded carrots, and julienne jicama. Garnish with chopped cilantro and a sprinkle of sesame seeds.
- Optional Finishing Touches: Drizzle with extra hoisin sauce, sriracha, or a light sesame vinaigrette for an extra burst of flavor.
Reference the recipe card below for detailed instructions.

Meal Prep Tips and Ingredient Swaps
- Layer for Freshness: When packing meal prep containers, layer the soba noodles on the bottom, then add the veggies and chicken on top. This keeps everything fresh and prevents the noodles from getting soggy.
- Keep Dressings Separate: If you plan to drizzle extra sauce or vinaigrette, keep it in a separate container and add it just before eating. This prevents your meal from becoming too soggy.
- Make It a Salad: If you prefer a lighter version, swap the soba noodles for a bed of mixed greens or spinach. Top with the grilled chicken and veggies for a fresh and satisfying salad.
- Swap Chicken for Tofu or Shrimp: For a vegetarian twist, substitute firm tofu instead of chicken. Press the tofu to remove excess water, then marinate and grill it just like the chicken. You can also use shrimp as a lighter protein option—just marinate and grill for 2-3 minutes per side until cooked.
- Use Zucchini Noodles Instead of Soba: If you’re looking to lower the carb content, swap the soba noodles for spiralized zucchini noodles (zoodles). They add extra nutrients and a similar texture without the calories.
- Try a Different Veggie Mix: If you can’t find jicama or prefer other veggies, go for thinly sliced bell peppers, radishes, or shredded cabbage. These provide a similar crunch and work well with the other flavors.
- Substitute Hoisin Sauce: If you’re avoiding hoisin sauce due to dietary restrictions, try a homemade teriyaki or peanut sauce. Both add a delicious twist while maintaining that savory, umami flavor.Rice Noodles Instead of Soba: For a slightly different texture, you can substitute rice noodles for soba noodles. They’re just as easy to cook and work beautifully with the Asian-inspired flavors.


Frequently Asked Questions
How long can I store this meal in the fridge?
This dish can be stored in the fridge for up to 4 days in airtight containers. The soba noodles and veggies hold up well, so it’s perfect for meal prep!
Are soba noodles gluten-free?
Traditional soba noodles are made from buckwheat, which is gluten-free. However, many brands mix buckwheat with wheat flour, so check the packaging if you need a gluten-free option. Alternatively, you can use gluten-free soba noodles or swap them with rice noodles.
What if I don’t have an indoor grill pan?
No worries! You can cook the chicken on a regular stovetop skillet or even bake it in the oven at 400°F (200°C) for about 20-25 minutes, or until it reaches an internal temperature of 165°F.


Grilled Hoisin Chicken with Soba Noodles
Equipment
Ingredients
Chicken Marinade
Noodles and Vegetables
Instructions
Notes
Nutrition