Posted on Leave a comment

Citrus Shrimp Quinoa Spinach Salad

shrimp quinoa salad

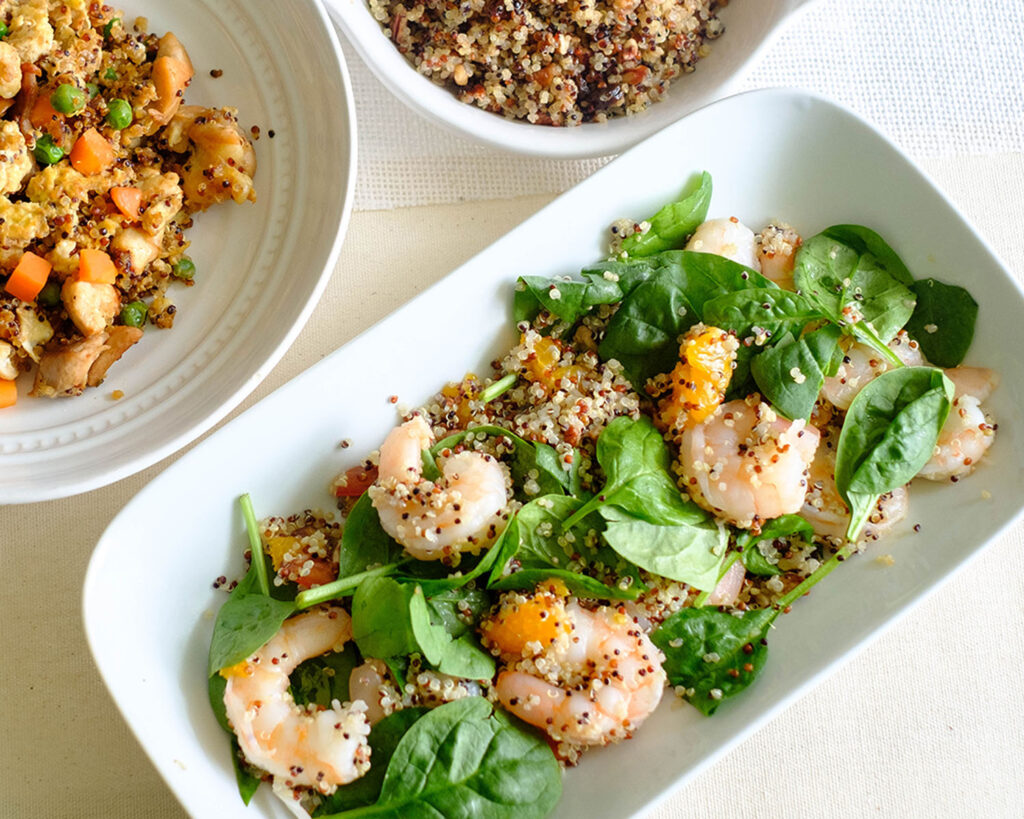
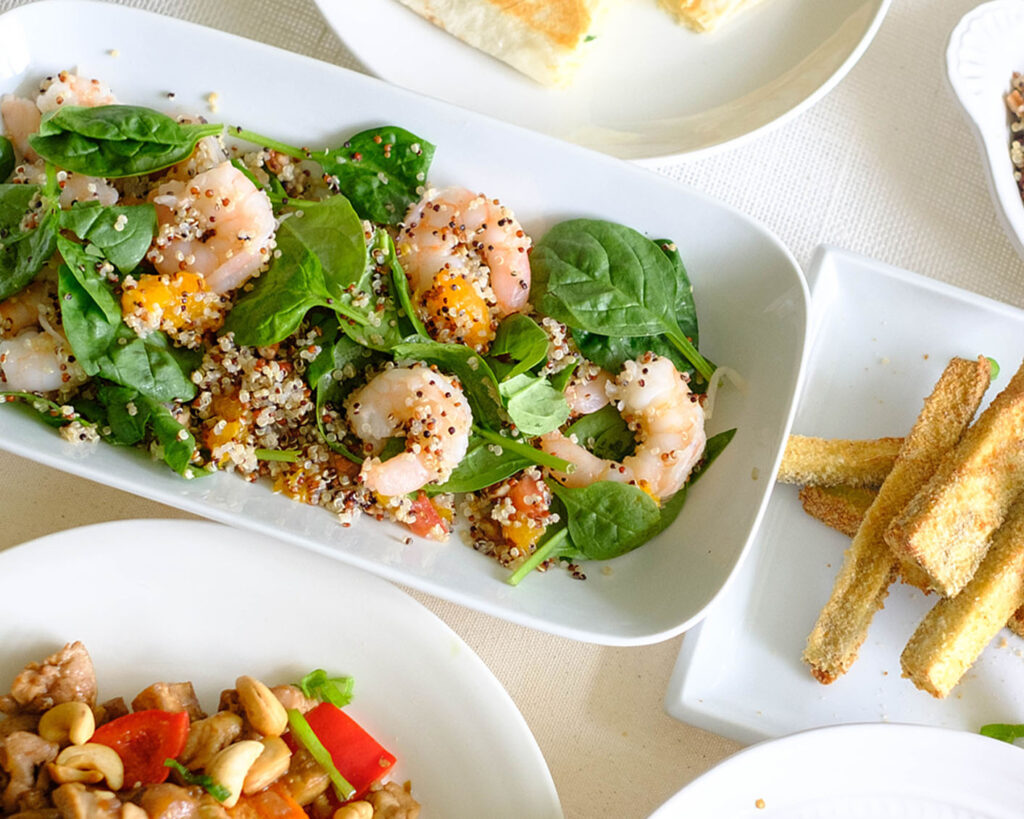
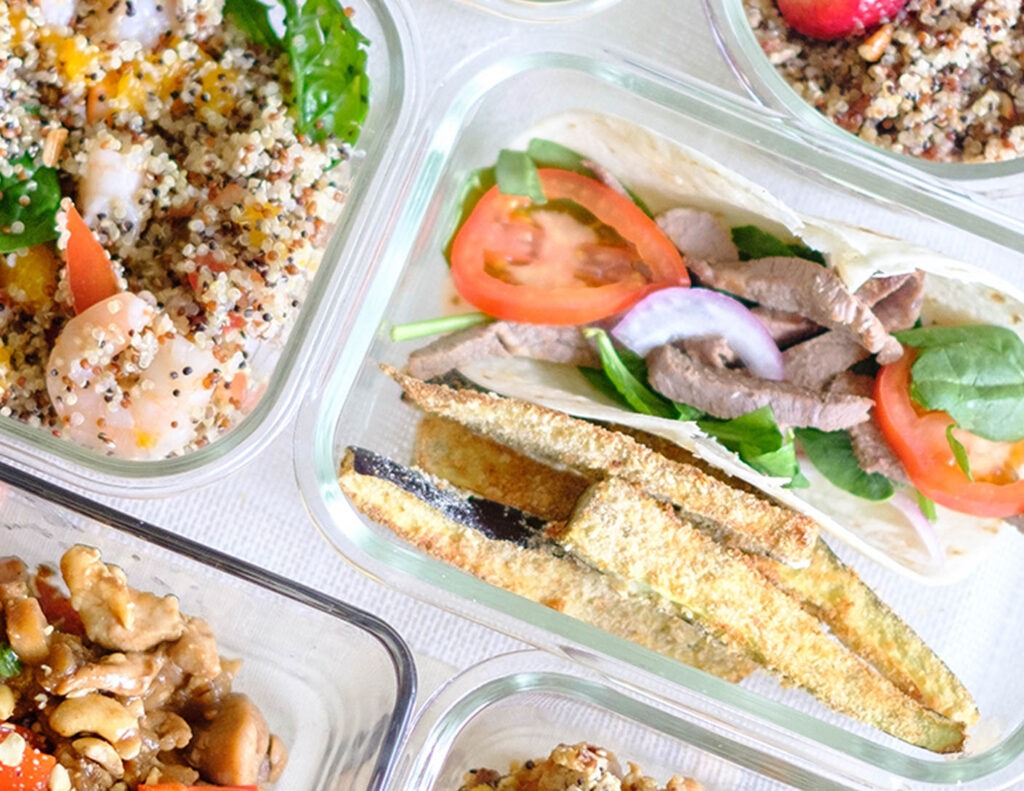
This citrus flavored shrimp quinoa with spinach salad is a fresh and easy lunch meal prep that you can prep for yourself in less than 20 minutes!

This post may contain affiliate links. Please see our privacy policy for details.

Rectangle plate with shrimp, quinoa, spinach, and mandarin oranges.

Reasons Why We Love This Shrimp Quinoa Spinach Salad

  • This salad has vibrant flavors paired with a powerhouse of nutrients.
  • The shrimp and quinoa pack in the protein.
  • The combination of the fruity mandarin orange and nutty spinach brings in healthy antioxidants and an array of vitamins and minerals.
  • The pecans also provide a good source of protein, healthy fats, and fiber.

The PrepYoSelf Newsletter

Ingredients You Need

  • Shrimp: We love using pre-cooked shrimp for salads because it makes meal prep easy. Shrimp is also low calorie, but high in protein.
  • Quinoa: You can use any color.
  • Spinach: This ingredient is rich in iron, Vitamin C and E, potassium, and magnesium which all contribute to supporting immune function.
  • Tomatoes: This fruit adds sweet and tangy flavors and it’s also good for protecting heart health.
  • Mandarin Oranges: You can use fresh oranges or any other citrus fruit such as grapefruit.
  • Pecans: We love adding nuts to our salads to add a crunchy texture but it is also a good source of healthy fat.
  • Vinaigrette: We made a homemade vinaigrette with the ingredients used in this recipe, but you can also use your choice of store-bought vinaigrette.
Rectangle plate with shrimp, quinoa, spinach, and mandarin oranges.

How to Make Shrimp Quinoa Spinach Salad

  1. First, prepare the quinoa in boiling water on the stovetop.
  2. While the quinoa is cooking, you can mix together the ingredients for the homemade vinaigrette.
  3. After the quinoa cooks, let it cool for a few minutes.
  4. Then, in a mixing bowl, mix together all of the ingredients and drizzle them with the vinaigrette.

Reference the recipe card below for detailed instructions.

Glass meal prep containers with shrimp, quinoa, spinach, and mandarin oranges.

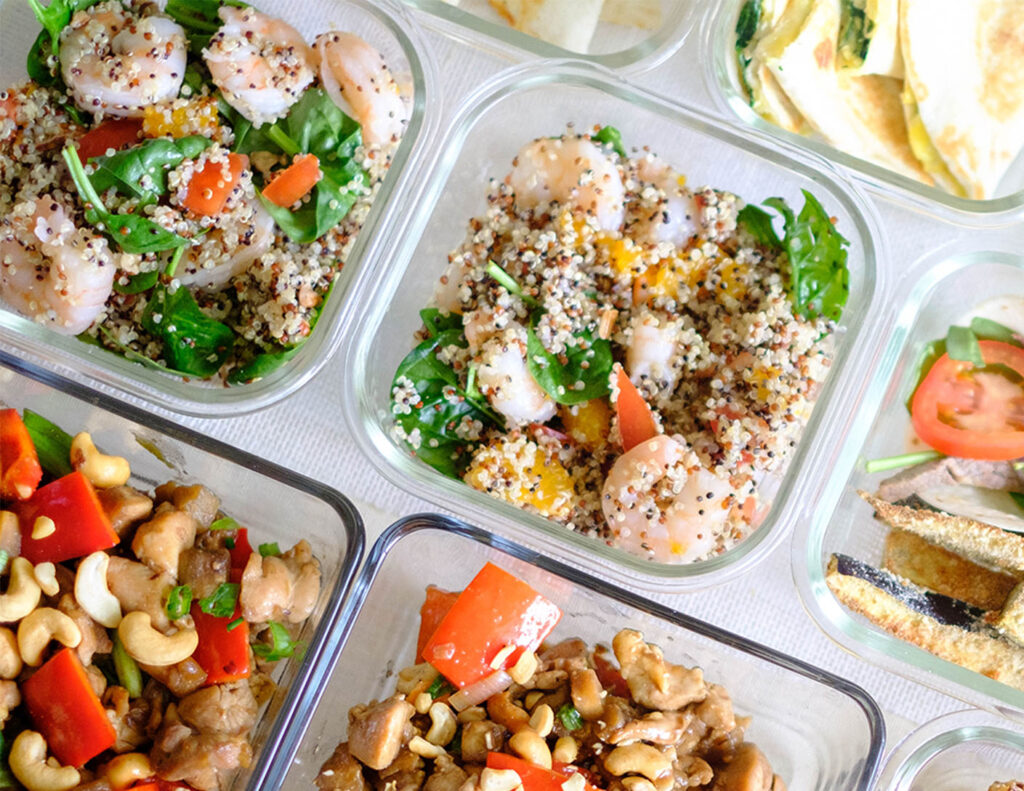
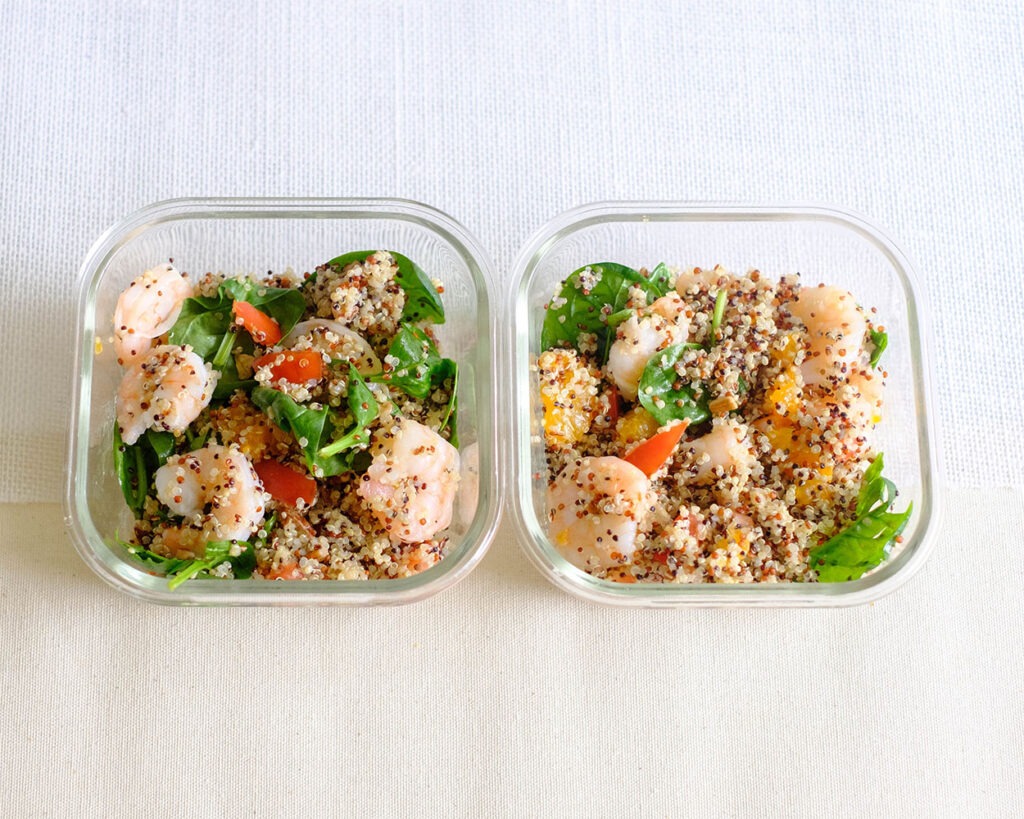
Meal Prep Tips for Citrus Shrimp Quinoa Salad

  • Ingredient Tips: If you are using frozen pre-cooked shrimp, it is best to defrost the shrimp in the refrigerator the night before for the best quality.
  • Batch Cooking Tips: We often use quinoa in meal prep, so you can also make a bigger batch in advance and freeze it in an air-tight container and store it up in the freezer for up to 3 months. All you have to do is defrost it as needed for your weekly meal prep.
  • Storage: This meal can be stored in a meal in an air-tight container in the refrigerator for up to 3 to 4 days. However, do not pour the vinaigrette over the salad until you are ready to eat the meal so that it does not get too soggy.
  • To Serve: This meal can be served chilled.
  • Extra Ingredients: Leftover oranges can be used in smoothies, and pecans can be used up in baked goods or eaten as a snack. Use shrimp in other recipes such as pasta, soft tacos, or roasted veggies.
Glass meal prep containers with shrimp, quinoa, spinach, and mandarin oranges.
Shrimp Salad

Citrus Shrimp Quinoa Spinach Salad

This quick and tasty shrimp quinoa and spinach salad is perfect for a weekday lunch meal. It is high in protein and loaded with nutrients.
No ratings yet
Prep Time 5 minutes
Cook Time 15 minutes
Course lunch, Main Course
Cuisine American, Mediterranean
Servings 2

Equipment

  • knife
  • cutting board
  • mixing bowls
  • boiling pot

Ingredients
  

Quinoa

  • 1/3 cup dried quinoa
  • 1 cup water

Salad Components

  • 12 oz large shrimp (frozen, pre-cooked, peeled & deveined)
  • 4 cups baby spinach
  • 1 roma tomato (diced)
  • 1 cup mandarin oranges (drained)
  • 2 tablespoon pecans (chopped)

Salad Dressing

  • 2 lemons (juiced)
  • 4 tablespoons olive oil
  • 1 tablespoon dijon mustard
  • 1 tablespoon honey
  • 1/4 teaspoon garlic powder
  • 1/4 teaspoon salt

Instructions
 

Quinoa

  • Bring 1 cup of water to a boil in a boiling pot. Add the quinoa and lower the heat to medium. Cover the pot with a lid and cook for 15 minutes. After it cooks, fluff with a fork and let it cool

Salad Dressing

  • In a mixing bowl, add the juice of two lemons with olive oil, dijon mustard, honey, and the seasonings. Whisk together until the dressing is well blended

Salad Assembly

  • Defrost the shrimp according to the packaged instructions
  • In a bowl, add the shrimp, quinoa, spinach, diced tomatoes, and mandarin oranges, and chopped pecans
  • Pour over the dressing and mix all the components together

Similar Recipes

shrimp kebab

Air Fryer Shrimp and Pineapple Kebabs

shrimp and corn

Sheet Pan Shrimp with Cauliflower and Corn

salmon salad

Salmon Salad Stuffed Avocado

You Might Also Like

Frequently Asked Questions

How to make quinoa taste good?

Use strong seasonings such as garlic powder, fresh herbs, and bold citrus flavors to boost the flavor of quinoa.


Is shrimp good for you?

Shrimp is low in calories yet rich in nutrients making it a great weight loss protein option. It is less than 100 calories for a 3 oz serving and provides about 20g of protein.


Is shrimp high in cholesterol?

A 3 oz serving contains 161 mg of cholesterol which makes most believe that it could easily increase the cholesterol in your blood. However, it also contains omega-3 fatty acids that promote heart health, and if eaten in moderation, it can be incorporated as part of a healthy and balanced diet.

Posted on 1 Comment

Baked Meatloaf Patties and Roasted Green Beans

meatloaf patties

Love the comfort of meatloaf, but don’t want to wait too long for the prep? Here’s a twist on a meatloaf-recipe family favorite using burger patties.

This post may contain affiliate links. Please see our privacy policy for details.

Calories: 626kcal | Carbohydrates: 24g | Protein: 37g | Fat: 43g | Saturated Fat: 15g | Polyunsaturated Fat: 3g | Monounsaturated Fat: 21g | Cholesterol: 120mg | Sodium: 1920mg | Potassium: 1281mg | Fiber: 6g | Sugar: 15g | Vitamin A: 1806IU | Vitamin C: 24mg | Calcium: 84mg | Iron: 7mg

Round plate with meatloaf recipe of beef patties covered in tomato sauce on top of roasted green beans.

While classic meatloaf recipes are normally baked in a loaf pan, we opted for using hamburger patties and baking them flat on a sheet pan. This definitely took less time than traditional meatloaf and was a huge time saver, and you still get the classic flavors of meatloaf that we all find comfort in.

The PrepYoSelf Newsletter

Why These Meatloaf Patties are Great for Meal Prep

  • The recipe uses budget-friendly ingredients
  • Everything can be cooked on one sheet pan
  • It’s a healthier version of meatloaf that still satisfies your tastebud

Round plate with meatloaf recipe of beef patties covered in tomato sauce on top of roasted green beans.

Easy to Find Ingredients for Baked Meatloaf Recipe

  • Lean Ground Beef Burger Patties: We used pre-made beef burger patties to save time on meal prep. However, you can definitely use any kind of ground meat and form your own burger patties
  • Green Beans: You can pair your patties with any kind of roasted veggies such as asparagus, broccoli, or even with mashed potatoes
  • Red Onions: Adding aromatics to anything always adds more flavor. You can also use sliced shallots or minced garlic
  • Tomato Sauce: You can even use leftover spaghetti sauce
  • Sugar: If you don’t want to use sugar, you can substitute it with honey. Adding a little bit of sweetness helps balance out the tartness of the tomato sauce
  • Olive Oil: Keep it heart-healthy with oil, and you can also use avocado oil

Glass meal prep containers with meatloaf recipe of beef patties covered in tomato sauce on top of roasted green beans.

Easy Instructions to Make Meatloaf Patties

  • Preheat the oven to 400F.
  • Mix together the tomato sauce with the sugar, seasonings, and red onions.
  • Layer the beef patties on a lined sheet pan and top each patty with the tomato sauce.
  • Place the seasoned green beans on another sheet pan since they will cook faster.
  • Bake in the oven until the beef patties are fully cooked.

Reference the recipe card below for detailed instructions.

Glass meal prep containers with meatloaf recipe of beef patties covered in tomato sauce on top of roasted green beans.

Meal Prep Tips for Meatloaf Patties

  • To Serve: You can serve these with a side of mashed potatoes, buttered pasta noodles, or even rice pilaf.
  • Leftovers: If you make a large batch and have leftovers, you can also enjoy these meatloaf patties in between toasted bread or hamburger buns.
  • To Store: You can store this in an airtight container in the refrigerator for up to 3 to 4 days.

meatloaf patty and green beans

Baked Meatloaf Patties and Roasted Green Beans

Get the homestyle taste of meatloaf, but with easy portions to prep for the week using hamburger patties.
4.67 from 3 votes
Prep Time 5 minutes
Cook Time 25 minutes
Course dinner, Main Course
Cuisine American
Servings 2
Calories 626 kcal

Equipment

  • knife
  • cutting board
  • sheet pan
  • oven

Ingredients
  

  • 4 lean beef hamburger patties (3 oz each)
  • 8 oz green beans (washed and trimmed)
  • 1/4 cup red onions (diced)
  • 1 cup tomato sauce
  • 1 tablespoon sugar
  • 1 teaspoon garlic powder
  • 1 teaspoon paprika
  • 1 teaspoon salt
  • 1 tablespoon olive oil

Instructions
 

  • Preheat the oven to 400F. In a mixing bowl mix together the tomato sauce with the brown sugar, red onions, half of the paprika spice, half of the garlic powder seasoning, and half of the salt.
  • Place the hamburger patties on a sheet pan and evenly top each patty with the tomato sauce mixture. Place the green beans on another sheet pan and season with the paprika, garlic powder, and salt. Drizzle the green beans with olive oil.
  • Place both sheet pans in the oven and bake the green beans for 12 to 15 minutes. Bake the beef patties for at least 25 minutes until it reaches an internal temperature of 165F.

Notes

Nutrition information provided is an estimate. It will vary based on cooking method and specific ingredients used. Please consult with your healthcare provider for specific dietary needs. To gain a better understanding, explore our nutrition disclaimer here

Nutrition

Calories: 626kcalCarbohydrates: 24gProtein: 37gFat: 43gSaturated Fat: 15gPolyunsaturated Fat: 3gMonounsaturated Fat: 21gCholesterol: 120mgSodium: 1920mgPotassium: 1281mgFiber: 6gSugar: 15gVitamin A: 1806IUVitamin C: 24mgCalcium: 84mgIron: 7mg

Similar Recipes

italian chicken

Italian Chicken with Green Beans and Almonds

sheet pan sausage

Sheet Pan Beef Sausage and Vegetables

stuffed lasagna peppers

Stuffed Beef Lasagna Peppers

You Might Also Like

Frequently Asked Questions

Do meat patties need breadcrumbs?

For this recipe, we did not use breadcrumbs like most traditional meatloaf recipes use because the patties were already formed and stuck together when they bake.


Do you have to put milk in meatloaf?

Milk is often added to meatloaf to help soak in the breadcrumbs. However, for this recipe, we did not use breadcrumbs and therefore did not use milk. This meatloaf patty version of the recipe is gluten-free and dairy free.


What meat do I use for meatloaf?

It is usually made with ground beef and sometimes includes a combination of pork or lamp. For this recipe, we only used ground beef, however, you can even use ground turkey or ground chicken.

Posted on Leave a comment

Rosemary Chicken with Potatoes and Artichokes

rosemary chicken

Beautifully roasted Rosemary Chicken Thighs with potatoes and artichokes make for an elegant and comforting weeknight meal.

This post may contain affiliate links. Please see our privacy policy for details.

Round plate with crispy chicken thighs, roasted potatoes and artichokes served with green arugula salad.

This lovely roasted chicken thigh recipe couldn’t be simpler to meal prep for yourself during a busy work week.

All you have to do is toss together the ingredients in one sheet pan and let the oven do the roasting. Round it out by serving it with a fresh arugula salad with a homemade lemon vinaigrette.

Rosemary and chicken have long been the perfect flavor combination. With crispy roasted potatoes and scattered artichoke hearts, it makes it for a decadent meal you won’t be able to resist.

The PrepYoSelf Newsletter

What are Artichoke Hearts?

  • The heart of an artichoke is the meaty part in the center that is hidden below the rough leaves of the globe artichoke.
  • The artichoke itself is very difficult to prep and takes quite some work to get to the edible parts, therefore, we often just buy canned or frozen artichoke hearts to keep it easy for meal prep.
  • Artichoke hearts can be used in pasta dishes, added to soups, or marinated and used as a salad topping.

Round plate with crispy chicken thighs, roasted potatoes and artichokes served with green arugula salad.

Recipe Ingredient and Variations:

  • Chicken Thighs: We used chicken thighs because you can get a tasty crispy skin when the chicken is roasted. However, if you want to keep this meal lean, you can also use chicken breast or chicken tenderloins.
  • Potato and Artichokes: This is a sheet pan recipe where we roasted the vegetables alongside the chicken thighs for minimal dishes.
  • Seasonings: We kept it simple with rosemary, paprika, garlic powder, and salt.
  • Olive oil: Coating your ingredients with olive oil helps give the ingredients a good crisp texture while it roasts in the oven.
  • More flavor: To add more flavor, you can also use fresh herbs such as basil, green onions, minced garlic, shallots, or even the zest of a lime or lemon.

Glass meal prep container with crispy chicken thighs, roasted potatoes and artichokes.

How to Make Baked Rosemary Chicken Thighs

  1. Preheat the oven to 400F. In a small bowl, mix together the seasonings.
  2. Next, cut the red baby potatoes into 1-inch cubes. Drain the artichokes if you purchased them canned. Cut them into quarters.
  3. Place both the chicken and vegetables on a sheet pan and sprinkle them with the seasonings and coat them with olive oil.
  4. Bake everything in the oven for 35 to 40 minutes until the chicken reaches an internal temperature of 165F and the skin is nice and golden brown.

Reference the recipe card below for detailed instructions.

Glass meal prep container with crispy chicken thighs, roasted potatoes and artichokes.

Meal Prep Tips for Roasted Rosemary Chicken

  • Diet Friendliness: To keep this recipe low carb, you can use non-starchy vegetables such as cauliflower florets, yellow squash, zucchini, or asparagus instead of the red baby potatoes.
  • Artichokes: If you use frozen artichokes, you can skip the step of thawing them out because the steam arising during the cooking process can help keep the chicken moist and juicy.
  • To Serve: Serve with a fresh side salad or fluffy rice pilaf.
  • To store: Store it in an airtight container for up to 3 to 4 days in the refrigerator.

rosemary chicken

Rosemary Baked Chicken Thighs with Roasted Potatoes and Artichokes

Crispy, Baked Chicken with Tangy Artichokes and Crispy Potatoes.
No ratings yet
Prep Time 5 minutes
Cook Time 1 minute
Course dinner, Main Course
Cuisine American, Italian
Servings 2

Equipment

  • knife
  • cutting board
  • sheet pan
  • oven

Ingredients
  

Chicken and Vegetables

  • 4 chicken thighs
  • 1 cup artichoke hearts (canned and drained)
  • 2 red baby potatoes
  • 1/4 teaspoon rosemary
  • 1/2 teaspoon garlic powder
  • 1/2 teaspoon paprika
  • 1/2 teaspoon salt

Salad and Dressing

  • 4 cups arugula
  • 2 tablespoon olive oil
  • 2 tablespoon lemon juce
  • 1 tablespoon honey
  • 1/4 teaspoon garlic powder
  • 1/4 teaspoon salt

Instructions
 

  • Preheat the oven to 400F. Cut the red baby potatoes and cut them into 1-inch cubes. Drain the artichoke hearts from the can and cut the hearts into quarters. In a small bowl, mix together the rosemary, paprika, garlic powder, and salt.
  • Place the chicken, baby potatoes, and artichokes into a baking dish. Evenly sprinkle everything with the seasonings and coat them with olive oil.
  • Bake everything in the oven for about 35 to 40 minutes until the chicken reaches an internal temperature of 165F.
  • While the chicken and vegetables are baking, whisk together the lemon vinaigrette. After everything cooks, enjoy the chicken and vegetables with a side of arugula salad drizzled with the homemade lemon vinaigrette.

Similar Recipes

Air Fried Chicken

Air Fryer “Fried” Chicken Drumsticks

chicken pesto

Sauteed Chicken Pesto with Artichokes

stuffed primavera chicken

Primavera Stuffed Chicken Breasts

You Might Also Like

Frequently Asked Questions

What does artichoke hearts taste like?

After they are cooked, the texture softens and produces a flavor similar to asparagus, celery, and brussels sprouts. 


Can you eat artichokes raw?

They are edible, however, most people prefer them cooked as they will have a stronger, bitter flavor. Cooking also softens the fibers and makes for an easier chew. 


What are other ways to cook artichokes?

You can boil them, grill them, braise them, and also steam them.

Posted on Leave a comment

Instant Pot Pork Carnitas Tostadas

pork carnitas

This Instant Pot Pork Carnitas is a game changer for your weekly dinner meal prep! It tastes as if it came from a restaurant, but you don’t have to break the budget by making it yourself at home.

This post may contain affiliate links. Please see our privacy policy for details.

Plate with pork carnitas on tostada shells topped with fresh pico de gallo and served with a side salad.

What Are Pork Carnitas?

Carnitas is a Mexican pork dish that usually uses inexpensive cuts of pork which uses inexpensive cuts of pork, making it an ideal ingredient for weekly meal prep.

The pork is then braised or simmered for hours with seasonings until it is so tender that you can shred it with a fork.

Since we want to keep meal prep quick and easy, we are going to skip the long hours of cooking the pork and take advantage of our Instant Pot and pressure cook it so that it can be ready in just a little over an hour.

The PrepYoSelf Newsletter

Here’s What You Need to Make Pork Carnitas

  • Pork: We used a skinless, boneless pork shoulder
  • Citrus Fruits: We added lime and orange to brighten up the dish with citrus flavors
  • Aromatics: Onions and garlic cloves add a ton of flavor to your cooking
  • Herbs: We used cilantro for a fresh herb flavor
  • Tostada shells: After cooking the pork we are going to serve it on top of a tostada shell

Ingredients for pork carnitas that include red onions, seasonings, cilantro, green onion, lime, orange, and pork.

Ingredients for pork carnitas that include red onions, seasonings, cilantro, green onion, lime, orange, and pork.

How to Make Instant Pot Carnitas

  1. Place the pork in the bottom of the instant pot.
  2. Sprinkle in the seasonings and add the red onions, garlic cloves, and chopped cilantro.
  3. Squeeze in the juice of the lime and oranges and leave the peels in the pot.
  4. Add a little bit of water and seal the lid.
  5. Cook on medium setting for 45 minutes.
  6. After the pork cooks, carefully release the steam and remove the lid.
  7. Remove the pork from the pot and shred the meat with two forks.
  8. Serve on top of tostadas with additional toppings.

Reference the recipe card below for detailed instructions.

Plate with pork carnitas on tostada shells topped with fresh pico de gallo and served with a side salad.

Meal Prep Tips for Instant Pot Pork Carnitas

  • Optional cook tip: In traditional carnitas recipes, the last step is to crisp up the shredded pork by sauteeing it in a pan. You can also place the shredded pork on a sheet pan and roast them in the oven until it is crispy before serving it.
  • What to serve with pork carnitas: You can serve it in a soft tortilla with shredded cabbage and top it off with sour cream, cheese, or avocado slices.
  • Large Batches: Increase the serving size of the recipe and make a large batch that you can freeze. Store it in a freezer-safe bag or container and freeze it for up to 3 months for the best quality.
  • Storage: Store in an airtight container in the refrigerator for up to 3 to 4 days for the best quality.

Glass meal prep containers with pork carnitas on tostada shells topped with fresh pico de gallo.

pork carnitas

Instant Pot Pork Carnitas Tostadas with Pico de Gallo

Savory and tendor pork carnitas cooked in the Instant Pot served on top of crispy tostada shells and a fresh side salad.
No ratings yet
Prep Time 5 minutes
Cook Time 55 minutes
Course lunch, Main Course
Cuisine American, Mexican
Servings 2

Equipment

  • knife
  • cutting board
  • Instant Pot

Ingredients
  

Pork Carnitas and Tostadas

  • 12 oz boneless pork shoulder
  • 1 lime
  • 2 oranges
  • 1/2 teaspoon paprika
  • 1/2 teaspoon chili powder
  • 1/4 teaspoon oregano
  • 1/2 teaspoon salt
  • 1/2 teaspoon pepper
  • 1/2 cup red onions (sliced)
  • 2 garlic cloves (peeled)
  • 1 cup water
  • 1/4 cup cilantro (chopped)

Pico de Gallo

  • 2 roma tomatoes (diced)
  • 1/4 cup red onions (diced)
  • 1/2 cup cilantro (chopped)
  • 1 each lime (juiced)
  • 1/4 teaspoon salt

Other Ingredients

  • 4 cups spring mix
  • 4 tostada shells

Instructions
 

  • Place the pork shoulder in the bottom of the instant pot. Sprinkle in the seasonings and add the red onions, garlic cloves, and chopped cilantro. Squeeze in the orange juice and lime juice. Leave the peels in the pot and pour in the water.
  • Cover the instant pot with the lid making sure it is in the sealed position. Cook on medium setting for 45 minutes (Note: if you do not have an instant pot, you can use a slow cooker on high for 4 to 6 hours)
  • Meanwhile, in a small bowl, mix together the ingredients for the pico de gallo.
  • After the pork cooks, carefully release the steam. Separate the pork from the excess liquid. Use two forks to shred the pork into small pieces. Serve the pork carnitas on top of tostada shells with pico de gallo and a side salad.

Similar Recipes

chicken soup

One Pot Mexican Chicken Soup

sweet potato blt

Sweet Potato BLT Sandwich

Grilled Honey Dijon Chicken Kale Salad

You Might Also Like

Frequently Asked Questions

Can I make slow cooker carnitas?

Yes, you can cook it on low for 8-10 hours or on high for 6 to 7 hours.


What are other ways to use carnitas?

You can serve them in burritos, in quesadillas, or make sliders with them. They are also a delicious filling for scrambled eggs or omelettes.


What is the difference between carnitas and barbacoa?

Carnitas is made with pork while barbacoa is normally made with beef cheek.

Posted on Leave a comment

Steak Wrap with Air Fryer Eggplant Fries

steak wrap

Thinly sliced steak in a flatbread wrap served with crispy and golden Air Fryer Eggplant Fries!

This post may contain affiliate links. Please see our privacy policy for details.

White rectangle plate with breaded eggplant fires and a steak wrap with yogurt sauce.

This recipe is packed full of protein and nutrients and tastes like a delicious meal you ordered from a fancy restaurant.

The PrepYoSelf Newsletter

Steak Wrap Ingredients

  • Sirloin Steak: Purchase thinly sliced sirloin steak. You can also use flank steak or any steak of your choice.
  • Seasonings: We used garlic powder, dried oregano, and salt.
  • Veggies: We added sliced red onions, tomatoes, and baby spinach.
  • Flatbread Wraps: If you can’t find flatbread wraps, you can substitute with regular tortilla wraps or a pita.

White rectangle plate with breaded eggplant fires and a steak wrap with yogurt sauce.

Air Fryer Eggplant Fries

  • Eggplant: Instead of regular potato fries, we wanted to use another kind of vegetable with our wrap, so we used eggplant. You can also slice up portobello mushrooms, yellow squash, or zucchini.
  • Eggs: This ingredient will help bind the breadcrumbs to the eggplant.
  • Breadcrumbs: You can use any kind such as panko breadcrumbs.
  • Seasonings: We used the same seasonings from the steak seasonings.

White rectangle plate with breaded eggplant fires and a steak wrap with yogurt sauce.

How to Make a Steak Wrap with Eggplant Fries

For this recipe, you are making the main dish, the side dish, and the sauce. We started with the Eggplant Fries first. Meanwhile, we marinated steak and cooked it on the indoor grill. While everything is cooking, we mixed up our yogurt sauce. Here are the three main components of this recipe:

Air Fryer Eggplant Fries

  1. Prepare the breadcrumb mixture: Whisk together the eggs with a little bit of water in one shallow bowl. In another bowl, mix together the breadcrumbs and seasonings
  2. Cut the eggplant: Slice the eggplant lengthwise into “french fry strips”
  3. Apply the breadcrumbs: Dip the eggplant in the egg mixture, then dredge it in the breadcrumbs
  4. Place in the Air Fryer: Arrange the fries in a single layer and spray with cooking spray. Cook until it is golden brown

Steak Wrap

  1. Heat an indoor grill on medium-high heat.
  2. Meanwhile, season the steak and coat it with olive oil.
  3. Sear the steak on the indoor grill on each side for a few minutes until you reach your desired doneness.
  4. Let the steak rest before slicing it into strips.
  5. Assemble your steak wrap with the toppings.

Yogurt Sauce

  1. In a small bowl, mix together the yogurt, lemon juice, and seasonings.
  2. You can also substitute the yogurt with sour cream or mayonnaise.
  3. Feel free to also add finely diced cucumbers, chopped fresh dill, or chopped chives to add more texture and flavors.

Reference the recipe card below for detailed instructions.

Glass meal prep containers with breaded eggplant fires and a steak wrap with yogurt sauce.

Meal Prep Tips for A Steak Wrap and Eggplant Fries

  • Steak: Use thinly cut steak for this recipe so that it cooks quickly. You can also purchase seak and cut it into thin strips
  • Prepping thick steaks: If you have a meat mallet, you can pound thick steaks into 1/2 inch thickness
  • Wrap: If you don’t want to use a flatbread wrap, you can also use a lettuce wrap or serve the steak on top of salad mix for a lower carb option
  • Cook method variations: If you don’t have an Air Fryer, bake the eggplant fries in the oven at 425F and cook it for about 15 minutes, flipping the fries halfway through.
  • Reheating Eggplant Fries: It is best to reheat them in the Air Fryer at 350F for 2 to 3 minutes. Otherwise, they may become soggy if reheated in the microwave.

Plate with breaded eggplant fires and a steak wrap with yogurt sauce.

steak wrap

Steak Wrap with Air Fryer Eggplant Fries

Easy delicious Steak Wrap with crispy and golden brown Air Fryer Eggplant Fries
No ratings yet
Prep Time 5 minutes
Cook Time 20 minutes
Course lunch, Main Course
Cuisine American, Mediterranean
Servings 2

Equipment

  • knife
  • cutting board
  • mixing bowl
  • shallow plate
  • indoor grill pan
  • Air Fryer

Ingredients
  

Steak Wrap

  • 12 oz sirloin steak (thinly sliced)
  • 1/4 teaspoon garlic powder
  • 1/4 teaspoon dried oregano
  • 1/4 teaspoon salt
  • 1 tablespoon olive oil
  • 1/4 cup red onions (sliced)
  • 1 roma tomato (sliced)
  • 1 cup baby spinach
  • 2 flatbread wraps

Air Fryer Eggplant

  • 1/2 eggplant
  • 2 large eggs
  • 1 cup breadcrumbs
  • 1/2 teaspoon dried oregano
  • 1/2 teaspoon garlic powder
  • 1/2 teaspoon salt
  • cooking spray

Yogurt Sauce

  • 1/2 cup yogurt
  • 1 lemon (juiced)
  • 1/4 teaspoon garlic powder
  • 1/4 teaspoon salt

Instructions
 

Eggplant Fries

  • In one shallow bowl, whisk together the eggs with 1/2 cup of water. In another shallow plate, mix together the breadcrumbs and seasonings.
  • Cut the eggplant lengthwise into 5 inch strips that are 1/2 inch thick. Dip the eggplant in the egg mixture, then dredge it in the breadcrumbs.
  • Arrange the coated eggplant in a single layer in the air fryer basket and spray with cooking spray on all sides. Cook in the air fryer for about 8 minutes at 375F until golden brown

Yogurt Sauce

  • In a small mixing bowl, add the yogurt and squeeze in lemon juice. Add the seasonings and mix well.

Steak Wrap

  • Meanwhile, marinate the steak with the seasonings and coat it with olive oil.
  • Heat an indoor grill pan on medium high heat and grill the steak on each side for about 3 to 5 minutes until it is fully cooked and reaches an internal temperature of 145F. Let the steak rest before slicing it into small strips
  • Spread some of the yogurt sauce on the flatbread and add the baby spinach. Layer the steak slices, sliced tomato, and sliced red onions on top. Serve with the eggplant fries and yogurt dipping sauce.

Similar Recipes

cilantro steak

Grilled Cilantro Skirt Steak with Cauliflower Rice

balsamic steak

Grilled Steak with Sweet Potato Wedges

beef and chinese broccoli

Garlicky Beef Stir Fry with Chinese Broccoli

You Might Also Like

Frequently Asked Questions

What are the health benefits of eggplant?

It is a low-calorie vegetable that provides fiber and a range of nutrients such as copper, manganese, and thiamine.


How to pick eggplant?

Pick an eggplant that is slightly firm, but not hard with a nice purple color on the outside.


Do I need to peel my eggplant?

No, the skin is entirely edible and provides many nutrients. However, some prefer to peel the eggplant because it can be tough with some larger eggplants.

Posted on Leave a comment

Cranberry Oatmeal Muffin Bars

cranberry oat muffins

These fruity cranberry oatmeal muffin bars are a treat that you can enjoy for breakfast, snacks, and even dessert!

This post may contain affiliate links. Please see our privacy policy for details.

White plate with cranberry oatmeal muffin bars.

We enjoy prepping make ahead breakfasts for the week so that we always have something on hand to start off the day with fuel and energy. And actually, the cranberries, oats, and a pinch of cinnamon make this recipe enjoyable to eat any time of they day.

Why are these cranberry oat bars healthy?

  • Rolled oats are a type of whole grain that provides a good source of fiber and nutrients
  • Cranberries are a rich source of vitamin C which is good for your skin, muscles, and bones
  • These are two healthy ingredients that you should stock up on as a solo cook

The PrepYoSelf Newsletter

Simple Ingredients for Cranberry Oatmeal Muffin Bars

We use common ingredients that you could easily have on hand. The main ingredients are rolled oats, eggs, and some sort of liquid.

  • Rolled oats: We used rolled oats for this recipe, but you could easily use quick-cooking oats. Using the oats gives some texture versus only using flour
  • Flour: You could omit the flour, however, we like incorporating just a small amount because it helps provide the muffin-like texture
  • Eggs: Eggs play an important role in baking since they help provide structure, add moisture, and act as a glue
  • Sweetener: You can use regular sugar, honey, or maple syrup
  • Applesauce: Applesauce is a great fat replacer in many baked goods. The moisture also will keep most baked goods moist and fresh longer
  • Cranberries and orange juice: Adding fruit to your baked goods is a great way to add fiber and additional vitamins and nutrients

Mixing bowls that include the ingredients for cranberry oatmeal muffin bars, such as, cranberries, egg, sugar, rolled oats, flour, orange, and olive oil

How to Prepare Oatmeal Muffin Bars for One:

  1. Preheat the oven to 400F. Grease your baking dish.
  2. In a mixing bowl, mix together your wet ingredients: egg, applesauce, orange juice, and maple syrup.
  3. Next add your dry ingredients: flour, oats, baking soda, and baking powder.
  4. Then, fold the cranberries into the batter.
  5. Finally, pour the batter into the baking dish and bake in the oven until the center is fully cooked.

Reference the recipe card below for detailed instructions.

A small baking dish with a golden brown cranberry oatmeal muffin bar.

Meal Prep Tips for Cranberry Oat Muffin Bars:

  • Other Fillings: Add chopped nuts, dried fruit, nut butter, or chia seeds
  • Other Prep Methods: You can also pour the batter into a small muffin pan and make separate portions
  • To Serve: Enjoy these muffin bars with yogurt. To repurpose them, you can also crumble them up and use them as a yogurt topping
  • Storage: Store them in an air-tight container or Ziploc bags in the refrigerator for up to 3 to 4 days
  • To Reheat: Heat them in the microwave until they warm through

Baking dish with cranberry muffins surrounded by other dishes stored in glass meal prep containers.

cranberry muffin

Cranberry Oatmeal Muffin Bars

Decadent cranberry oatmeal muffin bars that are easy to make and even more enjoyable to eat!
No ratings yet
Prep Time 5 minutes
Cook Time 15 minutes
Course Breakfast, Snack
Cuisine American
Servings 2

Equipment

  • mixing bowl
  • baking dish
  • oven

Ingredients
  

  • 1 large egg
  • 2 tablespoons maple syrup
  • 1 orange (juiced)
  • 1/4 cup applesauce
  • 1/4 cup flour
  • 1/2 cup rolled oats
  • 1/2 cup fresh cranberries (chopped)
  • 1/4 teaspoon baking soda
  • 1/4 teaspoon baking powder
  • 1 teaspoon olive oil

Instructions
 

  • Pre-heat the oven to 400F
  • In a mixing bowl, whisk together the eggs, sugar, and juice of one orange
  • Next, add the flour, oats, baking powder, and baking soda and mix well
  • Then, add the cranberries and fold them into the batter
  • Grease a baking dish with olive oil and pour in the batter
  • Bake in the oven for 15-20 minutes

Notes

Substitutions: If you don’t have fresh cranberries, you can use dried cranberries

Similar Recipes

baked oatmeal

Oven Baked Oats with Apricots and Berries

ricotta apple

Oven Baked Apple with Ricotta and Walnuts

french toast 2

Oven Baked French Toast Muffins with Strawberries

You Might Also Like

Smartfruit Mellow Mango + Immunity, 100% Real Fruit Purée

Trader Joe’s Unsalted, Dry Toasted Slivered Almonds

Trader Joe’s the Dark Chocolate Lover’s Chocolate Bar

Frequently Asked Questions

Is maple sugar healthier than sugar?

Although maple sugar is still high in sugar it has a lower glycemic index than table sugar. This could raise blood sugar slower than regular sugar.


Can I use frozen fruit?

Yes, any type of fillings will work well. If using frozen fruit, you don’t have to thaw it out before you mix it into the batter.


Can I use instant oatmeal for baking?

Yes, you can use rolled oats and instant oatmeal interchangeably in most baked oatmeal recipes.

Posted on

Sept 12 Weekly Meal Plan

beef sliders and coleslaw

Make sure to go to How this page works first if you haven’t yet.

Set Your Pace

  • If you’re a beginner at meal prep: Be prepared to set aside 2-3 hours. Once mise en place is complete, all of these recipes can be completed one by one.
  • If you’re a meal prep pro, use the sequenced steps below: These steps give you the flexibility to cook items simultaneously in a sequence of events.
  • Be sure to set timers and check on food items to avoid overcooking. Sequencing will save you time and meal prep can be done in 1-2 hours.

Meal Prep Run Down

  1. Preheat the oven to 400F.
  2. First, prepare the barley on the stovetop.
  3. Next, microwave one of the sweet potatoes.
  4. Afterward, start cooking the chuck roast in the Instant Pot since this will take the longest to cook.
  5. Meanwhile, start preparing the tilapia, broccolini, and diced sweet potato. Place them on sheet pans and bake them in the oven.
  6. Then, start cooking the chicken marinara on the stovetop and grill the chicken tenderloins.
  7. Lastly, prepare the omelette and pancakes on the stovetop.
  8. When everything is finished cooking, plate everything up in containers, and let them cool before refrigerating.

If you’re sequencing your meal prep, be sure to keep an eye on everything! Make sure food is kept refrigerated under 40F degrees until ready to eat.

Assembly Tips

  • Evenly divide meals according to the serving size
  • Let all items cool before placing them in the refrigerator
  • Keep all items refrigerated under 40F until ready to eat or reheat
  • Breakfast: Both meals can be reheated in the oven. The blueberries can be served chilled
  • Lunch: The chicken and beef can be reheated in the microwave, while the kale salad and coleslaw can be served chilled
  • Dinner: Both meals can be reheated in the microwave

Extra Flavors and Substitutions

  • Blueberries: You can substitute with raspberries
  • Chicken Tenderloins: You can also use chicken breasts
  • Broccolini: You can also use regular broccoli
  • Kale: You can also use baby spinach
  • Supplement meals with additional snacks such as fresh veggies and fruit for additional daily caloric needs. You can use lime/lemon and olive oil in place of salad dressing

Extra Leftover Ingredients Not Used

  • Protein: Freeze any uncooked meats and save for a later recipe, or you can cook the full amount, and freeze the portion that you do not eat, and save for later use.
  • Fruit: Use leftover fruit in smoothies, on top of yogurt, or with your cereal
  • Veggies: Freeze any leftover veggies for later use. Use leftover herbs in omelets or other dishes for the weekend

What Else

How This Page Works
Meal Prep 101
Weekly Meal Plans
Specialty Diets
Recipe Inspirations
Helpful Resources

Posted on Leave a comment

Easy Cauliflower Fried Rice

cauliflower rice

Easy, high protein, vegetarian cauliflower fried rice made in less than 15 minutes!

This post may contain affiliate links. Please see our privacy policy for details.

Round plate with a colorful cauliflower fried rice with peas, carrots, and shredded cabbage.

If you’re la huge cauliflower fan and love seeing it incorporated in tasty ways, then, you’ll appreciate this vegetarian “fried rice” recipe. Here’s why you’ll enjoy this recipe:

  • Super quick and simple, but still healthy and delicious at the same time
  • It’s a great high-protein vegetarian recipe
  • And..it’s fried rice without the guilt!

The PrepYoSelf Newsletter

To Prepare This Cauliflower Fried Rice, You’ll Need

  • Cauliflower Rice: You can make your own cauliflower rice, but to save time you can use pre-cut packaged options that can be found in the produce aisle or in the frozen section
  • Frozen Peas: You can use canned peas or frozen peas.
  • Shredded Carrots and Red Cabbage: These two ingredients add a variety of nutrients, but they also add beautiful colors to this dish
  • Aromatics: We used red onions and garlic, but you can also add green onions or shallots for this recipe
  • Seasonings: We seasoned our fried rice with coco aminos and sesame oil, but you can use regular soy sauce. If you want to add heat, you can also add chili oil

Round plate with a colorful cauliflower fried rice with peas, carrots, and shredded cabbage.

How to Make Cauliflower Fried Rice in Less Than 15 Minutes

  1. Add oil to a heated wok and stir fry the onions and garlic.
  2. Next, add the cauliflower rice and stir until they soften. Sprinkle with the seasonings.
  3. Finally, add the peas, carrots, cabbage, sesame oil, and coco aminos.
  4. Stir everything around.

Reference the recipe card below for detailed instructions.

Round plate with a colorful cauliflower fried rice with peas, carrots, and shredded cabbage.

Meal Prep Tips for Cauliflower Fried Rice

  • Vegetables: We used carrots and red cabbage, but you can use any kind of vegetables that you have on hand. Broccoli is also a good vegetable with a high amount of protein
  • Nuts: You can also add nuts for more protein such as cashews or peanuts
  • Herbs: To add flavor, you can also garnish with chopped green onions or fresh sliced basil leaves
  • Coco aminos: You can also substitute this with regular soy sauce
  • Added Protein: You can also add scrambled eggs to this recipe for more protein (note: adding eggs will turn the recipe into a vegetarian recipe instead of a vegan recipe)

Round plate with a colorful cauliflower fried rice with peas, carrots, and shredded cabbage.

cauliflower fried rice

Cauliflower Fried Rice

No ratings yet
Prep Time 5 minutes
Cook Time 15 minutes
Course Main Course
Cuisine American, Asian
Servings 2

Equipment

  • knife
  • cutting board
  • saute pan
  • spatula

Ingredients
  

  • 4 cups cauliflower rice
  • 1 cup frozen peas
  • 1 cup shredded carrots
  • 1/4 cup shredded red cabbage
  • 1/2 cup red onions (diced)
  • 2 cloves garlic (minced)
  • 1/4 cup coco aminos
  • 1/4 teaspoon onion powder
  • 1/4 teaspoon garlic powder
  • 1/4 teaspoon pepper
  • 1 teaspoon sesame oil
  • 1 tablespoon olive oil

Instructions
 

  • Add 2 tbsp of olive oil to the saute pan on medium-high heat, then add the red onion, and garlic and saute until wilted.
  • Then add the cauliflower and saute for 5 to 7 minutes until softened. Season with garlic powder, onion powder, and pepper.
  • Finally, add the peas, shredded carrots, red cabbage, sesame oil, and coco aminos (or soy sauce). Stir all ingredients well for another 5 minutes.

Similar Recipes

pineapple bbq chicken

Pineapple BBQ Chicken with Cauliflower Rice

cilantro steak

Cilantro Steak with Cauliflower Rice

ground beef

Sauteed Ground Beef with Peas and Carrots

You Might Also Like

Joel Gott Sauvignon Blanc White Wine

Amazon Brand – Happy Belly Roasted and Salted Peanuts

Trader joe’s Chili Onion Crunch

Frequently Asked Questions

Are peas high in protein?

Peas are a legume so they are a good source of protein. They provide about 2 grams of protein for ½ cup of serving.


Are peas good for weight loss?

They are relatively low in calories and packed with fiber and protein which is a great option for weight-loss diets.


What are the benefits of eating peas?

They are a good source of vitamins C, E, zinc, and antioxidants that can help strengthen your immune system along with a balanced diet.

Posted on Leave a comment

Baked Pine Nut Crusted Tilapia with Spinach

pine nut fish and spinach

If you’re looking for a low-carb, keto-friendly meal, then you’ll enjoy this healthy baked white fish with a pinenut crust served with sauteed spinach.

This post may contain affiliate links. Read the disclosure policy.

Round plate with baked pine nut crusted tilapia with sauteed spinach.

Meal prepping can help you learn more about nutrition and how to treat food as fuel. Here’s a simple meal prep idea that you can prep for the week and keep you on a healthy eating track.

This baked fish is a good source of protein. Adding the pine nut crust provides a good source of healthy fats and also adds a flavorful crunch against the soft, flaky white fish.

The PrepYoSelf Newsletter

Here’s What You Need

  • Tilapia: You can use any kind of white fish such as cod, grouper, or halibut
  • Pine Nuts: Pine nuts contain a variety of nutrients and antioxidants that can contribute to heart health
  • Spinach: Spinach is also a good source of fiber and vitamins
  • Dijon Mustard: This helps the pine nuts stick to the fish while baking and it also adds a layer of flavor

Round plate with baked pine nut crusted tilapia with sauteed spinach.

How to Bake Pine Nut Crusted Tilapia

  1. Pre-heat the oven to 400F.
  2. Pine Nut Crust: Insert nuts, chives, olive oil, and seasonings inside a plastic bag. Use a mallet or small pan to crush the pine nuts into crumbs.
  3. Prep the Tilapia: Spread dijon mustard on top of each fillet and top it off with the pine nut mixture.
  4. Bake the Tilapia: Bake it in the oven until it is fully cooked and the crust is golden brown.
  5. Spinach: Meanwhile, saute the spinach in a saute pan.

Reference the recipe card below for detailed instructions.

Glass meal prep container with baked pine nut crusted tilapia with sauteed spinach.

Meal Prep Tips for Pine Nut Crusted Tilapia

  • Air Fryer Tip: You can also cook the fish in an Air Fryer. Cook it at 400F for 7-9 minutes
  • To Serve: You can serve this dish with cauliflower rice or roasted yellow squash for additional servings of vegetables
  • To Store: Store in an airtight container in the refrigerator for up to 3 to 4 days.

Glass meal prep containers with baked pine nut crusted tilapia with sauteed spinach.

pine nut fish

Baked Pine Nut Crusted Tilapia with Sauteed Spinach

Try this low-carb baked white fish with a pine nut crust and sauteed spinach.
No ratings yet
Prep Time 5 minutes
Cook Time 20 minutes
Course dinner, Main Course
Cuisine American
Servings 2

Equipment

  • knife
  • cutting board
  • spatula
  • saute pan
  • sheet pan
  • oven

Ingredients
  

Tilapia

  • 12 oz tilapia filets
  • 3 tablespoons pine nuts
  • 2 tablespoons chives (chopped)
  • 1/4 teaspoon paprika
  • 1/4 teaspoon garlic powder
  • 1/4 teaspoon salt
  • 1/4 teaspoon pepper
  • 1 tablespoon dijon mustard
  • 1 teaspoon olive oil

Spinach

  • 6 cups baby spinach
  • 1/4 teaspoon garlic powder
  • 1/4 teaspoon salt
  • 1 teaspoon olive oil

Instructions
 

  • Pre-heat the oven to 400F. In a small plastic bag, add the pine nuts, chopped chives, olive oil, paprika, garlic powder, salt. Use mallet or small pan to crush the pine nuts into crumbs.
  • Place the tilapia fillets on a sheet pan and spread the dijon mustard on top of each fillet. Sprinkle the pinenut mixture on top and pat it down, making sure the whole fillet is covered. Bake it in the oven for 12 to 15 minutes,
  • Meanwhile, add oil to a saute pan on medium-high heat and saute the spinach until it wilts. Season with garlic powder and salt.
  • After the tilapia bakes, carefully remove it from the oven and serve with the sauteed spinach

Similar Recipes

ginger salmon

Oven Baked Orange Ginger Salmon and Snow Peas

shrimp and asparagus

Oven Baked Shrimp with Panko Breaded Asparagus

salmon beet salad

Citrus Ginger Salmon Spinach Salad with Roasted Beets

You Might Also Like

Frequently Asked Questions

What benefits do pine nuts have?

They are rich in antioxidants and anti-inflammatory compounds that promote heart health and also help improve blood glucose control.


What if I don’t have pine nuts?

You can also use chopped almonds in place of pine nuts.


What can I serve with this meal?

You can also serve this with roasted potatoes, rice pilaf, or your favorite side salad. If you want to keep it low-carb, serve it with cauliflower rice.

Posted on Leave a comment

Grilled Balsamic Steak Salad with Sweet Potato

balsamic steak

Some things are just meant to be just like this Balsamic Glazed Steak Salad with Savory Sweet Potato Wedges!

This post may contain affiliate links. Please see our privacy policy for details.

Round plate with grilled steak and sweet potato wedges on top of spring mix salad with cherry tomatoes.

Prepping tasty meals can be challenging, especially if you’re short on time. But meal prepping in advance can help set you up for success during the week. You’ll be able to enjoy tasty wholesome meals during your busy work week.

This steak dinner is rich in iron, Vitamin C, and fiber. Adding balsamic vinegar to the steak marinade is an easy way to add flavor to your steak. Baking the sweet potato wedges saves you from unnecessary calories from cooking it in the deep fryer.

The PrepYoSelf Newsletter

Ingredients for Easy Steak Salad and Sweet Potato

  • Steak: We splurged a bit and used NY Strip steak because of its intense and bold beef flavors. It’s not the most tender steak, but it still gives a robust flavor. However, you can use your choice of steak
  • Sweet Potato: Steak always goes well with potatoes, but we wanted to incorporate some Vitamin A which is found in sweet potatoes. It also has a lower glycemic index than regular potatoes making it carb-friendly
  • Balsamic Glaze and Seasonings: If you don’t have a balsamic glaze, you can also use a mixture of honey and soy sauce. The glaze gives the steak a good sear, char, and caramelization from grilling it on the pan
  • Salad Mix: We went with a spring mix that contains a mix of tender baby lettuce, spinach, and sometimes red and green romaine. However, you can go with whatever salad mix you have on hand

Round plate with grilled steak and sweet potato wedges on top of spring mix salad with cherry tomatoes.

How to Make Steak Salad and Baked Sweet Potato Wedges

  1. Pre-heat the oven to 400F.
  2. Prep the sweet potato by slicing it into wedges and baking them in the oven.
  3. Meanwhile, marinate the steak with balsamic glaze, olive oil, and seasonings.
  4. Heat the grill on medium-high heat. Sear the steak on each side until you reach your desired doneness.
  5. Serve the salad with your choice of salad dressing.

Reference the recipe card below for detailed instructions.

Glass meal prep container with grilled steak and sweet potato wedges on top of spring mix salad with cherry tomatoes.

Meal Prep Tips for Balsamic Steak and Sweet Potatoes

  • Cooking option: If you have an Air Fryer, you can also air fry the seasoned sweet potato wedges at 350F for 8 minutes
  • Glaze: You can make your own homemade salad dressing by mixing together the following: 1/4 cup balsamic glaze, 1/4 cup olive oil, 1 tbsp honey, 1 tbsp dijon mustard, 1/4 tsp thyme, 1/4 tsp garlic powder, 1/4 tsp salt. Save it in a glass jar and store it in the fridge. It will keep well for up to 2 weeks. Just be sure to give it a shake before serving.
  • To Store: This meal can be stored in an air-tight container in the refrigerator for up to 3 to 4 days.

Glass meal prep containers with grilled steak and sweet potato wedges on top of spring mix salad with cherry tomatoes.

steak and sweet potato

Grilled Balsamic Steak Salad with Roasted Sweet Potato Wedges

Sizzling balsamic steak dinner with roasted sweet potatoes served with a fresh green salad.
No ratings yet
Prep Time 5 minutes
Cook Time 20 minutes
Course lunch, Main Course
Cuisine American
Servings 2

Equipment

  • knife
  • cutting board
  • grill pan
  • sheet pan
  • oven

Ingredients
  

  • 12 oz NY strip steak (6 oz each, thinly sliced)
  • 1/2 teaspoon paprika
  • 1/2 teaspoon garlic powder
  • 1/2 teaspoon salt
  • 1 tablespoon balsamic glaze
  • 2 tablespoons olive oil
  • 2 small sweet potatoes
  • 4 cups spring mix salad
  • 4 tablespoons your choice of salad dressing
  • 1/4 cup cherry tomatoes (sliced)

Instructions
 

  • Preheat the oven to 400F. Mix together the paprika, garlic powder, and salt in a small bowl.
  • Peel the sweet potato, and slice it into 1/2 inch wedges. Layer the wedges on a sheet pan and sprinkle with half of the seasoning and coat with half of the olive oil. Place the sheet pan in the oven and roast in the oven for about 20 minutes until the sweet potato wedges are crispy.
  • Meanwhile, place the steak in a mixing bowl and season with the rest of the seasoning mix. Then, drizzle it with balsamic glaze and olive oil. Mix it all around until the steak is fully coated with the seasonings and balsamic glaze.
  • Heat a grill pan on medium high heat and grill the steak on each side for about 3 to 5 minutes until you reach your desired donness.
  • Serve the steak and sweet potatoes with a side salad and your choice of salad dressing.

Similar Recipes

sweet potato blt

Sweet Potato BLT Sandwich

balsamic chicken salad

Oven Baked Balsamic Chicken Salad

chicken salad

Oven Baked Honey Mustard Glazed Chicken Salad

You Might Also Like

Frequently Asked Questions

What meat compliments sweet potato?

Other than beef, chicken and pork taste delicious with sweet potatoes. 


What else goes well with sweet potato wedges?

You can serve it with baked chicken strips, deli sandwiches, or even make chili fries.


What is balsamic glaze good on?

You can drizzle this glaze on other grilled vegetables, toasted bruschetta, and even on top of juicy strawberries and as a sauce for vanilla ice cream.