Posted on Leave a comment

Portobello Mushroom Egg Bake

Hey there, breakfast lovers! I’m here to share with you an absolutely scrumptious recipe that will make your taste buds dance with joy: the Portobello Mushroom Egg Bake! Trust me, this dish is a game-changer when it comes to easy, tasty, and nutritious breakfasts that are perfect for meal prep. This breakfast dish is also a fantastic low-carb option for breakfast that will keep you feeling satisfied until lunchtime.

This post may contain affiliate links. Please see our privacy policy for details.

round plate with portobello mushroom baked with a egg and topped with sun-dried tomato slices and fresh basil.

Why this meal is a great low-carb breakfast option:

By choosing a low-carb breakfast option like the Portobello Mushroom Egg Bake, you’re fueling your body with the right nutrients to keep you feeling satisfied and energized until lunchtime. It’s a delicious way to kickstart your day while keeping your carb intake in check, and here’s why:

  • Portobello mushrooms are naturally low in carbohydrates, making them an excellent choice for those following a low-carb or keto lifestyle. By using mushrooms as the base of the egg bake instead of bread or other high-carb ingredients, you can enjoy a delicious and filling breakfast without the excess carbs.
  • Eggs are an excellent source of high-quality protein. Protein is known to promote feelings of fullness and can help curb cravings throughout the day. 
  • The Portobello mushrooms used in this recipe are not only low in carbs but also high in dietary fiber. Fiber adds bulk to your meal, slows down digestion, and helps you feel fuller for longer. This means that incorporating mushrooms into your breakfast will not only provide great flavor and texture but also contribute to keeping you satiated throughout the morning.
  • If you choose to add some healthy fats to your Portobello Mushroom Egg Bake, such as a drizzle of olive oil or sliced avocados, they can further enhance the satiety factor. Fats take longer to digest, providing a sustained release of energy and helping to keep hunger at bay.
  • The balance of low carbs, high protein, and healthy fats in the Portobello Mushroom Egg Bake creates a well-rounded and balanced meal that can help maintain steady blood sugar levels, which can help prevent energy crashes and cravings later in the day.

The PrepYoSelf Newsletter

Simple Ingredients You’ll Need

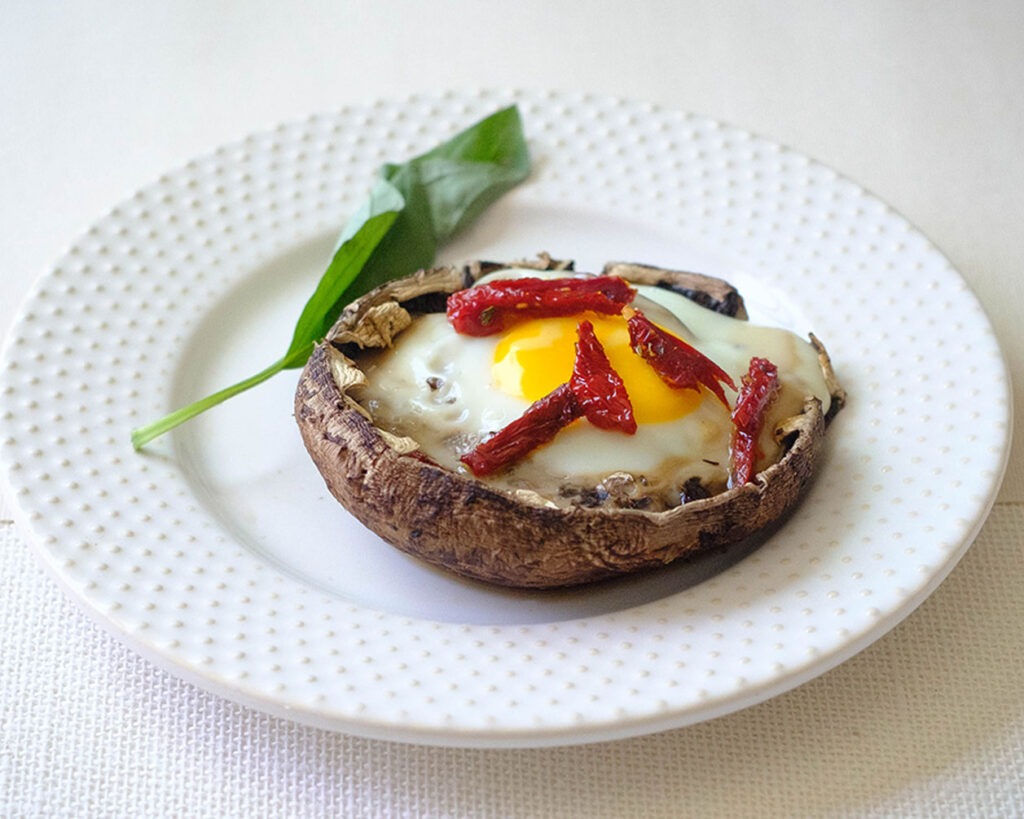
  • Portobello Mushrooms: This ingredient is the star of this recipe. These earthy delights are not only bursting with flavor but also packed with essential nutrients. Plus, their hearty texture and savory taste make them a perfect replacement for meat in vegetarian meals.
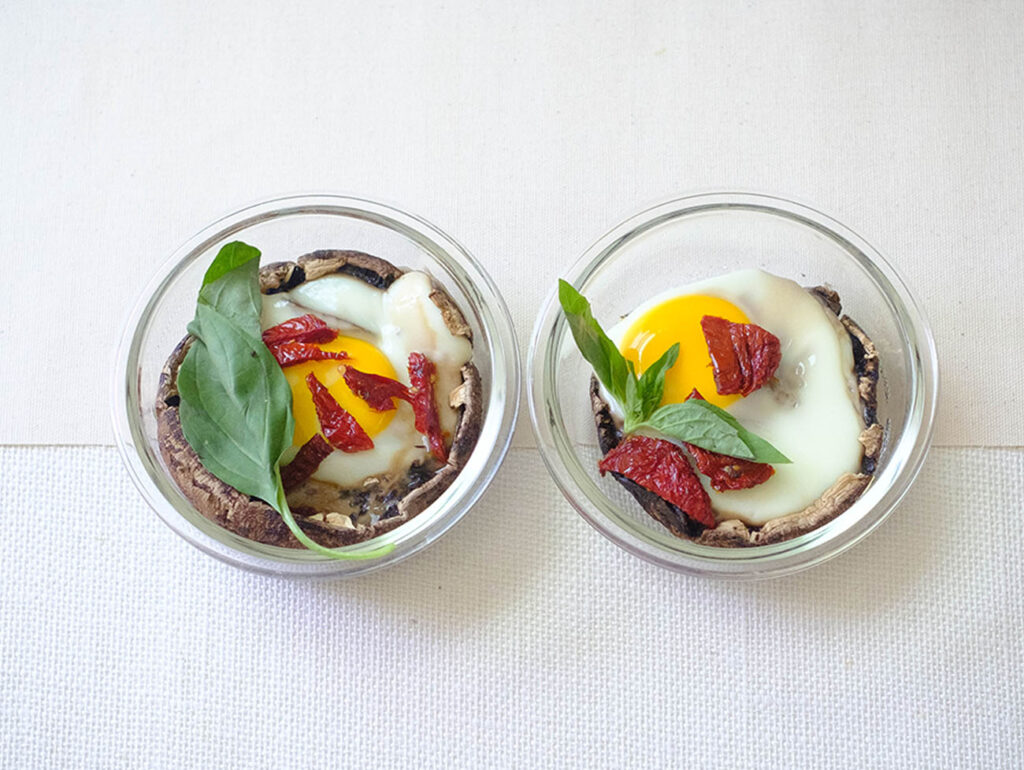
  • Eggs: Feel free to use 2 eggs per mushroom if you prefer more protein
  • Sun-dried tomatoes: We used harissa to add some heat and smoky flavors, but you can easily use another kind of chili sauce such as sriracha. 
  • Fresh Basil Leaves: We made our pistachio pesto from scratch, however, you can use any kind of store-bought pesto such as basil pesto.
round glass prep bowls with portobello mushroom baked with a egg and topped with sun-dried tomato slices and fresh basil.

How to Make Portobello Mushroom Egg Bake

Now, let’s talk about why this Portobello Mushroom Egg Bake is a fantastic option for meal prep, especially for those who prefer single-serving portions. First and foremost, this recipe is incredibly easy to make. You can whip it up in no time, and it requires only a handful of simple ingredients that you probably already have in your kitchen. Convenience is key when it comes to meal prep, right?

Here’s how to make this easy breakfast dish.

  1. Preheat the oven to 400F.
  2. Wipe the portobello mushrooms clean with a wet paper towel. Use a spoon to scrape out the inside ribs.
  3. Coat the portobello mushrooms with a little bit of olive oil and place the mushroom caps on a sheet pan with the flesh facing up.
  4. Crack an egg in the middle of the portobello mushrooms and season with salt.
  5. Bake the mushrooms in the oven for 12 to 15 minutes until the egg whites are set.
  6. Once they are cooked, garnish them with sliced sun-dried tomatoes and basil leaves for added flavor.

Reference the recipe card below for detailed instructions.

round glass prep bowls with portobello mushroom baked with a egg and topped with sun-dried tomato slices and fresh basil.

Meal Prep Tips for This Breakfast Dish

  • The beauty of this recipe lies in its versatility. You can prepare multiple portions of the Portobello Mushroom Egg Bake ahead of time, storing them in the refrigerator for up to four days. When you’re ready to enjoy a delicious and hassle-free breakfast, simply pop a portion in the microwave or oven to reheat. 
  • When it comes to serving, feel free to get creative! You can enjoy the Portobello Mushroom Egg Bake as is, or pair it with your favorite sides. Try adding a side of avocado slices, a dollop of Greek yogurt, or a sprinkle of fresh herbs to elevate the flavors. The possibilities are endless, so don’t be afraid to experiment and make it your own!
  • Now, let me share one last tip with you. If you’re a busy bee like me, prepping the mushrooms ahead of time can be a time-saver. Clean and slice your portobello mushrooms in advance, storing them in a container in the refrigerator. This way, you’ll have them ready to go whenever you want to whip up another batch of this fantastic Portobello Mushroom Egg Bake.
round plate with portobello mushroom baked with a egg and topped with sun-dried tomato slices and fresh basil.
Mushroom and Eggs

Oven Baked Egg and Portobello Mushrooms

No ratings yet
Prep Time 5 minutes
Cook Time 15 minutes
Course Breakfast
Cuisine American
Servings 2

Equipment

  • knife
  • cutting board
  • sheet pan
  • oven

Ingredients
  

  • 2 each large eggs
  • 2 each portobello mushrooms
  • 2 tbsp sun-dried tomatoes (sliced)
  • 1/8 tsp salt
  • 2 each fresh basil leaves (thinly sliced)
  • 1 tbsp olive oil

Instructions
 

  • Pre-heat oven to 400F. Wipe the portobello mushrooms clean with a wet paper towel. Use a spoon to scrape out the inside ribs
  • Coat the portobello mushrooms with the olive oil and place the portobolello mushrooms on a sheet pan. Crack an egg into each portobello and season with salt
  • Bake in the oven for 12 to 15 minutes until the egg whites set
  • Top it off with sliced sun-dried tomatoes and sliced basil leaves

Similar Recipes

fried egg and sausage hash

Fried Egg with Apple and Sausage Hash

Easy Cheese Omelette

easy sausage egg muffins

Sausage Egg Muffins with Strawberries

You Might Also Like

Frequently Asked Questions

Can I use regular mushrooms instead of Portobello mushrooms?

Absolutely! While the recipe is specifically designed for Portobello mushrooms, you can definitely substitute them with regular mushrooms if that’s what you have on hand. Just keep in mind that the texture and flavor may vary slightly.


Can I freeze the Portobello Mushroom Egg Bake?

While it’s technically possible to freeze this dish, the texture of the mushrooms and eggs may change upon thawing and reheating. For the best taste and texture, it’s recommended to store the Portobello Mushroom Egg Bake in the refrigerator for up to four days rather than freezing it.


Can I use egg substitutes or egg whites instead of whole eggs?

Yes, you can! If you prefer to use egg substitutes or egg whites, feel free to make the swap. The cooking time may be slightly different, so keep an eye on the bake to ensure the eggs are cooked through.

Posted on Leave a comment

Healthy Breakfast Pizza

Round plate with breakfast pizza that has egg topping, bell pepper, and red onions.

This breakfast pizza is a delicious and satisfying way to start your day. You’ll feel energized and ready to tackle whatever comes your way. And let’s face it, breakfast pizza is just plain fun to eat and it’s a healthy pizza!

This post may contain affiliate links. Please see our privacy policy for details.

Round plate with breakfast pizza that has egg topping, bell pepper, and red onions.

Why We Love Breakfast Pizza

  • Breakfast pizza can be a healthy pizza, if you choose nutritious ingredients. Start with a whole grain crust and lots of vegetables to boost the nutrients in your pizza.
  • Prepping it in advance makes it convenient for you to have a healthy option readily available for the mornings. You can store it in the refrigerator or freezer and just heat it up quickly for busy mornings when you don’t have time to prepare breakfast in the mornings.
  • Making it ahead of time also allows you to control the portion size especially if you’re trying to manage your calorie intake and maintain a balanced diet.
  • You also have the flexibility to add a variety of toppings such as eggs, sausage, cheese, vegetables, and herbs you have on hand.

The PrepYoSelf Newsletter

Simple Ingredients You’ll Need

  • Crust: We used a pre-made crust such as naan bread to help with portion control. You can also use pita bread or flatbreads as an option. It just depends on how thick you want your crust
  • Sauce: For the base of your toppings, you can spread tomato sauce. Other options you can use are pesto sauce or just even leave it bare with no sauce
  • Vegetables: We used bell peppers, red onions, and sliced tomatoes because of their nutrients and bright colors. However, feel free to spinach, sliced mushrooms, and even sliced zucchini.
  • Protein toppings: Since it’s breakfast pizza, we had to top it off with an egg, but you can easily add chopped breakfast sausage, bacon pieces, or even slices of prosciutto would be a delicious option
  • Cheese: opt for low-fat cheese or just make sure you only use a balanced portion of cheese to keep the fat and calorie content of your pizza in check. Mozzarella, feta cheese, and gruyere are great options
  • Herbs and spices: To add more flavor, sprinkle in some herbs and spices such as garlic powder, basil, oregano, or red pepper flakes. These ingredients add a layer of extra flavor without adding extra calories

Round plate with breakfast pizza that has egg topping, bell pepper, and red onions.

How to Make Breakfast Pizza

  1. Preheat the oven to 400F. Slice up your toppings as needed.
  2. Spread the base of the crust with tomato sauce.
  3. Crack the egg in the middle of each crust. Assemble the sliced veggies around the egg.
  4. Place the crust on a sheet pan and bake it in the oven for 15-20 minutes until the eggs are firmly set.

Reference the recipe card below for detailed instructions.

round plate with glass meal prep container with breakfast pizza with egg, naan bread, and vegetables

Meal Prep Tips for Breakfast Pizza

  • Use a good quality crust as it is the foundation of any great pizza. We used a pre-made crust to help with the time of prep.
  • Consider how you want your eggs cooked. If you like it runny, you can crack them directly into the pizza before you bake them. However, if you prefer firmer eggs, you can cook the eggs separately and then add them as a topping after the pizza cooks.
  • Experiment with different toppings. Instead of eggs, you can use smoked salmon and use cream cheese as your sauce base. Instead of a savory breakfast pizza, you can also make a sweet version such as a fruit breakfast pizza by using fruit and nut toppings, and maple syrup.

glass meal prep container with breakfast pizza with egg, naan bread, and vegetables

Round plate with breakfast pizza that has egg topping, bell pepper, and red onions.

Breakfast Pizza

Healthy Breakfast Pizza in less than 20 minutes. Start your day with a tasty bite!
No ratings yet
Prep Time 5 minutes
Cook Time 20 minutes
Course Breakfast
Cuisine American
Servings 2

Equipment

  • cutting board
  • knife
  • sheet pan
  • oven (or toaster oven/Air Fryer)

Ingredients
  

  • 2 large naan bread (or flatbread, 6 inches wide)
  • 1/4 cup red bell peppers (sliced)
  • 1/4 cup red onions (sliced)
  • 2 large eggs
  • 1/2 cup shredded mozzarella cheese
  • 2 tablespoons tomato sauce (optional)
  • 1/8 teaspoon garlic powder
  • 1/8 teaspoon salt

Instructions
 

  • Pre-heat the oven 400F. Use a spoon to spread the tomato sauce across the naan bread. Place the naan bread on a sheet pan.
  • Crack two eggs in the middle of each naan bread. Assemble the sliced bell peppers, onions, around the egg. Sprinkle with the seasoning.
  • Bake in the oven for about 15-20 minutes until the egg whites are firmly set and fully cooked. After it cooks, use a knife to cut it in half

Similar Recipes

pepper sandwich

Roasted Red Pepper and Cheese Sandwich

bean and corn taco

Vegetarian Black Bean and Corn Soft Tacos

eggplant

Grilled Eggplant Steaks with Marinara Sauce

You Might Also Like

Frequently Asked Questions

Is breakfast pizza healthy?

It can be healthy if made with nutritious ingredients. The key to keeping it healthy is limiting high fat, high fat, and high sodium ingredients and portion control.


Can breakfast pizza be frozen?

Yes, you can freeze breakfast pizza. Just make sure it is stored in tight plastic wrap in an airtight container. It’s best to use it up within 3 months for the best quality.


How do you reheat breakfast pizza?

You can place it in the oven at 350F for 5 to 7 minutes or you can just microwave it for 1-2 minutes

Posted on Leave a comment

Sheet Pan Chicken Fajita Lettuce Wraps

round plate with chicken fajita lettuce wrap and sliced mango

This post may contain affiliate links. Please see our privacy policy for details.

If you’re looking for a healthy lunch idea that also provides low cost meals, try these sheet pan chicken fajita lettuce wraps. They are easy to make and can be prepared quickly with just a few ingredients.

round plate with chicken fajita lettuce wrap and sliced mango - low cost meals

Why This Recipe Makes Low Cost Meals

Sheet pan chicken fajitas can be a low-cost meal that is great for meal prep for a few reasons:

  1. Simple budget-friendly ingredients: The ingredients needed for sheet pan chicken fajitas are generally affordable and easy to find. Chicken, bell peppers, onions, and basic spices are all relatively affordable, especially if purchased in bulk or on sale.
  2. Versatility: Sheet pan chicken fajitas can be customized to fit your budget and taste preferences. You can adjust the amount of chicken and vegetables you use, as well as the types of spices and herbs you like, depending on what you have on hand or what’s on sale at the grocery store.
  3. Simple cooking equipment: This recipe requires only a sheet pan and an oven, which are common kitchen items that most people already have. There is no need for any special equipment or appliances, which can help keep costs down.
  4. Leftovers: Sheet pan chicken fajitas also make great leftovers that can be repurposed into other meals such as salads, wraps, rice bowls, or quesadillas, which can help stretch your food budget even further.

The PrepYoSelf Newsletter

Ingredients for You’ll Need

Chicken fajita lettuce wraps can be a healthy lunch idea that provides a balanced mix of protein, fiber, vitamins and minerals, and healthy fats. By using fresh, whole ingredients and controlling the amount of added salt and fat, you can enjoy delicious and nutritious, low cost meals that supports overall health and well-being. Here are some ingredients that you’ll need to build this meal:

  1. Protein: Chicken is a great source of protein, which is important for building and repairing muscles, as well as for overall health.
  2. Vegetables: Chicken lettuce wraps typically include a variety of vegetables like bell peppers and red onions, which can provide fiber, vitamins, and minerals. Eating a variety of colorful vegetables can help support a healthy immune system, promote healthy digestion, and reduce the risk of chronic diseases.
  3. Low in carbohydrates: By using lettuce wraps, it can help lower carbohydrates. This can be beneficial for individuals who need to watch their carbohydrate intake due to health concerns like diabetes or insulin resistance.
  4. Low in saturated fat: By using minimal oil and healthy fats such as olive oil, in the cooking process, chicken fajita lettuce wraps can be low in saturated fat, which is important for heart health.
  5. Customizable: These lettuce wraps can be easily customized to fit your dietary needs and preferences. You can add or subtract ingredients based on your nutritional goals, and adjust the portion sizes to control calories.

chicken fajita wrap ingredients - low cost meals

How to Cook Sheet Pan Chicken Fajitas

  1. Preheat the oven to 400°F.
  2. In a large mixing bowl, combine the chicken, seasonings, and olive oil. Toss until everything is well coated.
  3. Spread the chicken, bell peppers, and red onions, evenly on a large sheet pan and bake for 20-25 minutes, or until the chicken is fully cooked and the vegetables are tender.
  4. Remove the sheet pan from the oven and let it cool for a few minutes. Dice, the chicken into small bite-size pieces.
  5. To assemble the lettuce wraps, spoon the chicken fajita mixture on to of the lettuce wraps
  6. Top each wrap with the fajita veggies. Feel free to serve these with additional toppings such as avocado, salsa, shredded cheese, or sour cream.

Reference the recipe card below for detailed instructions.

round plate with chicken fajita lettuce wrap and sliced mango - low cost meals

Prep Tips – Low Cost Meals

Following these meal prep tips, you can save time and have a nutritious and delicious meal ready to go throughout the week.

  • Prep the vegetables ahead of time: To save time, you can cut the bell peppers and onions ahead of time and store them in an airtight container in the refrigerator. This will make it easier to assemble the sheet pan when you’re ready to cook.
  • Make the fajita seasoning in advance: You can make the fajita seasoning in advance or you can purchase a pre-made seasoning mix. This will save time when it comes to assembling the recipe, as you can simply sprinkle the seasoning over the chicken and vegetables and mix them together.
  • Use portion control containers: Consider using portion control containers to measure out the chicken and vegetable portions. This will ensure that you have a balanced meal and prevent overeating. 
  • Add toppings later: If you plan to eat the sheet pan chicken fajitas later during the week, separate the toppings, such as the avocado or salsa, to prevent them from getting soggy.

chicken fajita wraps meal prepped in containers for low cost meals

round plate with chicken fajita lettuce wrap and sliced mango

Sheet Pan Chicken Fajita Lettuce Wraps

Sheet pan chicken fajitas are a delicious and easy-to-make meal that can be prepared quickly with just a few ingredients.
No ratings yet
Prep Time 5 minutes
Cook Time 20 minutes
Course lunch, Main Course
Cuisine Mexican
Servings 2

Equipment

  • knife
  • cutting board
  • sheet pan
  • oven

Ingredients
  

Chicken & Seasoning

  • 12 oz chicken tenderloins
  • 1/4 teaspoon chili powder
  • 1/4 teaspoon cumin
  • 1/4 teaspoon garlic powder
  • 1/4 teaspoon paprika
  • 1/4 teaspoon salt
  • 1 tablespoon olive oil

Fajita Veggies & Seasoning

  • 1 red bell pepper (sliced)
  • 1/4 cup red onions (sliced)
  • 1/4 teaspoon paprika
  • 1/4 teaspoon garlic powder
  • 1/4 teaspoon salt
  • 1 tablespoon olive oil

Optional Sides and Garnish

  • 1 mango (peeled and sliced)
  • 1/4 cup cilantro (chopped)
  • 1/4 cup red onions (diced)
  • 1/2 cup cherry tomatoes (sliced)
  • 1 lime (juiced)

Instructions
 

  • Pre-heat the oven to 400F. In large mixing bowl, combine the chicken with the seasonings and olive oil. Toss to coat the chicken evenly. Place the chicken, sliced bell peppers, and sliced onions on a sheet pan. Sprinkle the veggies with the seasonings and coat them with olive oil.
  • Bake in the oven for 20 minutes until the chicken is fully cooked and reaches an internal temperature of 165F. (cook for an additional 5 minutes until it reaches the internal temperature of 165F). You will want to cook it through until the vegetables are tender and slightly charred.
  • After the chicken cooks, let it rest for a few minutes before dicing it into small bite size pieces. Layer the chicken in the middle of the lettuce wraps and top it off with the fajita veggies. Garnish with lime juice and chopped fresh cilantro and serve with freshly sliced mango.

Similar Recipes

cilantro chicken

Cilantro Lime Chicken Salad with Strawberry Salsa

sweet and sour chicken wings

Air Fryer Sweet and Sour Chicken Wings

stuffed primavera chicken

Primavera Stuffed Chicken Breasts

You Might Also Like

Frequently Asked Questions

Can you use different types of lettuce for the wraps?

Yes, you can use any type of lettuce that is sturdy enough to hold the filling, such as romaine or iceberg lettuce. Jicama tortillas are also a good vegetable option for wraps.


Can you make sheet pan chicken fajita lettuce wraps vegan?

Yes, you can make sheet pan fajita lettuce wraps vegan by substituting the chicken with tofu or a plant-based protein and omitting the cheese.


Are sheet pan chicken fajita lettuce wraps healthy?

Yes, sheet pan chicken fajita lettuce wraps are a healthy meal option. They are low in calories, high in protein, and packed with vegetables.

Posted on Leave a comment

Grilled Steak with Roasted Corn and Potato Hash

steak and corn

This roasted corn and potato medley is the star of this steak dinner meal.

This post may contain affiliate links. Please see our privacy policy for details.

Round plate with grilled ribeye steak with corn, baby potatoes, and bell peppers.

When it comes to meal appeal, it is more important to add bright colors and use flavor profiles that you crave, and nothing pulls at our cravings like grilled steak dinner, crispy potatoes, and sweet corn.

The PrepYoSelf Newsletter

Here’s What You Need for This Steak Dinner and Corn Recipe

  • Steak: We used Rib Eye steak that was thinly sliced so that it can grill quickly
  • Marinade: We marinated our steak with balsamic glaze, paprika, garlic powder, and salt, and coated it with olive oil. This marinade gave good flavor and a good char and caramelization when we grilled the steak.
  • Vegetable Medley: We used a combination of corn, baby corn, and bell peppers

Round plate with grilled ribeye steak with corn, baby potatoes, and bell peppers.

Easy Steps for Making Steak and Corn

  1. Pre-heat the oven to 400F.
  2. Cut the vegetables and place them on a sheet pan. Add the seasonings and coat them with olive oil. Roast them in the oven.
  3. Meanwhile, marinate the steak with balsamic concentrate and seasonings.
  4. Heat an indoor grill and sear the steak on each side until it cooks to your desired doneness.
  5. Let the steak rest before slicing it into thin strips and enjoy them with the roasted corn and potato medley.

Reference the recipe card below for detailed instructions.

Glass meal prep container with grilled ribeye steak with corn, baby potatoes, and bell peppers.

Meal Prep Tips for Steak and Corn

  • Cooking option: If you have an Air Fryer, you can also air fry the vegetables at 350F for 8 minutes
  • Herbs: Add herbs to the corn medley such as green onions, basil, or cilantro for fresh flavors
  • To Store: Store in an airtight container for up to 3 days in the refrigerator

Glass meal prep container with grilled ribeye steak with corn, baby potatoes, and bell peppers.

Steak & Corn

Grilled Balsamic Steak with Roasted Corn and Potato Hash

A gourmet steak dinner served with a delicious medley of roasted sweet corn, potatoes, and bell peppers.
No ratings yet
Prep Time 5 minutes
Cook Time 15 minutes
Course dinner, Main Course
Cuisine American
Servings 2

Equipment

  • knife
  • cutting board
  • sheet pan
  • tongs
  • indoor grill pan
  • oven

Ingredients
  

Steak and Seasonings

  • 12 oz rib eye steak (thinly sliced)
  • 1 tablespoon balsamic concentrate
  • 1/4 teaspoon paprika
  • 1/4 teaspoon garlic powder
  • 1/4 teaspoon salt
  • 1 tablespoon olive oil

Roasted Corn and Potatoes

  • 2 baby potatoes
  • 1 cup corn
  • 1 red bell pepper (diced)
  • 1/4 teaspoon garlic powder
  • 1/4 teaspoon salt
  • 1/4 tsp pepper
  • 1 tablespoon olive oil

Instructions
 

  • Pre-heat the oven to 400F. Cut the baby potatoes in half and dice the red bell pepper. Place the potatoes, bell peppers, and corn on a sheet pan, add the seasonings and coat it with olive oil. Bake in the oven for 15 minutes.
  • Meanwhile, season the steak with balsamic concentrate, paprika, garlic powder, salt, pepper, and coat with olive oil.
  • Heat an indoor grill pan on medium high heat an sear the steak on each side for about 4 to 5 minutes until it is fully cooked and reaches an internal temperature of 145F. Let it rest before slicing it into thin strips and enjoy them with the roasted colorful veggies!

Similar Recipes

chicken soup

One Pot Mexican Chicken Soup

rosemary chicken

Rosemary Baked Chicken and Potatoes

shrimp and corn

Sheet Pan Shrimp with Cauliflower and Corn

You Might Also Like

Frequently Asked Questions

What else can you do with any leftover corn and potato medley?

If you have any leftovers, you can use them as a salad topper. We also like making it into a corn potato salad by adding a little bit of mayo and lemon juice.


Is corn high in fiber?

Yes, it is rich in fiber and can help aid digestion. It has insoluble fiber which feeds good bacteria in your gut and can help you keep regular. 


Is corn healthy?

Most people trying to lose weight avoid corn because they are concerned about weight gain. However, one ear of corn only has about 100 calories, 3 grams of fiber which can help you feel full longer, and the carb is a slow-to digest type of carb that can help with weight control. So you can enjoy this vegetable in balanced portions.

Posted on Leave a comment

Pineapple BBQ Chicken and Cauliflower Rice

pineapple bbq chicken

Baked Pineapple BBQ Chicken with Creamy Coconut Cauliflower Rice is a delicious weeknight dinner idea you’ll love.

This post may contain affiliate links. Please see our privacy policy for details.

Round plate with bbq baked chicken breasts topped with pineapple, red onions, and served on creamy cauliflower rice. weeknight dinner idea

We grew up in a household eating cuisines with tropical flavors. Fruit was often part of savory dishes. I guess you can say it was a great way to sneak fruit into our meals!

For this recipe, we used basic ingredients that we already had on hand and prepped them in a way to create a yummy, sweet, sour, and savory flavor combination. Perfect for a weeknight dinner idea.

The PrepYoSelf Newsletter

Here’s What You’ll Need for Baked Pineapple BBQ Chicken

  • Chicken Breasts: We used thinly sliced chicken breasts so that they can cook faster and cut down the prep time. You can also use chicken tenderloins for this recipe
  • Pineapple: We often have frozen pineapple on hand for smoothies, but you can also use canned or fresh pineapple
  • BBQ Sauce: Use your favorite pre-made bbq sauce such as honey or hickory smoke flavor
  • Red Onions: You can also use yellow or white onions, but we like using red onions to add color

Round plate with bbq baked chicken breasts topped with pineapple, red onions, and served on creamy cauliflower rice. weeknight dinner idea

How to Make Pineapple BBQ Chicken

  1. Preheat the oven to 400F.
  2. Place the chicken in a baking dish and coat it with the bbq sauce.
  3. Add the pineapple chunks and red onions on top.
  4. Sprinkle the chicken with the seasonings.
  5. Bake everything in the oven for 20-25 minutes until the chicken is fully cooked.

Reference the recipe card below for detailed instructions.

Glass meal prep container with bbq baked chicken breasts topped with pineapple, red onions, and served on creamy cauliflower rice. weeknight dinner idea

What to Serve with Baked Pineapple BBQ Chicken?

  • We wanted to keep the meal tropical, so we served it with creamy coconut cauliflower rice.
  • While the chicken bakes, saute cauliflower rice on medium-high heat. Add the coconut milk and seasonings and cook until the sauce thickens.
  • After the chicken cooks, serve it on top of the cauliflower rice and garnish it with freshly chopped cilantro.

Glass meal prep containers with bbq baked chicken breasts topped with pineapple, red onions, and served on creamy cauliflower rice. weeknight dinner idea

bbq pineapple chicken

Pineapple BBQ Chicken and Coconut Cauliflower Rice

Sweet and Savory Oven Baked Pineapple Chicken served with a Creamy Coconut Cauliflower Rice is a delicious and tropical dish that you'll enjoy during your work week.
No ratings yet
Prep Time 5 minutes
Cook Time 25 minutes
Course dinner, Main Course
Cuisine American
Servings 2

Equipment

  • knife
  • cutting board
  • saute pan
  • tongs
  • spatula
  • baking dish
  • oven

Ingredients
  

Pineapple BBQ Chicken

  • 12 oz chicken breasts (thinly sliced)
  • 1 cup pineapple (frozen)
  • 3/4 cup bbq sauce
  • 1/4 cup red onions (diced)
  • 1/4 teaspoon garlic powder
  • 1/4 teaspoon salt

Coconut Cauliflower Rice

  • 2 cups cauliflower rice (frozen)
  • 1/4 cup coconut milk
  • 1/4 cup cilantro (chopped)
  • 1/4 teaspoon garlic powder
  • 1/4 teaspoon salt
  • 1 tablespoon olive oil

Instructions
 

  • Preheat the oven to 400F. Place the chicken in a baking dish. Coat the chicken with bbq sauce. Top it off with the pineapple and red onions. Sprinkle it with the seasonings.
  • Bake in the oven for 20-25 minutes (flipping the chicken halfway through). Cook until it reaches an internal temperature of 165F.
  • Meanwhile, add oil to a saute pan on medium high heat and saute the cauliflower rice for about 3 to 4 minutes until it heats through and softens. Pour in the coconut milk and add the seasonings. Continue to stir until the sauce thickens.
  • After the chicken cooks, serve it with the cauliflower rice and top it off with freshly sliced cilantro. Enjoy this tropical delight!

Similar Recipes

cilantro steak

Grilled Cilantro Skirt Steak with Cauliflower Rice

cauliflower rice

Cauliflower Fried Rice

sweet and sour chicken wings

Air Fryer Sweet and Sour Chicken Wings

You Might Also Like

Frequently Asked Questions

What can I use instead of bbq sauce?

If you don’t like bbq sauce, you can mix together soy sauce with lemon and honey and marinate the chicken with it. For this recipe, mix together 2 tbsp soy sauce, 1 tbsp of lemon, and 1 tbsp of honey.


What can I serve with pineapple bbq chicken?

You can serve it with regular roasted cauliflower, mashed potatoes, or rice pilaf.


What if I don’t have pineapple?

Mango and oranges will also work well because they also have the tangy flavors that pineapple has and will work well with the sweetness of the bbq sauce.

Posted on Leave a comment

Oven Baked Orange Ginger Salmon and Snow Peas

ginger salmon

Honey Glazed Ginger Salmon and Roasted Snow Pea recipe that comes together in less than 20 minutes in one pan!

This post may contain affiliate links. Please see our privacy policy for details.

Round plate with baked salmon and snow peas served with a side of sliced oranges.

Flavor Highlights

We often use lemon to add the citrus component to seafood recipes, but switch it up and try oranges instead. The flavor will definitely surprise you! Pairing it with ginger and honey will become your new favorite flavor combination.

The PrepYoSelf Newsletter

To Prepare This Sheet Pan Salmon Recipe You’ll Need

  • Salmon: Use fresh salmon or frozen filets. If using frozen filets, be sure you thaw them out in the refrigerator in advance prior to baking.
  • Snow Peas: If you can’t find snow peas, you can use snow peas or other green vegetables such as green beans or asparagus.
  • Ginger and Garlic: If you don’t want to peel and mince your own ginger and garlic, there are packaged options that come in a paste or are already pre-minced that you can buy. You can also use powdered ginger or garlic if you already have it on hand.
  • Red Onions: You can also substitute with shallots or green onions.
  • Oranges: Feel free to add orange zest to the sauce.
  • Soy Sauce: Use lower-sodium soy sauce if you can.
  • Honey: You can also use maple syrup or agave nectar.

Round plate with baked salmon and snow peas served with a side of sliced oranges.

Easy Recipe Steps to Make Glazed Ginger Salmon & Snow Peas

  1. Preheat the oven to 400F.
  2. Whisk together your marinade in a small bowl.
  3. Place the salmon and snow peas on a sheet pan.
  4. Top the salmon with garlic, ginger, and red onions.
  5. Drizzle the marinade over the salmon and snow peas
  6. Bake everything in the oven for about 12 to 15 minutes.

Reference the recipe card below for detailed instructions.

Glass meal prep containers with baked salmon and snow peas served with a side of sliced oranges.

Meal Prep Tips for Honey Glazed Ginger Salmon

  • Other Cook Method: You can make this in a toaster oven or even in the Air Fryer (360F for 8 to 10 minutes).
  • To reheat: Reheat it in the microwave until it is warm. (about 2 minutes depending on your microwave settings).
  • Storage: Store in an airtight container in the refrigerator for up to 3 to 4 days for the best quality.
  • To Serve: Feel free to serve this with a side of rice pilaf or cauliflower rice.

Glass meal prep containers with baked salmon and snow peas served with a side of sliced oranges.

orange ginger salmon

Oven Baked Orange Ginger Salmon and Snow Peas

Sweet, sticky, and savory baked salmon with roasted snow peas all made in one sheet pan.
No ratings yet
Prep Time 5 minutes
Cook Time 15 minutes
Course dinner, Main Course
Cuisine American, Asian
Servings 2

Equipment

  • knife
  • cutting board
  • sheet pan
  • oven

Ingredients
  

  • 12 oz salmon
  • 8 oz snow peas
  • 1 orange (juiced)
  • 2 tablespoon soy sauce
  • 1 tablespoon honey
  • 1 tablespoon ginger (minced)
  • 1 tablespoon garlic (minced)
  • 1/4 cup red onions (diced)
  • 1 tablespoon olive oil

Instructions
 

  • Pre-heat the oven to 400F. In a small bowl, mix together the juice of an orange, soy sauce, and honey.
  • Place the salmon and snow peas on a sheet pan. Top the salmon with minced ginger and garlic. Top the snow peas with the diced red onions. Then, drizzle the marinade over both the salmon and veggies.
  • Bake in the oven for about 12 to 15 minutes. Enjoy with a side of sliced oranges for a refreshing palate cleanser!

Similar Recipes

salmon beet salad

Citrus Ginger Salmon with Roasted Beets

salmon and watermelon salad

Grilled Salmon with Watermelon Salad

salmon salad

Salmon Stuffed Avocado Salad

You Might Also Like

Frequently Asked Questions

Are sugar snap peas and snow peas the same?

Snow peas are flatter, while sugar snap peas are more rounded. However, both have similar flavors and nutritional profile.


What temperature should salmon be cooked at?

USDA recommends cooking fish to an internal temperature of 145F.


Is it okay to eat the skin on salmon?

Yes, while salmon is known to provide healthy fats, much of that skin is also stored in the skin and is a good source of omega 3s.

Posted on 1 Comment

Baked Meatloaf Patties and Roasted Green Beans

meatloaf patties

Love the comfort of meatloaf, but don’t want to wait too long for the prep? Here’s a twist on a meatloaf-recipe family favorite using burger patties.

This post may contain affiliate links. Please see our privacy policy for details.

Calories: 626kcal | Carbohydrates: 24g | Protein: 37g | Fat: 43g | Saturated Fat: 15g | Polyunsaturated Fat: 3g | Monounsaturated Fat: 21g | Cholesterol: 120mg | Sodium: 1920mg | Potassium: 1281mg | Fiber: 6g | Sugar: 15g | Vitamin A: 1806IU | Vitamin C: 24mg | Calcium: 84mg | Iron: 7mg

Round plate with meatloaf recipe of beef patties covered in tomato sauce on top of roasted green beans.

While classic meatloaf recipes are normally baked in a loaf pan, we opted for using hamburger patties and baking them flat on a sheet pan. This definitely took less time than traditional meatloaf and was a huge time saver, and you still get the classic flavors of meatloaf that we all find comfort in.

The PrepYoSelf Newsletter

Why These Meatloaf Patties are Great for Meal Prep

  • The recipe uses budget-friendly ingredients
  • Everything can be cooked on one sheet pan
  • It’s a healthier version of meatloaf that still satisfies your tastebud

Round plate with meatloaf recipe of beef patties covered in tomato sauce on top of roasted green beans.

Easy to Find Ingredients for Baked Meatloaf Recipe

  • Lean Ground Beef Burger Patties: We used pre-made beef burger patties to save time on meal prep. However, you can definitely use any kind of ground meat and form your own burger patties
  • Green Beans: You can pair your patties with any kind of roasted veggies such as asparagus, broccoli, or even with mashed potatoes
  • Red Onions: Adding aromatics to anything always adds more flavor. You can also use sliced shallots or minced garlic
  • Tomato Sauce: You can even use leftover spaghetti sauce
  • Sugar: If you don’t want to use sugar, you can substitute it with honey. Adding a little bit of sweetness helps balance out the tartness of the tomato sauce
  • Olive Oil: Keep it heart-healthy with oil, and you can also use avocado oil

Glass meal prep containers with meatloaf recipe of beef patties covered in tomato sauce on top of roasted green beans.

Easy Instructions to Make Meatloaf Patties

  • Preheat the oven to 400F.
  • Mix together the tomato sauce with the sugar, seasonings, and red onions.
  • Layer the beef patties on a lined sheet pan and top each patty with the tomato sauce.
  • Place the seasoned green beans on another sheet pan since they will cook faster.
  • Bake in the oven until the beef patties are fully cooked.

Reference the recipe card below for detailed instructions.

Glass meal prep containers with meatloaf recipe of beef patties covered in tomato sauce on top of roasted green beans.

Meal Prep Tips for Meatloaf Patties

  • To Serve: You can serve these with a side of mashed potatoes, buttered pasta noodles, or even rice pilaf.
  • Leftovers: If you make a large batch and have leftovers, you can also enjoy these meatloaf patties in between toasted bread or hamburger buns.
  • To Store: You can store this in an airtight container in the refrigerator for up to 3 to 4 days.

meatloaf patty and green beans

Baked Meatloaf Patties and Roasted Green Beans

Get the homestyle taste of meatloaf, but with easy portions to prep for the week using hamburger patties.
4.67 from 3 votes
Prep Time 5 minutes
Cook Time 25 minutes
Course dinner, Main Course
Cuisine American
Servings 2
Calories 626 kcal

Equipment

  • knife
  • cutting board
  • sheet pan
  • oven

Ingredients
  

  • 4 lean beef hamburger patties (3 oz each)
  • 8 oz green beans (washed and trimmed)
  • 1/4 cup red onions (diced)
  • 1 cup tomato sauce
  • 1 tablespoon sugar
  • 1 teaspoon garlic powder
  • 1 teaspoon paprika
  • 1 teaspoon salt
  • 1 tablespoon olive oil

Instructions
 

  • Preheat the oven to 400F. In a mixing bowl mix together the tomato sauce with the brown sugar, red onions, half of the paprika spice, half of the garlic powder seasoning, and half of the salt.
  • Place the hamburger patties on a sheet pan and evenly top each patty with the tomato sauce mixture. Place the green beans on another sheet pan and season with the paprika, garlic powder, and salt. Drizzle the green beans with olive oil.
  • Place both sheet pans in the oven and bake the green beans for 12 to 15 minutes. Bake the beef patties for at least 25 minutes until it reaches an internal temperature of 165F.

Notes

Nutrition information provided is an estimate. It will vary based on cooking method and specific ingredients used. Please consult with your healthcare provider for specific dietary needs. To gain a better understanding, explore our nutrition disclaimer here. 

Nutrition

Calories: 626kcalCarbohydrates: 24gProtein: 37gFat: 43gSaturated Fat: 15gPolyunsaturated Fat: 3gMonounsaturated Fat: 21gCholesterol: 120mgSodium: 1920mgPotassium: 1281mgFiber: 6gSugar: 15gVitamin A: 1806IUVitamin C: 24mgCalcium: 84mgIron: 7mg

Similar Recipes

italian chicken

Italian Chicken with Green Beans and Almonds

sheet pan sausage

Sheet Pan Beef Sausage and Vegetables

stuffed lasagna peppers

Stuffed Beef Lasagna Peppers

You Might Also Like

Frequently Asked Questions

Do meat patties need breadcrumbs?

For this recipe, we did not use breadcrumbs like most traditional meatloaf recipes use because the patties were already formed and stuck together when they bake.


Do you have to put milk in meatloaf?

Milk is often added to meatloaf to help soak in the breadcrumbs. However, for this recipe, we did not use breadcrumbs and therefore did not use milk. This meatloaf patty version of the recipe is gluten-free and dairy free.


What meat do I use for meatloaf?

It is usually made with ground beef and sometimes includes a combination of pork or lamp. For this recipe, we only used ground beef, however, you can even use ground turkey or ground chicken.

Posted on Leave a comment

Rosemary Chicken with Potatoes and Artichokes

rosemary chicken

Beautifully roasted Rosemary Chicken Thighs with potatoes and artichokes make for an elegant and comforting weeknight meal.

This post may contain affiliate links. Please see our privacy policy for details.

Round plate with crispy chicken thighs, roasted potatoes and artichokes served with green arugula salad.

This lovely roasted chicken thigh recipe couldn’t be simpler to meal prep for yourself during a busy work week.

All you have to do is toss together the ingredients in one sheet pan and let the oven do the roasting. Round it out by serving it with a fresh arugula salad with a homemade lemon vinaigrette.

Rosemary and chicken have long been the perfect flavor combination. With crispy roasted potatoes and scattered artichoke hearts, it makes it for a decadent meal you won’t be able to resist.

The PrepYoSelf Newsletter

What are Artichoke Hearts?

  • The heart of an artichoke is the meaty part in the center that is hidden below the rough leaves of the globe artichoke.
  • The artichoke itself is very difficult to prep and takes quite some work to get to the edible parts, therefore, we often just buy canned or frozen artichoke hearts to keep it easy for meal prep.
  • Artichoke hearts can be used in pasta dishes, added to soups, or marinated and used as a salad topping.

Round plate with crispy chicken thighs, roasted potatoes and artichokes served with green arugula salad.

Recipe Ingredient and Variations:

  • Chicken Thighs: We used chicken thighs because you can get a tasty crispy skin when the chicken is roasted. However, if you want to keep this meal lean, you can also use chicken breast or chicken tenderloins.
  • Potato and Artichokes: This is a sheet pan recipe where we roasted the vegetables alongside the chicken thighs for minimal dishes.
  • Seasonings: We kept it simple with rosemary, paprika, garlic powder, and salt.
  • Olive oil: Coating your ingredients with olive oil helps give the ingredients a good crisp texture while it roasts in the oven.
  • More flavor: To add more flavor, you can also use fresh herbs such as basil, green onions, minced garlic, shallots, or even the zest of a lime or lemon.

Glass meal prep container with crispy chicken thighs, roasted potatoes and artichokes.

How to Make Baked Rosemary Chicken Thighs

  1. Preheat the oven to 400F. In a small bowl, mix together the seasonings.
  2. Next, cut the red baby potatoes into 1-inch cubes. Drain the artichokes if you purchased them canned. Cut them into quarters.
  3. Place both the chicken and vegetables on a sheet pan and sprinkle them with the seasonings and coat them with olive oil.
  4. Bake everything in the oven for 35 to 40 minutes until the chicken reaches an internal temperature of 165F and the skin is nice and golden brown.

Reference the recipe card below for detailed instructions.

Glass meal prep container with crispy chicken thighs, roasted potatoes and artichokes.

Meal Prep Tips for Roasted Rosemary Chicken

  • Diet Friendliness: To keep this recipe low carb, you can use non-starchy vegetables such as cauliflower florets, yellow squash, zucchini, or asparagus instead of the red baby potatoes.
  • Artichokes: If you use frozen artichokes, you can skip the step of thawing them out because the steam arising during the cooking process can help keep the chicken moist and juicy.
  • To Serve: Serve with a fresh side salad or fluffy rice pilaf.
  • To store: Store it in an airtight container for up to 3 to 4 days in the refrigerator.

rosemary chicken

Rosemary Baked Chicken Thighs with Roasted Potatoes and Artichokes

Crispy, Baked Chicken with Tangy Artichokes and Crispy Potatoes.
No ratings yet
Prep Time 5 minutes
Cook Time 1 minute
Course dinner, Main Course
Cuisine American, Italian
Servings 2

Equipment

  • knife
  • cutting board
  • sheet pan
  • oven

Ingredients
  

Chicken and Vegetables

  • 4 chicken thighs
  • 1 cup artichoke hearts (canned and drained)
  • 2 red baby potatoes
  • 1/4 teaspoon rosemary
  • 1/2 teaspoon garlic powder
  • 1/2 teaspoon paprika
  • 1/2 teaspoon salt

Salad and Dressing

  • 4 cups arugula
  • 2 tablespoon olive oil
  • 2 tablespoon lemon juce
  • 1 tablespoon honey
  • 1/4 teaspoon garlic powder
  • 1/4 teaspoon salt

Instructions
 

  • Preheat the oven to 400F. Cut the red baby potatoes and cut them into 1-inch cubes. Drain the artichoke hearts from the can and cut the hearts into quarters. In a small bowl, mix together the rosemary, paprika, garlic powder, and salt.
  • Place the chicken, baby potatoes, and artichokes into a baking dish. Evenly sprinkle everything with the seasonings and coat them with olive oil.
  • Bake everything in the oven for about 35 to 40 minutes until the chicken reaches an internal temperature of 165F.
  • While the chicken and vegetables are baking, whisk together the lemon vinaigrette. After everything cooks, enjoy the chicken and vegetables with a side of arugula salad drizzled with the homemade lemon vinaigrette.

Similar Recipes

Air Fried Chicken

Air Fryer “Fried” Chicken Drumsticks

chicken pesto

Sauteed Chicken Pesto with Artichokes

stuffed primavera chicken

Primavera Stuffed Chicken Breasts

You Might Also Like

Frequently Asked Questions

What does artichoke hearts taste like?

After they are cooked, the texture softens and produces a flavor similar to asparagus, celery, and brussels sprouts. 


Can you eat artichokes raw?

They are edible, however, most people prefer them cooked as they will have a stronger, bitter flavor. Cooking also softens the fibers and makes for an easier chew. 


What are other ways to cook artichokes?

You can boil them, grill them, braise them, and also steam them.

Posted on Leave a comment

Cranberry Oatmeal Muffin Bars

cranberry oat muffins

These fruity cranberry oatmeal muffin bars are a treat that you can enjoy for breakfast, snacks, and even dessert!

This post may contain affiliate links. Please see our privacy policy for details.

White plate with cranberry oatmeal muffin bars.

We enjoy prepping make ahead breakfasts for the week so that we always have something on hand to start off the day with fuel and energy. And actually, the cranberries, oats, and a pinch of cinnamon make this recipe enjoyable to eat any time of they day.

Why are these cranberry oat bars healthy?

  • Rolled oats are a type of whole grain that provides a good source of fiber and nutrients
  • Cranberries are a rich source of vitamin C which is good for your skin, muscles, and bones
  • These are two healthy ingredients that you should stock up on as a solo cook

The PrepYoSelf Newsletter

Simple Ingredients for Cranberry Oatmeal Muffin Bars

We use common ingredients that you could easily have on hand. The main ingredients are rolled oats, eggs, and some sort of liquid.

  • Rolled oats: We used rolled oats for this recipe, but you could easily use quick-cooking oats. Using the oats gives some texture versus only using flour
  • Flour: You could omit the flour, however, we like incorporating just a small amount because it helps provide the muffin-like texture
  • Eggs: Eggs play an important role in baking since they help provide structure, add moisture, and act as a glue
  • Sweetener: You can use regular sugar, honey, or maple syrup
  • Applesauce: Applesauce is a great fat replacer in many baked goods. The moisture also will keep most baked goods moist and fresh longer
  • Cranberries and orange juice: Adding fruit to your baked goods is a great way to add fiber and additional vitamins and nutrients

Mixing bowls that include the ingredients for cranberry oatmeal muffin bars, such as, cranberries, egg, sugar, rolled oats, flour, orange, and olive oil

How to Prepare Oatmeal Muffin Bars for One:

  1. Preheat the oven to 400F. Grease your baking dish.
  2. In a mixing bowl, mix together your wet ingredients: egg, applesauce, orange juice, and maple syrup.
  3. Next add your dry ingredients: flour, oats, baking soda, and baking powder.
  4. Then, fold the cranberries into the batter.
  5. Finally, pour the batter into the baking dish and bake in the oven until the center is fully cooked.

Reference the recipe card below for detailed instructions.

A small baking dish with a golden brown cranberry oatmeal muffin bar.

Meal Prep Tips for Cranberry Oat Muffin Bars:

  • Other Fillings: Add chopped nuts, dried fruit, nut butter, or chia seeds
  • Other Prep Methods: You can also pour the batter into a small muffin pan and make separate portions
  • To Serve: Enjoy these muffin bars with yogurt. To repurpose them, you can also crumble them up and use them as a yogurt topping
  • Storage: Store them in an air-tight container or Ziploc bags in the refrigerator for up to 3 to 4 days
  • To Reheat: Heat them in the microwave until they warm through

Baking dish with cranberry muffins surrounded by other dishes stored in glass meal prep containers.

cranberry muffin

Cranberry Oatmeal Muffin Bars

Decadent cranberry oatmeal muffin bars that are easy to make and even more enjoyable to eat!
No ratings yet
Prep Time 5 minutes
Cook Time 15 minutes
Course Breakfast, Snack
Cuisine American
Servings 2

Equipment

  • mixing bowl
  • baking dish
  • oven

Ingredients
  

  • 1 large egg
  • 2 tablespoons maple syrup
  • 1 orange (juiced)
  • 1/4 cup applesauce
  • 1/4 cup flour
  • 1/2 cup rolled oats
  • 1/2 cup fresh cranberries (chopped)
  • 1/4 teaspoon baking soda
  • 1/4 teaspoon baking powder
  • 1 teaspoon olive oil

Instructions
 

  • Pre-heat the oven to 400F
  • In a mixing bowl, whisk together the eggs, sugar, and juice of one orange
  • Next, add the flour, oats, baking powder, and baking soda and mix well
  • Then, add the cranberries and fold them into the batter
  • Grease a baking dish with olive oil and pour in the batter
  • Bake in the oven for 15-20 minutes

Notes

Substitutions: If you don’t have fresh cranberries, you can use dried cranberries

Similar Recipes

baked oatmeal

Oven Baked Oats with Apricots and Berries

ricotta apple

Oven Baked Apple with Ricotta and Walnuts

french toast 2

Oven Baked French Toast Muffins with Strawberries

You Might Also Like

Smartfruit Mellow Mango + Immunity, 100% Real Fruit Purée

Trader Joe’s Unsalted, Dry Toasted Slivered Almonds

Trader Joe’s the Dark Chocolate Lover’s Chocolate Bar

Frequently Asked Questions

Is maple sugar healthier than sugar?

Although maple sugar is still high in sugar it has a lower glycemic index than table sugar. This could raise blood sugar slower than regular sugar.


Can I use frozen fruit?

Yes, any type of fillings will work well. If using frozen fruit, you don’t have to thaw it out before you mix it into the batter.


Can I use instant oatmeal for baking?

Yes, you can use rolled oats and instant oatmeal interchangeably in most baked oatmeal recipes.

Posted on Leave a comment

Baked Pine Nut Crusted Tilapia with Spinach

pine nut fish and spinach

If you’re looking for a low-carb, keto-friendly meal, then you’ll enjoy this healthy baked white fish with a pinenut crust served with sauteed spinach.

This post may contain affiliate links. Read the disclosure policy.

Round plate with baked pine nut crusted tilapia with sauteed spinach.

Meal prepping can help you learn more about nutrition and how to treat food as fuel. Here’s a simple meal prep idea that you can prep for the week and keep you on a healthy eating track.

This baked fish is a good source of protein. Adding the pine nut crust provides a good source of healthy fats and also adds a flavorful crunch against the soft, flaky white fish.

The PrepYoSelf Newsletter

Here’s What You Need

  • Tilapia: You can use any kind of white fish such as cod, grouper, or halibut
  • Pine Nuts: Pine nuts contain a variety of nutrients and antioxidants that can contribute to heart health
  • Spinach: Spinach is also a good source of fiber and vitamins
  • Dijon Mustard: This helps the pine nuts stick to the fish while baking and it also adds a layer of flavor

Round plate with baked pine nut crusted tilapia with sauteed spinach.

How to Bake Pine Nut Crusted Tilapia

  1. Pre-heat the oven to 400F.
  2. Pine Nut Crust: Insert nuts, chives, olive oil, and seasonings inside a plastic bag. Use a mallet or small pan to crush the pine nuts into crumbs.
  3. Prep the Tilapia: Spread dijon mustard on top of each fillet and top it off with the pine nut mixture.
  4. Bake the Tilapia: Bake it in the oven until it is fully cooked and the crust is golden brown.
  5. Spinach: Meanwhile, saute the spinach in a saute pan.

Reference the recipe card below for detailed instructions.

Glass meal prep container with baked pine nut crusted tilapia with sauteed spinach.

Meal Prep Tips for Pine Nut Crusted Tilapia

  • Air Fryer Tip: You can also cook the fish in an Air Fryer. Cook it at 400F for 7-9 minutes
  • To Serve: You can serve this dish with cauliflower rice or roasted yellow squash for additional servings of vegetables
  • To Store: Store in an airtight container in the refrigerator for up to 3 to 4 days.

Glass meal prep containers with baked pine nut crusted tilapia with sauteed spinach.

pine nut fish

Baked Pine Nut Crusted Tilapia with Sauteed Spinach

Try this low-carb baked white fish with a pine nut crust and sauteed spinach.
No ratings yet
Prep Time 5 minutes
Cook Time 20 minutes
Course dinner, Main Course
Cuisine American
Servings 2

Equipment

  • knife
  • cutting board
  • spatula
  • saute pan
  • sheet pan
  • oven

Ingredients
  

Tilapia

  • 12 oz tilapia filets
  • 3 tablespoons pine nuts
  • 2 tablespoons chives (chopped)
  • 1/4 teaspoon paprika
  • 1/4 teaspoon garlic powder
  • 1/4 teaspoon salt
  • 1/4 teaspoon pepper
  • 1 tablespoon dijon mustard
  • 1 teaspoon olive oil

Spinach

  • 6 cups baby spinach
  • 1/4 teaspoon garlic powder
  • 1/4 teaspoon salt
  • 1 teaspoon olive oil

Instructions
 

  • Pre-heat the oven to 400F. In a small plastic bag, add the pine nuts, chopped chives, olive oil, paprika, garlic powder, salt. Use mallet or small pan to crush the pine nuts into crumbs.
  • Place the tilapia fillets on a sheet pan and spread the dijon mustard on top of each fillet. Sprinkle the pinenut mixture on top and pat it down, making sure the whole fillet is covered. Bake it in the oven for 12 to 15 minutes,
  • Meanwhile, add oil to a saute pan on medium-high heat and saute the spinach until it wilts. Season with garlic powder and salt.
  • After the tilapia bakes, carefully remove it from the oven and serve with the sauteed spinach

Similar Recipes

ginger salmon

Oven Baked Orange Ginger Salmon and Snow Peas

shrimp and asparagus

Oven Baked Shrimp with Panko Breaded Asparagus

salmon beet salad

Citrus Ginger Salmon Spinach Salad with Roasted Beets

You Might Also Like

Frequently Asked Questions

What benefits do pine nuts have?

They are rich in antioxidants and anti-inflammatory compounds that promote heart health and also help improve blood glucose control.


What if I don’t have pine nuts?

You can also use chopped almonds in place of pine nuts.


What can I serve with this meal?

You can also serve this with roasted potatoes, rice pilaf, or your favorite side salad. If you want to keep it low-carb, serve it with cauliflower rice.