Posted on Leave a comment

Cheeseburger Quesadillas

plate with quesadillas and guacamole

If you’re searching for a tasty meal prep recipe that’s as delicious as your favorite takeout but healthier and more wholesome, you’ve hit the jackpot. Get ready to dance a salsa in your taste buds because we’re diving into the world of Cheeseburger Quesadillas paired with homemade guacamole and all your burger condiment dreams – onions, tomatoes, and pickles!

This post may contain affiliate links. Please see our privacy policy for details.

plate with quesadillas and guacamole

Why Meal Prep Cheeseburger Quesadillas?

  • Imagine biting into a warm, cheesy quesadilla filled with all the savory goodness of a burger. It’s like a fiesta in your mouth! You won’t even miss the takeout after this tasty meal prep.
  • Unlike the mystery ingredients often found in fast-food burgers, our recipe is packed with fresh and wholesome ingredients. Lean ground beef, whole-grain tortillas, and heaps of veggies ensure you’re getting the nutrients you need.
  • Want extra onions? No problem! Craving spicy jalapeños? Go for it! With this tasty meal prep, you have total control over the ingredients, making it easy to cater to your specific taste preferences and dietary needs.
  • Spend less time in the kitchen and more time savoring your meal. With our efficient meal prep strategy, you’ll have delicious, ready-to-eat quesadillas all week long.
  • Eating out can put a dent in your wallet, but our Cheeseburger Quesadillas are budget-friendly and wallet-approved. You’ll save both your hard-earned cash and your health.

The PrepYoSelf Newsletter

Ingredients You’ll Need for Cheeseburger Quesadillas

  • Lean Ground Beef: Choosing lean ground beef is not only a healthier option but also cost-effective. You get all the rich, meaty flavor without the excess fat. Buying in bulk or during sales can further reduce costs.
  • Flour Tortillas: Flour tortillas are incredibly versatile and affordable. You can often find them in larger packs, making them a budget-friendly choice for creating multiple quesadillas.
  • Sliced Cheese: Sliced cheese, typically cheddar or American, is a fantastic way to add creaminess and that classic cheeseburger flavor without breaking the bank. Look for sales or discounts on cheese at your local store.
  • Seasonings (Paprika, Garlic Powder, Olive Oil): Paprika and garlic powder add depth and flavor to the ground beef. Buying these seasonings in bulk can save you money in the long run. As for olive oil, it’s a staple that you can use in various recipes beyond just this one, making it a wise investment.
  • Avocado: Avocado, a superfood packed with nutrients, can be more affordable when you buy it as a whole fruit. Purchase avocados when they’re in season or on sale, and you’ll save even more.
  • Red Onions: Red onions are a budget-friendly choice for guacamole. They add a delightful crunch and mild, sweet flavor without costing a fortune. Buying onions in bulk bags is another cost-saving option.
  • Fresh Cilantro: Cilantro is an affordable herb, and a little goes a long way in terms of flavor. You can even grow your own cilantro at home in a small pot to reduce costs further.
  • Lime: Lime juice adds a zesty kick to guacamole. Opt for fresh limes when they’re in season or look for bottled lime juice for a more budget-friendly option.

In conclusion, by carefully selecting budget-friendly ingredients, buying in bulk or during sales, and embracing versatility in your cooking, you can enjoy the incredible flavors of Cheeseburger Quesadillas and homemade Guacamole without breaking the bank. Not only will you save money, but you’ll also savor the satisfaction of creating tasty meal prep from scratch.

plate with quesadillas and guacamole

How to Prepare These High-Protein Quesadillas

  1. Sauté the Ground Beef: Heat a drizzle of olive oil in a pan over medium-high heat. Add the lean ground beef to the pan and use a spatula to break it up into smaller pieces. Sprinkle the seasonings (paprika and garlic powder) evenly over the beef. Continue to cook the beef, stirring occasionally, until it’s golden brown and fully cooked, usually around 5 to 6 minutes.
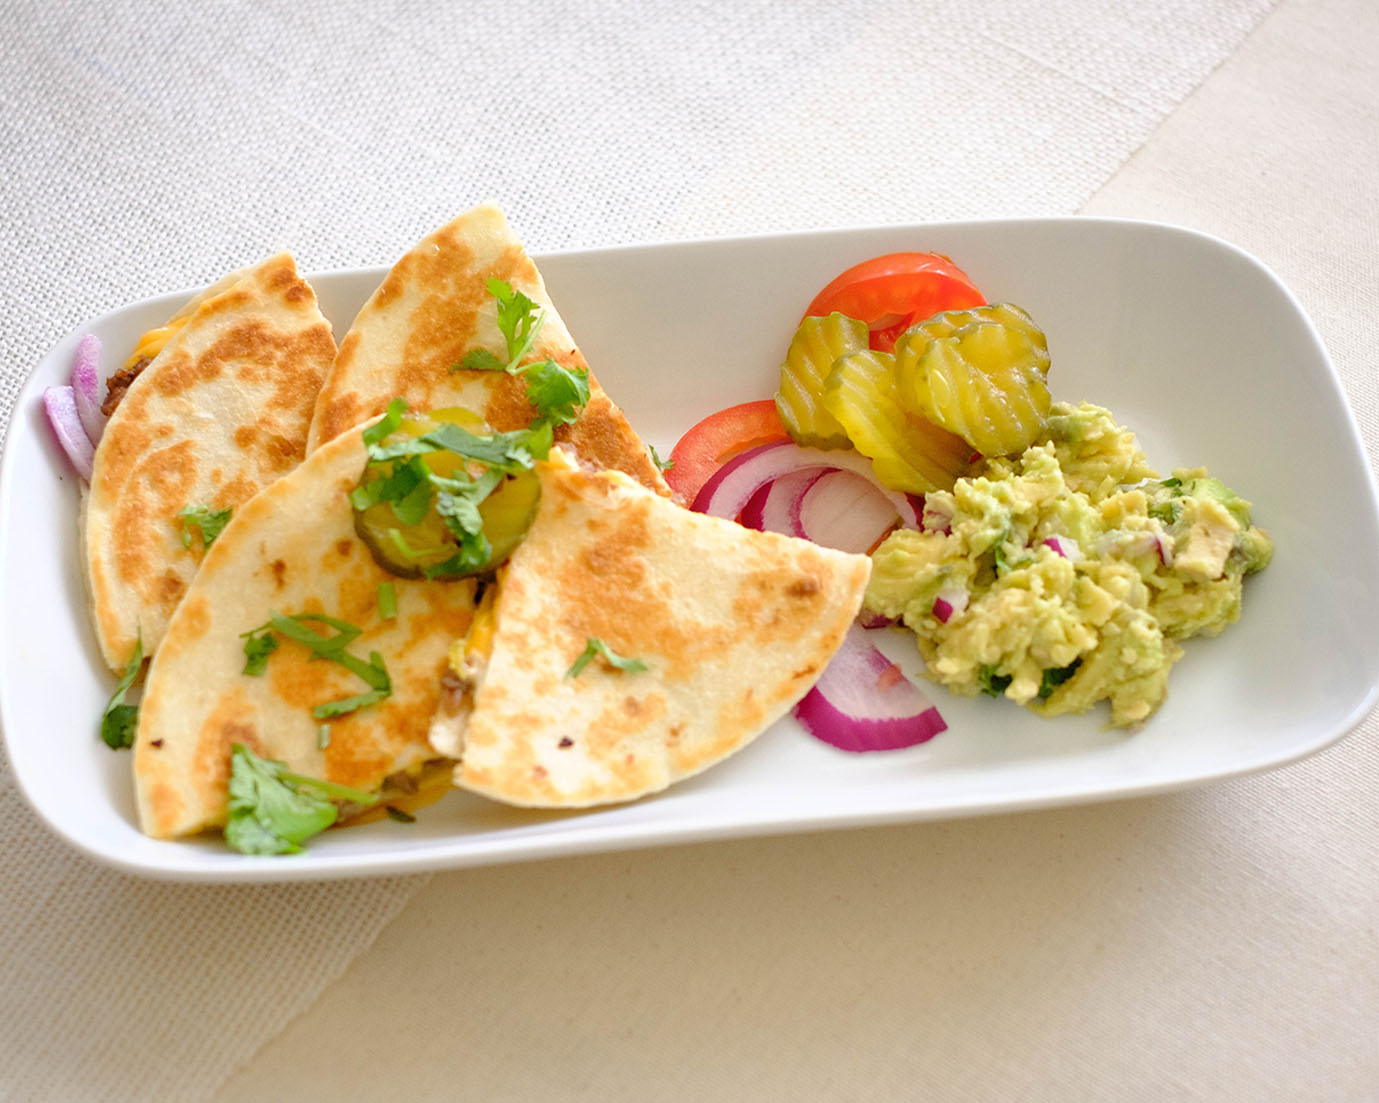
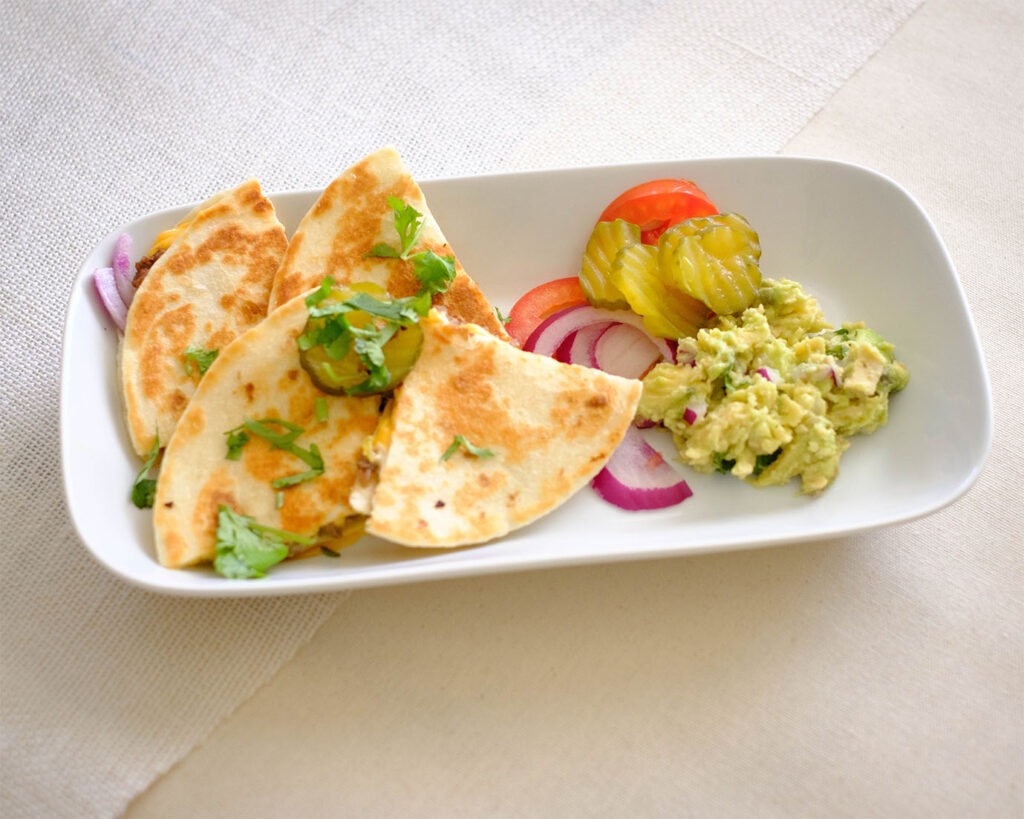
  2. Assemble the Quesadilla: Once the beef is cooked, remove it from the pan and set it aside. Lay out a tortilla on a clean surface or plate. Place a slice of cheddar cheese on one half of the tortilla. Layer half of the cooked beef mixture on top of the cheese. Add some sliced onions, diced tomatoes, and pickle slices on top of the beef. Place another tortilla on top to create a quesadilla sandwich.
  3. Toast the Quesadilla: Return the assembled quesadilla to the pan. Toast the bottom side for about 1 to 2 minutes until it’s golden and crispy. Carefully flip the quesadilla and toast the other side for another minute or until it’s crispy and the cheese inside is melted
  4. Cut and Serve: Once the quesadilla is nicely toasted, remove it from the pan. Use a sharp knife or pizza cutter to cut the quesadilla into quarters.

For the Homemade Guacamole

  1. To make the guacamole, start by slicing the avocados in half and removing the seeds.
  2. Scoop out the avocado flesh into a mixing bowl.
  3. Add the diced red onions, fresh cilantro, juice of one lime, and a pinch of salt to the bowl with the avocado.
  4. Use a fork to mash and mix everything together until you achieve your desired guacamole consistency. Some prefer it chunky, while others like it smoother.

Reference the recipe card below for detailed instructions.

plate with quesadillas and guacamole

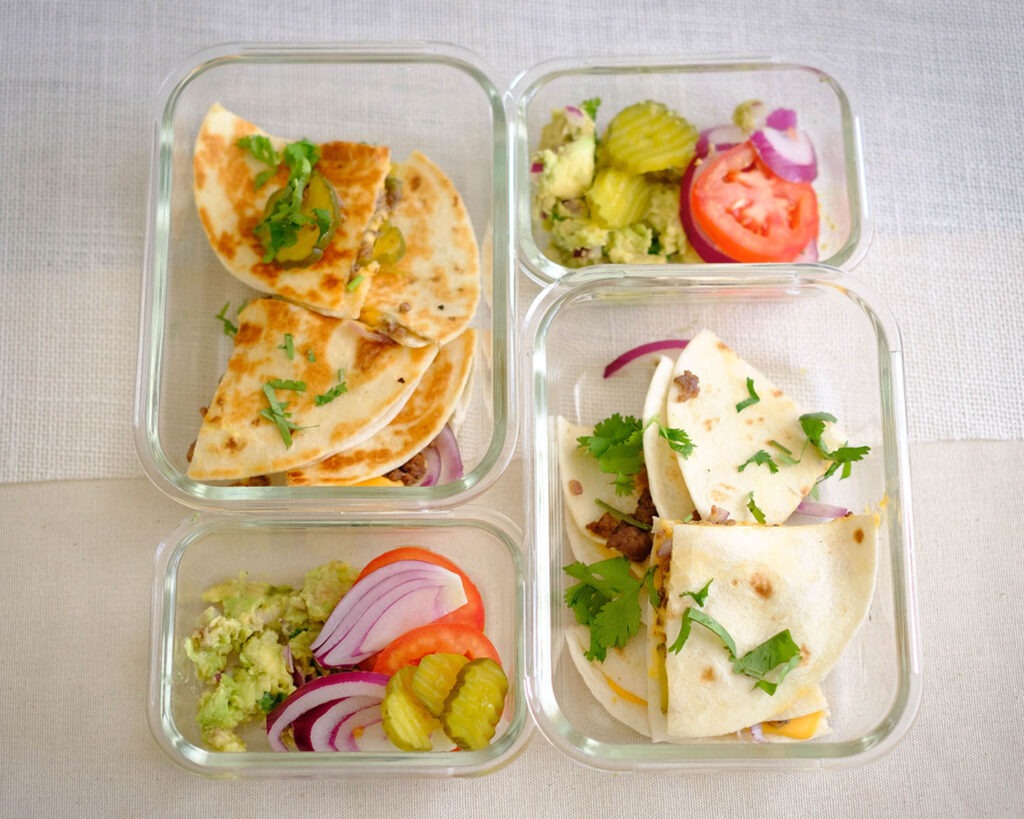
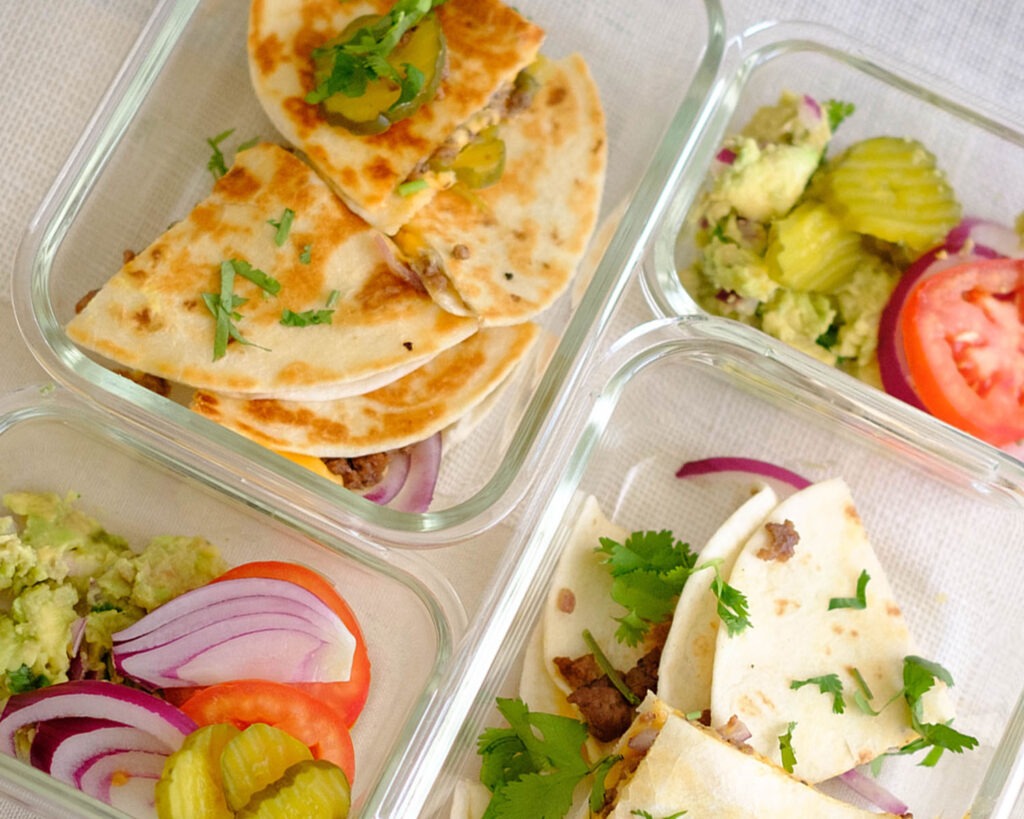
Meal Prep Tips for Cheeseburger Quesadillas

  • Storage Tips: For the Cheeseburger Quesadillas, store them in airtight containers to maintain freshness. It’s a good idea to separate any burger condiments (onions, tomatoes, pickles) in small containers to prevent sogginess. Place a small piece of parchment paper between each quesadilla slice to prevent sticking when you stack them in the container.
  • Guacamole Tips: Guacamole tends to brown over time due to exposure to air. To keep it fresh, press a piece of plastic wrap directly onto the surface of the guacamole to minimize air contact. Alternatively, store it in a small, airtight container and squeeze some extra lime juice on top.
  • Reheating Tips: For the best results, reheat your Hamburger Quesadilla in a preheated oven or toaster oven at around 350°F (175°C) for 5-10 minutes or until heated through and crispy. If you’re short on time, you can use the microwave. Place the quesadilla on a microwave-safe plate and heat on medium power for about 1-2 minutes, checking periodically to ensure it’s heated evenly.
  • Ingredient Swaps: Experiment with different proteins. Try ground turkey, chicken, or even plant-based options like black beans or tofu for a vegetarian twist. Get creative with cheese choices. While cheddar is classic, consider pepper jack for some heat, Swiss for a milder flavor, or even a vegan cheese if you prefer a dairy-free option. Explore various tortilla types such as whole wheat, spinach, or corn tortillas for a different flavor profile and dietary preferences.
  • Veggie Additions: Customize your quesadillas with additional veggies like bell peppers, jalapeños, or sautéed mushrooms.
  • Salsa and Sauces: Elevate your quesadilla with your favorite sauces. Salsa, barbecue sauce, or hot sauce can add an extra kick. Customize your guacamole with diced jalapeños, diced pineapple, or even mango for a fruity twist.
plate with quesadillas and guacamole
hamburger quesadilla

Cheeseburger Quesadillas and Guacamole

Indulge in savory Cheeseburger Quesadillas filled with seasoned beef, gooey cheddar cheese, and burger condiments, paired with creamy Homemade Guacamole.
No ratings yet
Prep Time 5 minutes
Cook Time 25 minutes
Course dinner, lunch, Main Course
Cuisine American, Latin
Servings 2

Equipment

  • knife
  • cutting board
  • mixing bowl
  • saute pan

Ingredients
  

Quesadilla

  • 8 oz lean ground beef
  • 1/4 tsp paprika
  • 1/4 tsp garlic powder
  • 1/4 tsp pepper
  • 1 tbsp olive oil
  • 4 each flour tortillas
  • 6 each sliced cheese

Guacamole

  • 2 each avocado
  • 1/4 cup red onions (diced)
  • 1/4 cup fresh cilantro (chopped)
  • 1 each lime
  • 1/4 tsp salt

Vegetable Condiments

  • 1/4 cup red onions (sliced)
  • 1 each roma tomato (sliced)
  • 1/4 cup sliced pickles

Instructions
 

Hamburger Quesadillas

  • Add olive oil to a pan on medium-high heat and saute the ground beef. Add the seasonings
  • Break the meat up into smaller pieces and cook until golden brown (about 5 to 6 minutes). After it cooks, remove it from the pan
  • Assemble the quesadilla by adding 1 slice of cheddar cheese to the bottom of one tortilla. Layer the cheese with half of the beef mixture and top it off with some sliced onions, tomatoes, pickles, and top tortilla
  • Place the quesadilla back into the pan and toast the bottom for about a minute to two minutes. Then flip it over and toast the other side for another minute
  • After the quesadilla is toasted, cut it into quarters

Guacamole

  • Slice the avocadoes in half and remove the seeds. Scoop out the avocado and place it in a mixing bowl. Add the diced onions, cilantro, juice of the lime, and salt. Use a fork to mash it all together
  • Dip your quesadilla into the creamy guacamole and enjoy!

Similar Recipes

bean taco

Butternut Squash and Black Bean Soft Taco

chicken pesto wrap

Chicken Pesto Wrap with Hummus

celery chicken salad

Celery Chicken Salad Wrap

You Might Also Like

Bubo, Pinot Noir

Trader Joe’s Unsalted, Dry Toasted Slivered Almonds

Saucy Lips – Handcrafted Gourmet Sauces and Marinades

Frequently Asked Questions

Can I use ground chicken instead of ground beef for the quesadillas?

Yes, you can! Ground chicken is a great alternative that offers a lighter flavor profile.


Are there any vegetarian alternatives for the ground beef in the quesadillas?

Absolutely! You can substitute the beef with ingredients like black beans, lentils, or crumbled tofu for a vegetarian option.


What’s a good side dish to serve with these quesadillas and guacamole?

A simple green salad, corn on the cob, or a fruit salad can complement this meal beautifully.

Posted on Leave a comment

Grilled Asian Skirt Steak with Roasted Bok Choy

round plate with grilled skirt steak and roasted bok choy and shiitake mushrooms

Grilled Asian Skirt Steak with Roasted Bok Choy and Mushrooms is your gateway to delicious, health-conscious, budget-friendly meals that won’t leave you chained to the stove. Embrace the convenience, revel in the flavors, and let this recipe elevate your meal prep game like never before. You’ll definitely indulge in the gratification of crafting this scrumptiuous dish and discover that meal prepping can be both an enjoyable journey and a rewarding destination.

This post may contain affiliate links. Please see our privacy policy for details.

round plate with grilled skirt steak and roasted bok choy and shiitake mushrooms

Why You’ll Enjoy This

  • This recipe streamlines meal preparation by combining marinated grilled steak with roasted veggies, ensuring a balanced and satisfying meal without requiring excessive hours in the kitchen.
  • The infusion of soy sauce, honey, and sesame oil imparts an Asian-inspired symphony of tastes that bursts with every bite, turning mundane meals into delightful culinary adventures.
  • This dish accommodates different dietary preferences by offering ingredient swaps – from protein sources to vegetable choices – making it an inclusive option for diverse tastes.
  • By prepping ahead, you transform mundane lunch breaks into delightful moments of savoring a home-cooked masterpiece. The ease of assembly and reheating ensures that you remain fueled and energized throughout your day.

The PrepYoSelf Newsletter

Ingredients You’ll Need

  • Juicy and tender skirt steak is marinated to perfection. The combination of soy sauce, honey, and sesame oil creates an irresistible umami flavor profile that will make your taste buds sing! Skirt steak, often celebrated for its rich flavor and tender texture, takes center stage in our Grilled Asian Skirt Steak recipe. Derived from the diaphragm muscle of the cow, this cut boasts a pronounced beefy taste that’s perfect for absorbing marinades and seasonings.
  • Baby bok choy, a staple in Asian cuisine, offers a delightful combination of crispness and mild sweetness. Its tender leaves and stalks are not only visually appealing but also add a refreshing element to the dish. This leafy green is a fantastic source of vitamins A and C, as well as minerals like calcium and iron. Incorporating bok choy into your meal prep adds a nutritious punch to your plate. In our recipe, roasting imbues it with a hint of caramelization while retaining its freshness.
  • Shiitake mushrooms, cherished for their distinct earthy flavor, complement the dish’s Asian theme beautifully. These fungi bring depth and complexity to the plate. Shiitakes are a powerhouse of umami, the fifth taste sensation that adds depth and savoriness to dishes. Their inclusion amplifies the overall flavor profile of the meal. These mushrooms have a meaty texture when cooked, offering a satisfying chewiness that pairs well with the tender steak and bok choy. Shiitakes are packed with essential nutrients, including B vitamins, fiber, and minerals. They contribute both flavor and nutritional benefits to the dish.

round plate with grilled skirt steak and roasted bok choy and shiitake mushrooms

How to Make Grilled Skirt Steak and Roasted Veggies

  1. To start, set your oven to a toasty 400°F (200°C). This initial step sets the stage for the culinary magic about to unfold.
  2. Trim the bottom stalk of the bok choy, separate those vibrant leaves, and give them a thorough rinse. Lay them out with the shiitake mushrooms on a trusty sheet pan.
  3. Drizzle the soy sauce, sesame oil, and a pinch of garlic powder over the bok choy and mushrooms. Now, let your oven do its thing, roasting them for 10-12 minutes until they’re golden and tender.
  4. While the veggies are getting cozy in the oven, let’s tend to that delectable skirt steak. Season it with soy sauce, honey, garlic powder, a pinch of salt, and more of that savory sesame oil.
  5. Fire up an indoor grill pan on medium-high heat. Sear your marinated steak for 4 to 5 minutes on each side, until it’s cooked to perfection. Aim for that ideal internal temperature of 145°F (63°C). Afterward, give your steak a moment to rest before slicing it into elegant, thin strips.

Reference the recipe card below for detailed instructions.

round plate with grilled skirt steak and roasted bok choy and shiitake mushrooms

Meal Prep Tips

  • Storing: Store your prepped portions in airtight containers to keep those flavors intact and your ingredients fresh.
  • Reheating: When you’re ready to savor your creation, a quick spin in the microwave or a brief stint on the stovetop will restore the magic.
  • Ingredient Swaps: Feel free to put your own spin on this recipe. Swap the steak for chicken, tofu, or your favorite protein. Broccoli and snow peas are also great alternatives for veggie swaps.

round plate with grilled skirt steak and roasted bok choy and shiitake mushrooms

steak and bok choy

Grilled Asian Skirt Steak with Roasted Bokchoy

Elevate your weekday dining with Grilled Asian Skirt Steak paired harmoniously with Roasted Bok Choy and Shiitake Mushrooms. This convenient, flavorful delight offers a burst of Asian-inspired tastes while providing a nutrient-rich, budget-friendly solution for busy schedules.
No ratings yet
Prep Time 5 minutes
Cook Time 20 minutes
Course dinner, Main Course
Cuisine American, Asian
Servings 2

Equipment

  • knife
  • cutting board
  • sheet pan
  • tongs
  • indoor grill pan
  • oven

Ingredients
  

Steak and Marinade

  • 12 oz skirt steak
  • 1 tbsp soy sauce
  • 1 tsp honey
  • 1/4 tsp garlic powder
  • 1/4 tsp salt
  • 1 tsp sesame oil

Roasted Bokchoy and Mushrooms

  • 2 stalks baby bokchoy
  • 2 cups shiitake mushrooms
  • 1 tbsp soy sauce
  • 1/4 tsp garlic powder
  • 1 tbsp sesame oil

Instructions
 

  • Pre-heat the oven to 400F
  • Cut 1/2 of an inch from the bottom stalk of the bok choy. Separate out the leaves and thoroughly rinse it
  • Place the bok choy and shiitake mushrooms on a sheet pan and drizzle it with the soy sauce, sesame oil, and garlic powder. Roast in the oven for 10-12 minutes
  • Meanwhile, season the steak with the soy sauce, honey, garlic powder, salt, and sesame oil
  • Heat an indoor grill pan on medium-high heat and sear the steak on each side for about 4 to 5 minutes until it is fully cooked and reaches an internal temperature of 145F. Let it rest before slicing it into thin strips
  • Serve the steak with the roasted vegetables

Similar Recipes

sweet potato blt

Sweet Potato BLT Sandwich

balsamic chicken salad

Oven Baked Balsamic Chicken Salad

chicken salad

Oven Baked Honey Mustard Glazed Chicken Salad

You Might Also Like

Frequently Asked Questions

Can I use a different type of steak for this recipe?

Absolutely! While skirt steak works wonderfully due to its tenderness and quick cooking time, you can experiment with other cuts like flank steak or sirloin. Adjust the cooking time accordingly to ensure your chosen cut is cooked to your liking.


Can I substitute the vegetables with others I have on hand?

Definitely! While roasted bok choy and shiitake mushrooms provide a wonderful Asian-inspired flair, you can swap them out for other roasted veggies like broccoli, bell peppers, or zucchini. Keep in mind that roasting times may vary, so adjust accordingly.


Can I use an outdoor grill instead of an indoor grill pan?

Of course! An outdoor grill will add a delightful smokiness to your steak. Preheat the grill to medium-high heat and follow the same grilling times as mentioned in the recipe. Keep an eye on the steak to prevent overcooking.

Posted on Leave a comment

Beef Zucchini Nachos

wooden plate with sliced zucchini topped with ground beef, bell peppers, tomatoes, and shredded cheese

Beef Zucchini Nachos, your new meal prep superheroes. It’s like getting all the joy of restaurant nachos without the guilt or the hit to your wallet. So go on, get cooking, and enjoy every delicious, crunchy, and flavor-packed bite!

This post may contain affiliate links. Please see our privacy policy for details.

Plate with chicken fajitas, mango salsa, and colorful bell peppers and onions served with tortillas.

Why We Love These Beef Zucchini ‘Nachos’

Say hello to the marvelously delicious Beef Zucchini Nachos – your new go-to for meal prep magic! These babies are so incredible, you won’t even be tempted by those takeout temptations anymore.

Picture this: layers of flavor-packed ground beef, sautéed white onions and yellow bell peppers, and the vibrant pop of cherry tomatoes. Oh, and let’s not forget the star of the show – sliced zucchini, standing in as your crispy, guilt-free “chips.” And guess what? They taste just as good, if not better, than your favorite restaurant nachos.

The PrepYoSelf Newsletter

Simple Ingredients You’ll Need

  • Ground Beef: The hearty foundation of our nachos, bringing a savory kick to the party.
  • White Onions & Yellow Bell Peppers: Sautéed to perfection, these guys add a sweet crunch and a colorful twist.
  • Cherry Tomatoes: Bursting with juiciness and freshness, they add a delightful pop of flavor.
  •  Shredded Cheddar Cheese: Melted and ooey-gooey, this cheese takes your nachos to a whole new level.
  • Sliced Zucchini: The brilliant stand-in for traditional chips – crispy, satisfying, and oh-so-healthy.
  • Seasonings (Chili Powder, Cumin, Paprika, Garlic Powder, Salt, Olive Oil): This powerhouse combo is like a party in your mouth, turning every bite into a fiesta!

wooden plate with sliced zucchini topped with ground beef, bell peppers, tomatoes, and shredded cheese

Easy Step-by-Step Process:

  1. Preheat the Oven: Crank it up to 400°F (200°C) and let it get all warm and cozy.
  2. Slice & Season: Grab your zucchinis and slice them into 1/4 inch thick rounds. Sprinkle them with a dash of garlic powder and salt, then give them a loving coat of olive oil.
  3. Bake the Zucchini Slices: Lay those seasoned zucchini rounds onto a baking sheet and slide them into the preheated oven. Let them bake for about 12 to 15 minutes, until they’re golden and crisp.
  4. Sauté Veggies: While your zucchinis are getting their crunch on, heat up a sauté pan on medium-high and add a dash of olive oil. Toss in those onions and bell peppers, giving them a quick sauté for 2 to 3 minutes until they’re tender.
  5. Add Beef & Seasonings: Time to introduce the ground beef to the pan. Sprinkle in your magnificent mix of chili powder, cumin, paprika, garlic powder, and salt. Give it all a sauté dance until the beef turns a beautiful golden brown, about 6 to 7 minutes.
  6. Build the Magic: Take your zucchini slices out of the oven – they’re probably dancing with excitement now. Arrange them on a plate or serving dish, then heap on that glorious seasoned beef. Shower it all with shredded cheddar cheese and the vibrant cherry tomatoes.

Reference the recipe card below for detailed instructions.

wooden plate with sliced zucchini topped with ground beef, bell peppers, tomatoes, and shredded cheese

Meal Prep Tips for Baked Chicken Fajitas

  • Storage: If you somehow have leftovers (they’re so good, it’s a rare occurrence), store the components separately. Keep the beef and veggies in an airtight container in the fridge, and the zucchini slices in a separate container.
  • Reheating: To experience the nacho joy all over again, simply reheat the beef and veggies in a pan over medium heat until warm. As for the zucchini “chips,” a quick pop in the toaster oven will bring back their crispy charm.
  • Veggie Swap: Feeling adventurous? Swap out the ground beef for ground turkey or even black beans for a vegetarian twist. And don’t hesitate to toss in some sliced jalapeños for an extra kick of spice!

glass rectangular meal prep containers with sliced zucchini topped with ground beef, bell peppers, tomatoes, and shredded cheese

zucchini nachos

Beef Zucchini Nachos

These low carb zucchini nachos are delicious, crunchy, and have a flavor-packed bite!
No ratings yet
Prep Time 5 minutes
Cook Time 20 minutes
Course lunch, Main Course
Cuisine American, Mexican
Servings 2

Equipment

  • knife
  • cutting board
  • spatula
  • saute pan
  • sheet pan
  • oven

Ingredients
  

  • 10 oz ground beef
  • 2 each zucchini
  • 1/4 cup white onions (diced)
  • 1 each yellow bell pepper (diced)
  • 1/4 cup cherry tomatoes (sliced)
  • 1/2 cup shredded cheddar cheese
  • 1/8 tsp chili powder
  • 1/8 tsp cumin
  • 1/8 tsp paprika
  • 1/8 tsp garlic powder
  • 1/4 tsp salt
  • 1 tbsp olive oil

Zucchini

  • 1/4 tsp garlic powder
  • 1/4 tsp salt
  • 1 tbsp olive oil

Instructions
 

  • Pre-heat the oven to 400F
  • Slice the zucchini into 1/4 inch thick rounds. Season with garlic powder and salt. Coat with olive oil
  • Place the zucchini slices on a sheet pan and bake them in the oven for 12 to 15 minutes
  • Meanwhile, add olive oil to a saute pan on medium-high heat. Saute the onions and bell peppers until they soften (about 2 to 3 minutes)
  • Next, add the ground beef and seasonings and saute until it is fully cooked and golden brown (about 6 to 7 minutes)
  • Remove the zucchini slices from the oven and top them off with the taco meat. Top it off with shredded cheese and cherry tomatoes

Similar Recipes

cilantro chicken

Cilantro Lime Chicken Salad with Strawberry Salsa

sweet and sour chicken wings

Air Fryer Sweet and Sour Chicken Wings

stuffed primavera chicken

Primavera Stuffed Chicken Breasts

You Might Also Like

Frequently Asked Questions

Can I use a different type of meat?

Of course! While the original recipe features ground beef, you can easily switch it up. Try ground turkey, chicken, or even plant-based alternatives like crumbled tofu or tempeh for a vegetarian version.


Can I use pre-made taco seasoning?

Absolutely, using pre-made taco seasoning can save you time and effort. However, making your own seasoning blend from scratch as mentioned in the recipe allows you to customize the flavors to your liking.


Can I use different vegetables for sautéing?

Absolutely. The sautéed onions and bell peppers can be swapped with other veggies you enjoy, such as mushrooms, spinach, or even grated carrots. The goal is to add flavor and texture, so feel free to get creative!

Posted on Leave a comment

Roast Beef Deli Cheesesteak Sandwich

round plate with beef deli sandwich

Hello, my fellow food enthusiasts, let’s spice up our lunchtime routine with this incredible Roast Beef Deli Cheesesteak Sandwich. With its wholesome ingredients, fantastic flavors, and easy preparation, it’s a game-changer for your meal prep game. Get ready to savor every bite and enjoy a lunch that’s packed with love and flavor. Happy cooking!

This post may contain affiliate links. Please see our privacy policy for details.

round plate with beef deli sandwich

This Roast Beef Deli Cheesesteak Sandwich isn’t just a taste sensation, but it’s also a budget-friendly option that will leave you wondering if you stepped into a gourmet sandwich shop. Let me break it down for you:

Affordable Ingredients: One of the best things about this sandwich is that its main ingredients are readily available and won’t break the bank. Whole wheat bread, roast beef deli meat, sliced cheddar cheese, fajita bell peppers, onions, and tomatoes are all wallet-friendly options that can be easily found at your local grocery store.

Flavorful DIY: By making this sandwich at home, you have full control over the ingredients and their quality. You can ensure that your roast beef is top-notch, your veggies are fresh and vibrant, and your cheese is the perfect match for your taste buds. Plus, adding those cooked fajita bell peppers and onions brings a gourmet touch to the sandwich without the gourmet price tag.

Gourmet Touch on a Budget: The combination of high-quality ingredients, like the roast beef and cheddar cheese, elevates the flavors and creates a gourmet experience without the hefty price of a fancy sandwich shop. The mix of textures and flavors, along with the fajita-style veggies, adds a gourmet twist that will make you feel like a master chef.

The PrepYoSelf Newsletter

Deli Cheeseteak Sandwich Ingredients

  • Let’s dive into the ingredients that make this sandwich a lunchtime superstar. First up, we have whole wheat bread. Not only does it provide a wholesome base for our sandwich, but it also adds a nutty flavor and a delightful chewiness. Whole wheat bread is a great choice for those seeking a healthier alternative without compromising on taste.
  • Next, we have the star of the show: roast beef deli meat. Picture thinly sliced, succulent roast beef that melts in your mouth, delivering a rich, savory taste. It’s like a flavor explosion in every bite! The roast beef brings a hearty element to our sandwich, making it a filling and satisfying option.
  • But wait, we’re not done yet! To take this deli sandwich to the next level, we’re adding sliced cheddar cheese. Imagine the creamy, gooey texture of the cheese mingling with the warm roast beef—it’s pure bliss! The cheddar cheese adds a delightful sharpness and richness, perfectly complementing the other ingredients.
  • Now, here’s where we really turn up the flavor dial: fajita bell peppers and onions. By incorporating these cooked veggies into our sandwich, we’re introducing a burst of color and a delightful tang. The combination of sweet bell peppers and savory onions adds a tantalizing twist that will have your taste buds singing!
  • And let’s not forget about the tomato! Slices of ripe, juicy tomato bring a refreshing element to the sandwich, balancing out the richness of the roast beef and cheese. Plus, it adds a lovely pop of color and juiciness that takes this sandwich to a whole new level of deliciousness.

round plate with beef deli sandwich

How to Make a Roast Beef Deli Cheesesteak Sandwich

Now, let me share a little secret with you: this Roast Beef Deli Cheesesteak Sandwich is not only mouthwatering, but it’s also incredibly easy to make. The only thing you really need to cook is the fajita peppers.

To make the fajita bell peppers and onions, start by heating a pan over medium heat with a drizzle of oil. Add sliced bell peppers and onions, and sauté until they become tender and slightly caramelized. You can also season them with fajita seasoning or a blend of spices like cumin, paprika, and chili powder for an extra kick of flavor.

Then, simply layer the roast beef, cheddar cheese, fajita bell peppers and onions, and tomato slices between two slices of whole wheat bread. Press it together gently, and voila! You’ve got yourself a flavor-packed lunch that will make your colleagues drool with envy.

Reference the recipe card below for detailed instructions.

    meal prep containers with beef deli sandwich

    Meal Prep Tips

    • When it comes to meal prep, it’s essential to store your sandwiches properly to keep them fresh. Wrap each sandwich tightly in plastic wrap or place them in airtight containers. Pop them in the refrigerator, and they’ll stay fresh for up to three days. Now you can say goodbye to boring lunches and hello to a delightful homemade sandwich that will make you the envy of the office!
    • But why stop there? You can pair this Roast Beef Deli Cheesesteak Sandwich with a variety of delicious sides to make it a well-rounded meal. How about some crispy sweet potato fries, a refreshing green salad, or even a cup of hot soup on the side?

    meal prep containers with beef deli sandwich

    Beef Sandwich

    Deli Style Cheesesteak Sandwich

    Whether you're packing this sandwich for lunch at the office or enjoying it at home, you'll savor every bite and appreciate the wallet-friendly goodness of this scrumptious sandwich.
    No ratings yet
    Prep Time 5 minutes
    Cook Time 10 minutes
    Course lunch, Main Course
    Cuisine American
    Servings 2

    Equipment

    • knife
    • cutting board
    • saute pan
    • spatula

    Ingredients
      

    Sandwich Ingredients

    • 4 slices whole wheat bread
    • 4 oz roast beef deli meat
    • 2 slices cheddar cheese
    • 1 each green bell pepper (sliced)
    • 1/4 cup red onions (sliced)
    • 1 tbsp olive oil
    • 1 each roma tomato (sliced)

    Salad Ingredients

    • 4 cups spring mix
    • 4 tbsp choice of salad dressing

    Instructions
     

    • Add oil to a pan on medium high heat and saute the bell peppers and onions until they soften
    • Next, add the sliced cheese to the bottom layer of the sandwich bread, layering the roast beef on top
    • Top it off with fresh sliced tomatoes, the sauteed bell peppers, and onions. Then add the top layer of the sandwich bread
    • Slice in half and enjoy with a side salad and dressing

    Similar Recipes

    cilantro steak

    Grilled Cilantro Skirt Steak with Cauliflower Rice

    balsamic steak

    Grilled Steak with Sweet Potato Wedges

    beef and chinese broccoli

    Garlicky Beef Stir Fry with Chinese Broccoli

    You Might Also Like

    Frequently Asked Questions

    Can I substitute the roast beef deli meat with another type of meat?

    Of course! While roast beef deli meat adds a rich and savory flavor, you can experiment with other deli meats like turkey, ham, or even chicken. Just make sure to choose thinly sliced meats to ensure easy biting.


    Can I serve this sandwich warm?

    Absolutely! If you prefer a warm sandwich, you can heat it in a panini press, toaster oven, or even on a stovetop griddle. Make sure to heat it until the cheese melts and the bread turns golden brown for a delightful warm and toasty experience.


    Can I add additional toppings to the sandwich?

    Definitely! Feel free to get creative and add your favorite toppings to customize your sandwich. Some popular options include sliced avocado, pickles, lettuce, or even a dollop of mayonnaise or spicy mustard.

    Posted on Leave a comment

    Chili Steak Salad with Orange Salsa

    round plate with steak and orange salsa

    Hey there, foodies! Today, I’m thrilled to share with you an incredible recipe that will rock your meal prep game: Grilled Steak Salad with Orange Salsa. Get ready to tantalize your taste buds with a mouthwatering steak marinade and a zesty orange salsa that will take your meal prep to the next level!

    This post may contain affiliate links. Please see our privacy policy for details.

    round plate with steak and orange salsa

    Why you’ll enjoy this

    • Grilled Steak with Orange Salsa isn’t just incredibly delicious; it’s also packed with health benefits. The lean steak provides a generous amount of protein to fuel your muscles and keep you satisfied throughout the day. Oranges, rich in vitamin C, boost your immune system, while tomatoes and cilantro provide essential vitamins and antioxidants. With this recipe, you’re not just satisfying your taste buds; you’re nourishing your body too!
    • Meal prepping with Grilled Steak with Orange Salsa can actually save you money in the long run. By purchasing steak in bulk and preparing it ahead of time, you can take advantage of better deals and reduce food waste. Additionally, by making your own marinade and salsa, you have control over the ingredients, ensuring a budget-friendly yet incredibly flavorful meal prep option.
    • One of the greatest advantages of this recipe is that it keeps your meal prep interesting and tasty throughout the week. The marinade and salsa infuse the steak with delicious flavors that deepen over time, making each bite more satisfying than the last. Plus, the bright and vibrant colors of the orange salsa will instantly bring a pop of freshness to your plate. Trust me, you’ll be looking forward to digging into this meal every single day!

    The PrepYoSelf Newsletter

    Ingredients for this Zesty Steak Salad

    • Let’s start by talking about the star of the show – the steak marinade. It’s a tantalizing blend of flavors that will make your taste buds dance with joy. We combine the tangy freshness of lime juice and orange juice, the smoky kick of chili powder, the aromatic touch of garlic powder, and just the right amount of salt, pepper, and olive oil. This marinade not only enhances the flavor of the steak but also tenderizes it to perfection.
    • Now, let’s move on to the show-stopping sidekick – the orange salsa. Bursting with vibrant colors and zesty flavors, this salsa is a match made in culinary heaven. We combine juicy oranges, crisp red onions, ripe roma tomatoes, fragrant cilantro, a splash of lime juice, and a pinch of salt. The result? A refreshing and tangy salsa that perfectly complements the grilled steak.

    round plate with steak and orange salsa

    How to Make Chili Steak Salad

    Making the Salsa: This salsa is so simple to make and it’s a great combination of fruit and veggies.

    1. Peel your oranges and separate the orange pieces.
    2. Dice the red onions and roma tomatoes.
    3. Chop the cilantro.
    4. Combine the oranges, tomatoes, red onions, and cilantro in a bowl.
    5. Squeeze lime juice all over the ingredients and season with salt to tatse.

    Grilling the Steak: We want to marinate it with incredible flavors that will complement the citrus salsa:

    • Start by patting dry your steak to remove any excess moisture.
    • In a small bowl, combine the lime juice, orange juice, seasonings, and olive oil.
    • Marinate the steak for at least 10 minutes.
    • Preheat your grill or stovetop pan to medium-high heat.
    • Cook the steak for about 4-5 minutes per side, or until it reaches your desired level of doneness. Remember to adjust the cooking time based on the thickness of your steak.
    • Once cooked, let the steak rest for a few minutes before slicing it into thin strips.

    Reference the recipe card below for detailed instructions.

    glass meal prep containers with steak and orange salsa

    Meal Prep Tips for Steak Salad

    • Storing: Once you’ve grilled the steak and prepared the orange salsa, you can store them separately in airtight containers in the refrigerator. 
    • Reheating: The steak can be reheated gently in a skillet or microwave for a quick and easy meal.
    • Side Suggestions: Oh, the possibilities are endless! Serve it alongside some corn salad, roasted vegetables, and sliced avocadoes for a well-balanced and satisfying meal. You can also slice the steak and stuff it into a warm tortilla for a delicious steak taco experience. The choice is yours.

    round plate with steak and orange salsa

    Steak Salad

    Chili Steak Salad with Orange Salsa

    Grilled Steak with Orange Salsa is a tantalizing recipe that has zesty flavors, vibrant colors, and nutritious benefits.
    No ratings yet
    Prep Time 5 minutes
    Cook Time 15 minutes
    Course lunch, Main Course
    Cuisine American, Mexican
    Servings 2

    Equipment

    • knife
    • cutting board
    • mixing bowls
    • indoor grill pan
    • tongs

    Ingredients
      

    Steak & Marinade

    • 12 oz flank steak
    • 1 each lime (juiced)
    • 1 each orange (juiced)
    • 1/4 tsp chili powder
    • 1/4 tsp garlic powder
    • 1/4 tsp salt
    • 1/4 tsp pepper
    • 1 tbsp olive oil
    • 4 cups spring mix
    • 2 each avocado

    Orange Salsa

    • 2 each oranges (peeled)
    • 1/4 cup red onions (diced)
    • 2 each roma tomatoes (diced)
    • 1/4 cup cilantro (chopped)
    • 1 each lime (juiced)
    • 1/4 tsp salt

    Instructions
     

    • Mix together the steak marinade in a bowl and place the steak in the bowl. Make sure the steak is fully coated with the marinade and marinate for at least 10 minutes
    • Next, heat an indoor grill pan on medium high heat and grill the steak on each side for about 4 to 5 minutes until you reach the desired doness
    • Meanwhile, prepare the orange salsa
    • After the steak cooks, let it rest before slicing into small strips
    • Serve the steak on top of spring mix, topped off with the orange salsa and avocado slices

    Similar Recipes

    sweet potato blt

    Sweet Potato BLT Sandwich

    balsamic chicken salad

    Oven Baked Balsamic Chicken Salad

    chicken salad

    Oven Baked Honey Mustard Glazed Chicken Salad

    You Might Also Like

    Frequently Asked Questions

    Can I use a different cut of steak for this recipe?

    Absolutely! While this recipe works wonderfully with cuts like ribeye or flank steak, you can use your preferred cut of steak. Just keep in mind that different cuts may require varying cooking times on the grill.


    Can I marinate the steak overnight?

    Yes, marinating the steak overnight will intensify the flavors and tenderize the meat even more. It’s a great option if you want to prep ahead and save time on the day of cooking.


    Can I substitute lime juice or orange juice with lemon juice?

    Of course! While lime and orange juices bring a unique tanginess, you can substitute them with lemon juice if that’s what you have on hand. The flavor will be slightly different, but still delicious.

    Posted on Leave a comment

    Breakfast Potatoes with Taco Meat

    round plate with sliced potatoes rounds, ground beef, and diced bell peppers

    Imagine combining the crispy goodness of pan-fried potatoes with the savory deliciousness of taco meat. Trust me, it’s a match made in culinary heaven! Not only will this dish tantalize your taste buds, but it will also help you make the most of your leftovers. Get ready to transform that extra taco meat into a breakfast delight that will make your mornings brighter. Let’s dive in!

    This post may contain affiliate links. Please see our privacy policy for details.

    round plate with sliced potatoes rounds, ground beef, and diced bell peppers

    Why This is Great for Meal Prep

    Variety and Convenience: One of the reasons I adore making pan-fried potatoes with taco meat for meal prep is the amazing variety it adds to your weekly menu. We all know how monotonous meal prep can sometimes get, but not anymore! By incorporating this recipe into your repertoire, you’ll have a mouthwatering alternative to the usual meal prep staples.

    Versatility: The beauty of this dish lies in its versatility. Not only can you savor taco meat as a main course, but you can also repurpose the leftovers into a delightful breakfast. Picture this: a plateful of golden-brown potatoes topped with reheated taco meat, accompanied by a perfectly fried egg. It’s the kind of breakfast that will make you jump out of bed with enthusiasm!

    Time and Money-Saving: Let’s talk about the practical benefits, shall we? Making pan-fried breakfast potatoes with taco meat is a fantastic way to save time and money. By incorporating leftovers into your meal prep routine, you’ll reduce food waste and stretch your budget further. Plus, you won’t have to spend hours cooking each day, as this dish can be made in advance and enjoyed throughout the week.

    The PrepYoSelf Newsletter

    Ingredients You’ll Need

    Let’s delve into the easy and simple ingredients that make this pan-fried breakfast potatoes with taco meat recipe a breeze to prepare. Here’s what you’ll need:

    • Red Potatoes: Red potatoes add a lovely pop of color and a creamy texture to this dish. They hold their shape well when cooked and provide a delicious contrast to the taco meat. Make sure to slice them into thin rounds for optimal cooking.
    • Ground Beef: Ground beef forms the hearty base of the taco meat. Choose a lean or medium-fat ground beef for a balance between flavor and tenderness. You can also opt for ground turkey, chicken, or plant-based alternatives if you prefer.
    • White Onions: White onions add a distinct, slightly sweet flavor to the taco meat. They complement the spices and provide a subtle crunch. Dice them finely or slice them thinly, depending on your preference.
    • Yellow Bell Pepper: Yellow bell pepper contributes a vibrant color and a mild, slightly sweet taste to the dish. It adds freshness and a delightful crunch. Feel free to use other bell pepper colors if you prefer or if they’re readily available.
    • Cherry Tomatoes: Cherry tomatoes bring a burst of juiciness and a hint of sweetness to the recipe. They add a vibrant pop of color and a refreshing element. You can halve or quarter them, depending on their size.
    • Combination of Seasonings: To give the taco meat its irresistible flavor, we have a delightful combination of seasonings such as paprika, chili powder, cumin, garlic powder, and salt. Remember, feel free to adjust the quantities of the seasonings to suit your personal taste preferences. You can also add other spices or herbs to further customize the flavor profile of your dish. Get creative and have fun with it!

    round plate with sliced potatoes rounds, ground beef, and diced bell peppers

    How to Make Breakfast Potatoes with Taco Meat

    1. Slice the breakfast potatoes into thin slices.
    2. Add oil to the pan, and pan-fry the potatoes on each side until they are golden brown and fluffy on the inside. This should take about 4 to 5 minutes on each side.
    3. After the potatoes are cooked, remove them from the pan.
    4. Using the same pan, cook your taco meat. If the ground meat is raw, make sure it fully cooks. If you are using leftover taco meat, just cook them until they heat through.

    Reference the recipe card below for detailed instructions.

    rectangle glass meal prep containers with sliced potatoes rounds, ground beef, and diced bell peppers

    Meal Prep Tips:

    • To serve this delightful meal, I recommend plating your pan-fried potatoes with a generous helping of taco meat on top. Add a sprinkle of your favorite cheese, a dollop of sour cream, and a handful of fresh herbs for that extra burst of flavor. Voila! A breakfast that will have you dancing to the kitchen in the morning.
    • When it comes to reheating, you can do it on the stovetop, in the oven, or even in the microwave. Just make sure to heat everything thoroughly while maintaining the desired texture of your potatoes.
    • If you want to freeze portions for later use, simply transfer the cooled dish into airtight containers or freezer bags. When you’re ready to enjoy, thaw it in the refrigerator overnight and reheat it using your preferred method.

    rectangle glass meal prep containers with sliced potatoes rounds, ground beef, and diced bell peppers

    taco meat and potatoes

    Breakfast Potatoes with Taco Meat

    Pan-fried potatoes with taco meat is the ultimate breakfast meal prep delight.
    No ratings yet
    Prep Time 5 minutes
    Cook Time 20 minutes
    Course lunch, Main Course
    Cuisine American, Mexican
    Servings 2

    Equipment

    • knife
    • cutting board
    • spatula
    • saute pan

    Ingredients
      

    Potatoes

    • 2 each small red potatoes
    • 1/8 tsp paprika
    • 1/8 tsp salt
    • 1 tsp olive oil

    Taco Meat

    • 6 oz ground beef
    • 1/4 cup white onions (diced)
    • 1/2 each yellow bell pepper (diced)
    • 1/4 cup cherry tomatoes (sliced)
    • 1/8 tsp chili powder
    • 1/8 tsp cumin
    • 1/8 tsp paprika
    • 1/8 tsp garlic powder
    • 1/8 tsp salt
    • 1 tbsp olive oil

    Instructions
     

    • Slice the potatoes into 1/4 inch thick rounds. Season with garlic powder, paprika, and salt
    • Add the oil to a saute pan on medium-high heat. Cook the sliced potatoes on each side for about 4 to 5 minutes until it is golden brown and tender
    • After the potatoes have cooked, remove them from the pan and set them aside. Add more olive oil to the pan and saute the onions and bell peppers until they soften (about 2 to 3 minutes)
    • Next, add the ground beef and seasonings and saute until it is fully cooked and golden brown (about 6 to 7 minutes)
    • Top it off the sliced potatoes with the taco meat and cherry tomatoes

    Similar Recipes

    fried egg and sausage hash

    Fried Egg with Apple and Sausage Hash

    Easy Cheese Omelette

    easy sausage egg muffins

    Sausage Egg Muffins with Strawberries

    You Might Also Like

    Frequently Asked Questions

    Can I use any type of potato for this recipe?

    Yes, you can use various types of potatoes, such as russet, Yukon gold, or red potatoes. Just keep in mind that different potatoes may have slightly different textures and cooking times.


    Can I customize the toppings?

    Absolutely! Feel free to get creative with your toppings. You can add fresh salsa, diced avocado, sliced jalapeños, or a squeeze of lime juice for an extra zing. Customize it to suit your taste preferences and enjoy the burst of flavors!


    Can I use pre-cooked taco meat for this recipe?

    Absolutely! Using leftover taco meat is a great option, but you can also use pre-cooked taco meat from the store. Just make sure to heat it thoroughly when combining it with the pan-fried potatoes.

    Posted on Leave a comment

    Grilled Peach and Steak Salad

    grilled peach and steak salad in rectangle plate

    Picture this: succulent grilled peaches paired with perfectly seasoned steak, all atop a bed of vibrant greens. Yes, we’re talking about the irresistible Grilled Peach and Steak Salad! Not only is it a burst of flavors, but it’s also an excellent choice for meal prep. Let’s dive into the fantastic world of grilling peaches, seasoning steak, and assembling this mouthwatering salad.

    This post may contain affiliate links. Please see our privacy policy for details.

    grilled peach and steak salad in rectangle plate

    The Perfect Salad for Freshness and Vibrant Flavors

    Here’s why this combination is the ultimate choice when you’re craving something fresh and bursting with flavors:

    • Sweet and Smoky: The grilled peaches add a delightful sweetness and smoky undertones to the salad, making it a delightful surprise in every bite.
    • Juicy and Tender: The steak, with its flavorful seasoning, brings a juicy and tender element to the salad. Its savory notes perfectly complement the sweetness of the peaches.
    • Vibrant Greens: Choose your favorite assortment of fresh greens as the base of your salad. Think crisp lettuce, baby spinach, or peppery arugula. These greens provide a refreshing and nutritious backdrop to the star ingredients.
    • Versatile Additions: Get creative and add your favorite toppings to enhance the flavors even further. Consider adding crumbled feta cheese, toasted nuts, or a tangy vinaigrette for an extra burst of goodness.

    The PrepYoSelf Newsletter

    Ingredients for this Simple Steak Salad

    • Protein: The steak in this salad serves as a fantastic source of protein. Protein is essential for building and repairing tissues, supporting muscle growth, and keeping you feeling satisfied and full. By including steak in this salad, you’re adding a substantial amount of high-quality protein to your meal.
    • Vegetables: This salad is packed with an abundance of fresh vegetables, which contribute to its nutritional value. The vibrant greens, such as lettuce, spinach, or arugula, provide essential vitamins, minerals, and dietary fiber. These leafy greens are low in calories but rich in nutrients, helping to promote overall health.
    • Fruit: The star ingredient, grilled peaches, adds a delightful touch of fruitiness to the salad. Peaches are not only juicy and delicious but also a great source of vitamins, particularly vitamin C, and dietary fiber. Incorporating fruit into your meal provides natural sweetness and additional nutrients.

    grilled peach and steak salad in rectangle plate

    How to Make Grilled Peach and Steak Salad

    Grilling Peaches: Grilling peaches not only enhances their natural sweetness but also gives them a tantalizing smoky flavor. Here’s a simple step-by-step guide on how to grill peaches to perfection:

    1. Start by preheating your grill to medium-high heat.
    2. Cut the peaches in half, removing the pits.
    3. Brush the cut sides of the peaches with a light coating of olive oil. This will help prevent sticking and promote caramelization.
    4. Place the peaches on the grill, cut side down, and let them cook for about 2-3 minutes until grill marks appear.
    5. Flip the peaches and cook for another 2-3 minutes on the skin side.
    6. Remove the peaches from the grill and let them cool slightly before slicing them into wedges for the salad.

    Seasoning the Steak: Now, let’s talk about the star of the show—the steak! We want to infuse it with incredible flavors that will complement the sweetness of the peaches. Here’s a quick and easy seasoning blend that will make your taste buds sing:

    • Start by patting dry your steak to remove any excess moisture.
    • In a small bowl, combine the paprika, garlic powder, and salt to create the seasoning blend.
    • Sprinkle the seasoning evenly on both sides of the steak, pressing it gently to adhere.
    • Preheat your grill or stovetop pan to medium-high heat.
    • Cook the steak for about 4-5 minutes per side, or until it reaches your desired level of doneness. Remember to adjust the cooking time based on the thickness of your steak.
    • Once cooked, let the steak rest for a few minutes before slicing it into thin strips.

    Reference the recipe card below for detailed instructions.

    grilled peach and steak salad in meal prep containers

    Meal Prep Tips

    • Storing: If you have leftovers or are prepping the salad in advance, store the components separately. Keep the grilled peaches, sliced steak, and greens in separate airtight containers in the refrigerator to maintain freshness.
    • Reheating: If you prefer to enjoy the salad warm, you can quickly reheat the grilled peaches and steak before adding them to the greens. You can either heat them in a microwave-safe dish for a short duration or lightly sauté them in a pan over medium heat until warmed through.
    • Side Suggestions: Serve the Grilled Peach and Steak Salad with a slice of crusty bread or a dinner roll. It’s perfect for mopping up any delicious dressing or juices from the salad. Grilled asparagus, zucchini, or bell peppers make excellent side dishes. Toss them with olive oil, salt, and pepper, then grill them alongside the peaches for a well-rounded meal. Add a serving of cooked quinoa or rice as a nutritious and filling side dish. It complements the flavors of the salad while adding some additional texture and substance.

    grilled peach and steak salad in meal prep containers

    Steak & Peach Salad

    Grilled Peach and Steak Salad

    This Grilled Peach and Steak Salad is a healthy and balanced meal option that incorporates protein, vegetables, and fruit.
    No ratings yet
    Prep Time 5 minutes
    Cook Time 15 minutes
    Course lunch, Main Course
    Cuisine American
    Servings 2

    Equipment

    • knife
    • cutting board
    • tongs
    • indoor grill pan

    Ingredients
      

    Steak and Seasonings

    • 12 oz sirloin steak
    • 1/4 tsp paprika
    • 1/4 tsp garlic powder
    • 1/4 tsp salt
    • 1 tbsp olive oil

    Salad Ingredients

    • 2 each small peaches
    • 4 cups baby spinach
    • 1 each roma tomato (diced)
    • 1/4 cup red onions (sliced)
    • 1 each cucumber (cut in rounds)
    • 4 tbsp choice of vinaigrette dressing

    Instructions
     

    • Season the steak with paprika, garlic powder, salt, pepper, and coat with olive oil
    • Cut the peaches into slices
    • Heat an indoor grill pan on medium high heat an sear the peaches on each side for about 2 to 3 minutes. Set aside for the salad
    • Next, sear the steak on each side for about 4 to 5 minutes until it is fully cooked and reaches an internal temperature of 145F. Let it rest before slicing it into thin strips
    • Serve the steak on top of the baby spinach, topped with fresh tomatoes, red onions, and cucumbers. Add the grilled peaches and drizzle with your choice of salad vinaigrette

    Similar Recipes

    sweet potato blt

    Sweet Potato BLT Sandwich

    balsamic chicken salad

    Oven Baked Balsamic Chicken Salad

    chicken salad

    Oven Baked Honey Mustard Glazed Chicken Salad

    You Might Also Like

    Frequently Asked Questions

    Can I substitute peaches with other fruits?

    Certainly! While grilled peaches add a unique and delicious flavor to the salad, you can experiment with other fruits based on your preference or seasonal availability. Nectarines, plums, or even grilled pineapple can be excellent alternatives that still provide a touch of sweetness.


    What dressings pair well with this salad?

    The Grilled Peach and Steak Salad pairs well with a variety of dressings. A light vinaigrette made with balsamic vinegar or a tangy citrus dressing can complement the flavors beautifully. You can also try a creamy dressing like a yogurt-based dressing with herbs or a honey mustard dressing for a touch of sweetness.


    Can I add additional toppings to the salad?

    Absolutely! Feel free to get creative with toppings to enhance the flavors and textures. Crumbled feta cheese, toasted nuts or seeds (such as almonds or pumpkin seeds), thinly sliced red onions, or fresh herbs like basil or mint can all be delightful additions to this salad.

    Posted on Leave a comment

    Cauliflower Sausage Pizza

    round plate with cauliflower sausage pizza

    Hey there, fellow foodies! Get ready to tantalize your taste buds and nourish your body with a sensational recipe that’s perfect for meal prep: Cauliflower Sausage Low Carb Pizza! With just a handful of ingredients and a little bit of culinary prowess, you’ll have a delicious pizza that’s ready to conquer your cravings in no time. The best part? It’s a one-pan wonder! No need to fuss with multiple dishes or complicated techniques. You simply top your cauliflower crusts with mouthwatering sausage and your favorite toppings and bake it to perfection. Voila! A scrumptious pizza is born.

    This post may contain affiliate links. Please see our privacy policy for details.

    Calories: 579kcal | Carbohydrates: 21g | Protein: 25g | Fat: 45g | Saturated Fat: 16g | Polyunsaturated Fat: 4g | Monounsaturated Fat: 23g | Cholesterol: 92mg | Sodium: 1221mg | Potassium: 1274mg | Fiber: 6g | Sugar: 7g | Vitamin A: 519IU | Vitamin C: 142mg | Calcium: 294mg | Iron: 2mg

    round plate with cauliflower sausage pizza

    Let’s get down to the nitty-gritty and discuss the cost factor. Cauliflower Sausage Pizza is a budget-friendly option for your meal prep repertoire. Cauliflower is often an affordable vegetable that is readily available. Sausage, with its rich and savory flavors, adds a touch of indulgence without breaking the bank. Plus, you can get creative with your toppings, utilizing leftovers or ingredients you already have on hand and saving money while satisfying your cravings.

    But wait, there’s more! This low carb pizza is a healthier alternative to its traditional counterpart. By swapping out the traditional flour-based crust for a cauliflower crust, you’re reducing the carb content significantly. Cauliflower crust is not only lower in carbs but also packed with essential nutrients, fiber, and antioxidants. It’s like getting a nutritional boost while relishing your favorite comfort food. Talk about having your (pizza) pie and eating it too!

    The PrepYoSelf Newsletter

    Here’s What You’ll Need for Cauliflower Pizza

    • First up is the mighty cauliflower head. We’ll transform this humble vegetable into a delicious low carb pizza crust that’s high in flavor.
    • Now, let’s talk about the toppings. We’ll start with a generous spread of tomato sauce. You can use your favorite store-bought variety, or if you’re feeling adventurous, whip up a homemade version bursting with fresh flavors. Either way, make sure to cover the cauliflower crust evenly, creating a vibrant tomato canvas for the rest of the ingredients.
    • Next, we’ll add dollops of creamy ricotta cheese. Its smooth texture and subtle tanginess will provide a delightful contrast to the other ingredients. If you don’t have ricotta on hand, feel free to substitute it with goat cheese or even cream cheese for a slightly different twist.
    • Now, it’s time to introduce some protein power. Dice up some beef sausage into bite-sized pieces and scatter them over the pizza. The sausage brings a rich, savory flavor that complements the other components beautifully. If you prefer a vegetarian version, you can swap the beef sausage for your favorite meatless alternative like plant-based sausages or marinated tofu.
    • Of course, what’s a pizza without a generous layer of ooey-gooey mozzarella cheese? Sprinkle it generously over the toppings, allowing it to melt and create a golden, cheesy blanket of deliciousness. If you’re feeling adventurous, you can mix in some grated Parmesan cheese or experiment with different types of cheese like fontina or provolone.
    • To elevate the flavors even further, sprinkle some Italian seasoning over the top. This blend of aromatic herbs like oregano, basil, thyme, and rosemary adds a burst of Mediterranean goodness that will make your taste buds sing. If you don’t have Italian seasoning, feel free to use individual herbs or get creative with your own spice blend.

    round plate with cauliflower sausage pizza

    How to Make Cauliflower Pizza

    1. Preheat the oven to 400F.
    2. Prep your cauliflower head by removing the outer green leaves and cutting off the bottom stem.
    3. Cut through the middle of the cauliflower head and cut thick 1-inch “steak slices).
    4. Place the cauliflower slices on a sheet pan and drizzle with olive oil and bake it in the oven.
    5. After the cauliflower gets tender and finishes cooking, carefully remove it from the oven and add your toppings.
    6. Place the cauliflower pizzas back in the oven and bake for another 5 to 10 minutes until the sausage heats through and the cheese melts.

    Reference the recipe card below for detailed instructions.

    glass meal pep containers with cauliflower sausage pizza

    Meal Prep Tips for Cauliflower Low Carb Pizza

    • Once your Cauliflower Sausage Pizza is baked to golden perfection, you can easily store the leftovers in airtight containers in the fridge. When you’re ready to enjoy it, a quick reheat in the oven or microwave will bring back its glorious flavors. If you want to freeze individual slices, make sure to wrap them tightly in plastic wrap or use freezer-safe containers. This way, you can have a tasty, ready-to-eat meal whenever the pizza cravings strike.
    • But why stop at just pizza? Cauliflower Sausage Pizza is incredibly versatile and can be served with a variety of scrumptious side dishes. How about pairing it with a fresh, vibrant salad loaded with leafy greens and your favorite veggies? The options are endless, and you’ll have a satisfying, protein-packed meal that will keep you energized and feeling fabulous.
    • If you don’t want to use your oven, you can also make this in your Air Fryer. Just keep in mind that the Air Fryer cooks much faster, so reduce the cooking time by 5 minutes and lower the temperature to 375F.

    glass meal pep containers with cauliflower sausage pizza

    cauliflower pizza

    Cauliflower Sausage Pizza

    No ratings yet
    Prep Time 5 minutes
    Cook Time 20 minutes
    Course dinner, Main Course
    Cuisine American, Italian
    Servings 2
    Calories 579 kcal

    Equipment

    • knife
    • cutting board
    • sheet pan
    • oven

    Ingredients
      

    • 1 each cauliflower head
    • 2 each beef sausage links
    • 1/2 cup ricotta cheese
    • 1/4 cup shredded mozzarella cheese
    • 1 tbsp garlic (minced)
    • 1/4 cup tomato sauce
    • 1/4 tsp thyme
    • 1/4 tsp salt
    • 2 tbsp olive oil

    Instructions
     

    • Pre-heat the oven to 400F
    • Cut the outer green leaves of the cauliflower and cut off the bottom of the cauliflower stem, but make sure to keep the core intact
    • Cut through the middle of the cauliflower head to keep the florets together and cut thick "steak" slices about 1 inch thick
    • Save two thick slices and set the other floret pieces aside for another dish (you can keep it in the fridge for a few days or freeze it for a few months)
    • Place the cauliflower slices on a sheet pan and drizzle it with olive oil making sure it is fully coated
    • Bake it in the oven for about 25 minutes.
    • Meanwhile, dice the sausage in small square pieces. Mix together the tomato sauce with the thyme and salt
    • After 25 minutes, remove the cauliflower from the oven and top it off with the tomato sauce, minced garlic, shredded mozzarella, ricotta cheese, and sausage
    • Place it back in the oven to bake for another 5 to 10 minutes until the sausage heats through and the cheese melts

    Notes

    Nutrition information provided is an estimate. It will vary based on cooking method and specific ingredients used. Please consult with your healthcare provider for specific dietary needs. To gain a better understanding, explore our nutrition disclaimer here. 

    Nutrition

    Calories: 579kcalCarbohydrates: 21gProtein: 25gFat: 45gSaturated Fat: 16gPolyunsaturated Fat: 4gMonounsaturated Fat: 23gCholesterol: 92mgSodium: 1221mgPotassium: 1274mgFiber: 6gSugar: 7gVitamin A: 519IUVitamin C: 142mgCalcium: 294mgIron: 2mg

    Similar Recipes

    cilantro steak

    Grilled Cilantro Skirt Steak with Cauliflower Rice

    cauliflower rice

    Cauliflower Fried Rice

    sweet and sour chicken wings

    Air Fryer Sweet and Sour Chicken Wings

    You Might Also Like

    Frequently Asked Questions

    Can I make the pizza without cheese?

    Absolutely! If you’re looking for a dairy-free option or simply prefer not to use cheese, you can omit it or try using a vegan cheese alternative.


    Can I use a different sauce?

    Of course! Feel free to experiment with basil pesto sauce, alfredo sauce, and even just freshly sliced tomatoes.


    Can I add additional toppings to the pizza?

    Definitely! Feel free to get creative with your toppings. Add your favorite vegetables, such as bell peppers, onions, or mushrooms, to enhance the flavors and add more nutritional value.

    Posted on Leave a comment

    Instant Pot Beef Soft Tacos

    round plate with beef soft tacos

    So, my friends, get ready to embrace the convenience, deliciousness, and affordability of Instant Pot Beef Soft Tacos. With their tender beef, vibrant flavors, and endless possibilities for toppings and sides, these tacos are a true meal prep game-changer. Let’s make mealtime a fiesta of flavors and enjoy every single bite with a smile on our faces. Happy cooking and happy eating!

    This post may contain affiliate links. Please see our privacy policy for details.

    round plate with instant pot beef soft tacos

    Why This Recipe is a Time and Money Saver

    Time is precious, my friends, and this recipe is here to save the day. The Instant Pot works its magic by drastically reducing cooking time, which means you can whip up a batch of these delectable beef soft tacos even on the busiest of days. Whether you’re a busy professional, a parent juggling multiple responsibilities, or simply someone who values efficiency in the kitchen, this recipe is your golden ticket to a stress-free dinner.

    Let me tell you, making this recipe is an absolute breeze! With the help of our trusty Instant Pot, you can have tender, flavorful beef in no time. The magic of pressure cooking ensures that even the toughest cuts of beef become melt-in-your-mouth goodness. Simply toss in the ingredients, set the timer, and let the Instant Pot work its magic while you focus on other tasks.

    Now, let’s talk about the budget-friendly aspect of this recipe. We all know that beef can sometimes be a little heavy on the wallet, but fear not! By choosing cheaper cuts like chuck or round roast, you can create a mouthwatering taco filling without breaking the bank. Plus, the Instant Pot’s ability to tenderize those cuts means you don’t have to splurge on the pricier options.

    The PrepYoSelf Newsletter

    Here’s What You Need to Make Instant Pot Beef Tacos

    • Beef: We used chuck roast, but you can choose any cut of beef
    • Aromatics: We added, garlic cloves, celery, red onions
    • Liquid: We added some water and tomato sauce
    • Pico de Gallo: Mixture of tomatoes, celery, red onions, lime juice, and cilantro
    • Tortilla: You can use flour or corn tortillas

    round plate with instant pot beef soft tacos

    How to Make Instant Pot BBQ Beef

    1. Prepare the beef in the instant pot. Add the garlic, celery, red onions, tomato sauce, salt, and pepper.
    2. While the beef cooks, chop up the veggies for the pico de gallo.
    3. After the beef cooks, carefully release the steam and remove the lid. Drain the beef from the excess liquid and shred it with a fork.
    4. Fill the tortillas with the shredded beef and top it off with pico de gallo and fresh pepper strips.

    Reference the recipe card below for detailed instructions.

    glass containers with instant pot beef soft tacos

    Meal Prep Tips for Instant Pot Beef Tacos

    Now, let’s talk about the ultimate taco spread. While these Instant Pot Beef Soft Tacos are definitely the star of the show, they love to be accompanied by some delicious sidekicks. How about serving them with zesty salsa, creamy guacamole, tangy sour cream, and a sprinkle of fresh cilantro? You can also whip up some Mexican rice, refried beans, or a refreshing corn salad to round out the meal. The options are endless!

    There are also endless possibilities of repurposing leftovers. Here are some ways to transform your beef into new and exciting meals:

    • Beef Taco Salad: Transform your Instant Pot Beef Soft Tacos into a vibrant taco salad. Start with a bed of fresh lettuce, add your reheated beef, and top it off with diced tomatoes, sliced avocado, shredded cheese, and a dollop of sour cream. Drizzle your favorite dressing over the top, and you’ve got a satisfying and nutritious meal.
    • Beef Enchiladas: Roll up your beef in corn tortillas, place them in a baking dish, and smother them with enchilada sauce. Sprinkle some cheese on top and bake until the cheese is bubbly and golden. Serve with a side of Mexican rice and refried beans for a comforting dinner.
    • Beef Quesadillas: Grab a couple of tortillas, layer them with shredded beef and your choice of cheese. Heat them up in a skillet until the cheese is melted and the tortillas are golden and crispy. Cut them into wedges, and you’ve got a mouthwatering snack or a quick and easy lunch option.

    glass containers with instant pot beef soft tacos

    beef soft tacos

    Instant Pot Beef Soft Tacos

    Tender beef, vibrant flavors, and refreshing toppings make these Instant Pot Beef Soft Tacos a delicious meal.
    No ratings yet
    Prep Time 5 minutes
    Cook Time 50 minutes
    Course lunch, Main Course
    Cuisine American, Latin
    Servings 2

    Equipment

    • knife
    • cutting board
    • Instant Pot
    • mixing bowl

    Ingredients
      

    Beef and Seasonings

    • 12 oz chuck roast
    • 2 each garlic cloves (peeled)
    • 1/4 cup celery (diced)
    • 1/4 cup red onions (diced)
    • 8 oz tomato sauce
    • 1 cup water
    • 1 tsp salt
    • 1/4 tsp paprika
    • 1/4 tsp chili powder
    • 1/4 tsp cumin
    • 1/4 tbsp pepper

    Pico de Gallo

    • 1 each roma tomato (diced)
    • 1/4 cup celery (diced)
    • 1/4 cup red onions (diced)
    • 1 each lime (juiced)
    • 1/4 cup cilantro (chopped)
    • 1/4 tsp salt

    Sides

    • 1 each red bell pepper (sliced)
    • 4 each flour tortillas

    Instructions
     

    • Place the chuck roast in the instant pot and add celery, onions, garlic, tomato sauce, seasonings, and water. Cover and seal the lid and place under high pressure for 45 minutes. After it cooks, follow the manufacturer's instructions for natural release and carefully remove the lid
    • Drain the beef from the soup and shred with a fork (note: you can save the liquid and freeze it, use it for stock for soup recipes)
    • While the beef is cooking, prepare the pico de gallo
    • After the beef cooks, serve the beef in tortillas, topped with pico de gallo and bell pepper strips

    Similar Recipes

    chicken soup

    One Pot Mexican Chicken Soup

    sweet potato blt

    Sweet Potato BLT Sandwich

    Grilled Honey Dijon Chicken Kale Salad

    You Might Also Like

    Frequently Asked Questions

    Can I use frozen beef for this recipe?

    It’s generally recommended to use thawed beef for better results. Frozen beef may require a longer cooking time and could affect the texture of the meat.


    Can I use a different cut of beef?

    Absolutely! While the recipe suggests using a chuck or round roast, you can experiment with other cuts like brisket or even stew meat. Just keep in mind that different cuts may require slight adjustments to the cooking time.


    Can I use chicken or pork instead of beef?

    Of course! The beauty of tacos is their versatility. Feel free to swap the beef for chicken, pork, or even tofu for a vegetarian option. Adjust the cooking time accordingly based on the protein you choose.

    Posted on Leave a comment

    Stuffed Baked Potato with Instant Pot BBQ Beef

    Whether you’re craving the comforting flavors of a backyard barbecue or the simple pleasure of a well-executed baked potato, this Instant Pot BBQ Beef and Baked Potato recipe hits all the right notes. The rich, smoky beef combined with the buttery, fluffy potato is a combination that will have you singing its praises.

    This post may contain affiliate links. Please see our privacy policy for details.

    plate with baked potato and instant pot beef bbq on top with broccoli side

    Why this meal is great for meal prep

    Meal prepping can be a lifesaver, especially for those of us with busy schedules. With this recipe, you can prepare a batch of tender, juicy shredded beef, and perfectly baked potatoes in your trusty Instant Pot. The best part? It’s incredibly easy! Just set it and forget it while you go about your day, and voila – a delicious meal awaits you when you’re ready.

    Now, let’s talk about the single-serving aspect. Sometimes, you just want a satisfying meal all to yourself, right? Well, this recipe has got you covered. You can easily adjust the portions to make a single serving, allowing you to indulge in a hearty and comforting meal without worrying about leftovers. It’s the perfect solution for those nights when you’re craving a nice warm, comfort meal.

    The PrepYoSelf Newsletter

    Here’s What You Need to Make Stuffed Potatoes with Instant Pot Beef BBQ

    • Beef: We used chuck roast, but you can choose any cut of beef
    • Aromatics: We added, garlic cloves, celery, white onions, and green onions
    • Liquid: We added some water to tomato sauce
    • Potatoes: You can also use sweet potatoes
    • Broccoli: For added fiber, we enjoyed this dish with broccoli, but feel free to serve it with your choice of veggies.

    plate with baked potato and instant pot beef bbq on top with broccoli side

    How to Make Instant Pot BBQ Beef

    Now, let’s talk about why this recipe is a dream come true for BBQ lovers and baked potato enthusiasts. The Instant Pot works its magic, transforming tough cuts of beef into melt-in-your-mouth, smoky, BBQ-infused perfection. The meat becomes so tender that it practically falls apart with a gentle touch of a fork. Pair that with a perfectly baked potato – fluffy on the inside, crispy on the outside – and you’ve got a match made in heaven. Here’s how to make it:

    1. Prepare the shredded beef in the instant pot. Add the garlic, celery, white onions, tomato sauce, salt, and pepper.
    2. While the beef cooks, preheat the oven to 425F. Clean the potatoes and scrub them well. Then, place them on a sheet pan and bake them in the oven for 50-60 minutes.
    3. After the beef cooks, carefully release the steam and remove the lid. Drain the beef from the excess liquid and shred it with a fork.
    4. Mix the beef with your choice of BBQ sauce.
    5. Once the potatoes are cooked, let them cool before slicing them in half. Top it off with the BBQ beef and enjoy with a side of veggies. Garnish with fresh green onions.

    Reference the recipe card below for detailed instructions.

    Glass meal prep container with instant pot beef and baked potato and broccoli

    Meal Prep Tips for Stuffed BBQ Beef Potatoes

    • Now, let’s dive into the nitty-gritty of storage and serving. Once you’ve prepared your Instant Pot BBQ Shredded Beef and Baked Potatoes, you’ll want to store them properly to enjoy later. I recommend dividing the shredded beef into individual airtight containers and refrigerating them. As for the baked potatoes, wrap them in foil and keep them in the fridge alongside the beef. When you’re ready to dig in, simply reheat the beef in the microwave or on the stovetop, and warm up the baked potato in the oven or microwave. Easy peasy, right?
    • When it comes to serving, get creative! Pile that luscious shredded beef on top of the fluffy baked potato, and garnish with your favorite toppings like sour cream, shredded cheese, green onions, or even some spicy BBQ sauce. The possibilities are endless, so feel free to customize it to your liking. 
    • To reheat, simply microwave the shredded beef on high for 1-2 minutes or until warmed through. For the baked potatoes, you can either reheat them in the oven at 350°F (175°C) for about 10-15 minutes or in the microwave for 2-3 minutes until heated to your liking.

    glass meal prep containers with food including instant pot beef and baked potatoes

    BBQ Baked Potato

    BBQ Beef Stuffed Potatoes with Steamed Broccoli

    A comforting stuffed baked potato with tender and juicy Instant Pot BBQ beef that is perfect for a weekday meal.
    No ratings yet
    Prep Time 5 minutes
    Cook Time 50 minutes
    Course lunch, Main Course
    Cuisine American
    Servings 2

    Equipment

    • knife
    • cutting board
    • Instant Pot
    • mixing bowls
    • spoon
    • sheet pan
    • oven

    Ingredients
      

    • 12 oz chuck roast
    • 2 each garlic cloves
    • 1/4 cup celery (diced)
    • 1/2 cup white onions (diced)
    • 8 oz tomato sauce
    • 1 tsp salt
    • 1 tsp pepper
    • 2 each small russet potatoes
    • 3 cups broccoli florets
    • 2 tbsp green onions (chopped)
    • 1/4 tsp salt
    • 1 tbsp olive oil

    Condiments

    • 1/4 cup BBQ Sauce

    Instructions
     

    Baked Potato

    • Pre-heat the oven to 425F
    • Wash and scrub the potatoes. Poke them with a fork all around
    • Coat them with olive oil and season with salt and pepper
    • Place the potatoes on a sheet pan and bake in the oven for 50-60 minutes

    Instant Pot BBQ Beef

    • Meanwhile, prepare the shredded beef in the instant pot. Add the garlic, celery, white onions, tomato sauce, salt, and pepper
    • After the beef cooks, be sure to follow the manufacturer instructions for natural release of the steam. Carefully remove the lid
    • Drain the beef from the excess liquid and shred with a fork
    • After you shred the beef, mix it with the BBQ sauce

    Steamed Broccoli

    • Pour water into a boiling pot 1/4 of the way and boil the water. Place a strainer that will fit over the rim of the boiling pot
    • Carefully place the broccoli in the strainer and steam for about 5 to 6 mintues above boiling water

    Assembly

    • Once the potatoes are cooked, let it cool for a few minutes before slicing it in half. Top it off with the bbq beef and serve with a side of steamed broccoli. Garnish with fresh chopped green onions

    Similar Recipes

    chicken soup

    One Pot Mexican Chicken Soup

    sweet potato blt

    Sweet Potato BLT Sandwich

    Grilled Honey Dijon Chicken Kale Salad

    You Might Also Like

    Frequently Asked Questions

    Can I use any type of potato for stuffed baked potatoes?

    While russet potatoes are most commonly used for stuffed baked potatoes due to their fluffy texture, you can also use other varieties like Yukon gold or sweet potatoes. Just keep in mind that the cooking times may vary slightly depending on the type of potato you choose.


    Can stuffed baked potatoes be frozen?

    Stuffed baked potatoes can be frozen, but it’s best to freeze them before adding the toppings. After baking and cooling the potatoes, wrap them individually in foil or place them in airtight freezer bags. They can be stored in the freezer for up to 3 months. When ready to enjoy, thaw the potatoes in the refrigerator overnight, reheat in the oven, and then add your desired toppings.


    Are stuffed baked potatoes healthy?

    Stuffed baked potatoes can be part of a healthy diet when prepared with nutritious toppings and enjoyed in moderation. It’s important to balance the ingredients and portion sizes to ensure a well-rounded meal.