Posted on Leave a comment

Spinach and Cheese Omelette

glass meal prep containers with omelette topped with eggs

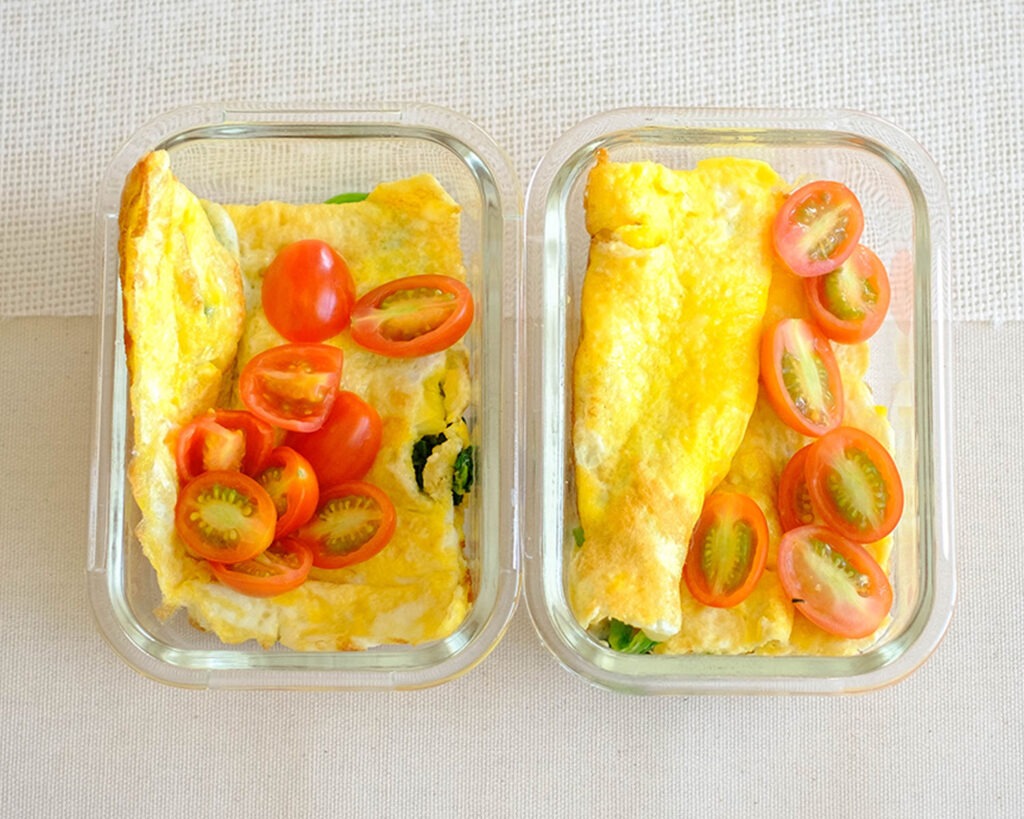
Our Spinach Omelette Meal Prep is bursting with protein, veggies, and cheesy goodness. This budget-friendly breakfast egg recipe is designed to fuel your day with nutrition and flavor. Perfect for those who crave a wholesome start without sacrificing convenience, each bite of this omelette is a symphony of savory delights. Imagine fluffy eggs enveloping wilted spinach and gooey mozzarella, topped with vibrant cherry tomatoes for a burst of freshness. Whether you’re rushing out the door or savoring a leisurely morning, this egg recipe is your ticket to a satisfying and nourishing breakfast experience. Get ready to conquer your day with a hearty, homemade meal that’s as easy on the wallet as it is on the taste buds!

This post may contain affiliate links. Please see our privacy policy for details.

Calories: 289kcal | Carbohydrates: 4g | Protein: 19g | Fat: 22g | Saturated Fat: 7g | Polyunsaturated Fat: 3g | Monounsaturated Fat: 10g | Trans Fat: 0.04g | Cholesterol: 349mg | Sodium: 486mg | Potassium: 475mg | Fiber: 1g | Sugar: 2g | Vitamin A: 5066IU | Vitamin C: 21mg | Calcium: 239mg | Iron: 3mg
round plate with omelette topped with eggs

Why this egg recipe is a nutritional powerhouse:

  • Protein-Packed Powerhouse: Protein is essential for muscle repair and growth, keeping you feeling full and satisfied for longer periods. Say goodbye to mid-morning hunger pangs and hello to sustained energy levels!
  • Veggie-Rich Goodness: Spinach isn’t just Popeye’s favorite for nothing! Packed with vitamins, minerals, and antioxidants, spinach adds a nutritious punch to your morning routine. It’s a great source of iron, folate, vitamin K, and fiber, supporting overall health and vitality.
  • Cheese for Calcium: Who says healthy eating can’t be indulgent? The addition of shredded mozzarella not only amps up the flavor but also provides a calcium boost. 
  • Tomato for Vitamin C: Those vibrant cherry tomatoes aren’t just there for show! Packed with vitamin C, they bolster your immune system and promote healthy skin. Plus, their juicy sweetness adds a burst of flavor that elevates the entire dish.
  • Long-Lasting Satisfaction: Thanks to the combination in this egg recipe of protein, fiber, and healthy fats from eggs, spinach, and olive oil, this Spinach Omelette Meal Prep keeps you feeling full and satisfied for hours. No more mid-afternoon energy crashes or desperate trips to the vending machine—just steady, sustained energy to power you through your day.

The PrepYoSelf Newsletter

Here are the Ingredients You’ll Need For This Egg Recipe:

  • Eggs: Eggs are the backbone of our omelette, providing a rich source of high-quality protein, essential vitamins, and minerals. They’re budget-friendly and versatile, making them a staple in any meal prep arsenal. Not only do they add a creamy texture to our omelette, but they also contribute to its satisfying and filling nature, helping you stay satiated throughout the morning.
  • Spinach: Popeye knew what he was talking about! Spinach adds vibrant color, texture, and a nutritional punch to our omelette. It’s packed with vitamins A, C, and K, as well as iron, folate, and fiber. By sautéing the spinach before adding it to the omelette, we not only enhance its flavor but also make its nutrients more readily available for absorption by the body. Plus, using baby spinach keeps costs down without compromising on taste or nutrition.
  • Mozzarella Cheese: This ooey-gooey goodness not only adds a creamy texture and cheesy flavor to our omelette but also provides a source of calcium and protein. By using shredded mozzarella, we ensure that each bite is perfectly balanced with just the right amount of cheesy goodness. Plus, mozzarella tends to be more budget-friendly compared to other types of cheese, making it a cost-effective choice for meal prep.
  • Cherry Tomatoes: These little bursts of flavor add a pop of color and sweetness to our omelette. Rich in vitamin C, potassium, and antioxidants, cherry tomatoes not only enhance the taste but also contribute to overall health and well-being. Slicing them up and garnishing our omelette with fresh cherry tomatoes adds a refreshing touch that complements the savory flavors perfectly.
  • Olive Oil: A drizzle of olive oil adds a hint of Mediterranean flair to our omelette while providing heart-healthy monounsaturated fats. By using just a tablespoon, we keep the fat content in check while still enhancing the flavor and texture of the dish. Olive oil is a pantry staple that’s both budget-friendly and versatile, making it an excellent choice for meal prep recipes.
round plate with omelette topped with eggs

How to Meal Prep Spinach and Cheese Omelette:

  1. Heat up a tablespoon of olive oil in a pan over medium heat. Make sure that glorious green oil coats the bottom like a champ. Toss in those chopped spinach leaves and let them dance around until they wilt into perfection. Once they’re done, scoop ’em out of the pan and set them aside. They’ll be back for a flavorful encore!
  2. Grab a bowl and crack those eggs into it. Give them a good whisk until they’re all buddy-buddy. Now, pour this eggy goodness into your preheated pan. Tilt the pan like a pro to spread that eggy magic all around. Let it heat up and firm up, then use your spatula skills to coax the edges towards the middle.
  3. Once your eggs are starting to look all fancy and set, it’s time to add the stars of the show! Sprinkle that shredded mozzarella like confetti over the top, followed by your sautéed spinach. Gently fold your omelette in half, shaping it into a glorious moon of yumminess. Let it cook for a hot minute or so to melt that cheese into gooey perfection.
  4. It’s garnish time, folks! Grab those cherry tomatoes, slice ’em up, and scatter them over your omelette masterpiece. They add a pop of color and a burst of freshness that’ll have your taste buds doing the happy dance.

Reference the recipe card below for detailed instructions.

Meal Prep and Pairing Tips:

  • Whole Grain Toast or English Muffins: Serve your Spinach Omelette with a slice of whole grain toast or an English muffin for added fiber and texture. It’s the perfect vehicle for soaking up any leftover egg and cheese goodness.
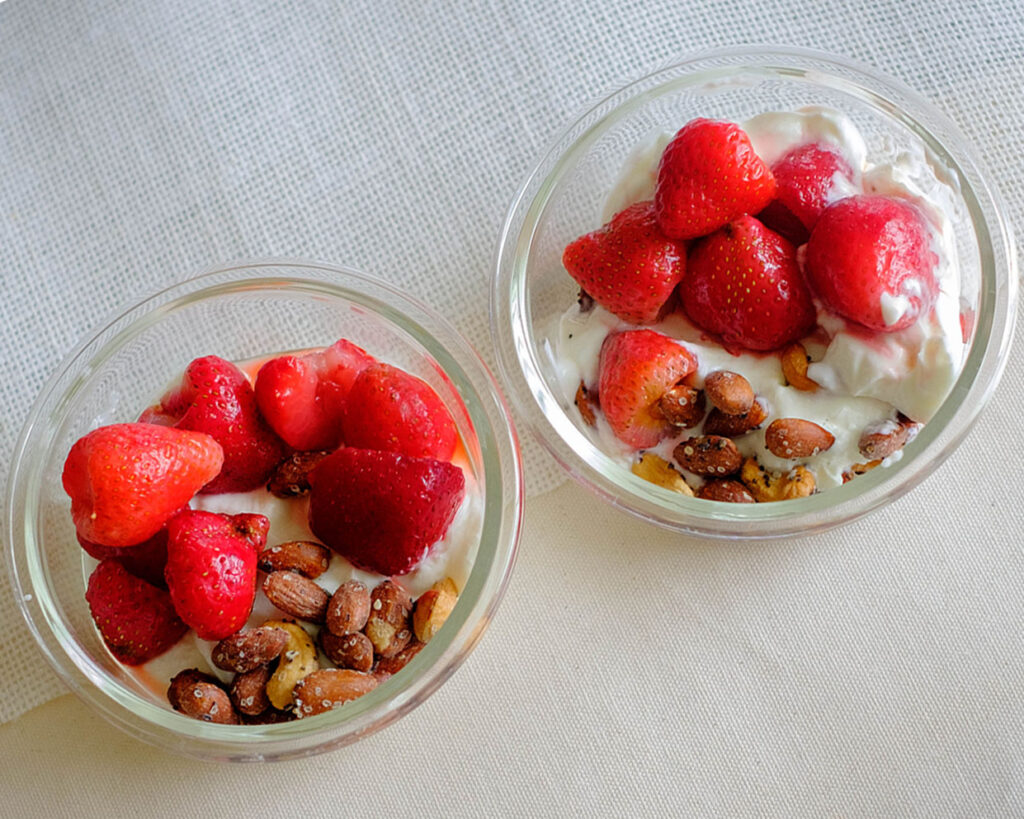
  • Fresh Fruit: Add a pop of color and sweetness to your meal with a side of fresh fruit. Berries, sliced bananas, or a fruit salad are all excellent options that complement the savory flavors of the omelette.
  • Greek Yogurt: Boost the protein content of your breakfast by pairing your omelette with a small serving of Greek yogurt. Top it with a drizzle of honey or a sprinkle of granola for extra flavor and crunch.
  • Mixed Greens Salad: Balance out the richness of the omelette with a simple mixed greens salad dressed with olive oil and balsamic vinegar. It’s a refreshing and nutritious addition to your meal.
  • Avocado Slices: Creamy avocado slices are a delicious addition to your breakfast plate. They add healthy fats, fiber, and a satisfying creaminess that pairs perfectly with the omelette.
glass meal prep containers with omelette topped with eggs
round plate with omelette topped with eggs

Spinach and Cheese Omelette

Fuel your day with our Spinach Omelette Meal Prep—packed with protein, veggies, and cheesy goodness, it's a budget-friendly breakfast that's as nutritious as it is delicious!
No ratings yet
Prep Time 5 minutes
Cook Time 10 minutes
Course Breakfast
Cuisine American
Servings 2
Calories 289 kcal

Equipment

  • knife
  • cutting board
  • mixing bowl
  • whisk
  • 6 inch omelette pan
  • spatula

Ingredients
  

  • 4 large eggs
  • 1/2 cup shredded mozzarella
  • 3 cups baby spinach (chopped)
  • 1/2 cup cherry tomatoes (sliced)
  • 1 tablespoon olive oil
  • 1/8 teaspoon salt (or to preferred taste)

Instructions
 

  • Add olive oil to a pan on medium heat making sure it coats the bottom of the pan. Add the spinach and saute until it wilts. Then remove it from the pan and set it aside.
  • Whisk the eggs in a bowl. Pour the egg mixture into the heated pan. Tilt the pan around to spread it to the edge of the pan. Let the eggs heat through and firm up. Use the spatula to gently push the sides toward the middle, letting the liquid egg flow to the edge of the pan.
  • Let the eggs cook for another 2 to 3 minutes and sprinkle the top of the eggs with the shredded cheese and the cooked spinach. Gently fold the omelette in half in a moon shape and cook for another 30 seconds to let the cheese melt.
  • Garnish with freshly sliced cherry tomatoes.

Notes

Nutrition information provided is an estimate. It will vary based on cooking method and specific ingredients used. Please consult with your healthcare provider for specific dietary needs. To gain a better understanding, explore our nutrition disclaimer here

Nutrition

Calories: 289kcalCarbohydrates: 4gProtein: 19gFat: 22gSaturated Fat: 7gPolyunsaturated Fat: 3gMonounsaturated Fat: 10gTrans Fat: 0.04gCholesterol: 349mgSodium: 486mgPotassium: 475mgFiber: 1gSugar: 2gVitamin A: 5066IUVitamin C: 21mgCalcium: 239mgIron: 3mg

Similar Recipes

fried egg and sausage hash

Fried Egg with Apple and Sausage Hash

egg stuffed bell peppers

Oven Baked Breakfast Egg Stuffed Peppers

easy sausage egg muffins

Sausage Egg Muffins with Strawberries

You Might Also Like

Evolution Fresh Organic Pure 100% Cold-Pressed Orange Juice

Setton Farms Dry Roasted and Salted Pistachios

Filippo Berio Pesto, Classic Basil

Frequently Asked Questions

Can I use frozen spinach instead of fresh?

Absolutely! Frozen spinach works well in this recipe. Just make sure to thaw it and squeeze out any excess moisture before sautéing it in the pan.


Can I add meat to this recipe?

Yes, you can add cooked meat such as diced ham, cooked bacon, or crumbled sausage for extra protein and flavor. Make sure the meat is fully cooked before adding it to the omelette.


Can I make this recipe ahead and freeze it?

Yes, you can! Wrap individual portions of the cooked omelette tightly in plastic wrap or aluminum foil and place them in a freezer-safe bag or container. They can be frozen for up to 2-3 months. To reheat, simply thaw in the refrigerator overnight and reheat in the microwave or skillet until heated through.

Posted on Leave a comment

Balsamic Steak Bites with Brussels Sprouts

These Balsamic Steak Bites are a testament to the fact that nutritious meal prep doesn’t have to be complicated or time-consuming. Picture succulent New York Strip Steak, perfectly seared to golden perfection, dancing in a marinade of balsamic vinegar, honey, and savory spices. Paired with crispy, roasted Brussels sprouts, this recipe proves you can prioritize your health without sacrificing taste or precious time in the kitchen.

This post may contain affiliate links. Please see our privacy policy for details.

Calories: 569kcal | Carbohydrates: 35g | Protein: 40g | Fat: 30g | Saturated Fat: 11g | Polyunsaturated Fat: 2g | Monounsaturated Fat: 14g | Cholesterol: 136mg | Sodium: 712mg | Potassium: 1108mg | Fiber: 5g | Sugar: 25g | Vitamin A: 998IU | Vitamin C: 112mg | Calcium: 108mg | Iron: 5mg

round plate with steak cubes and brussel sprouts

Reasons Why This Recipe is Tasty and Healthy:

  • Protein Powerhouse: The New York Strip Steak in this recipe is not only mouthwateringly delicious but also a fantastic source of high-quality protein. Perfect for keeping you full and satisfied throughout your hectic day.
  • Green Goodness: Brussels sprouts are the unsung heroes of the veggie world. Packed with vitamins, minerals, and fiber, these little green gems contribute to a healthy digestive system and provide a nutrient boost to keep you going strong.
  • Balanced Marinade Magic: Our balsamic vinegar and honey marinade adds a burst of flavor without loading up on unnecessary calories. It’s the perfect balance of sweet and tangy, elevating your meal without the guilt.
  • Easy Peasy Oven Magic: Throw those brussels sprouts in the oven, and let them work their crispy magic while you tackle other tasks. Minimal effort, maximum taste – just what the busy bee ordered!
  • Budget-Friendly Brilliance: We get it, keeping it affordable is key. This recipe is not only easy on the wallet but also a savvy way to ensure you’re getting the most bang for your nutritional buck.

The PrepYoSelf Newsletter

Ingredient Breakdown:

  • New York Strip Steak: Not only is it a lean cut, keeping things light on the calorie front, but it’s also a fantastic source of high-quality protein. This ensures you stay fuller for longer, aiding in muscle repair and overall satiety. Plus, it’s a budget-friendly choice that packs a punch of flavor without breaking the bank.
  • Brussels Sprouts: Brussels sprouts are a nutritional powerhouse, and we’ve enlisted them for their fiber content, vitamins (C, K, and B), and minerals. They bring a delightful crunch and earthy flavor, balancing the richness of the steak. Not to mention, these little green wonders are budget-friendly, making them a wallet-friendly choice for a nutrient-packed side.
  • Balsamic Vinegar: Balsamic vinegar adds a layer of depth and tanginess to our marinade without piling on excess calories. It’s a wise flavor investment that elevates the dish while providing antioxidants and potential digestive benefits. The sweet and sour notes make for a delightful contrast, making your taste buds dance without compromising your health goals.
  • Honey: Honey brings natural sweetness to the marinade, harmonizing with the balsamic vinegar for a balanced flavor profile. It’s a healthier alternative to refined sugar, offering a touch of sweetness without the guilt. This golden nectar enhances the overall taste experience while contributing trace amounts of essential nutrients.
  • Garlic Powder: Garlic powder adds a savory kick and depth of flavor to both the steak marinade and the brussels sprouts. It’s a budget-friendly way to infuse a savory note without the fuss of chopping and sautéing fresh garlic. 
  • Olive Oil: Olive oil not only helps in searing the steak to perfection but also contributes heart-healthy monounsaturated fats. It brings richness to the dish and aids in the absorption of fat-soluble vitamins from the brussels sprouts. In moderation, it’s a smart and flavorful addition to keep your meal both tasty and nutrient-dense.

round plate with steak cubes and brussel sprouts

How to Meal Prep Balsamic Steak Bites

  1. Preheat that oven to 400F, and while it’s warming up, mix together the balsamic marinade. Set it aside – it’s about to work its magic!
  2. While your sprouts are roasting, cube up that New York Strip Steak. Sear it to golden perfection in a hot skillet, approximately 2-3 minutes per side.
  3. Turn off the heat, drizzle the remaining marinade over your steak bites, and give it a good mix. Watch that sauce reduce and thicken – pure perfection in the making.
  4. Once your steak bites and brussels sprouts are ready, it’s time to savor the fruits of your labor. Delicious, nutritious, and oh-so-satisfying!

Reference the recipe card below for detailed instructions.

glass meal prep containes with steak cubes and brussel sprouts

Meal Prep Pairing Tips

  • Grain Power: Pair this dish with a side of quinoa, brown rice, or cauliflower rice for an extra boost of complex carbs. It adds a satisfying element to your meal and complements the flavors of the steak and brussels sprouts.
  • Fresh Greens: Serve alongside a simple green salad tossed with a lemon vinaigrette. The crispiness of the salad provides a refreshing contrast to the hearty steak bites and roasted brussels sprouts.
  • Citrus Zing: Squeeze a bit of fresh lemon over the steak bites just before serving. The citrusy brightness enhances the overall flavor profile and adds a delightful zing to every bite.
  • Creamy Contrast: A dollop of horseradish sauce or a light sour cream-based sauce can provide a creamy contrast to the dish. It adds a cooling element and complements the savory flavors of the steak and balsamic marinade.
  • Herbaceous Twist: Garnish with fresh herbs such as parsley or thyme to add a burst of freshness. The herbs not only contribute to the visual appeal but also bring a layer of complexity to the dish.

round plate with steak cubes and brussel sprouts

Balsamic Steak Bites with Brussels Sprouts

Savor the simplicity of our Balsamic Steak Bites with Brussels Sprouts – succulent New York Strip Steak, seared to perfection, bathed in a flavorful balsamic-honey marinade, and paired with crispy roasted Brussels sprouts for an easy, healthy, and downright delicious meal prep.
No ratings yet
Prep Time 5 minutes
Cook Time 20 minutes
Course dinner, lunch
Cuisine American
Servings 2
Calories 569 kcal

Equipment

  • knife
  • cutting board
  • skillet
  • sheet pan
  • oven

Ingredients
  

  • 12 oz New York Strip Steak
  • 3 cups brussels sprouts

Marinade

  • 4 tablespoons balsamic vinegar
  • 2 tablespoons honey
  • 1/2 teaspoon garlic powder
  • 1/2 teaspoon salt
  • 1/2 teaspoon pepper
  • 2 teaspoons olive oil

Instructions
 

  • Preheat the oven to 400F.
  • In a small bowl, mix together the marinade and set it aside.
  • Next, trim the brussels sprouts and cut them into quarters. Place them on a sheet pan and drizzle them with half of the marinade. Bake them in the oven for 15-20 minutes until golden brown and crispy.
  • Meanwhile, cut the steak into one inch cubes. Add oil to a hot skillet and sear the steak on each side for about 2 to 3 minutes until it is golden brown and fully cooked to your desired doneness.
  • Turn the heat off the skillet and drizzle the rest of the marinade over the steak bites and mix it thoroughly. Let the sauce reduce and thicken. Enjoy the steak bites along with the roasted brussels sprouts.

Notes

Nutrition information provided is an estimate. It will vary based on cooking method and specific ingredients used. Please consult with your healthcare provider for specific dietary needs. To gain a better understanding, explore our nutrition disclaimer here

Nutrition

Calories: 569kcalCarbohydrates: 35gProtein: 40gFat: 30gSaturated Fat: 11gPolyunsaturated Fat: 2gMonounsaturated Fat: 14gCholesterol: 136mgSodium: 712mgPotassium: 1108mgFiber: 5gSugar: 25gVitamin A: 998IUVitamin C: 112mgCalcium: 108mgIron: 5mg

Similar Recipes

sweet potato blt

Sweet Potato BLT Sandwich

balsamic chicken salad

Oven Baked Balsamic Chicken Salad

chicken salad

Oven Baked Honey Mustard Glazed Chicken Salad

You Might Also Like

Frequently Asked Questions

Can I use a different cut of steak for this recipe?

Of course! While New York Strip Steak is recommended for its lean profile and tenderness, you can experiment with other cuts like sirloin or flank steak. Adjust cooking times accordingly.


Are there any substitutes for honey in the marinade?

Absolutely! Maple syrup or agave nectar can be excellent alternatives. They provide a similar sweetness without compromising the overall flavor.


Is this recipe suitable for a low-carb diet?

Yes! With the focus on lean protein and vegetables, this recipe is friendly for those following a low-carb or keto lifestyle. Pair it with cauliflower rice for an even lower carb option. Feel free to adjust the honey and balsamic vinegar ratios to suit your taste preferences.

Posted on Leave a comment

Stuffed Acorn Squash with Taco Meat

rectangle meal prep container with acorn squash stuffed with taco meat, tomatoes, and side spring salad

Our Taco Meat Stuffed Acorn Squash recipe is a sensational fusion of Tex-Mex flavors that brings together convenience, health, and affordability. Perfectly seasoned lean ground beef dances with aromatic spices, creating a delicious combination of flavors. Nestled within the tender embrace of roasted acorn squash halves, this dish transforms your meal prep into a delightful experience. The optional garnishes of cherry tomatoes and cilantro add a burst of freshness, elevating it to restaurant-quality heights.

This post may contain affiliate links. Please see our privacy policy for details.

Calories: 551kcal | Carbohydrates: 35g | Protein: 41g | Fat: 29g | Saturated Fat: 7g | Polyunsaturated Fat: 5g | Monounsaturated Fat: 16g | Trans Fat: 1g | Cholesterol: 105mg | Sodium: 843mg | Potassium: 1756mg | Fiber: 5g | Sugar: 6g | Vitamin A: 2378IU | Vitamin C: 53mg | Calcium: 116mg | Iron: 7mg

wooden plate with acorn squash stuffed with taco meat, tomatoes, and side spring salad

Why You’ll Enjoy this Recipe for Meal Prep

Now, why is this recipe a game-changer for your hectic schedule? Imagine savoring restaurant-quality flavors without spending hours in the kitchen or draining your wallet. It’s the perfect blend of convenience, health, and taste.

The acorn squash provides a natural, nutrient-rich bowl for your taco masterpiece, making it hearty and satisfying. Plus, the vibrant colors and fresh ingredients not only make it visually appealing but also ensure you’re getting a wholesome, balanced meal.

So, let’s break the monotony of meal prep! With this Taco Meat Stuffed Acorn Squash, you’re not just cooking – you’re creating a mini fiesta in your kitchen. Enjoy the convenience, relish the flavors, and make meal prep an exciting part of your routine. Say goodbye to boring and hello to deliciously easy!

The PrepYoSelf Newsletter

Ingredients You’ll Need

  • Lean Ground Beef: A protein powerhouse! Lean ground beef provides the essential protein to keep you full and satisfied. It’s a budget-friendly option, and the leanness ensures you’re getting all the good stuff without unnecessary fat.
  • Acorn Squash: The star of our show! Acorn squash acts as a natural, nutrient-packed bowl for our taco meat. Rich in vitamins and fiber, it adds a hearty and wholesome element to the dish. Plus, it’s easy on the budget, making it a smart choice for our busy bees.
  • Red Onions: Packed with flavor and a touch of sweetness, red onions add a delightful crunch and depth to the sautéed mixture. They’re a cost-effective way to elevate the taste without breaking the bank.
  • Yellow Bell Pepper: Bringing vibrant color and a boost of vitamin C, yellow bell peppers add freshness and a hint of sweetness. They’re an affordable veggie option that complements the overall flavor profile.
  • Chili Powder: A spice that brings the heat! Chili powder adds that characteristic Tex-Mex kick, enhancing the flavor of the ground beef without the need for excess salt or unhealthy additives.
  • Paprika: Smoky and earthy, paprika contributes depth and warmth to the dish. It’s a cost-effective way to infuse a restaurant-quality flavor into our taco meat.
  • Tomato Paste: A concentrated burst of tomato goodness! Tomato paste not only thickens our taco mixture but also imparts a rich, savory flavor. It’s an economical way to add depth to the dish.
  • Cherry Tomatoes:  A burst of freshness! Cherry tomatoes add a juicy and colorful touch to the stuffed acorn squash. They’re optional, but their affordability and vibrancy make them a delightful addition.
  • Chopped Cilantro: The herb that ties it all together! Cilantro adds a bright and herbaceous note, enhancing the overall freshness of the dish. It’s an optional garnish, but its budget-friendly nature and flavor-enhancing properties make it a winner.

wooden plate with acorn squash stuffed with taco meat, tomatoes, and side spring salad

How to Meal Prep this Stuffed Acorn Squash With Taco Meat

  1. Preheat your oven to 400F. Slice that acorn squash in half, scoop out those seeds, and place them on a baking sheet. Sprinkle with a pinch of salt and coat with a tablespoon of olive oil. Into the oven for 40 minutes until the squash is tender
  2. While the squash works its magic, sauté diced onions in a tablespoon of oil until soft. Add the ground beef, break it into pieces, and let it turn into golden brown goodness.
  3. Sprinkle in chili powder, paprika, garlic powder, and salt. Stir until your kitchen is filled with the aroma of a Tex-Mex masterpiece.
  4. Introduce tomato paste to the party, mixing it until it becomes one with the taco meat. Toss in diced bell peppers, stirring for an extra minute of flavor fusion.
  5. Your acorn squash should be ready for the spotlight. Carefully stuff each half with your sizzling taco meat.
  6. Top it off with a burst of freshness – cherry tomatoes and chopped cilantro. Ta-da!
  7. Pair your stuffed squash with a vibrant spring mix salad, dressed to perfection with your favorite dressing.

Reference the recipe card below for detailed instructions.

rectangle meal prep container with acorn squash stuffed with taco meat, tomatoes, and side spring salad

Meal Prep Tips:

  • Sharp Knife for Squash: A sharp knife is your best friend when dealing with acorn squash. It makes slicing through the tough skin and removing the seeds much easier. Take your time and use a steady hand for safety.
  • Even Squash Halves: When slicing the acorn squash, aim for even halves. This ensures uniform cooking, and your taco meat will be evenly distributed, creating a balanced and satisfying meal.
  • Oil Coating for Squash: Coat the acorn squash halves with olive oil before baking. This not only enhances the flavor but also helps achieve a beautifully roasted exterior. A brush or your hands can be used to evenly distribute the oil.
  • Seasoning Layering: Add the chili powder, paprika, garlic powder, and salt gradually while cooking the taco meat. This allows the flavors to layer and develop, giving your dish that authentic Tex-Mex taste.
  • Careful Squash Stuffing: When stuffing the acorn squash halves, do it with care to avoid breaking the squash. Evenly distribute the taco meat mixture, ensuring each bite has a perfect balance of flavors.

rectangle meal prep container with acorn squash stuffed with taco meat, tomatoes, and side spring salad

taco stuffed squash

Taco Meat Stuffed Acorn Squash

Experience a burst of Tex-Mex flavors with our Taco Meat Stuffed Acorn Squash, where lean ground beef seasoned to perfection meets tender roasted acorn squash, topped with optional cherry tomatoes and cilantro, paired with a refreshing side spring salad – a delicious, healthy, and budget-friendly meal prep delight!
No ratings yet
Prep Time 5 minutes
Cook Time 40 minutes
Course dinner, lunch, Main Course
Cuisine American, Mexican
Servings 2
Calories 551 kcal

Equipment

  • knife
  • cutting board
  • spatula
  • saute pan
  • sheet pan
  • oven

Ingredients
  

  • 12 oz lean ground beef
  • 1 each acorn squash
  • 1/4 cup red onions (diced)
  • 1 each yellow bell pepper (diced)
  • 1/4 tsp chili powder
  • 1/4 tsp paprika
  • 1/4 tsp garlic powder
  • 1/4 tsp salt
  • 2 tbsp tomato paste
  • 2 tbsp olive oil
  • 4 cups spring mix
  • 4 tbsp your choice of salad dressing
  • 1/4 cup cherry tomatoes (optional)
  • 1/4 cup chopped cilantro (optional)

Instructions
 

  • Pre-heat the oven to 400F
  • Slice the acorn squash in half and remove the seeds. Place the halves on a sheet pan and sprinkle it with a pinch of slat and coat it with a tbsp of olive oil
  • Bake it in the oven for 40 minutes until the flesh is tender
  • Meanwhile, add a tbsp of oil to a saute pan on medium-high heat and saute the diced onions until they soften. Then, add the ground beef and break it into smaller pieces
  • Season the beef with the seasonings and continue to stir until it is fully cooked and golden brown (about 5 to 7 minutes)
  • Then, add the tomato paste and mix it well until it is fully incorporated
  • Add the chopped bell peppers and mix them well into the taco meat for another minute
  • Once the acorn squash cooks, carefully remove it from the oven. Evenly stuff each squash half with the taco meat
  • Top it off with fresh tomatoes and cilantro and enjoy with a side salad

Notes

Nutrition information provided is an estimate. It will vary based on cooking method and specific ingredients used. Please consult with your healthcare provider for specific dietary needs. To gain a better understanding, explore our nutrition disclaimer here

Nutrition

Calories: 551kcalCarbohydrates: 35gProtein: 41gFat: 29gSaturated Fat: 7gPolyunsaturated Fat: 5gMonounsaturated Fat: 16gTrans Fat: 1gCholesterol: 105mgSodium: 843mgPotassium: 1756mgFiber: 5gSugar: 6gVitamin A: 2378IUVitamin C: 53mgCalcium: 116mgIron: 7mg

Similar Recipes

cilantro chicken

Cilantro Lime Chicken Salad with Strawberry Salsa

sweet and sour chicken wings

Air Fryer Sweet and Sour Chicken Wings

stuffed primavera chicken

Primavera Stuffed Chicken Breasts

You Might Also Like

Frequently Asked Questions

Can I substitute the ground beef with another protein?

Absolutely! You can swap out the ground beef for ground turkey, chicken, or a plant-based alternative if you prefer. Adjust cooking times accordingly.


I’m not a fan of acorn squash. Can I use a different type of squash?

Of course! While acorn squash adds a unique sweetness, you can use butternut squash or even bell peppers as a delicious alternative.


Can I freeze the stuffed acorn squash for later?

While the acorn squash itself may not freeze well due to its high water content, you can freeze the taco meat mixture separately. Thaw and stuff fresh acorn squash when ready to enjoy.

Posted on Leave a comment

Beef and Bean Sprout Stir Fry

glass square containers with sliced beef stir fry with bell peppers, sliced zucchini, and sliced mushrooms, and bean sprouts

Whip up a delightful Beef and Bean Sprout Stir Fry – a budget-friendly, healthy, and quick meal prep alternative to takeout. Thinly sliced sirloin steak, vibrant veggies, and crunchy bean sprouts create a symphony of flavors in this easy-to-follow recipe. Perfect for busy individuals who need help with weekly meal prep, this dish offers convenience without compromising on taste or nutrition. From the savory soy-infused beef to the satisfying crunch of fresh bean sprouts, each bite is a celebration of deliciousness. Elevate your dinner routine with this homemade stir fry, bringing together speed, affordability, and wholesome ingredients for a delightful dining experience.

This post may contain affiliate links. Please see our privacy policy for details.

Calories: 434kcal | Carbohydrates: 23g | Protein: 50g | Fat: 18g | Saturated Fat: 4g | Polyunsaturated Fat: 2g | Monounsaturated Fat: 9g | Cholesterol: 104mg | Sodium: 1128mg | Potassium: 1535mg | Fiber: 7g | Sugar: 14g | Vitamin A: 1196IU | Vitamin C: 79mg | Calcium: 104mg | Iron: 6mg

round plate with weekly meal prep of sliced beef stir fry with bell peppers, sliced zucchini, and sliced mushrooms, and bean sprouts

Bean Sprouts: The Crunchy Marvel in Asian Cuisine

Bean sprouts are a culinary gem, especially in Asian dishes, and for good reason. These little sprouts are typically grown from mung beans and are harvested just as they start to sprout. Here’s why they’ve become a staple in Asian cuisine and weekly meal prep:

  • Nutrient-Packed Powerhouse: Despite their delicate appearance, bean sprouts are a nutritional powerhouse. They’re low in calories but high in essential nutrients like vitamins C and K, folate, and fiber. Talk about a nutrient boost without the guilt!
  • Crunchy Texture and Fresh Flavor: Bean sprouts bring a delightful crunch to any dish. This adds a textural contrast that’s particularly appreciated in stir-fries, salads, and noodle dishes. Their mild, slightly sweet flavor complements various ingredients, making them a versatile addition to any recipe.
  • Quick and Easy to Prepare: Bean sprouts require minimal preparation. A quick rinse and they’re ready to go! This makes them a time-saving ingredient for busy individuals who want to streamline their meal prep without sacrificing freshness and nutrition.
  • Affordable and Accessible: One of the best parts about bean sprouts is their accessibility and affordability. You can easily find them in grocery stores year-round, and they won’t break the bank. This makes them an excellent choice for those looking to maintain a healthy diet on a budget.
  • Versatility in Asian Cuisine: Bean sprouts play a crucial role in many Asian dishes, adding a distinctive element to classics like Pad Thai, Bibimbap, and, of course, stir-fries. They absorb the flavors of the surrounding ingredients while maintaining their own unique texture, making them an integral part of the dish.

In conclusion, bean sprouts are a weekly meal prep champion – they’re nutritious, easy to work with, and add that extra oomph to your Asian-inspired culinary creations. So, whether you’re stir-frying, tossing them into salads, or experimenting with noodle dishes, let bean sprouts take center stage in your meal prep adventures! 

The PrepYoSelf Newsletter

To Weekly Meal Prep Beef & Bean Sprout Stir Fry, You’ll Need

  • Sirloin Steak: Sirloin steak brings protein-packed goodness to the table. Sliced thinly, it cooks quickly, ensuring a tender and juicy bite. It’s the heart of our stir fry, providing substance and that meaty satisfaction.
  • Red Onions: Red onions add a touch of sweetness and vibrant color to the dish. When sautéed, they become tender and release their natural sugars, enhancing the overall flavor profile.
  • Green Onions: Green onions contribute a mild onion flavor with a hint of freshness. They’re sprinkled on top at the end, providing a pop of color and a delightful crunch.
  • Zucchini: Zucchini adds a mild, slightly sweet flavor and a wonderful tender-crisp texture. It complements the heartiness of the beef, bringing balance to the dish.
  • Red Bell Pepper: The red bell pepper introduces a burst of color and a hint of sweetness. Its crisp texture adds another layer of complexity, making each bite exciting.
  • Bean Sprouts: The crunchy heroes of our stir fry! Bean sprouts bring a refreshing, crisp texture that contrasts beautifully with the other ingredients. They absorb the savory flavors of the dish while maintaining their freshness.
  • Mushrooms: Mushrooms contribute a savory, earthy flavor and a meaty texture. They absorb the sauce beautifully, adding depth to the overall taste.
  • Soy Sauce: The umami powerhouse! Soy sauce is the key to the savory, salty goodness that ties everything together. It adds depth and richness to the dish.
  • Sesame Oil: The finishing touch! Sesame oil adds a delightful nutty aroma and flavor. Drizzled at the end, it provides a burst of authenticity and enhances the overall Asian-inspired experience.

round plate with weekly meal prep of sliced beef stir fry with bell peppers, sliced zucchini, and sliced mushrooms, and bean sprouts

How to Weekly Meal Prep Beef and Bean Sprout Stir Fry

  1. Start by slicing your sirloin steak into thin strips against the grain. Sprinkle a pinch of salt and pepper over the strips to enhance the flavor.
  2. Heat up your wok on medium-high heat, add a splash of olive oil, and sauté those beef strips until they’re golden and cooked to perfection. Once done, set them aside – we’ll bring them back into the limelight in a bit.
  3. Toss in the sliced onions, bell pepper, and bean sprouts into the wok. Let them dance around for 3 to 5 minutes until they’re soft and tender. We’re creating a symphony of colors and flavors here!
  4. Bring back those glorious beef strips to the pan, and it’s party time! Season the ensemble with soy sauce and a dash of garlic powder. Then, drizzle in that magical sesame oil. Give it a good mix until every ingredient is singing in harmony.
  5. Your Beef and Bean Sprout Stir Fry is ready to steal the show! Serve it up with steamed rice or noodles – whatever suits your fancy.

Reference the recipe card below for detailed instructions.

weekly meal prep glass square containers with sliced beef stir fry with bell peppers, sliced zucchini, and sliced mushrooms, and bean sprouts

Ingredient Swaps

  • Protein Variations: Swap out the sirloin steak for thinly sliced chicken breast or thigh for a leaner option. For a vegetarian twist, substitute the meat with extra-firm tofu cubes. Press the tofu to remove excess water before slicing.
  • Vegetable Options: Replace zucchini with broccoli florets for a cruciferous crunch. Add matchstick carrots for a touch of natural sweetness and vibrant color.
  • Sauce Substitutes: Switch up the flavor profile by using teriyaki sauce instead of soy sauce. For a richer umami taste, consider using oyster sauce in place of soy sauce.
  • Oil Alternatives: Infuse a hint of coconut flavor by using coconut oil instead of olive oil. If you’re out of sesame oil, use toasted sesame seed oil for a similar nutty aroma.
  • Vegetarian Option: Introduce edamame for an extra protein boost in the absence of meat.

glass square containers with sliced beef stir fry with bell peppers, sliced zucchini, and sliced mushrooms, and bean sprouts for weekly meal prep

round plate with thin slice beef stir fry with red bell pepper, zucchini, and bean sprouts

Beef and Bean Sprout Stir Fry

This beef and bean sprout stir fry is a healthy and flavorful dish that is perfect for a quick and easy weeknight dinner. It's also a great way to use up any leftover vegetables you have in your fridge.
No ratings yet
Prep Time 5 minutes
Cook Time 15 minutes
Course dinner, Main Course
Cuisine Asian
Servings 2
Calories 434 kcal

Equipment

  • knife
  • cutting board
  • wok
  • tongs

Ingredients
  

  • 12 oz sirloin steak (thinly sliced strips)
  • 1/4 cup red onions (sliced)
  • 1/4 cup green onions (sliced)
  • 1/2 zucchini (sliced)
  • 1/2 red bell pepper (sliced)
  • 14 oz bean sprouts (canned and drained, or fresh)
  • 8 oz mushrooms (sliced)
  • 2 tbsp soy sauce
  • 1/4 tsp garlic powder
  • 1 tablespoon olive oil
  • 1 teaspoon sesame oil

Instructions
 

  • Slice the beef into thin strips against the grain and season with salt and pepper.
  • Add olive oil to a wok on medium-high heat and saute the beef strips. After they cook, scoop them out of the wok and set them aside.
  • Next, add the sliced onions, bell pepper, and bean sprouts to the wok and saute them for about 3 to 5 minutes until the vegetables are soft and tender.
  • Finally, return the beef strips to the pan and season with soy sauce and garlic powder. Then, drizzle with sesame oil and mix well. Enjoy with steamed rice or noodles.

Notes

Nutrition information provided is an estimate. It will vary based on cooking method and specific ingredients used. Please consult with your healthcare provider for specific dietary needs. To gain a better understanding, explore our nutrition disclaimer here

Nutrition

Calories: 434kcalCarbohydrates: 23gProtein: 50gFat: 18gSaturated Fat: 4gPolyunsaturated Fat: 2gMonounsaturated Fat: 9gCholesterol: 104mgSodium: 1128mgPotassium: 1535mgFiber: 7gSugar: 14gVitamin A: 1196IUVitamin C: 79mgCalcium: 104mgIron: 6mg

Similar Recipes

ginger salmon

Oven Baked Orange Ginger Salmon and Snow Peas

orange chicken

Air Fryer Orange Soy Glazed Chicken with Broccoli

balsamic steak

Grilled Steak with Sweet Potato Wedges

You Might Also Like

Frequently Asked Questions

Can I use a different cut of beef?

Absolutely! While sirloin steak is a great option, you can use flank steak, ribeye, or even tenderloin. Adjust cooking times based on the cut’s thickness.


What type of noodles or rice pairs best with this dish?

Steamed jasmine rice or thin rice noodles are fantastic choices. Udon or soba noodles also work well. Pick your favorite or mix it up each time you make it!


How do I prevent the beef from becoming tough?

Slice the beef thinly against the grain and avoid overcooking. Sauté quickly on medium-high heat to maintain tenderness.

Posted on Leave a comment

Yogurt with Strawberries and Mixed Nuts

round glass containers with yogurt topped with strawberries and mixed nuts

Meal prep our Healthy Yogurt Bowl with Strawberries and Mixed Nuts! Finding a healthy breakfast that’s both delicious and budget-friendly can be a challenge. But fear not, because this recipe makes for a delicious, easy-to-prep morning ritual. Packed with protein-rich yogurt, fresh strawberries bursting with vitamins, and a crunchy medley of mixed nuts, this bowl is a powerhouse of nutrients to fuel your day. Best of all, it’s a budget-friendly and stress-free option that proves healthy breakfasts can be both attainable and delectable. Get ready to transform your mornings with a breakfast that’s as good for your wallet as it is for your taste buds!

This post may contain affiliate links. Please see our privacy policy for details.

Calories: 292kcal | Carbohydrates: 22g | Protein: 12g | Fat: 18g | Saturated Fat: 7g | Polyunsaturated Fat: 2g | Monounsaturated Fat: 9g | Cholesterol: 32mg | Sodium: 116mg | Potassium: 610mg | Fiber: 3g | Sugar: 15g | Vitamin A: 255IU | Vitamin C: 44mg | Calcium: 324mg | Iron: 1mg

round bowl with yogurt topped with strawberries and mixed nuts for a healthy breakfast

Why This Recipe is Great for Meal Prep

  • Time-Saving Magic: This Yogurt Bowl takes minutes to assemble, making it the ultimate go-to for your busy-morning healthy breakfasts. No need to sacrifice flavor for speed – you can have both!
  • Budget-Friendly Brilliance: Our recipe is designed with your budget in mind. Yogurt, strawberries, mixed nuts, and cinnamon powder – simple, wholesome ingredients that won’t make a dent in your wallet. Who says nutritious can’t be affordable?
  • Minimal Ingredients, Maximum Flavor: When life gets hectic, simplicity is key. With just four main ingredients, this Yogurt Bowl is a breeze to prepare. Yet, each spoonful bursts with the goodness of creamy yogurt, sweet strawberries, crunchy nuts, and a touch of warmth from cinnamon – a symphony of flavors that won’t disappoint.
  • Versatility at its Finest: Feel like mixing it up? Go ahead! This recipe is a canvas for your creativity. Swap out strawberries for your favorite seasonal fruits, experiment with different nut combinations, or add a drizzle of honey if you’re feeling extra indulgent. Your Yogurt Bowl, your rules!
  • Nutrient-Packed Goodness: Busy days call for fuel that keeps you going. This Yogurt Bowl isn’t just a treat for your taste buds; it’s a nutritional powerhouse. Packed with protein, vitamins, and antioxidants from the fruits and nuts, it’s the perfect way to kickstart your day on a healthy breakfast note.
  • Portability for the Win: Got a meeting or an early workout? No worries – this Yogurt Bowl is easily portable. Grab a container with a lid, and you’ve got a nutritious breakfast or snack that you can enjoy on the go. No excuses for skipping the most important meal of the day!

The PrepYoSelf Newsletter

Ingredient Breakdown:

  • Yogurt – Creamy Foundation: The yogurt forms the base of our bowl, providing a lusciously creamy texture that’s both satisfying and indulgent. Yogurt is rich in protein, keeping you full and energized throughout the day. Yogurt is a cost-effective source of dairy or plant-based goodness, making it perfect for those mindful of their wallets.
  • Strawberries – Burst of Sweetness:  Strawberries add a sweet and fruity kick without the need for added sugars. A budget-friendly way to satisfy your sweet tooth! Packed with vitamin C, strawberries contribute to a healthy immune system – a must for busy individuals on the go. Beyond taste, strawberries bring a vibrant burst of color that makes your healthy breakfast visually appealing.
  • Mixed Nuts – Crunchy Nuttiness: Nuts bring a satisfying crunch, adding a dynamic texture to the creamy yogurt and soft strawberries. Nuts are loaded with heart-healthy fats, providing a source of sustained energy. Nuts are a nutrient-dense option, contributing essential vitamins and minerals without breaking the bank.
  • Cinnamon Powder – Warm and Aromatic Elegance: A pinch of cinnamon adds a cozy, comforting element to the bowl, making it a perfect treat, especially on chilly mornings. A little goes a long way with cinnamon, making it a cost-effective way to enhance the overall flavor profile of your bowl.

round bowl with yogurt topped with strawberries and mixed nuts for a healthy breakfast

Steps to Meal Prep this Yogurt Bowl

  1. Grab your meal prep bowls and start by placing a generous cup of your favorite yogurt at the bottom of each bowl. Whether you’re into Greek yogurt for that creamy texture or plant-based options for a dairy-free twist, the choice is yours!
  2. Now, let’s add a pop of color and sweetness! Take your fresh, ripe strawberries and slice them up into bite-sized pieces. Gently place them on top of the yogurt, creating a vibrant strawberry layer that’s as visually appealing as it is delicious.
  3. It’s crunch time! Sprinkle your favorite mixed nuts over the strawberries. Whether you go for almonds, walnuts, or a mix of both, these little powerhouses will add the perfect crunch to every spoonful.
  4. To tie it all together, sprinkle cinnamon powder over the bowl. This warm and aromatic touch will elevate the flavors, giving your Yogurt Bowl a hint of cozy goodness.
  5. Grab a spoon and give your creation a gentle mix. Blend those creamy, fruity, and nutty layers to create a symphony of textures and tastes that will dance on your taste buds.

Reference the recipe card below for detailed instructions.

round glass containers with yogurt topped with strawberries and mixed nuts for a healthy breakfast

Meal Prep Tips for Yogurt Bowls

  • Morning Beverage Boost: Pair your Yogurt Bowl with a cup of your favorite morning beverage. Whether it’s a hot cup of coffee, energizing green tea, or a refreshing glass of orange juice, the combination enhances your healthy breakfast experience.
  • Crunchy Granola Topping: For an extra crunch, top your Yogurt Bowl with a small handful of granola. It adds texture, flavor, and a satisfying crunch that complements the creaminess of the yogurt and the nuts.
  • Side of Whole Grain Toast: Add a side of whole grain toast for a well-rounded meal. The complex carbs provide sustained energy, keeping you fueled throughout the morning.
  • Drizzle of Honey: For those with a sweet tooth, a drizzle of honey over the Yogurt Bowl adds a touch of natural sweetness. It’s an indulgent yet healthy breakfast addition.
  • Fresh Mint Garnish: Elevate the freshness by garnishing your bowl with a few fresh mint leaves. The burst of herbal aroma complements the fruity and nutty flavors.
  • Mix Up the Fruit Palette: Experiment with different fruits based on what’s in season or on sale. Blueberries, raspberries, or sliced banana can bring variety to your Yogurt Bowl without compromising on budget or nutrition.

round glass containers with yogurt topped with strawberries and mixed nuts for a healthy breakfast

yogurt with berries

Yogurt with Strawberries and Mixed Nuts

Elevate your mornings with a budget-friendly and nutritious Yogurt Bowl featuring creamy yogurt, fresh strawberries, mixed nuts, and a hint of cinnamon – a quick and easy breakfast that's as wholesome as it is delicious!
No ratings yet
Prep Time 5 minutes
Cook Time 5 minutes
Course Breakfast, Snack
Cuisine American
Servings 2
Calories 292 kcal

Equipment

  • spoon
  • serving bowl

Ingredients
  

  • 2 cups yogurt
  • 1 cup strawberries
  • 4 tbsp mixed nuts
  • 1/4 tsp cinnamon powder

Instructions
 

  • Place yogurt at the bottom of the bowl
  • Add the strawberries and mixed nuts on top
  • Sprinkle with cinnamon powder

Notes

Nutrition information provided is an estimate. It will vary based on cooking method and specific ingredients used. Please consult with your healthcare provider for specific dietary needs. To gain a better understanding, explore our nutrition disclaimer here.

Nutrition

Calories: 292kcalCarbohydrates: 22gProtein: 12gFat: 18gSaturated Fat: 7gPolyunsaturated Fat: 2gMonounsaturated Fat: 9gCholesterol: 32mgSodium: 116mgPotassium: 610mgFiber: 3gSugar: 15gVitamin A: 255IUVitamin C: 44mgCalcium: 324mgIron: 1mg

Similar Recipes

baked oatmeal

Oven Baked Oats with Apricots and Berries

cranberry oat muffins

Cranberry Oatmeal Muffin Bars

french toast 2

Oven Baked French Toast Muffins with Strawberries

You Might Also Like

Frequently Asked Questions

Can I use frozen strawberries?

Fresh strawberries are recommended for the best texture and flavor. If using frozen, thaw them first, and be aware that the consistency might be a bit different.


Is there a dairy-free alternative for this recipe?

Yes, choose a plant-based yogurt to make this recipe dairy-free. Almond, coconut, or soy yogurt are great options, offering a variety of flavors.


How can I adjust the sweetness level?

Feel free to adjust the sweetness by adding a touch of maple syrup, agave nectar, or any sweetener of your choice. Taste as you go to find your perfect balance.

Posted on Leave a comment

Instant Pot Butter Chicken

square glass meal prep container with butter chicken and roasted cauliflower

Our Instant Pot Butter Chicken is a succulent blend of boneless chicken thighs, aromatic spices, and creamy tomato goodness, all prepared effortlessly in your trusty Instant Pot. We’ve cracked the code to create a restaurant-quality dish that won’t break the bank, tailored for busy individuals craving a taste of luxury without compromising their health or budget. This recipe is a harmonious symphony of flavors, featuring budget-friendly ingredients, healthy swaps like Greek yogurt for cream, and a seamless preparation process that guarantees a delicious, stress-free dining experience.

This post may contain affiliate links. Please see our privacy policy for details.

Calories: 651kcal | Carbohydrates: 19g | Protein: 33g | Fat: 50g | Saturated Fat: 18g | Polyunsaturated Fat: 7g | Monounsaturated Fat: 21g | Trans Fat: 0.1g | Cholesterol: 212mg | Sodium: 847mg | Potassium: 1199mg | Fiber: 5g | Sugar: 8g | Vitamin A: 1367IU | Vitamin C: 82mg | Calcium: 110mg | Iron: 3mg

round plate with instant pot butter chicken and roasted cauliflower

Why You’ll Enjoy This Chicken Meal Prep:

  • Time-Saving Magic: Let’s face it – time is not always on our side. That’s why the Instant Pot is our superhero in this recipe! With just a few button clicks, you’ll have a mouthwatering Indian Butter Chicken ready to roll. Perfect for those who want the taste without the kitchen marathon.
  • Budget-Friendly Bliss: We get it; you want gourmet without draining your wallet. Our recipe is a budget-friendly masterpiece, utilizing simple and accessible ingredients. No need for a treasure map to find these items at your local grocery store!
  • Healthy and Hearty: Staying on the healthy track is a breeze with our recipe. We’ve swapped out heavy ingredients for a creamy blend of tomato sauce, spices, and a touch of heavy cream. It’s comfort food without the guilt – perfect for keeping that New Year’s resolution intact!
  • Flavor Explosion: Brace your taste buds for an explosion of flavors! The combination of garlic, ginger, curry powder, and turmeric is an infusion of spices, promising an instant ticket to flavor town.

The PrepYoSelf Newsletter

Ingredient Breakdown:

  • Boneless Chicken Thighs: Tender, juicy, and budget-friendly, chicken thighs are the perfect protein base for our dish. They absorb the rich flavors of the spices and sauces, creating a hearty and satisfying meal without breaking the bank.
  • White Onions: Onions form the flavor foundation of countless dishes, and here they add a sweet and savory kick. Besides enhancing taste, they’re cost-effective and readily available, making them a go-to for any budget-friendly meal.
  • Garlic: These aromatic powerhouses are the dynamic duo that injects bold, authentic flavors into the dish. Not only do they elevate taste, but they also bring their health benefits, known for their immune-boosting and anti-inflammatory properties.
  • Tomato Paste: Tomatoes add a luscious texture and a touch of sweetness to our dish. Tomato paste provides depth, while tomato sauce adds a saucy consistency. These pantry staples are not just affordable but also packed with vitamins and antioxidants.
  • Water: It might seem simple, but water plays a crucial role in creating the perfect balance of flavors. It helps form the base for the sauce, allowing all the spices to meld together, resulting in a harmonious and budget-friendly liquid gold.
  • Curry Powder and Turmeric Powder: The heart of Indian cuisine! These spices bring warmth and depth to the dish. Curry powder combines a mix of flavorful spices, while turmeric adds a vibrant color and anti-inflammatory properties. Using them in moderation keeps the dish healthy and wallet-friendly.
  • Heavy Cream: Here’s the secret to the luxurious creaminess without sacrificing health. A modest amount of heavy cream adds richness to the sauce, making it indulgent without going overboard. It’s the magic touch that transforms the dish into a comforting delight.
  • Cilantro: Fresh herbs like cilantro add a burst of freshness, balancing the rich flavors. They’re not just a pretty garnish; they bring a unique flavor profile that complements the spices. Cilantro is inexpensive, widely available, and elevates the dish to a whole new level.
  • Roasted Cauliflower:  Cauliflower, the versatile superstar! It’s budget-friendly, low in calories, and takes on the flavors of our spice mix beautifully. Roasting it enhances its natural sweetness and adds a satisfying crunch to the meal.
  • Garlic Powder , Paprika , Salt : This trio of seasonings turns simple cauliflower into a flavor-packed side. It’s a cost-effective way to add depth and complexity to your meal without resorting to unhealthy options.
  • Olive Oil: A touch of olive oil ensures the cauliflower roasts to perfection, enhancing its nutty flavor. It also brings healthy monounsaturated fats to the table, contributing to a well-rounded and nutritious dish.

round plate with instant pot butter chicken and roasted cauliflower

How to Meal Prep Instant Pot Butter Chicken

  1. Preheat your oven to 400°F. Meanwhile, fire up the Instant Pot in sauté mode and add a splash of olive oil. Toss in the onions, garlic, and ginger, and let them dance for 2-3 minutes until the onions soften. Add the chicken and give it a little tanning session for another 2-3 minutes.
  2. Time to amp up the flavor game! Add tomato paste, water, tomato sauce, curry powder, and turmeric powder. Give it a good stir, close the Instant Pot lid, and set the valve to sealing. While the magic happens, spread your cauliflower on a sheet pan, sprinkle it with garlic powder, paprika, and salt, and let it roast for 12-15 minutes.
  3. After the chicken cooks, release the pressure carefully. Switch back to sauté mode, pour in the heavy cream and sprinkle in the cilantro. Stir and let the liquid simmer until it thickens (around 5 minutes).
  4. Plate up your Instant Pot Indian Butter Chicken, alongside the golden-roasted cauliflower. Dive in and enjoy the blissful union of flavors. This dish pairs perfectly with steamed rice or warm naan bread for a complete experience.

Reference the recipe card below for detailed instructions.

round plate with instant pot butter chicken and roasted cauliflower

Meal Prep Tips

  • ​​Batch Cooking Bliss: Make a larger quantity of the Instant Pot Indian Butter Chicken to enjoy throughout the week. It reheats beautifully, and the flavors even have time to deepen over time.
  • Freeze for Future Feasts: Portion out leftovers into freezer-friendly containers for a quick and satisfying meal on busy days. Label and date each container to keep track of your delicious frozen treasures.
  • Protein Swaps: Experiment with protein alternatives such as boneless chicken breasts, tofu, or chickpeas for a vegetarian option. It’s a fantastic way to cater to different dietary preferences without sacrificing flavor.
  • Veggie Power: Amp up the veggie content by adding spinach, peas, or bell peppers during the cooking process. This not only boosts the nutritional profile but also adds color and texture to your meal.
  • Healthier Cream Options: For a lighter version, swap out the heavy cream for Greek yogurt or coconut milk. These alternatives bring a creamy texture without compromising on flavor, and they’re often healthier options.
  • Pairing Perfection: Pair the Instant Pot Indian Butter Chicken with a simple side salad for a refreshing contrast. A cucumber and tomato salad with a squeeze of lemon or a dollop of yogurt is a perfect match.
  • Make it a Wrap: Transform your Instant Pot Indian Butter Chicken into wraps or burritos with whole-grain tortillas. Add some fresh greens, and you’ve got a portable, delicious meal.

square glass meal prep container with instant pot butter chicken and roasted cauliflower

round plate with indian butter chicken and roasted cauliflower

Instant Pot Butter Chicken with Roasted Cauliflower

This Instant Pot Butter Chicken recipe will satisfy your cravings for something hearty and comforting.
No ratings yet
Prep Time 5 minutes
Cook Time 25 minutes
Course dinner, Main Course
Cuisine Indian
Servings 2
Calories 651 kcal

Equipment

  • Instant Pot
  • sheet pan
  • oven

Ingredients
  

Instant Pot Indian Butter Chicken

  • 12 oz boneless chicken thighs
  • 1/4 cup white onions (diced)
  • 1 tablespoon garlic (minced)
  • 1 tablespoon ginger (minced)
  • 1 tablespoon tomato paste
  • 1/2 cup tomato sauce
  • 2 cups water
  • 1/2 teaspoon curry powder
  • 1/2 teaspoon turmeric powder
  • 1/3 cup heavy cream
  • 1/4 cup cilantro (chopped)

Roasted Cauliflower

  • 3 cup cauliflower florets
  • 1/4 teaspoon garlic powder
  • 1/4 teaspoon paprika
  • 1/4 teaspoon salt
  • 1 tablespoon olive oil

Instructions
 

  • Preheat the oven to 400F. Turn on the Instant Pot to saute mode and add the olive oil. Add the onions, garlic, and ginger and saute for 2-3 minutes until the onions soften. Next add the chicken and brown it on all sides for another 2-3minutes.
  • Add the tomato paste and brown it for a minute, then add the tomato paste, water, and seasonings and stir to combine. Close the Instant Pot lid and turn the valve to sealing. Meanwhile, place the cauliflower on a sheet pan and sprinkle with the seasonings and coat with olive oil. Roast in the oven for 12-15 minutes.
  • After the Instant Pot cooking time has finished, carefully use the quick release to release the pressure. Turn the Instant Pot to saute mode again and pour in the heavy cream and cilantro. Stir to combine and let the liquid simmer until the sauce has thickened to your desired thickness (about 5 minutes).
  • Enjoy with the roasted cauliflower or your choice of side such as steamed rice or naan bread.

Notes

Nutrition information provided is an estimate. It will vary based on cooking method and specific ingredients used. Please consult with your healthcare provider for specific dietary needs. To gain a better understanding, explore our nutrition disclaimer here

Nutrition

Calories: 651kcalCarbohydrates: 19gProtein: 33gFat: 50gSaturated Fat: 18gPolyunsaturated Fat: 7gMonounsaturated Fat: 21gTrans Fat: 0.1gCholesterol: 212mgSodium: 847mgPotassium: 1199mgFiber: 5gSugar: 8gVitamin A: 1367IUVitamin C: 82mgCalcium: 110mgIron: 3mg

Similar Recipes

chicken soup

One Pot Mexican Chicken Soup

sweet potato blt

Instant Pot Beef Ragu

pork carnitas

Instant Pot Pork Carnitas

You Might Also Like

Frequently Asked Questions

Can I use store-bought curry powder, or should I make my own blend?

Either option works! Store-bought curry powder is convenient and adds a wonderful depth of flavor. If you prefer a personalized touch, feel free to create your own blend with cumin, coriander, turmeric, and other spices.


Is it possible to make this recipe in a slow cooker instead of an Instant Pot?

Absolutely! Brown the chicken and sauté the aromatics in a pan, then transfer everything to a slow cooker. Cook on low for 4-6 hours or until the chicken is cooked through.


Can I use frozen cauliflower for the roasted cauliflower side?

While fresh cauliflower is recommended for optimal texture, you can use frozen cauliflower if that’s what you have. Just be aware that frozen cauliflower may release more water during roasting.

Posted on Leave a comment

Oven Baked Harissa Chicken Tenders

Let’s make Oven Baked Harissa Chicken with Pomegranate! This chicken meal prep recipe is full of flavor, health, and simplicity. Picture succulent, oven baked chicken tenderloins and diced turnips coated in a vibrant harissa sauce, seasoned to perfection and baked to juicy perfection. What makes this dish a winner for busy individuals? It’s a combination of bold flavors that won’t break the bank, a nutritional powerhouse with lean protein and vibrant veggies, and a no-fuss, one-pan wonder that’ll have you savoring every bite without spending hours in the kitchen.

This post may contain affiliate links. Please see our privacy policy for details.

Calories: 327kcal | Carbohydrates: 16g | Protein: 38g | Fat: 12g | Saturated Fat: 2g | Polyunsaturated Fat: 2g | Monounsaturated Fat: 6g | Trans Fat: 0.02g | Cholesterol: 109mg | Sodium: 774mg | Potassium: 1016mg | Fiber: 4g | Sugar: 10g | Vitamin A: 329IU | Vitamin C: 45mg | Calcium: 53mg | Iron: 1mg

oven baked harissa chicken on a plate with veggies

What is Harissa?

Harissa is a versatile and flavorful condiment originating from North Africa. We love this condiment for meal prep because it’s known for its bold and spicy profile, making it a popular addition to various dishes. The primary ingredients in harissa include chili peppers, garlic, olive oil, and a blend of spices such as coriander, cumin, and caraway. 

Harissa is often used as a condiment to add heat and depth to dishes. It can be spread on bread, mixed into sauces, marinades, or dressings, and used as a flavor booster in soups, stews, and roasted dishes. It’s versatility is why we love using it for our oven baked chicken meal prep.

Why You’ll Love This Oven Baked Chicken Recipe

  • Quick and Easy Prep: Time is precious, and this recipe respects that. With minimal chopping and mixing, you’ll have a flavorful feast on the table without spending hours in the kitchen. It’s the perfect solution for those hectic days.
  • Healthy Goodness: Packed with lean protein from the chicken and nutrient-rich turnips, this dish is a nutritional powerhouse. Harissa sauce not only adds a kick but also brings metabolism-boosting capsaicin to the party. We’re talking about fueling your body with the good stuff!
  • Budget-Friendly Brilliance: We get it – budget matters. This recipe uses simple, accessible ingredients that won’t break the bank. Turnips are not only budget-friendly but also add a lovely earthy sweetness to the dish. You can enjoy a gourmet-style meal without a hefty price tag.
  • Flavor Fiesta: Harissa sauce brings a delightful North African flair, infusing the chicken and turnips with a spicy, smoky flavor. The paprika and garlic powder add depth, while the pomegranate seeds and pepperoncini peppers provide a burst of freshness and tang. It’s a symphony of tastes that’ll make your taste buds dance!
  • Convenient Sheet Pan Magic: Who loves doing dishes? Exactly. This recipe is a one-pan wonder. Toss everything on a sheet pan, pop it in the oven, and voila – minimal cleanup, maximum flavor. It’s a win-win for anyone who wants a delicious meal without the kitchen chaos.

The PrepYoSelf Newsletter

Ingredient Breakdown

  • Chicken Tenderloins: Lean Protein Powerhouse. Chicken is an excellent source of lean protein, essential for muscle maintenance and repair. It keeps you feeling full for longer, making it a fantastic choice for those looking to manage their weight.
  • Turnips: Fiber-Rich Satiety: Turnips bring in a substantial amount of dietary fiber. Fiber is the unsung hero when it comes to feeling satisfied after a meal – it slows down digestion, stabilizes blood sugar levels, and contributes to a lasting feeling of fullness.
  • Harissa Sauce: Metabolism Boost with Capsaicin: Harissa sauce, made from chili peppers, contains capsaicin. This compound not only adds a delightful heat but also boosts metabolism, aiding in weight management. Plus, the spiciness can help control appetite.
  • Pomegranate Seeds: Antioxidant Richness. Pomegranate seeds are bursting with antioxidants, particularly punicalagins and anthocyanins. These compounds have anti-inflammatory effects, support heart health, and contribute to overall well-being.
  • Pepperoncini Peppers: Vitamin C Kick. These peppers bring a tangy zing and a dose of vitamin C. Vitamin C is not only essential for a strong immune system but also aids in the absorption of non-heme iron from plant-based sources like turnips, enhancing overall nutrient utilization.
  • Paprika: Antioxidant Boost. Paprika, derived from bell peppers, adds flavor while contributing antioxidants like beta-carotene. Antioxidants play a crucial role in neutralizing free radicals, supporting cellular health and longevity.
  • Olive Oil: Healthy Fats for Satiety. Olive oil is a staple in the Mediterranean diet, known for its heart-healthy monounsaturated fats. These fats contribute to satiety, helping you stay full and satisfied after your meal.

oven baked chicken harissa on a plate

How to Meal Prep Harissa Chicken Tenders

  1. Preheat your oven to a toasty 425°F. We’re getting that crispy goodness started! Peel and dice those turnips into cute little 1/2 inch cubes. It’s like a veggie dance party in your kitchen!
  2. In a big mixing bowl, throw in your chicken tenderloins and those diced turnips. Now, let’s get saucy! Add in the harissa sauce, paprika, garlic powder, salt, and the star of the show – olive oil. Give it a good mix until everything is coated and ready to party.
  3. Lay out your chicken and turnip masterpiece on a sheet pan. It’s like a canvas of deliciousness. Pop it in the preheated oven and let the magic happen for 20-25 minutes or until the chicken hits that perfect 165°F internal temperature.
  4. Once your oven has worked its wonders, take out your creation and sprinkle it with pomegranate seeds and those zesty pepperoncini peppers. It’s the grand finale – flavor explosion!
  5. Now, serve it up and revel in the deliciousness you’ve just created. It’s a healthy, budget-friendly masterpiece that’s as easy as it is tasty.

Reference the recipe card below for detailed instructions.

oven baked harissa chicken on a plate

Pairing Tips for Harissa Chicken

  • Couscous or Quinoa: Serve the harissa chicken over a bed of fluffy couscous or nutty quinoa. These grains are excellent for soaking up the flavorful juices and adding a satisfying texture to each bite.
  • Greek Yogurt Sauce: Whip up a quick and refreshing Greek yogurt sauce with a dash of lemon juice, chopped mint, and a pinch of salt. This creamy sauce complements the spiciness of harissa and adds a cooling element to the meal.
  • Green Salad with Feta: Create a simple green salad with fresh greens, cucumber, and cherry tomatoes. Crumble some feta cheese over the top for a burst of creaminess and tang, balancing the heat from the harissa.
  • Herb-infused Rice: Elevate your meal with a side of herb-infused rice. Toss in some chopped parsley, dill, and a squeeze of lemon juice for a fragrant and flavorful accompaniment.
  • Garlic Hummus and Pita: Serve a side of garlic-infused hummus with warm, toasted pita bread. The creamy hummus adds richness, and the pita provides a satisfying element for scooping up the harissa chicken.
  • Tabbouleh Salad: Tabbouleh, a salad made with finely chopped parsley, tomatoes, and bulgur, is a fantastic side dish. It’s light, refreshing, and the citrusy notes will complement the harissa spice.
  • Citrusy Cucumber Salad: Combine sliced cucumbers with oranges, red onion, and a citrus vinaigrette. This salad adds a burst of freshness and a juicy, citrusy element to balance the meal.

harissa chicken

Oven Baked Harissa Chicken with Pomegranate

Indulge in the bold flavors of Oven Baked Harissa Chicken with Pomegranate, a one-pan wonder that's budget-friendly, packed with lean protein and vibrant veggies, making meal prep a breeze for busy individuals.
No ratings yet
Prep Time 5 minutes
Cook Time 25 minutes
Course lunch
Cuisine Middle Eastern
Servings 2
Calories 327 kcal

Equipment

  • knife
  • cutting board
  • mixing bowl
  • sheet pan
  • oven

Ingredients
  

  • 12 oz chicken tenderloins
  • 2 each turnips
  • 2 tbsp harissa sauce
  • 1/4 cup pomegranate seeds
  • 1/4 cup sliced pepperoncini peppers
  • 1/4 tsp paprika
  • 1/4 tsp garlic powder
  • 1/4 tsp salt
  • 1 tbsp olive oil

Instructions
 

  • Pre-heat the oven to 425F
  • Peel and dice the turnips into 1/2 inch cubes
  • In a mixing bowl add the chicken tenderloins and diced turnips
  • Add the harissa sauce, seasonings, and olive oil and mix it all together. Make sure the chicken and turnips are fully coated with the sauce and seasonings
  • Place the chicken and turnips on a sheet pan and bake in the oven for 20-25 minutes until the chicken reaches an internal temperature of 165F
  • Serve the chicken with pomegranate seeds and pepperonicini peppers

Notes

Nutrition information provided is an estimate. It will vary based on cooking method and specific ingredients used. Please consult with your healthcare provider for specific dietary needs. To gain a better understanding, explore our nutrition disclaimer here

Nutrition

Calories: 327kcalCarbohydrates: 16gProtein: 38gFat: 12gSaturated Fat: 2gPolyunsaturated Fat: 2gMonounsaturated Fat: 6gTrans Fat: 0.02gCholesterol: 109mgSodium: 774mgPotassium: 1016mgFiber: 4gSugar: 10gVitamin A: 329IUVitamin C: 45mgCalcium: 53mgIron: 1mg

Similar Recipes

orange chicken

Air Fryer Orange Soy Glazed Chicken and Broccoli

roasted chicken and rutabaga

Roasted Lemon Italian Chicken with Rutabaga

rosemary chicken

Rosemary Baked Chicken and Potatoes

You Might Also Like

Frequently Asked Questions

Can I use a different cut of chicken for this recipe?

Absolutely! While the recipe calls for chicken tenderloins, you can use other cuts like chicken breasts or thighs. Adjust the cooking time accordingly to ensure they reach a safe internal temperature.


I can’t find harissa sauce. Can I substitute it with something else?

While harissa has a unique flavor, you can try a mix of tomato paste, red pepper flakes, smoked paprika, and a touch of cayenne as a substitute. Adjust the quantities to your taste preference.


Is this recipe suitable for a low-carb diet?

Yes! The dish is relatively low in carbohydrates, especially if you pair it with cauliflower rice or a low-carb side.

Posted on Leave a comment

Pomegranate Pistachio Granola

rectangular glass meal prep container with pistachios, pomegranate, and rolled oats

Introducing the Pomegranate Pistachio Granola recipe! In the hustle and bustle of our busy lives, finding a quick and healthy breakfast or snack can be a challenge. Fear not, as this granola recipe is here to level up your meal prep game. Bursting with the vibrant duo of pomegranate seeds and pistachios, this crunchy delight is a combination of flavors that will brighten up your mornings and keep you energized throughout the day. With just a handful of budget-friendly ingredients and a few simple steps, you’re on your way to a week of nutritious, satisfying, and downright delicious meals.

This post may contain affiliate links. Please see our privacy policy for details.

Calories: 385kcal | Carbohydrates: 43g | Protein: 7g | Fat: 23g | Saturated Fat: 3g | Polyunsaturated Fat: 4g | Monounsaturated Fat: 14g | Sodium: 4mg | Potassium: 340mg | Fiber: 5g | Sugar: 24g | Vitamin A: 65IU | Vitamin C: 5mg | Calcium: 35mg | Iron: 2mg

round plate with pistachios, pomegranate, and rolled oats

Why This Granola Recipe Rocks:

  • Convenience is Key: This recipe is perfect for busy bees like you who need a quick and healthy fix. Prepare it over the weekend, and you’ve got breakfast or snacks sorted for the entire week!
  • Budget-Friendly Bliss: No need to splurge on fancy ingredients. This recipe keeps it real and budget-friendly while still delivering on taste and nutrition.
  • Versatile Vibes: Enjoy it with yogurt, milk, or simply grab a handful for a satisfying snack. It’s a versatile treat that suits any part of your day.

The PrepYoSelf Newsletter

About the Ingredients

  • Nutrient-Packed Powerhouse: This granola is a nutritional powerhouse, boasting a combination of rolled oats, pomegranate seeds, and pistachios. Packed with fiber, vitamins, and minerals, it’s like a nutrient treasure chest for your body, ensuring you get the essential goodness you need.
  • Sustained Energy Release: The balanced blend of complex carbohydrates from rolled oats, healthy fats from olive oil and pistachios, and natural sugars from honey and pomegranate seeds provides a sustained release of energy. Say goodbye to mid-morning slumps and afternoon crashes – this granola keeps you energized and focused!
  • Fiber-Fueled Satisfaction: Fiber is the unsung hero when it comes to feeling full and satisfied. The rolled oats and pistachios in this granola are rich in fiber, promoting a feeling of fullness that sticks with you. No more mindless snacking between meals – this granola has got your back!
  • Heart-Healthy Goodness: Olive oil and pistachios team up to bring heart-healthy monounsaturated fats to the table. These fats play a crucial role in supporting cardiovascular health, making this granola a heart-smart choice for those looking to prioritize their well-being.
  • Antioxidant Boost for Immunity: Pomegranate seeds are not only a burst of juicy sweetness but also a rich source of antioxidants. These antioxidants help combat oxidative stress in the body, supporting a robust immune system. Your taste buds get a treat, and your immune system gets a boost – it’s a win-win!

round plate with pistachios, pomegranate, and rolled oats

How to Meal Prep Granola

  1. Start by adding 2 tablespoons of olive oil to a sauté pan over medium heat. Once the oil is heated, pour in the 1/2 cup of rolled oats. Stir them around until they’re fully coated with that golden goodness and get slightly toasted.
  2. Time to sweeten the deal! Add 2 tablespoons of honey and sprinkle in 1/4 teaspoon of cinnamon. Mix everything up well, and watch as your kitchen transforms into a haven of deliciousness.
  3. Finally, toss in the 1/2 cup of pomegranate seeds and the 1/4 cup of shelled pistachios. These little powerhouses bring color, crunch, and a whole lot of goodness. Turn off the heat and mix it all together.
  4. Allow your granola creation to cool in the pan. As it cools, the flavors will mingle and dance together, creating a taste that’s simply irresistible.

Reference the recipe card below for detailed instructions.

rectangular glass meal prep container with pistachios, pomegranate, and rolled oats

Pairing Tips for Pomegranate Pistachio Granola

  • Yogurt Paradise: Spoon the granola generously over a bowl of creamy Greek yogurt. Add a drizzle of honey for an extra sweet kick.
  • Oatmeal Harmony: Sprinkle your granola over a piping hot bowl of oatmeal. The nutty crunch and burst of pomegranate seeds add a delightful surprise to your morning oats. A dash of cinnamon ties it all together.
  • Smoothie Bowl Extravaganza: Top your favorite smoothie bowl with a handful of Pomegranate Pistachio Granola for a satisfying crunch. The combination of creamy smoothie and crunchy granola is a match made in flavor heaven.
  • Layered Parfait Perfection: Create a stunning parfait by layering the granola with yogurt and a mix of fresh fruits. Repeat the layers for a visually appealing and delicious treat.
  • Chia Pudding Elegance: Combine the granola with a chia pudding for a nutritious and satisfying snack. The chia seeds and granola provide a double dose of texture and nutritional goodness.
  • Cheese and Granola Combo: Surprise your taste buds by pairing the granola with a mild cheese, like ricotta or goat cheese. Spread it on whole-grain toast and sprinkle the granola on top for a unique and satisfying snack.
  • Trail Mix Magic: Mix the Pomegranate Pistachio Granola with additional nuts, seeds, and dried fruits to create a custom trail mix. It’s a convenient, on-the-go snack that’s perfect for your busy lifestyle.

rectangular glass meal prep container with pistachios, pomegranate, and rolled oats

pistachio granola

Pomegranate Pistachio Granola

Elevate your mornings with our Pomegranate Pistachio Granola – a vibrant blend of rolled oats, honey, and crunchy pistachios, topped with juicy pomegranate seeds, for a budget-friendly, nutrient-packed, and irresistibly delicious meal prep option!
No ratings yet
Prep Time 5 minutes
Cook Time 5 minutes
Course Breakfast, Snack
Cuisine American
Servings 2
Calories 385 kcal

Equipment

  • spatula
  • saute pan

Ingredients
  

  • 1/2 cup rolled oats
  • 1/2 cup pomegranate seeds
  • 1/4 cup pistachios (shelled)
  • 2 tbsp honey
  • 1/4 tsp cinnamon
  • 2 tbsp olive oil

Instructions
 

  • Add oil to a saute pan on medium heat
  • Pour in the rolled oats and stir it around until it is fully coated with the oil and gets slightly toasted
  • Next, add the honey, cinnamon, and mix well
  • Finally, add the pomegranate seeds and pistachio nuts
  • Turn off the heat and mix it all together

Notes

Nutrition information provided is an estimate. It will vary based on cooking method and specific ingredients used. Please consult with your healthcare provider for specific dietary needs. To gain a better understanding, explore our nutrition disclaimer here

Nutrition

Calories: 385kcalCarbohydrates: 43gProtein: 7gFat: 23gSaturated Fat: 3gPolyunsaturated Fat: 4gMonounsaturated Fat: 14gSodium: 4mgPotassium: 340mgFiber: 5gSugar: 24gVitamin A: 65IUVitamin C: 5mgCalcium: 35mgIron: 2mg

Similar Recipes

cranberry oat muffins

Cranberry Oatmeal Muffin Bars

french toast 2

Oven Baked French Toast Muffins with Strawberries

baked oatmeal

Oven Baked Oats with Apricots and Berries

You Might Also Like

Frequently Asked Questions

Can I use different nuts in this granola recipe?

Absolutely! Feel free to experiment with your favorite nuts like almonds, walnuts, or cashews. It’s an excellent way to customize the granola to suit your taste preferences.


Can I substitute the honey with another sweetener?

Yes, you can. Maple syrup or agave nectar are great alternatives if you’re looking for a different sweetener. Adjust the quantity to your desired level of sweetness.


Can I use frozen pomegranate seeds?

Leftover ingredients like chopped dates, walnuts, and honey can be used in various recipes, from salads to baked goods. 

Posted on Leave a comment

Mexican Cabbage Roll

glass meal prep containers with mexican cabbage roll topped with shredded cheese, diced tomatoes, and corn

Our Restaurant-Quality Mexican Cabbage Rolls! combines the comfort of classic cabbage rolls with the bold, vibrant flavors of Mexican cuisine – If you’re a busy bee craving a delicious, budget-friendly meal that doesn’t compromise on taste, you’re in for a treat. Picture this: tender cabbage leaves cradling a savory mixture of lean ground beef, sautéed red onions, and a symphony of spices, all enveloped in a zesty tomato embrace with a hint of chiles. This twist not only elevates the traditional cabbage roll experience to restaurant-quality levels but also offers a lower-carb alternative, making it perfect for those on a health-conscious journey.

This post may contain affiliate links. Please see our privacy policy for details.

Calories: 308kcal | Carbohydrates: 22g | Protein: 31g | Fat: 12g | Saturated Fat: 5g | Polyunsaturated Fat: 1g | Monounsaturated Fat: 4g | Trans Fat: 0.4g | Cholesterol: 84mg | Sodium: 976mg | Potassium: 1060mg | Fiber: 4g | Sugar: 10g | Vitamin A: 1469IU | Vitamin C: 47mg | Calcium: 180mg | Iron: 5mg

round plate with mexican cabbage roll topped with shredded cheese, diced tomatoes, and corn

Why This Recipe Is Meal Prep Worthy

  • Restaurant-Quality Flavors: Our Mexican Cabbage Rolls bring a burst of restaurant-quality flavors to your table. The combination of lean ground beef seasoned with paprika, chili powder, and garlic powder, paired with the spicy kick from diced tomatoes with chiles, creates a symphony of tastes that will transport you straight to your favorite Mexican eatery. It’s a culinary adventure without leaving the comfort of your home.
  • Lower-Carb Delight: For those watching their carb intake, these rolls are a dream come true. It’s a fantastic option for individuals following a low-carb or keto lifestyle without sacrificing the comforting satisfaction of a well-made, hearty meal.
  • Budget-Friendly Brilliance: Eating delicious, wholesome meals shouldn’t break the bank, and our Mexican Cabbage Rolls are a shining example of budget-friendly brilliance. Cabbage is an economical vegetable, and the recipe utilizes lean ground beef, a cost-effective protein source. With pantry staples like canned tomatoes and spices, you’re creating a gourmet experience without the gourmet price tag. It’s a win-win for your taste buds and your wallet.
  • Meal Prep Magic: We understand the hustle of busy lives, and that’s why these Mexican Cabbage Rolls are perfect for meal prep enthusiasts. The recipe is designed to be made in batches, making it easy to prepare several servings at once. Once rolled and baked, these rolls freeze beautifully, ensuring you have a supply of tasty, homemade meals ready to go whenever you need them. It’s meal prep magic that takes the stress out of mealtime.
  • Versatility for All Occasions: Whether you’re hosting a dinner party or enjoying a quiet night in, these rolls are a versatile choice. Their elegant presentation and bold flavors make them a standout dish for special occasions, while their simplicity and practicality make them an excellent option for everyday meals. From family dinners to potlucks, these Mexican Cabbage Rolls are a crowd-pleaser that fits any occasion.

The PrepYoSelf Newsletter

Ingredients & Swaps

  • Cabbage: Cabbage is not only affordable but also a nutritional powerhouse. Packed with vitamins and fiber, it’s the star of our show. When boiling, make sure not to overcook it; we want those leaves tender but still with a bit of bite. For a twist, try using savoy cabbage or even large collard greens for a heartier cabbage roll.
  • Lean Ground Beef: Opting for lean ground beef keeps the dish healthy without compromising on flavor. You can also switch it up with ground turkey or chicken for a lighter alternative.
  • Red Onions: Red onions add a sweet and savory kick to the filling. If you’re not a fan, yellow or white onions work just as well. Shallots can be a sophisticated swap too!
  • Corn: Corn brings a burst of sweetness and texture. Fresh corn off the cob is fantastic, but frozen or canned options are convenient. If you’re feeling adventurous, try black beans or diced zucchini for an extra veggie boost.
  • Orange Bell Pepper: The orange bell pepper adds vibrancy and a slightly sweet flavor. Feel free to experiment with different colored peppers for a visually stunning dish. For a smoky twist, use roasted red peppers from a jar.
  • Canned Diced Tomatoes with Chiles: These tomatoes bring the heat! The canned variety with chiles adds a spicy kick, but you can control the heat by choosing mild or hot versions. Diced tomatoes with jalapeños are a great alternative. Fresh diced tomatoes work too, especially if you want to control the spice level completely.
  • Tomato Sauce: Tomato sauce binds everything together. Choose a low-sodium version to keep things on the healthier side. If you prefer a different texture, crushed tomatoes or tomato puree are excellent substitutes. Add a pinch of sugar to balance acidity if needed.
  • Shredded Cheddar Cheese: Cheddar cheese brings a gooey, melty goodness to the party. Feel free to experiment with different cheeses like Monterey Jack or pepper jack for added flavor.
  • Paprika, Chili Powder, Garlic Powder, Salt: This quartet of spices is the secret behind the flavorful meat mixture. Adjust the quantities based on your taste preferences. Smoked paprika can add depth, and for an extra kick, consider using cayenne pepper or chipotle powder. Fresh garlic is a fantastic swap for garlic powder if you have it on hand.

round plate with mexican cabbage roll topped with shredded cheese, diced tomatoes, and corn

Simple Steps to Meal Prep This Cabbage Roll

  1. Boil a pot of water and toss in the half head of cabbage. Let it dance in the boiling water for 7 to 8 minutes until the leaves become tender and can easily separate from the core. Once it’s all tender, rescue the cabbage and let it cool before you start pulling those leaves apart. It’s cabbage roll time!
  2. In a sauté pan on medium-high heat, add a dash of oil and sauté those red onions until they’re feeling soft and translucent.
  3. Introduce the lean ground beef to the party and sprinkle in the paprika, chili powder, garlic powder, and salt. Break up that beef into bite-sized pieces and let it groove until fully cooked (about 6 to 7 minutes). Now, pour in the tomato sauce and give it a good stir. Let those flavors mingle and dance together.
  4. Take 2 to 3 cabbage leaves and stack them on top of each other for each roll. Scoop 1/3 cup of the seasoned meat mixture into the center of the cabbage leaves. Roll ’em up like a burrito, tucking in the sides as you go. It’s like you’re wrapping up a little gift of goodness!
  5. Preheat your oven to 375°F (190°C). Place your beautiful cabbage rolls in a baking dish and pour over the diced tomatoes with chiles. Oh, the aroma! Sprinkle that shredded cheddar cheese on top, and into the oven they go for 15 minutes. Watch that cheese melt into a gooey perfection!

Reference the recipe card below for detailed instructions.

glass meal prep containers with mexican cabbage roll topped with shredded cheese, diced tomatoes, and corn

Meal Prep Tips for Mexican Cabbage Soup

  • Fresh Greens Galore: Serve the Mexican Cabbage Rolls alongside a crisp, refreshing green salad. The acidity of a lime vinaigrette can complement the richness of the rolls beautifully.
  • Cilantro Sensation: Garnish with freshly chopped cilantro for a burst of freshness. The herb’s citrusy notes enhance the overall flavor profile.
  • Mexican Rice Marvel: Accompany the rolls with a side of fluffy Mexican rice for a complete and satisfying meal. The rice can soak up the flavorful juices from the rolls.
  • Taco Tuesday Remix: Unroll the cabbage leaves and use the seasoned ground beef as a taco filling. Top with your favorite taco fixings like salsa, guacamole, and sour cream for a new twist.
  • Soup of the Day: Dice the leftover cabbage leaves and mix them into a hearty tomato-based soup. Add the remaining meat mixture for a comforting Mexican-inspired soup that’s perfect for chilly days.

glass meal prep containers with mexican cabbage roll topped with shredded cheese, diced tomatoes, and corn

Plate of cabbage rolls topped with shredded cheese and diced tomatoes.

Mexican Cabbage Roll

Experience a budget-friendly fiesta with our Restaurant-Quality Mexican Cabbage Rolls, combining lean ground beef, vibrant spices, and zesty tomatoes, all wrapped in tender cabbage leaves for a lower-carb twist that's perfect for meal prep and bursting with bold, savory flavors.
No ratings yet
Prep Time 5 minutes
Cook Time 30 minutes
Course dinner, Main Course
Cuisine American, Mexican
Servings 2
Calories 308 kcal

Equipment

  • knife
  • cutting board
  • boiling pot
  • saute pan
  • baking dish
  • oven

Ingredients
  

  • 1 half head of cabbage
  • 8 oz lean ground beef
  • 1/4 cup red onions (diced)
  • 1/2 cup corn (fresh, frozen, canned)
  • 1/4 cup orange bell pepper (diced)
  • 12 oz canned diced tomatoes with chiles
  • 4 oz tomato sauce
  • 1/4 cup shredded cheddar cheese
  • 1/4 tsp paprika
  • 1/4 tsp chili powder
  • 1/4 tsp garlic powder
  • 1/4 tsp salt

Instructions
 

  • Boil a pot of water. Place the cabbage in the pot and boil for 7 to 8 minutes until the leaves are tender and can easily separate from the core. Once the cabbage is tender, remove it from the water and let it cool before pulling the leaves apart.
  • Meanwhile, add oil to a saute pan on medium-high heat and saute the red onions until they soften. Add the ground beef and sprinkle in the seasonings. Break it up into smaller pieces and continue to stir the beef around until it fully cooks (about 6 to 7 minutes). Then, add the tomato sauce and stir it into the meat mixture.
  • Layer 2 to 3 cabbage leaves on top of each other for each roll. Scoop 1/3 cup of the meat mixture into the center of the cabbage leaves. Wrap the leaves like a burrito tucking in the sides as you go.
  • Place the rolls in a baking dish and pour over the diced tomatoes. Sprinkle the shredded cheddar cheese on top and bake in the oven for 15 minutes.

Notes

Nutrition information provided is an estimate. It will vary based on cooking method and specific ingredients used. Please consult with your healthcare provider for specific dietary needs. To gain a better understanding, explore our nutrition disclaimer here

Nutrition

Calories: 308kcalCarbohydrates: 22gProtein: 31gFat: 12gSaturated Fat: 5gPolyunsaturated Fat: 1gMonounsaturated Fat: 4gTrans Fat: 0.4gCholesterol: 84mgSodium: 976mgPotassium: 1060mgFiber: 4gSugar: 10gVitamin A: 1469IUVitamin C: 47mgCalcium: 180mgIron: 5mg

Similar Recipes

turkey soup

One Pot Turkey Toscana Soup

chicken fajitas

Sheet Pan Chicken Fajitas with Mango Salsa

pork carnitas

Instant Pot Pork Carnitas Tostadas

You Might Also Like

Frequently Asked Questions

Are there alternatives to cabbage for wrapping the rolls?

Yes, indeed! While cabbage leaves are traditional, you can experiment with other leafy greens like collard greens or even large Swiss chard leaves for a unique twist.


Can I make this recipe vegetarian?

Absolutely! Swap the ground beef for plant-based crumbles or a mix of quinoa and black beans for a delicious vegetarian version. Adjust the seasonings accordingly.


Can I customize the filling with additional vegetables?

Of course! Feel free to add your favorite veggies to the meat mixture. Diced zucchini, mushrooms, or spinach can be wonderful additions, adding both flavor and nutrients.

Posted on Leave a comment

Lemon Ricotta Breakfast Cake

rectangle baking dish with a lemon ricotta breakfast cake

Energize Your Mornings with a Zesty Twist: Lemon Ricotta Breakfast Cake! This delightful creation not only tastes delicious but also takes the hassle out of your busy mornings. Picture this: a zesty, moist cake that’s not only a treat for your senses but a triumph for your meal prep game. With simple ingredients and a quick bake time, it’s the perfect solution for those who crave a wholesome breakfast but lack the time. Get ready to savor the joy of a well-prepared morning with this Lemon Ricotta Breakfast Cake that’s sure to become a staple in your breakfast routine.

This post may contain affiliate links. Please see our privacy policy for details.

Calories: 489kcal | Carbohydrates: 56g | Protein: 14g | Fat: 25g | Saturated Fat: 8g | Polyunsaturated Fat: 2g | Monounsaturated Fat: 13g | Trans Fat: 0.01g | Cholesterol: 113mg | Sodium: 139mg | Potassium: 204mg | Fiber: 2g | Sugar: 27g | Vitamin A: 407IU | Vitamin C: 29mg | Calcium: 189mg | Iron: 3mg

rectangle baking dish with a lemon ricotta breakfast cake

Why This Breakfast Cake is a Game-Changer for Meal Prep

In the world of breakfast delights, this cake stands out as a beacon of tastiness and convenience. So, whether you’re conquering the day solo or sharing the love with your loved ones, let the Lemon Ricotta Breakfast Cake be your morning delight.

  • Quick and Easy: In the blink of an eye, you’ll have a delightful breakfast ready to roll.
  • Zesty Goodness: The lemony kick will wake up your taste buds like a sunrise for your mouth.
  • Wholesome Ingredients: Indulge in the sweet satisfaction without the guilt. The use of olive oil and ricotta keeps it light and lovely
  • Portion Control: Slice it up into individual servings for built-in portion control. No need to eyeball your breakfast; it’s pre-portioned and ready to roll.

The PrepYoSelf Newsletter

Ingredients & Swaps

  • Egg: For an egg-free version, substitute with a flax egg (1 tablespoon ground flaxseed + 3 tablespoons water) or applesauce. This tweak maintains moisture while being kind to our vegan friends.
  • Sugar: Opt for natural sweeteners like maple syrup, honey, or coconut sugar instead of white sugar. It adds a subtle sweetness without the refined sugars. You can also use sugar alternatives such as swerve.
  • Oil: Choose a lighter oil, like avocado oil, for a dose of healthy monounsaturated fats. It keeps the cake moist while giving you a boost of heart-healthy goodness.
  • Flour: Sub in whole wheat flour for a fiber-rich alternative. This not only adds a nutty flavor but also keeps you feeling fuller for longer. Replace a portion of the flour with almond flour. This adds a delightful nuttiness to the cake.
  • Yogurt: Incorporate a couple of tablespoons of Greek yogurt for an additional protein boost and a creamy texture. It complements the ricotta beautifully.
  • Spices: Add a pinch of nutmeg to the mix for a warm, comforting flavor. Nutmeg complements the citrus notes and adds a layer of depth.

rectangle baking dish with a lemon ricotta breakfast cake

How to Meal Prep Lemon Ricotta Breakfast Cake

  1. Preheat your oven to 400°F.
  2. In a mixing bowl, gather your ingredients: 1 large egg, 1/4 cup white sugar, 1/2 cup ricotta cheese, 2 tablespoons of olive oil, and the freshly squeezed juice of one lemon. It’s time to let the flavor dance party begin! Mix until these ingredients well blended.
  3. Now, it’s time to add a little pow-wow to our mix. Sprinkle in 1/2 cup of flour and 1/4 teaspoon of baking powder. Keep the mixing vibes going until you’ve got a batter that’s smooth and sensational.
  4. Grease up your baking dish because it’s showtime! Pour your batter into the dish, making sure it’s spread out evenly. Pop it into the preheated oven and let the magic happen for the next 12-15 minutes.
  5. Keep an eye on your creation as it bakes. You want the center to be fully cooked, and when you insert a toothpick, it should come out clean. Once that happens, you’re officially the maestro of your kitchen!

Reference the recipe card below for detailed instructions.

rectangle baking dish with a lemon ricotta breakfast cake

Meal Prep Tips:

  • Transform the recipe into muffins for an even more portable option. Perfect for those days when you need breakfast on the run!
  • Serve your breakfast cake with a medley of fresh berries or sliced fruit. The natural sweetness pairs perfectly with the zesty cake.
  • A generous dollop of Greek yogurt on the side adds creaminess and a protein boost. It complements the cake’s texture and enhances the overall experience.
  • Sprinkle chopped nuts (like almonds or walnuts) or seeds (such as chia or flaxseeds) on top for an extra crunch and a dose of healthy fats.
  • Pair your slice with a cup of herbal tea, a latte, or a refreshing glass of orange juice. The choices are endless, and each adds its unique touch.
  • For a unique twist, pair the cake with a side of eggs or turkey sausage. The savory elements contrast beautifully with the sweet and citrusy flavors.

rectangle baking dish with a lemon ricotta breakfast cake

White rectangular baking dish with a lemon ricotta bar

Lemon Ricotta Breakfast Cake

Here's a light, refreshing Lemon Ricotta Breakfast Cake that is perfect for mornings made with simple ingredients. Perfect for a breakfast or mid-day snack or even as a dessert.
No ratings yet
Prep Time 5 minutes
Cook Time 15 minutes
Course Breakfast, Dessert, Snack
Cuisine American
Servings 2
Calories 489 kcal

Equipment

  • mixing bowl
  • baking dish
  • oven

Ingredients
  

  • 1 large egg
  • 1/4 cup white sugar
  • 1/2 cup ricotta cheese
  • 2 tablespoon olive oil
  • 1/2 cup flour
  • 1/4 teaspoon baking powder
  • 1 lemon (juiced)

Instructions
 

  • Preheat the oven to 400F. In a mixing bowl, combine the eggs, sugar, oil, lemon juice, and ricotta cheese. Mix until all ingredients have blended. Then, add the flour and baking powder and mix well.
  • Pour the batter into a greased baking dish and bake in the oven for 12-15 minutes until the center is fully cooked.

Notes

Nutrition information provided is an estimate. It will vary based on cooking method and specific ingredients used. Please consult with your healthcare provider for specific dietary needs. To gain a better understanding, explore our nutrition disclaimer here

Nutrition

Calories: 489kcalCarbohydrates: 56gProtein: 14gFat: 25gSaturated Fat: 8gPolyunsaturated Fat: 2gMonounsaturated Fat: 13gTrans Fat: 0.01gCholesterol: 113mgSodium: 139mgPotassium: 204mgFiber: 2gSugar: 27gVitamin A: 407IUVitamin C: 29mgCalcium: 189mgIron: 3mg

Similar Recipes

baked oatmeal

Oven Baked Oats with Apricots and Berries

ricotta apple

Oven Baked Apple with Ricotta and Walnuts

french toast 2

Oven Baked French Toast Muffins with Strawberries

You Might Also Like

Smartfruit Mellow Mango + Immunity, 100% Real Fruit Purée

Trader Joe’s Unsalted, Dry Toasted Slivered Almonds

Trader Joe’s the Dark Chocolate Lover’s Chocolate Bar

Frequently Asked Questions

Can I use low-fat ricotta cheese?

Yes, low-fat ricotta cheese can be used without compromising the texture or flavor of the cake. It’s a great option for those looking to reduce the fat content.


Can I use a different citrus fruit?

Absolutely! While the recipe calls for lemon juice, you can experiment with other citrus fruits like lime, orange, or even a combination for a unique twist on flavors.


Can I make this recipe gluten-free?

Yes, you can! Substitute the regular flour with a gluten-free flour blend or almond flour to create a gluten-free version of this breakfast cake. Adjust the quantity as needed based on the flour you choose.