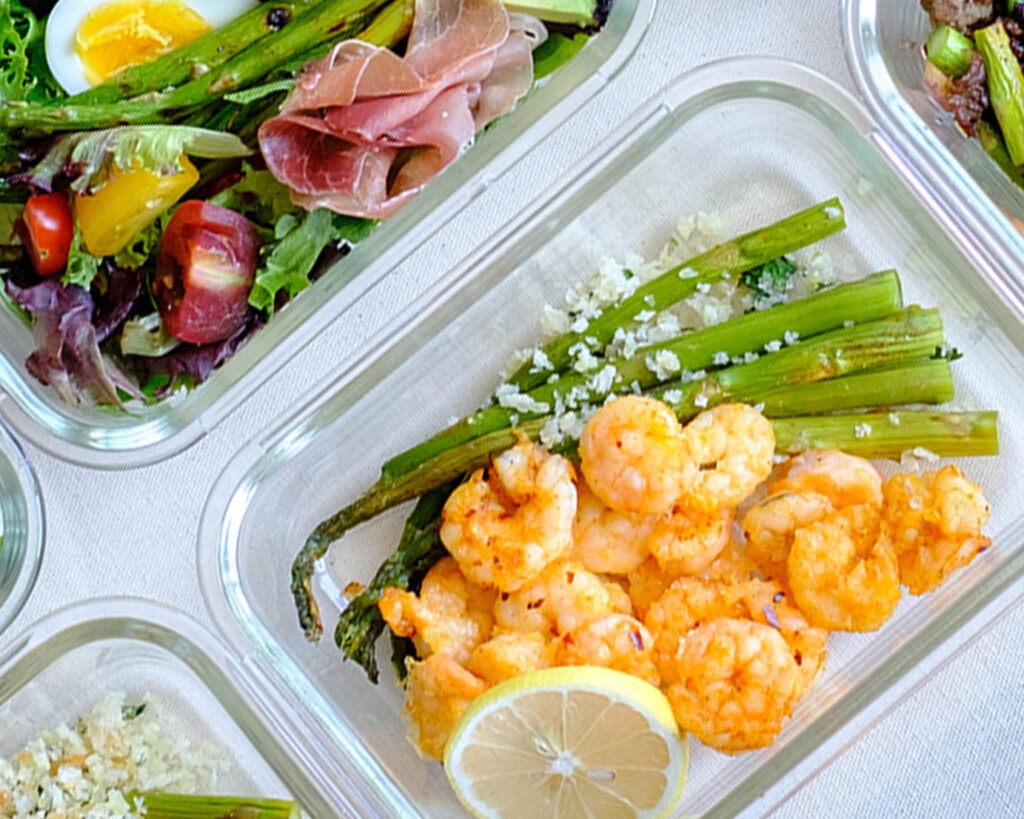
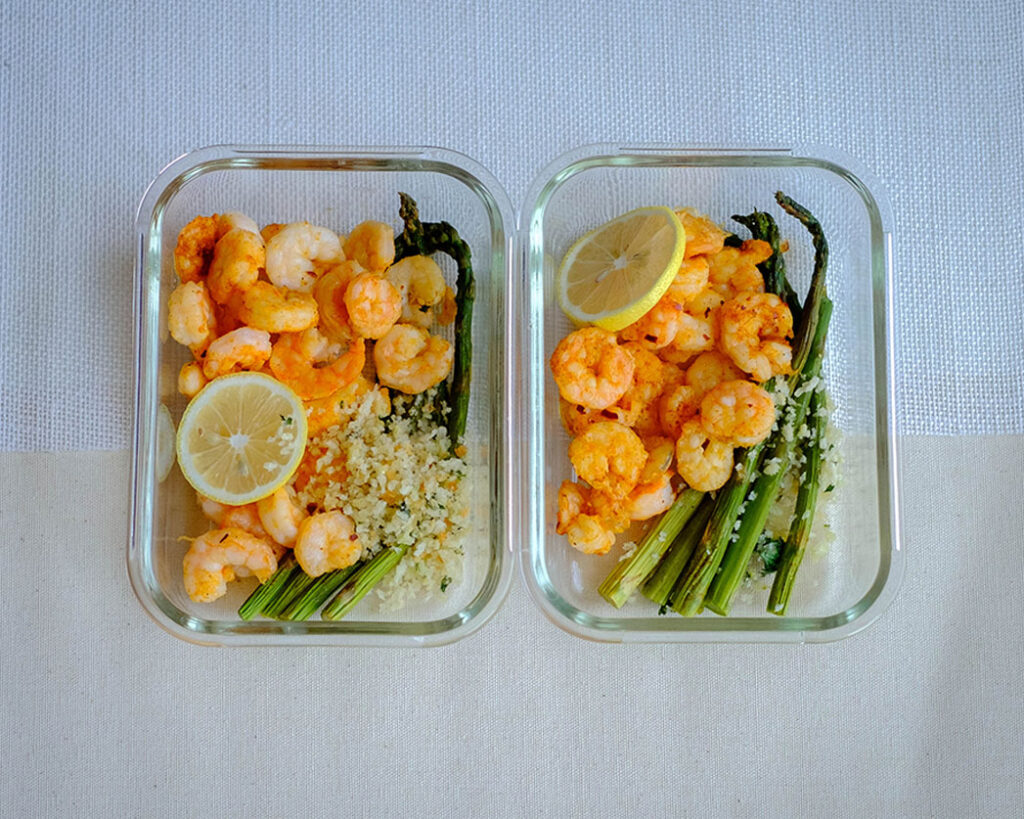
Garlic lemon shrimp and crispy panko-crusted asparagus all baked together in one pan! This super easy baked shrimp recipe keeps the dishes to a minimum and the flavor clean and crisp.
This post may contain affiliate links. Please see our privacy policy for details.
Need a game plan for your midweek dinner after a long day of work? Then, you’ll want to try this quick and easy cooking method that will help you get dinner on the table in less than 30 minutes.
Sheet pan meals save time, make clean-up easier, and the oven does all the work. That’s why we love this Oven Baked Shrimp with Roasted Asparagus topped with crispy panko breadcrumbs.
The PrepYoSelf Newsletter
Easy Ingredients for this Baked Shrimp Recipe
Shrimp: Get shrimp that is already peeled and deveined
Asparagus: You can also swap this ingredient out with green beans or broccolini
Lemon: Lemon on seafood help to add bright flavors to the dish
Seasonings: We used chili red pepper flakes for a little bit of heat, paprika for smoky flavors, and garlic as an aromatic
Breadcrumb Mixture: This crunchy topping is the star of the show that adds a layer of crunch and flavor to the dish. This crispy and garlicky combination levels up the dish
Easy Steps to Make Sheet Pan Shrimp and Asparagus
Pre-heat the oven to 400F.
Place the shrimp and asparagus on a sheet pan and sprinkle them with seasonings. Coat with olive oil.
In a small bowl, mix together the breadcrumb mixture and top off the asparagus with the bread crumbs.
Bake everything in the oven for 10-12 minutes
Reference the recipe card below for detailed instructions.
Meal Prep Tips for Sheet Pan Meals
Line the pan with foil or parchment paper to help with easy clean-up.
Avoid overcrowding the pan. This will help everything crisp up instead of steaming the food.
Pair proteins and vegetables that have similar cook times.
Oven Baked Shrimp with Asparagus and Panko Breadcrumbs
Crispy, golden panko crusted asparagus paired with high-protein shrimp. An easy sheet pan meal for your busy work week.
Panko is a Japanese style of breadcrumbs that are lighter, airier, crispier, and larger than regular breadcrumbs that give a bigger crunch to deep-fried foods.
Can I use panko and breadcrumbs interchangeably?
You can use them interchangeably, the only difference is your preference in how crunchy you prefer your coating on fried foods
Which is healthier panko or breadcrumbs?
Panko is lower in calories, sodium, and fat than regular breacrumbs.
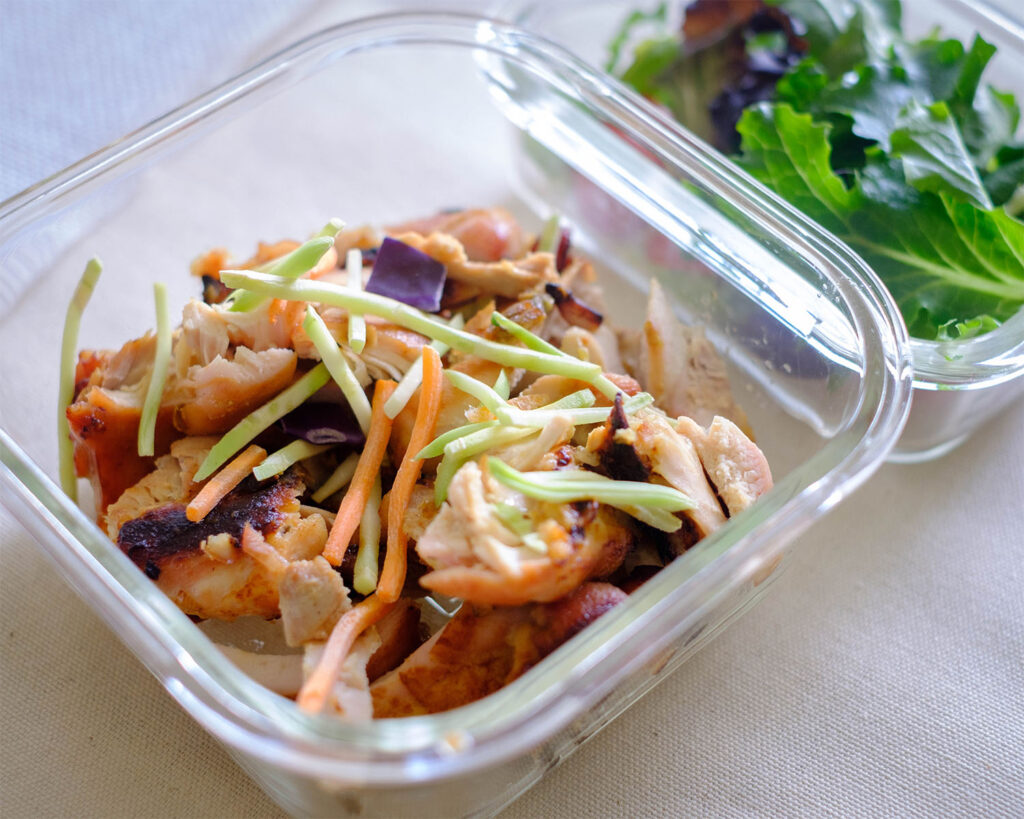
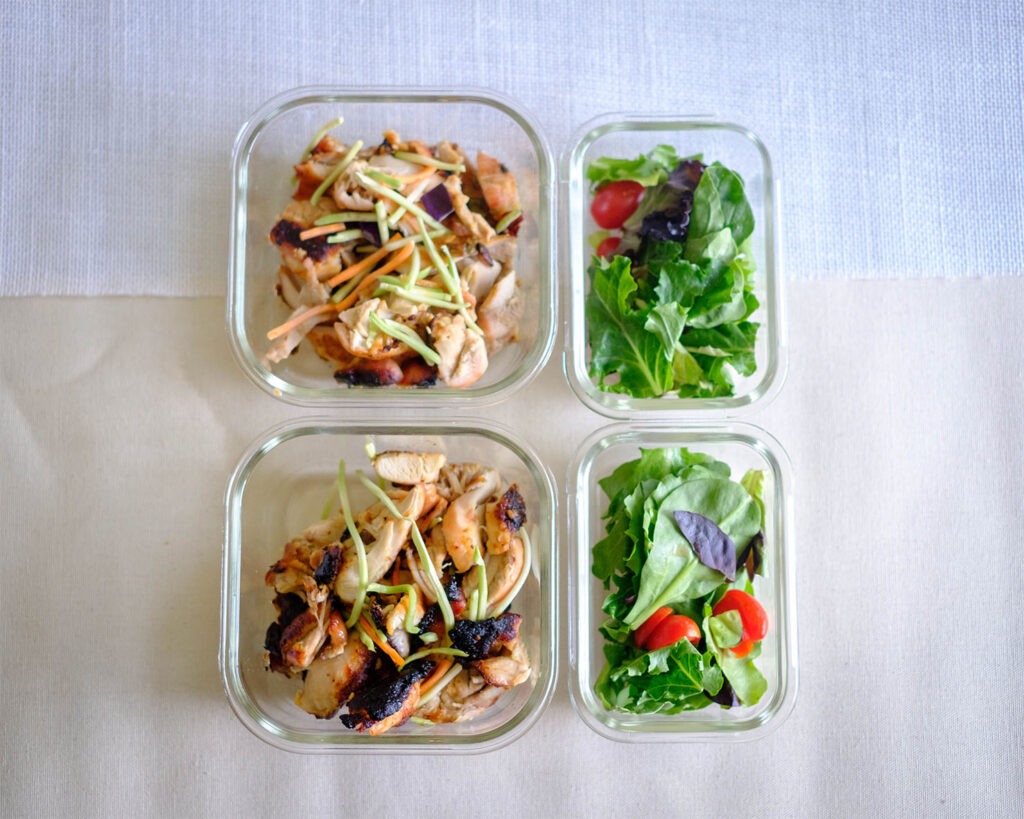
The recipe uses pantry-friendly ingredients to make this flavorful marinade for your chicken.
This is a sheet pan recipe that makes it easy to clean up.
It is also budget-friendly and saves you money during the week.
The PrepYoSelf Newsletter
Featured Ingredients
Chicken: We use boneless chicken thighs, but you can easily swap them with chicken breasts or chicken tenderloins.
Green Onions: Herbs bring freshness to marinades. Easily swap it with whatever fresh herbs you have on hand such as basil or parsley.
Soy Sauce: This sauce adds savory flavors and gives the chicken a nice caramel color after cooking.
Dijon Mustard: This ingredient adds a sharp tangy flavor to the marinade.
Honey: The sweetness of honey pairs well with the savory and tangy flavors of the soy sauce and dijon mustard.
Oil: We used olive oil but you can also use coconut oil or sesame oil.
Easy Recipe Steps for Baking Honey Mustard Glazed Chicken
Preheat the oven to 425F.
Mix together the chicken marinade in a bowl and marinate the chicken for at least 10 minutes.
Place the marinated chicken in a baking dish and bake until it fully cooks. (flip it halfway through the cooking process)
After it cooks, let it rest before cutting them into bite-size pieces.
Serve the baked honey dijon glazed chicken with the salad and dressing.
Reference the recipe card below for detailed instructions.
Meal Prep Tips for Honey Mustard Glazed Chicken Salad
Preparation tip: If you are cooking with thick chicken breasts, you can pound the meat flat with a meat mallet until it is about 1 inch thick. This process helps tenderize the meat and also speeds up the cooking process.
Cooking Variations: You can also bake the chicken in a small toaster oven or cook it in the Air Fryer (cook at 360F for 20 minutes until it reaches an internal temperature of 165F). Another option is to pan-fry the chicken in a skillet or grill it on an indoor grill pan if you prefer to cook on the stovetop.
Storage: Store the meal in an air-tight container in the refrigerator for up to 3 to 4 days. You can also store the chicken in a freezer-safe container or bag for up to 3 months for the best quality.
To Reheat: Heat the chicken in the microwave until they warm through. However, you can eat the chicken chilled.
Oven Baked Honey Mustard Glazed Chicken Salad
Baked honey mustard chicken glazed in a sweet, tangy, and savory marinade that is cooked until juicy and tender. Easily serve it on top of fresh spring mix.
Pre-heat the oven to 425F. In a mixing bowl, mix together the chicken marinade. Then, add the chicken and coat it with the marinade. Marinate for at least 10 minutes.
Then, place the chicken in a baking dish and bake in the oven for 20 minutes. After 20 minutes, flip the chicken and cook for another 10 minutes. Use a thermometer to ensure that the chicken has cooked to an internal temperature of 165F.
After the chicken has cooked, remove it from the oven and let it cool before slicing into bite size pieces.
Meanwhile, in a bowl, mix together the salad dressing ingredients until it is well blended. Assemble the chicken on top of the spring mix salad with broccoli slaw mix and cherry tomatoes. Drizzle everything with the salad dressing.
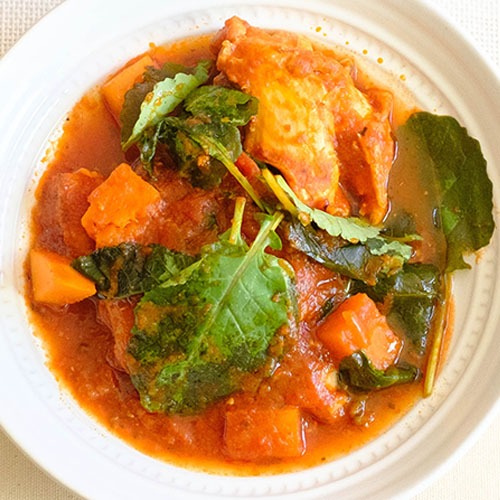
This easy one-pot dish is simply made with chicken stewed in marinara sauce and paired with sweet potatoes and kale. This is a hearty and chunky chicken recipe that is sure to warm you up on a cold night and only takes a few simple steps. One-pot chicken recipes are generally straightforward and require minimal cooking skills. They are suitable for beginners or those who are less confident in the kitchen. Even if you’re not an experienced cook, you can still create a tasty and satisfying meal with a one-pot recipe.
One-pot chicken recipes are perfect for meal prep as they’re easy on the cook and the clean up. One-pot recipes also build complex and deep flavors, incorporating a variety of ingredients including proteins, vegetables, and grains, all cooked together. This makes it easier to create well-balanced meals with a good mix of nutrients and flavors. You can experiment with different combinations and customize the recipe to suit your dietary preferences.
Meal prep tips for One-Pot Chicken Marinara
Chicken: We used chicken breast to keep it lean, however, if you prefer dark meat, feel free to use boneless skinless chicken thighs.
Sweet Potatoes: We used sweet potatoes, however, if you want to use regular potatoes, try them with red baby potaotes to cut your down your prep.
Vegetables: We paired it with baby kale for extra veggies and nutrients, however, you can use other vegetables such as bell peppers, baby carrots, or even spinach.
Marinara Sauce: If you don’t have marinara sauce, you can substitute with tomato sauce and just add some italian seasoning.
Wash and peel the sweet potato and cut in 1 inch cubes
Add oil to a soup pot on medium high heat and saute red onions until they soften
Next, add the chicken breasts and saute for about 3 to 5 minutes until it is golden brown
Then, add the marinara sauce and water in the pot and mix well
Add the sweet potato and bring the liquid to a boil. After it is boiling, lower the heat to low medium and cover the pot with a lid. Simmer for abot 20 minutes until the chicken fully cooks to an internal temperature of 165F
Finally, remove the lid and stir in the baby kale until it wilts
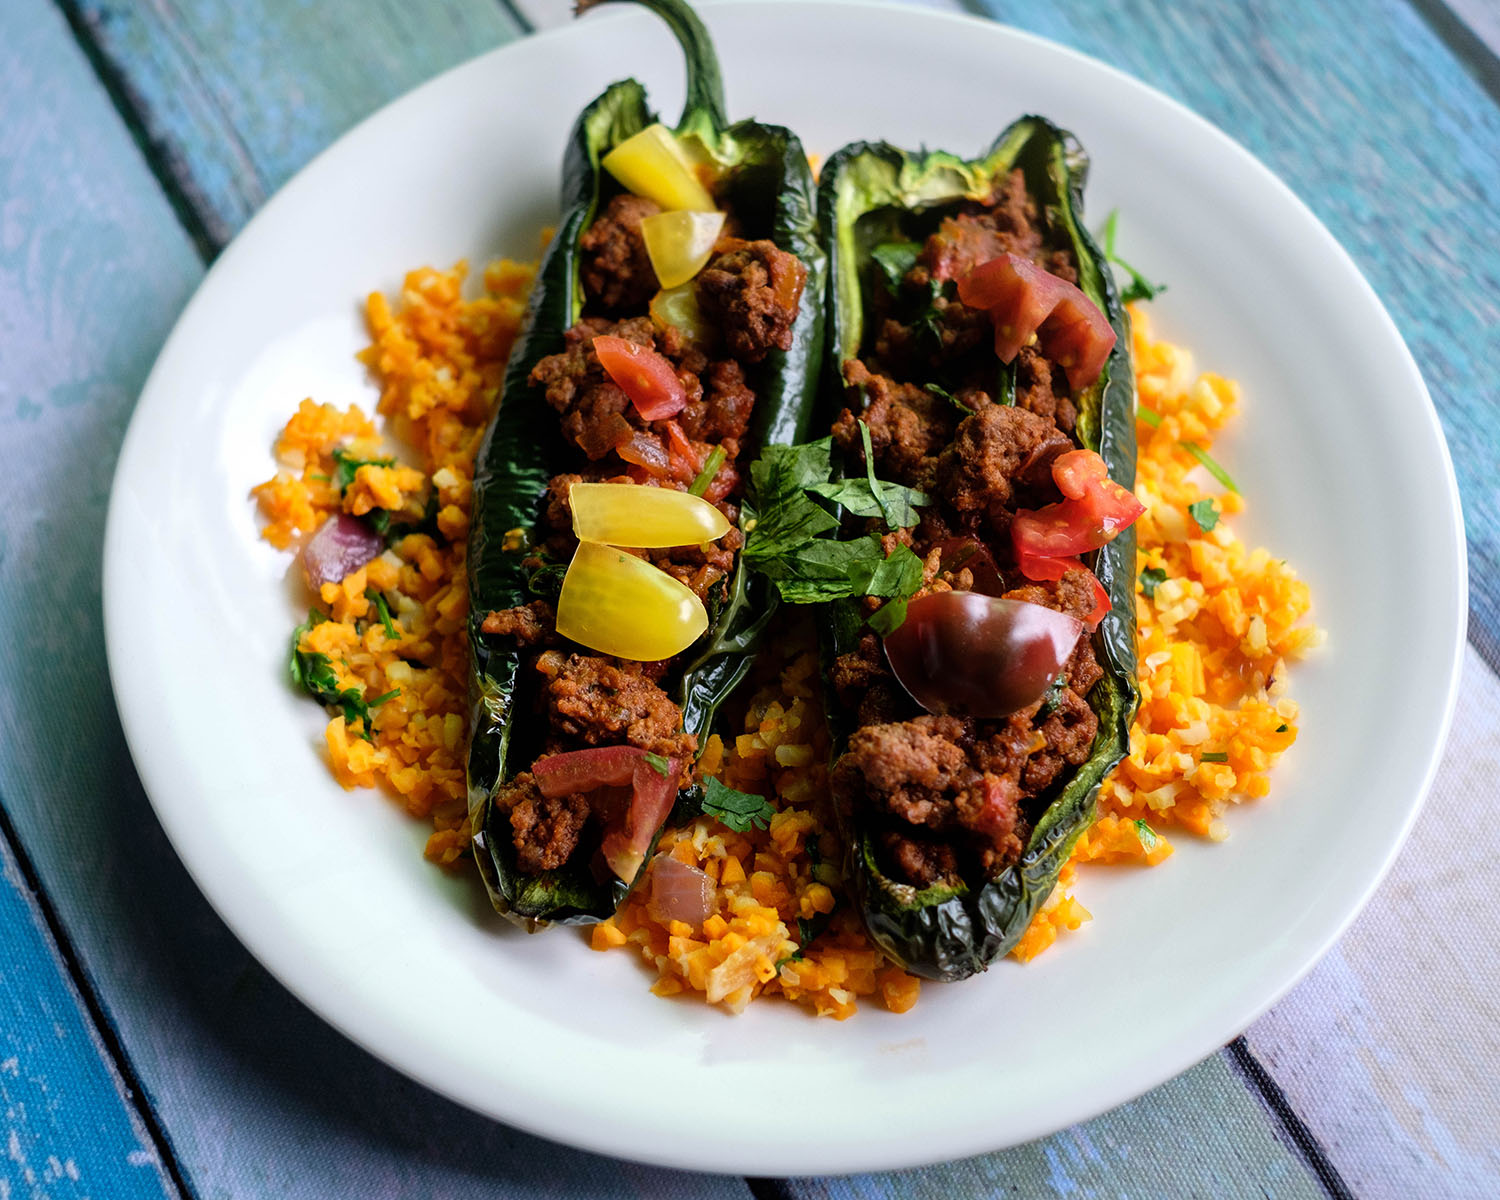
Easy, baked southwest stuffed pepper recipe with ground beef. Bold, savory flavors are served on top of a bright and colorful cilantro sweet potato and cauliflower rice.
3cupssweet potato and cauliflower rice(recommend Green Giant's brand)
1/4cupcherry tomatoes(sliced)
1/4cupcilantro(chopped)
Get Recipe Ingredients
Instructions
Pre-heat the oven to 350F
Arrange the poblano peppers in a single layer on a sheet pan and bake for 10-15 minutes
Meanwhile, add oil to a pan on medium high heat and saute the onions until they soften
Next, add the ground beef and season with chili powder, cumin, garlic powder, and salt. Continue to saute for about 5 to 8 minutes until the meat is browned and cooked through
Then, stir in the roasted diced tomatoes and diced green chilies
Heat the sweet potato and cauliflower rice in the microwave according to the packaged instructions
Once the peppers have cooked from the oven, let them cool for a few minutes and carefully spoon in the ground beef mixture into each pepper half
Serve the stuffed peppers on top of the sweet potato and cauliflower rice
Garnish with fresh diced tomatoes and chopped cilantro
Notes
Note: Feel free to add additional toppings such as shredded cheese, guacamole, or sour cream. You can also add beans, corn, or other veggies to your ground beef mixture.
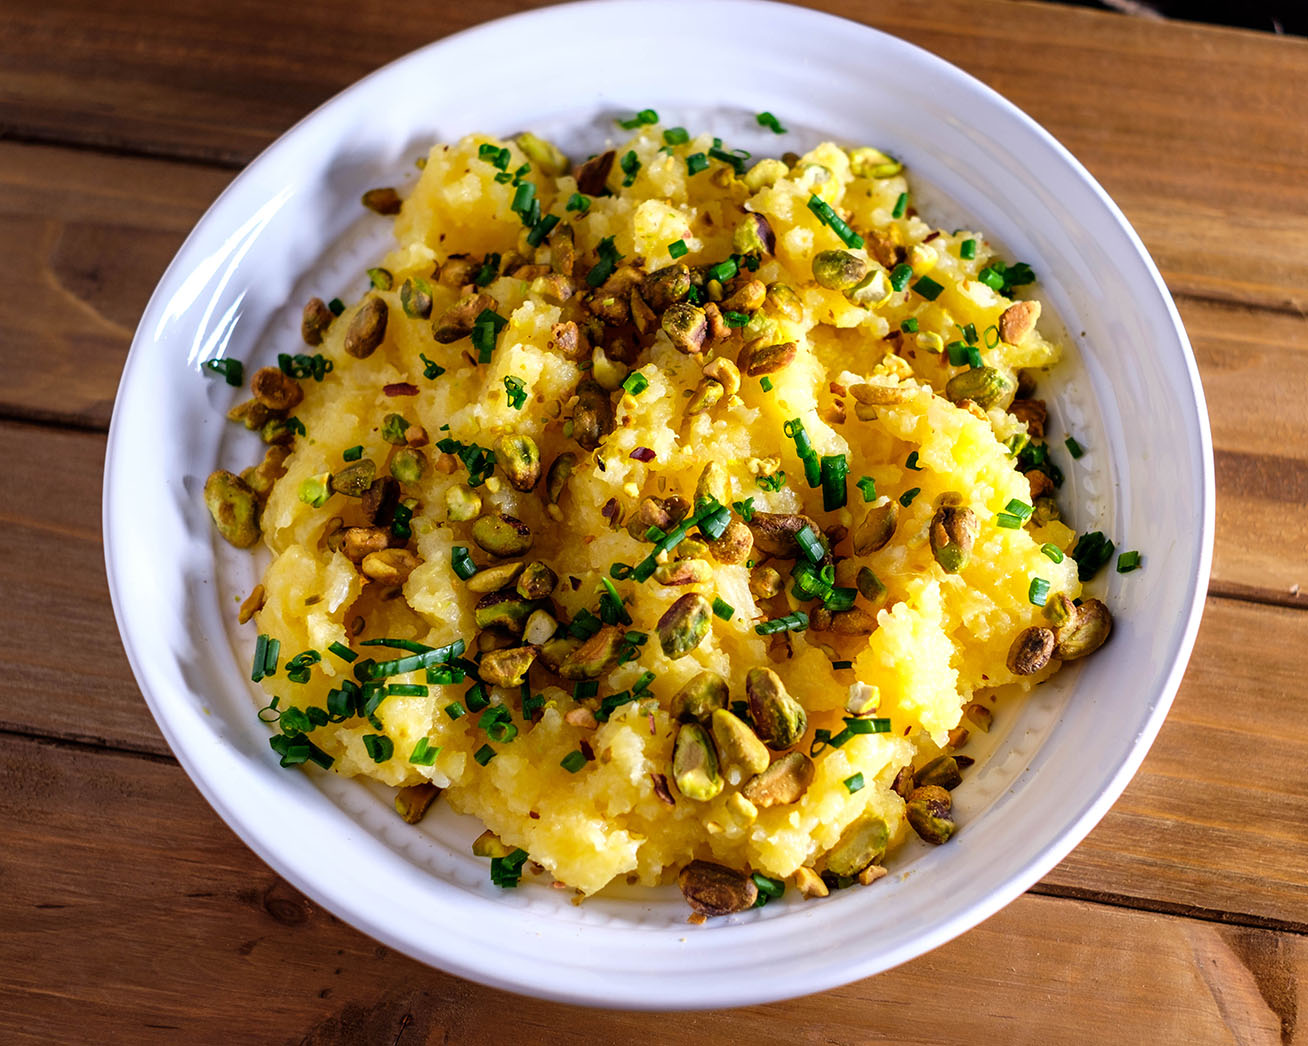
This cauliflower mashed “potatoes” is so much creamier than you can ever imagine. It is filled with such great flavor and serves as a great low-carb alternative to your classic mashed potatoes.
Ease of Making: Easy
This would make a perfect side dish for any cold winter feast and will be a great addition to Thanksgiving entrees.
If you’re looking for an easy side dish to prep for the holidays, try this dish. No need for peeling and cooks in less time than your classic mashed potatoes.
How to Cook Cauliflower Mashed “Potatoes”
Start with steaming your cauliflower florets.
Meanwhile, saute the garlic.
After the cauliflower florets have gotten tender, add the garlic and florets into a blender.
Season with salt and blend until smooth.
Place the cauliflower in a heated pot and mix in the butter, sour cream, and parmesan cheese
Top it off with fresh chives and roasted pistachios
Meal prep tips for Mashed Cauliflower
Does cauliflower really taste like mashed potatoes?
While the texture may be close, they will not exactly taste the same. Cauliflower will naturally be blander because of the water content. Try roasting the cauliflower instead of steaming for a firmer mash. Roasting it will also give it a sweeter and nuttier flavor. We also added the same herbs that we normally would add to mashed potatoes such as chives.
How to make mashed cauliflower creamy?
Mix in cheese, butter, sour cream, and milk to make it rich and smooth.
What can you eat with Mashed Cauliflower?
It is a great side dish to accompany any roasted or pan-fried protein such as tender roasted beef, pork chops, or roasted chicken.
Creamy Mashed Cauliflower “Potatoes” with Roasted Pistachios
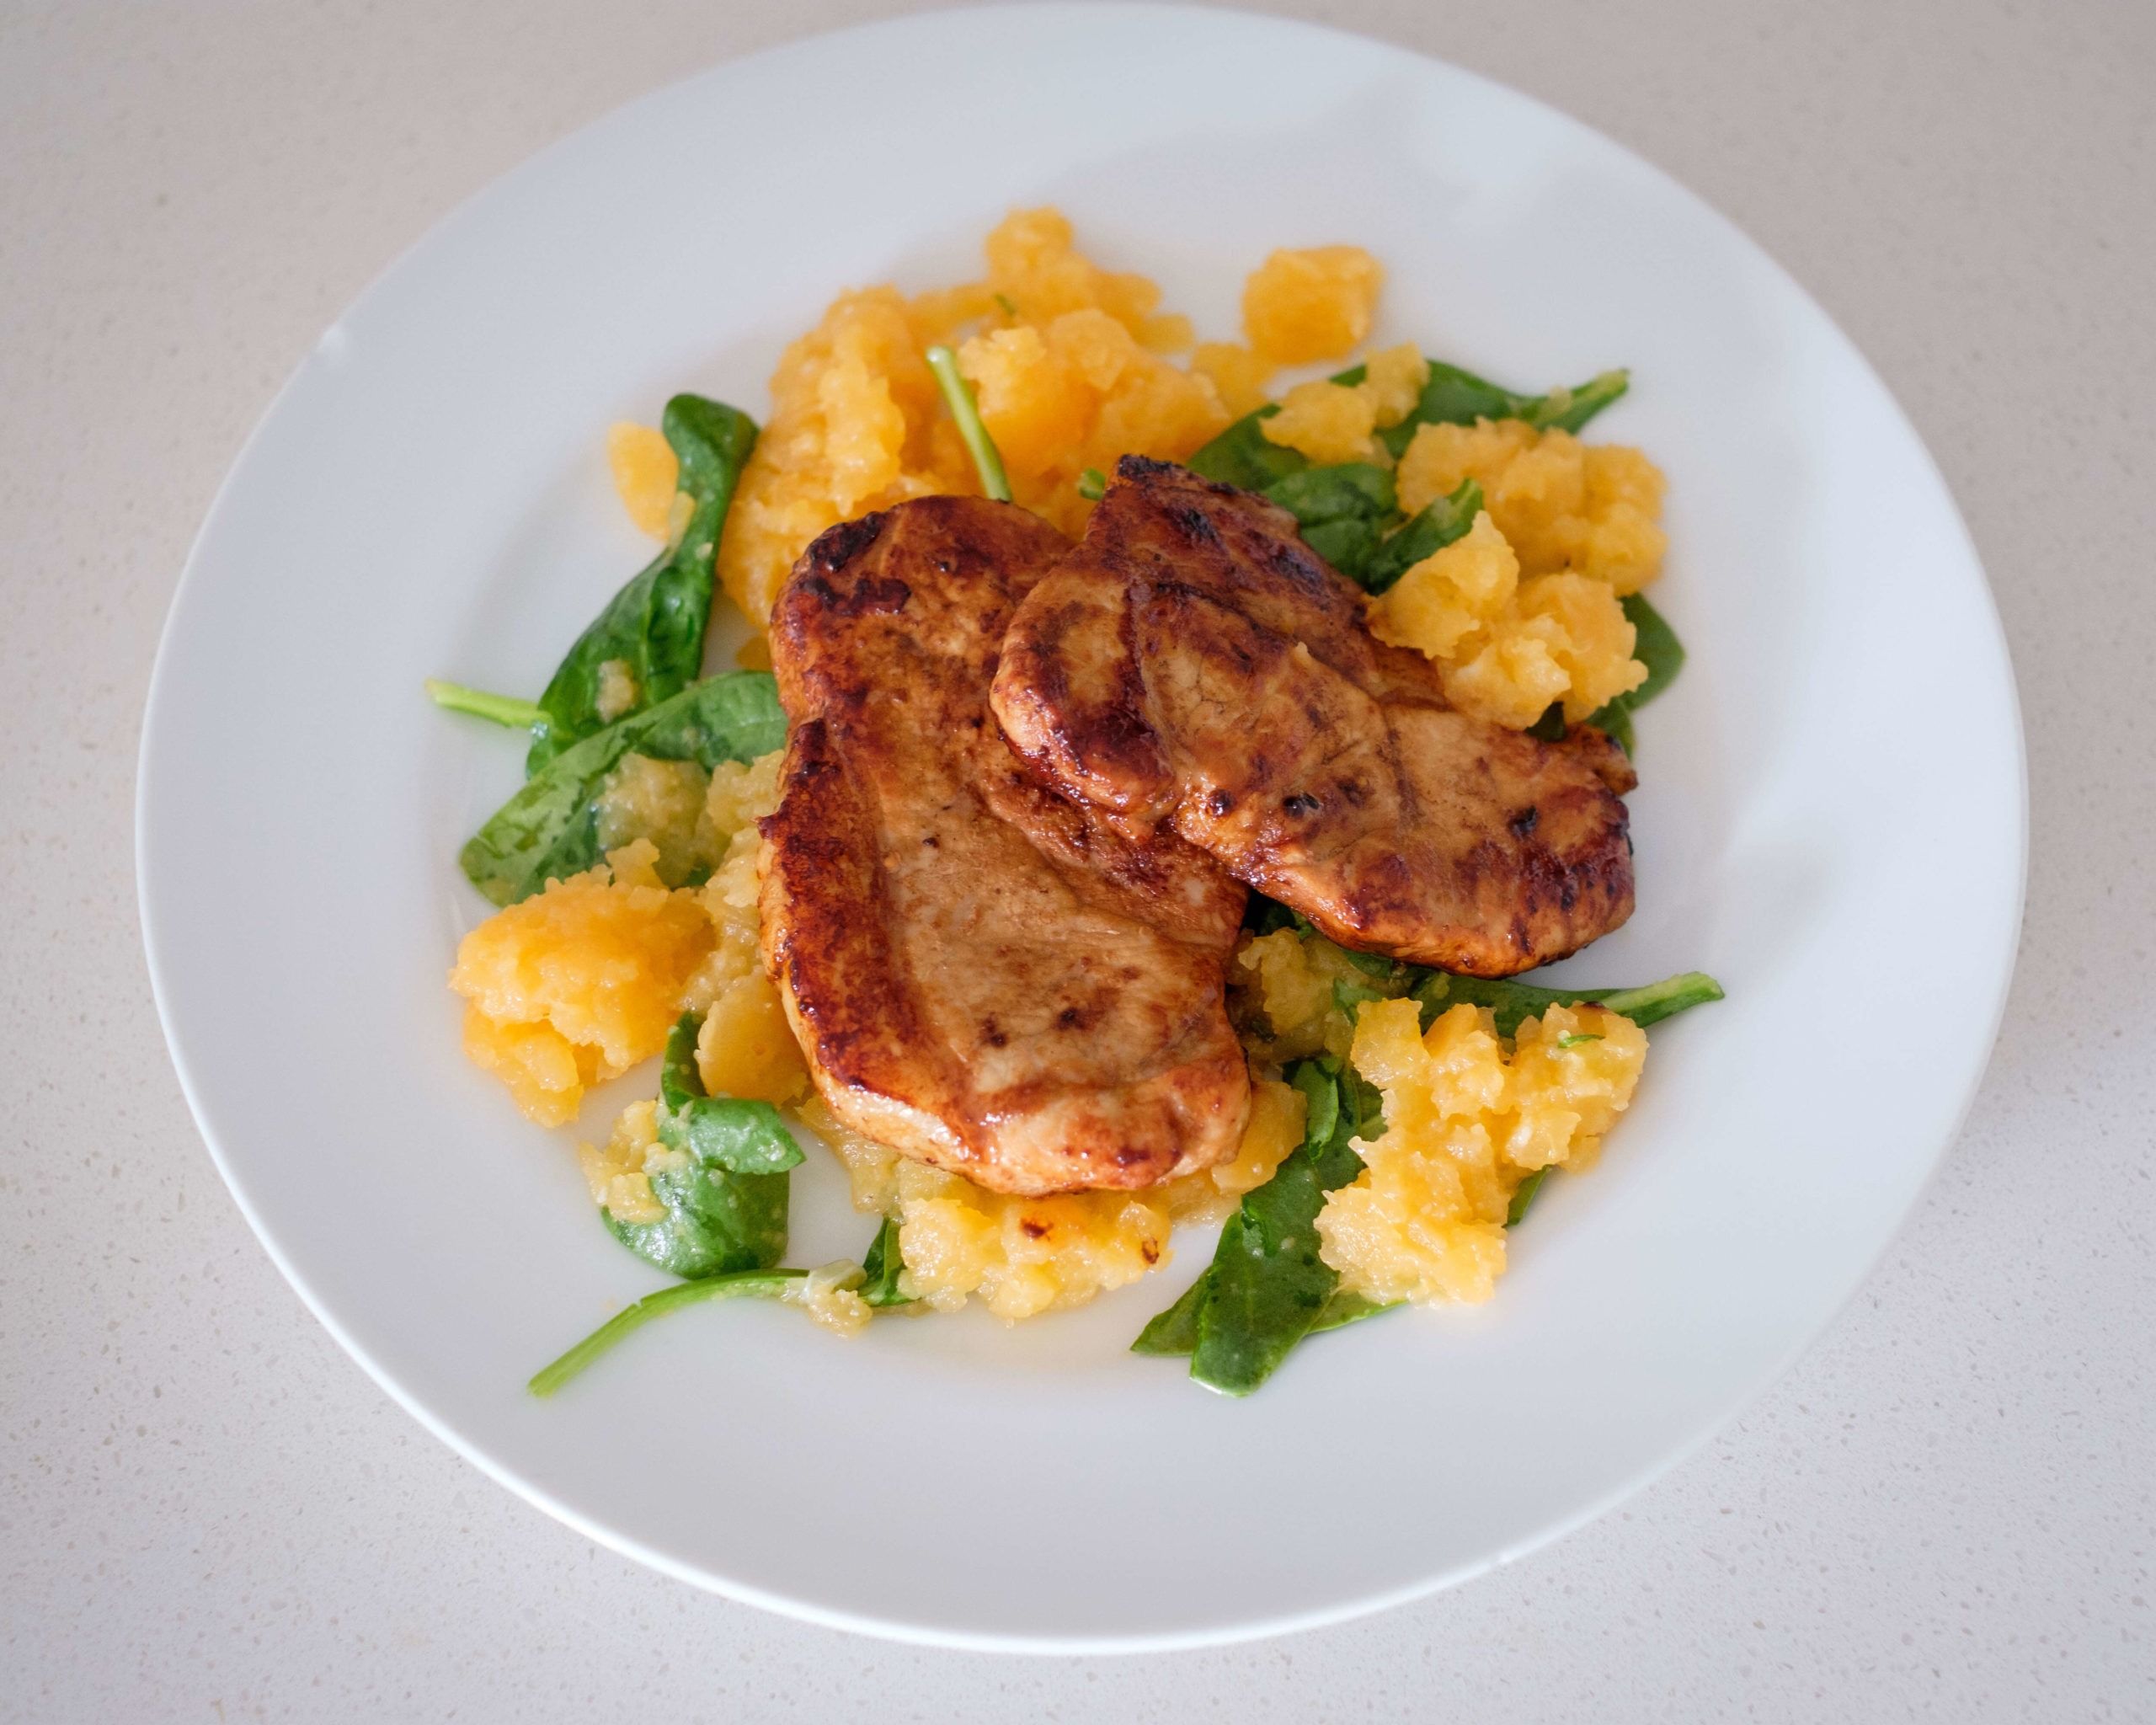
Crispy golden brown pork chops ready in less than 10 minutes! These easy pan-fried pork chops come together quickly, are bursting with flavor, low carb, and make for a perfect weeknight dinner.
Ease of Making: Medium
This pork chop recipe is prepared on the stovetop and uses thinly sliced boneless cuts that sear in a hot skillet with a beautiful golden-brown crust. It’s served on top of garlic mashed rutabaga mixed with spinach, a combo superfood side dish that is also a great low carb option to use instead of potatoes.
Pork often gets a bad rap for being unhealthy, but choosing the right cut provides some health benefits. Some cuts can be high in cholesterol, saturated fat, and calories, but if you’re looking for a healthy option, always choose lean cuts such as tenderloin, loin chops, and sirloin roast.
Lean cuts of pork are high in protein, low in fat, and have more B-Vitamins than other types of meats. B-vitamins that contribute to boosting energy by helping with metabolism and energy production. Pork also delivers iron that helps carry oxygen and potassium that helps regulate blood pressure. It provides all these essential nutrients, while still being about lean as chicken.
How to Cook Pan-Fried Pork Chops
Keep the seasoning simple and season both sides
Heat a saute pan over medium-high heat
Add oil and add the chops
Sear on each side for 3 to 5 minutes
Cook until it reaches an internal temperature of 145F
Set it aside for a few minutes before slicing the pork
Meal prep tips for Pan-Fried Pork Chops with Mashed Rutabaga and Spinach
Pan-frying is a quick and easy cooking method to get the maximum flavor on proteins and sear in the juices.
Pork chops are known for being classic comfort food, less expensive and fatty than beef, and relatively easy to prepare. However, lean cuts can often be tough due to its lower fat content. Therefore, using the right cooking technique is key.
Marinating your protein overnight can help tenderize lean cuts just like these pork chops and actually help speed up the cooking process.
Add oil to a hot pan (medium high heat). Prior to placing the pork chops in the pan, use paper towels to wipe off any excess marinade. This will help get a good golden brown sear and avoid it from steaming in the pan.
Add the pork chops to the pan and let them cook and sizzle. Cook on the first side for 3 minutes before flipping it over. You want the meat done and cooked all the way through, but because they are so thin, it should be quickly cooked.
Pair them with a comforting side dish just like the garlic mashed rutabagas and spinach medley or check out our:
Pan-Fried Pork Chops with Mashed Rutabaga and Spinach Recipe
Crispy golden brown pork chops ready in less than 10 minutes! These easy pan-fried pork chops come together quickly, are bursting with flavor, low carb, and make for a perfect weeknight dinner.
4 eachsmall boneless pork chops (thinly sliced about 3 to 4 oz each)
2tbspbalsamic vinegar
1tbspdijon mustard
2tbspsoy sauce
2tbspolive oil
1/2tspgarlic powder
1/2 tsponion powder
1/2 tsppepper
Rutabaga and seasonings
1eachsmall rutabaga
2cupsbaby spinach
2eachgarlic cloves
1/2tsppaprika
1/2tspgarlic powder
1/2tsponion powder
2tspsalt
1/2tsppepper
2tbspolive oil note: can use butter for more flavor
Get Recipe Ingredients
Instructions
Pre-Cook (Mise en Place):
Gather your equipment: cutting board, knife, large saucepan, skillet, tongs, fork/potato masher
Marinate the pork chops with the seasonings. Preferably overnight, but at least 30 minutes prior to cooking
Peel the rutabaga and cut into chunks. Peel the garlic
Cooking Method:
Place the rutabaga in a saucepan with water and 1 tsp of salt. Bring the water to a boil. Once it reaches a boil, reduce the heat to low medium and let it simmer for 25-30 minutes until it is fork tender.
Meanwhile, add oil to a pan on medium high heat and sear the pork chops on each side for about 3 to 5 minutes until it is fully cooked and reaches an internal temperature of 145F
Once the rutabaga cooks, drain it completely. Add the olive oil and seasonings and mash with a fork. Once it is mashed, mix in the spinach
Serve the pork chops on top of the mashed rutabaga. Eat and enjoy!
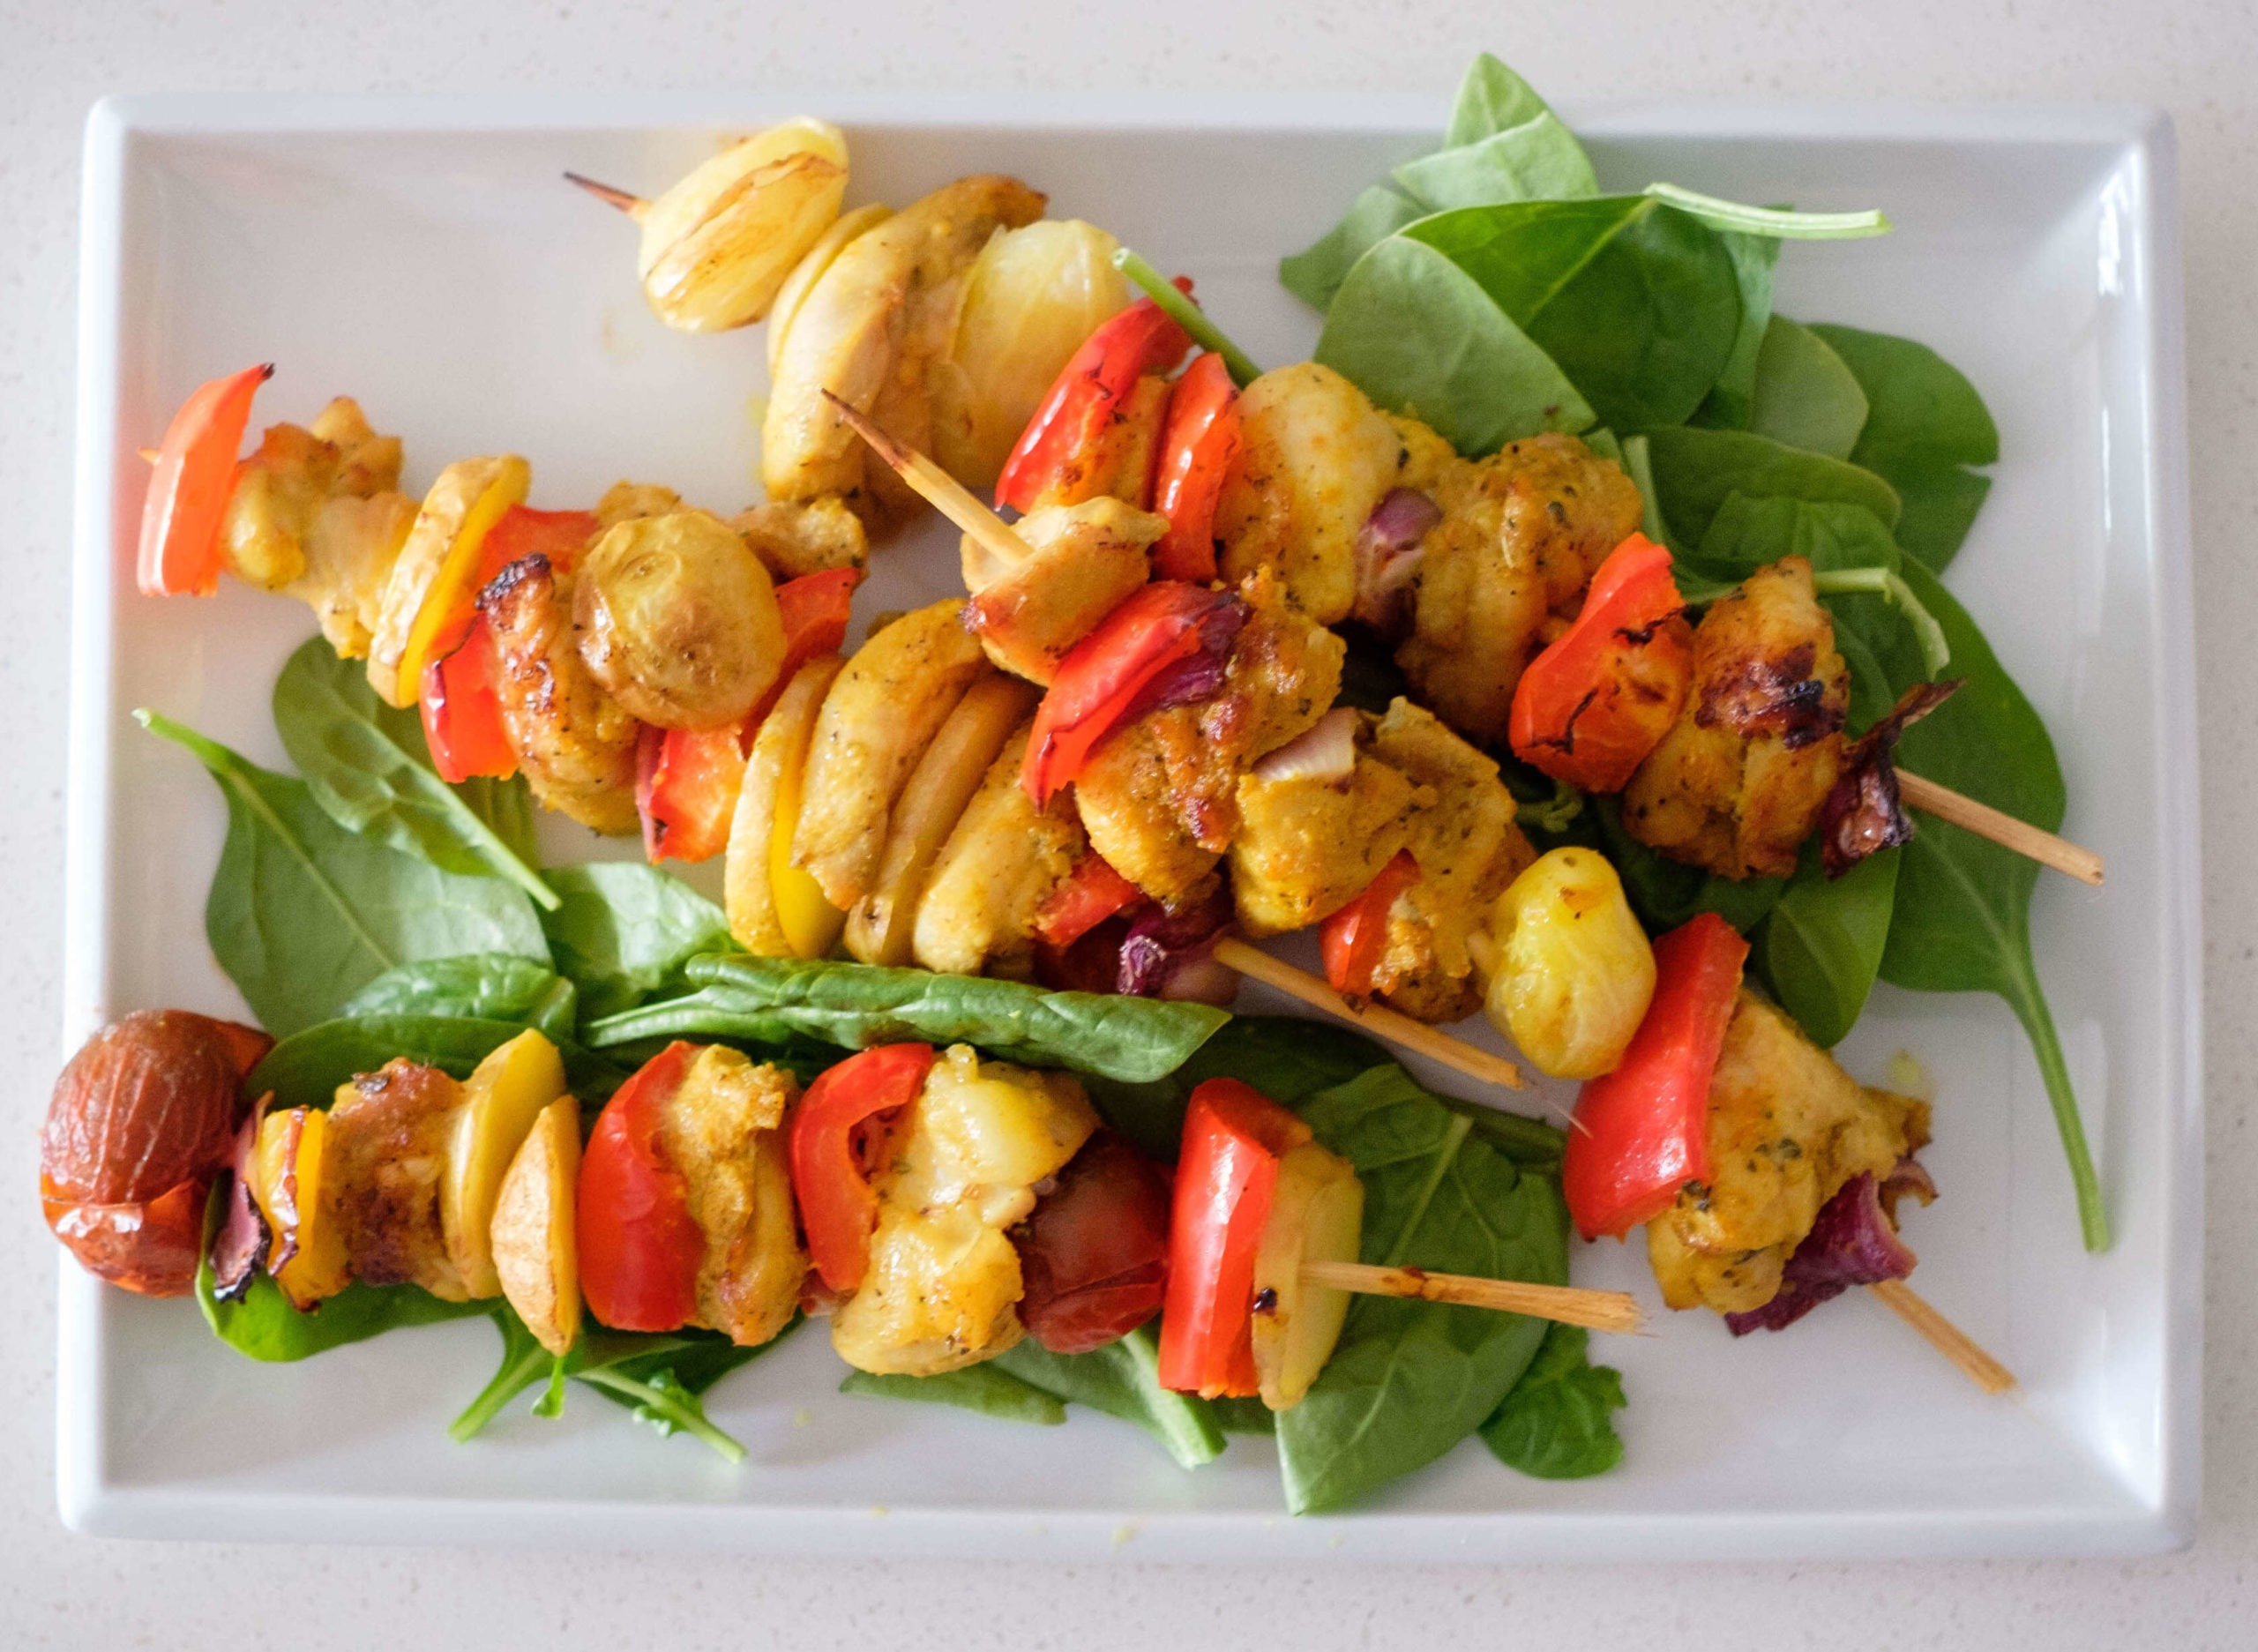
Kebabs are one of the tastiest dishes stacked with tender marinated meats and bright colored veggies. Not only do bell peppers and cherry tomatoes add great flavor to this dish, but they are also full of essential nutrients that are good for your health. Bell peppers and cherry tomatoes are great sources of Vitamin A, Vitamin C, and potassium. A diet rich in vegetables can help reduce the risk of developing heart disease and certain types of cancers. The fibers help keep your digestive tract working properly. Along with being full of nutrients, they are low-calorie and deliver a satisfying bite.
Ease of Making: Easy
What I love about kebabs is that there are so many ways to make them and so many flavors from all over the world that you can incorporate. They are easy to make and can be cooked on a grill, in the oven, or in an air fryer just like these chicken kebabs. Serve them with your choice of sides such as a salad, in a pita, on top of a bed of rice pilaf, or additional veggies.
Meal prep tips for Air Fryer Mediterranean Chicken Kebabs
The Air Fryer is great for meal prep. It is the perfect size for roasting veggies and cooks large portions of protein. Therefore, you can batch cook multiple food items without having to pre-heat the oven and waste all that oven space.
The air fryer essentially is like an amped-up oven. The difference is that it has a fan and it utilizes a more compact space to facilitate fast cooking. The fan circulates the air around making food items crisp which is similar to what you could get from deep frying, minus the extra added fat. With normal baking ovens, there is a lot of humidity, so it’s difficult for an outer crisp to occur.
Sometimes using a leaner cut of meat such as chicken breasts can result in dry tough meat. Which is why marinating your meats prior to cooking is a good technique to prevent it from drying out and making it chewy. Marinades have acidic components that help tenderize meats and make them juicy. They also help reduce the time of cooking.
This recipe’s marinade incorporates some flavor spices such as paprika, cumin, turmeric powder, and minced garlic which all offer antioxidant and anti-inflammatory properties that can help boost immunity.
If you’re using wooden skewers be sure to soak them in water for at least 10 minutes to prevent them from scorching.
Layer the ingredients on the skewers and place them in the air fryer basket.
Side salads and pita bread with dip make great side dishes for kebabs.
If using wooden skewers, soak them for at least 10 minutes
Cut the chicken into 1.5 inch chunks. Mix together the marinade and marinate the chicken overnight or at least 30 minutes prior to cooking
If using the oven, preheat oven to 425F
Cut the bell peppers and red onion into chunks
Assemble the kebabs using skewers. Layer the chicken with the veggies.
Place in the air fryer and cook at 360F for 15-18 minutes (until internal temperature is 165F). If using the oven, cook for 20-25 minutes, until the outer edges are golden brown and chicken is cooked through an internal temperature of 165F)
Serve with your choice of sides and sauces. Examples: salad, pita, couscous, rice pilaf, or tortillas, etc
Video
If you love this recipe, check out these other recipes we know you’ll love too:
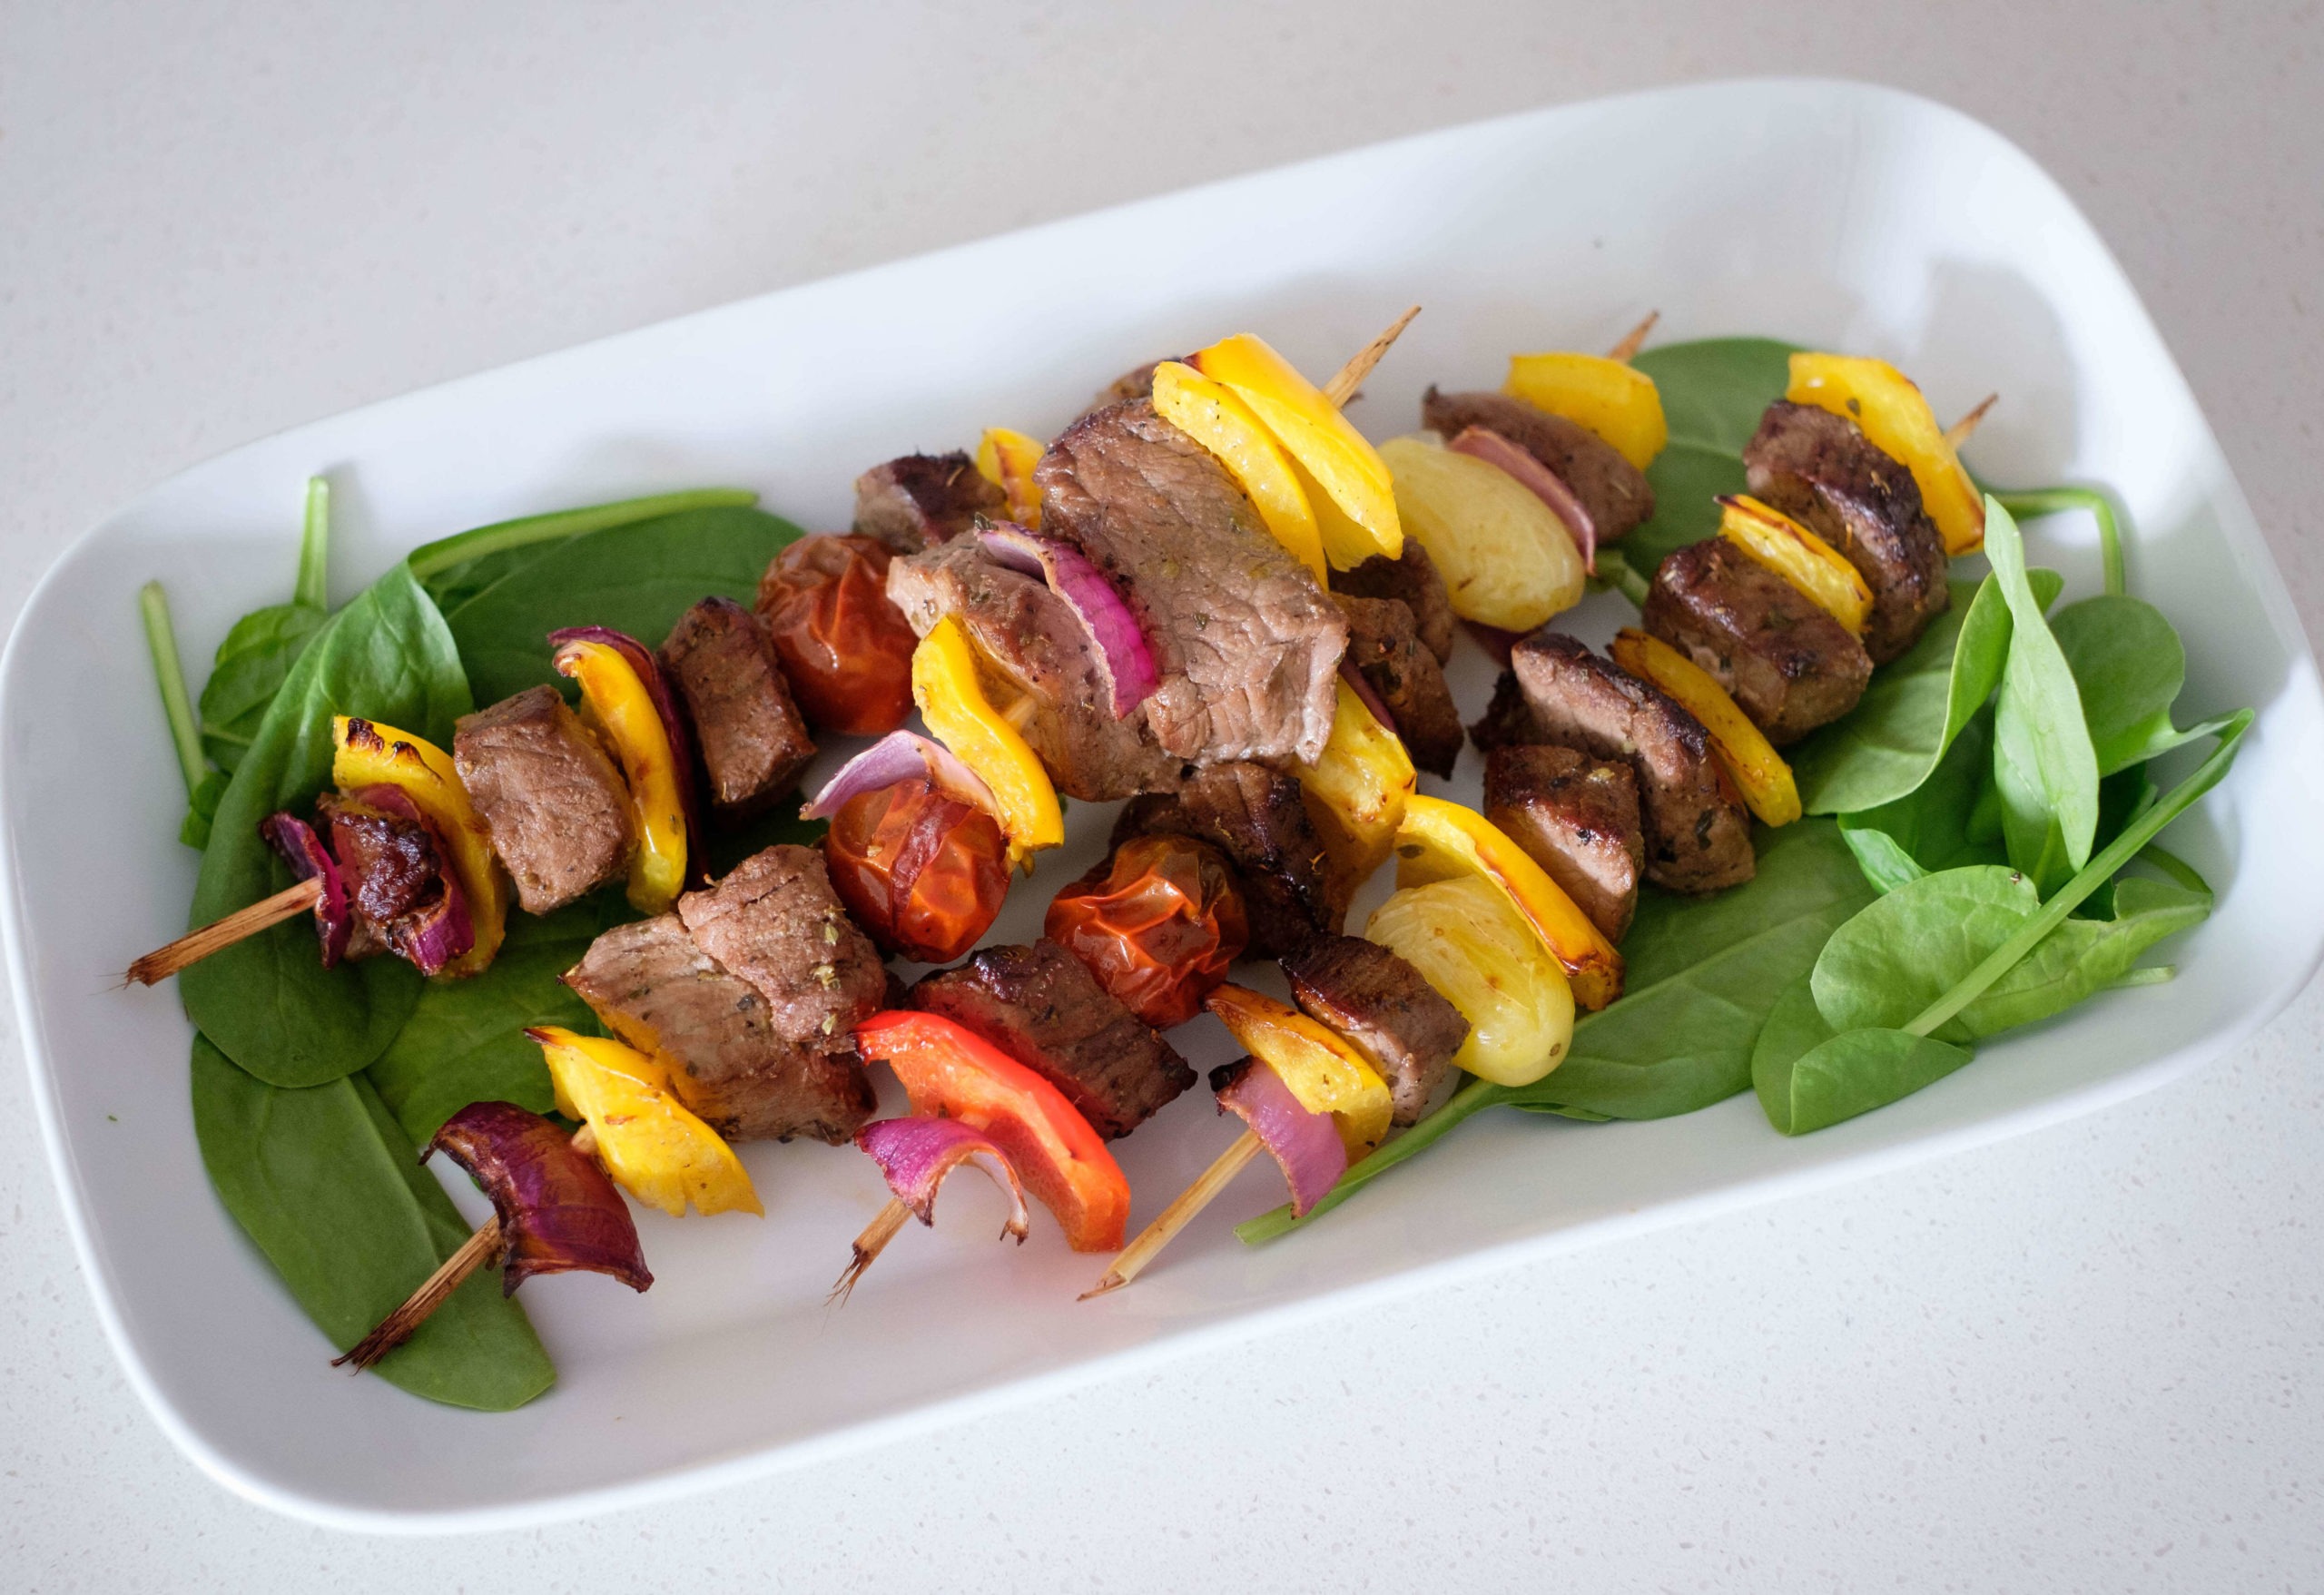
Air fryer steak kebabs are such a fun and great meal that you can enjoy with friends or family. Everybody loves eating food on a stick, especially kiddos! It’s also a great way to pack flavor and healthy ingredients together on a skewer.
Ease of Making: Easy
Kebabs are traditionally cooked on a skewer over a fire or baked in an oven so that it can roast. Roasting is one of the healthiest ways to prepare your meals because it results in minimal losses of vitamins and nutrients.
Advantages of roasting:
Good quality meat is tender when roasted
Vegetables maintain their heart-healthy fiber and vitamins and minerals for fighting disease
Food is more appealing because it has a desirable texture and color by turning crispy and golden brown
Unlike stovetop methods such as sauteing or stir-frying, It is a cooking method that allows you to be hands-free and requires minimal involvement in the cooking process
Using a roasting pan in an oven is usually the best way to roast food because it allows the oven heat to reach as much of the surface of food as possible and allows the air to circulate.
However, if you don’t have a roasting pan and don’t want to wait to heat up your large oven, then an air fryer will do perfectly. It has a basket that holds food similar to a roasting rack and the fan allows the air to circulate the heat evenly around the food giving it that golden brown crisp.
Meal prep tips for Air Fryer Steak Kebabs
Cooking air fryer steak kebabs is not only a time saver, but cleanup is also incredibly easy, and it also tastes amazing.
Make sure to measure your air fryer to check that your skewers you are using actually fit inside of your air fryer. 6 to 8-inch skewers tend to fit best in most air fryers. And if you are using wooden skewers, make sure to soak them in water for at least 10 minutes to keep them from burning
When cutting veggies, make sure they are all the same size chunks the meat so that they all cook evenly. Use a variety of colorful vegetables like bell peppers and even add fruit such as pineapple
One of the best cuts of beef for kebabs is the Sirloin cut. It is relatively tender, lean, and fits into a balanced diet. In addition, it is budget-friendly. Other good beef choices are flat iron, strip steak, and even tenderloin.
Sometimes using a leaner cut of meat can result in dry tough meat. Therefore, marinating your meats prior to cooking is a good technique to prevent it from drying out and making it chewy. This marinade combines pantry friendly items such as Worcestershire sauce, soy sauce, dijon mustard, and spices such as oregano and garlic powder. One of the tasty components that result from marinating meat is getting that distinct flavor from a good golden brown crust when the protein cooks. Adding a sweet component such as honey yields in that delicious crust when cooked at high heat.
Air Fryer Beef Kebabs
Kebabs are such a fun and great meal that you can enjoy with friends or family. Everybody loves eating food on a stick, especially kiddos! It’s also a great way to pack flavor and healthy ingredients together on a skewer.
1tbspbrown sugar note: you can use honey, agave nectar or white sugar
Get Recipe Ingredients
Instructions
If using wooden skewers, soak them for at least 10 minutes
Cut the beef into 1.5 inch chunks. Mix together the marinade and marinate the beef overnight or at least 30 minutes prior to cooking
If using the oven, preheat oven to 425F
Cut the bell peppers and red onion into chunks
Assemble the kebabs using skewers. Layer the skewer by alternating the beef with the veggies.
Place in the air fryer and cook at 400F for 8-10 minutes. If using the oven, cook for 10-12 minutes, until the outer edges are brown and beef is cooked to an internal temperature of 145F
Serve with your choice of sides and sauces. Examples: salad, pita, couscous, rice pilaf, or tortillas, etc
Video
If you love this recipe, check out these other recipes we know you’ll love too:
This meal prep Baked Salmon with Parmesan Butternut Squash Noodles is easy and simply perfect for a light and refreshing weekday lunch. It’s a great low carb meal with minimal ingredients that you can make in less than 20 minutes.
Easy of Making: Easy
When it comes to eating healthy, it’s all about including a balance of proteins, veggies, smart carbs, and healthy fats. This meal delivers a powerhouse of nutrients that will help you meet your health goals.
Salmon is a great source of protein that will help you keep full longer. It is also rich in healthy fats such as Omega-3 Fatty acids which may promote weight loss and decrease belly fat. Salmon is also high in B Vitamins which is important in helping the food you eat into energy, creating and repairing DNA, and reducing inflammation that can lead to heart disease. It is also tasty, versatile, and widely available.
This baked salmon is paired with a superfood medley of butternut squash spirals, cherry tomatoes, and arugula. Butternut squash is a low calorie, low carb, a sweet, and nutty ingredient that makes a great addition to many savory recipes and is packed with vitamins, minerals, fiber, and antioxidants. Antioxidants help prevent cellular damage and reduce inflammation which may reduce your risk of several chronic diseases.
To add flavor and pack it with even more nutrients, we mixed it in with arugula that has a distinctive peppery flavor and a great source of calcium and folate. The addition of tart flavors from the cherry tomatoes pair well with the savory and nutty flavors of this recipe.
So not only is this recipe tasty, but it is also packed with nutrients to help you meet a healthy and balanced diet.
Meal Prep Tips for Baked Salmon with Parmesan Butternut Squash Noodles:
How to pick the right salmon:
There are several types of salmon, such as pink salmon, red salmon, and Atlantic salmon. Any of these types can taste delicious in the oven.
You do however want to make sure you choose a filet with firm flesh when you are buying at the store. When you gently press the fillet with your finger, it should spring back. You also want to avoid any fish that are dark around the edges or brown/yellow discoloration. And be sure to smell the fish. It should smell like saltwater or the sea smell and not have a strong fishy smell.
Baking salmon delivers soft, juicy, and tender salmon on the inside with crispy edges.
The key to evenly cooking the fish is to let it sit on the counter for a few minutes until it comes to room temperature, otherwise, other parts of the fish might overcook while the other parts are still raw.
How to use frozen salmon:
If you are using frozen fish, be sure to let it defrost in the refrigerator overnight and also allow it to come to room temperature before baking.
The great thing about salmon is that you don’t need a lot of seasonings to make it taste good. However, you don’t want to add salt too early, otherwise, it will draw out the moisture if left for an extended period of time. For best results, salt the salmon right before you place it in the oven to cook.
Fish cooks fairly quickly, however, cook time will vary depending on the thickness. The thickest part of the salmon should look opaque and the layers within the salmon should flake apart easily.
Baked Salmon with Parmesan Butternut Squash Noodles
This Baked Salmon with Parmesan Butternut Squash Noodles is easy and simply perfect for a light and refreshing weekday lunch. It’s a great low carb meal with minimal ingredients that you can make in less than 20 minutes.
Marinate the salmon with the seasonings and olive oil. Place on sheet pan lined with parchment paper
Cooking Method:
Place salmon in the oven and bake it for 10-15 minutes
Add olive oil to a skillet on medium high heat. Saute the garlic and butternut squash noodles for 3 to 5 minutes. Add seasonings and continue to stir until butternut squash is tender
Add fresh tomatoes and arugula
Top off the noodles with shredded parmesan cheese
Serve the salmon on top of the noodles. Eat and enjoy!
Video
If you love this recipe, check out these other recipes we know you’ll love too:
There are many recipes you can use to prepare salmon, but one that never disappoints is an Asian baked salmon recipe. Our version of this is a baked sesame ginger salmon. The marinated salmon soaks up the flavors of the ginger sesame dressing and it is then baked to perfection in the oven alongside seasoned kale and butternut squash. This quick-and-easy salmon recipe also only uses one pan, which may be an even better benefit than the high sources of fiber and healthy fats you’ll find throughout this dish. We’ll take our Omega-3s with a clean kitchen any day.
Ease of Making: Easy
All jokes aside, there truly are countless nutritional benefits to this meal. Salmon is packed with omega-3s, protein, B vitamins, potassium and more. It has also been known to reduce your risk of cancer, heart disease, joint problems and other medical issues or conditions.
Then we have our kale and butternut squash, each nutrient dense on their own. Kale is known as one of the healthiest and nutritious foods on the planet, due to its low calorie content and high volume of vitamins and antioxidants. Kale has been linked to protection against diabetes, cancer, and heart disease and benefits digestion, skin, hair, eyes and more.
Butternut squash didn’t want kale and salmon to have all the fun when it comes to benefiting your health, this winter vegetable is a great source of fiber, vitamins (A,C, B, E), calcium, magnesium and zinc
How to Cook Salmon
Salmon can be cooked in a multitude of ways; oven, stovetop, air fryer, broiled, etc. Each recipe may call for a different variation of cooking method. However, no matter the cooking method here’s a guide for getting your ideal doneness on the inside of the fish.
Salmon Temperature Guide
Cook
Internal Temperature
Rare
120℉
Medium Rare
125℉
Medium
130℉
Medium Well
135℉
Well Done
140℉
Please note that the USDA recommends that salmon reaches an internal temperature of 145F to ensure food safety (measured with a cooking thermometer in the thickest part of the filet). Consuming salmon that does not reach the internal temperature of 145F can increase the risk of being exposed to foodborne illness.
Broiling is one of the healthiest ways to cook salmon, unlike some other fish, salmon’s natural oils prevent the fish from drying out when cooked this way. This cooking method also doesn’t require the addition of any fats like oil.
Do you rinse salmon before cooking?
Depending on the freshness of your fish you may want to rinse it and pat dry. Fresh or hardly aged salmon is fine without a rinse.
Do you season salmon before cooking?
Yes, but you want to season immediately before baking as salt can start to break down the proteins and draw out the moisture in salmon if it sits too long.
Butternut Squash and Kale FAQ
How long to cook?
Cooking Time for Butternut Squash at 400F
Cut
Time
Butternut squash halved
50-60 minutes
Butternut squash cubed
35-45 minutes
Butternut squash diced
15-20 minutes
Can you eat butternut squash without cooking it?
Yes, butternut squash can be consumed raw. Many people find that they like putting it in salads or smoothies. However, butternut squash contains a lot of beta-carotene which is easier to absorb once heated.
Do I need to peel butternut squash before roasting?
Depending on the recipe you may not need to peel the butternut squash before roasting. This recipe calls for dicing the squash in small portions so that it can cook at the same pace as the salmon and kale, so it will need to be peeled.
How long does cooked butternut squash last?
Cooked squash can last 3-4 days in the refrigerator and up to 3-4 months in the freezer for best quality.
How long does fresh butternut squash last?
A whole butternut squash with the skin still on should be kept outside of the refrigerator and can last an entire month in the right conditions.
What is kale good for?
Besides this recipe, kale makes a perfect addition to salads, smoothies, omelets, breakfast scrambles and more.
How many calories are in kale?
There are 8 calories in one cup of chopped raw kale, and 33 calories in one cup of cooked kale.
How much protein in kale?
There are 0.7 grams of protein in one cup of chopped raw kale, and 2.5 grams in one cup of cooked kale.
How to tell if kale is bad?
As kale ages you will notice the leaves start to wilt and turn brown. If the decomposition goes further, your kale will turn into a liquid brown mush and likely start to leak out it’s bag.
Meal prep tips for Baked Sesame Ginger Salmon
Switch up your sides – if there are just too many nutrient-dense ingredients in this recipe for you, try switching up the sides. Rice and broccoli would make perfect pairs with this salmon.
Broil it – If you like your salmon to have a nice crisp outer layer, try broiling it for the last five minutes of the baking process.
Baked Sesame Ginger Salmon with Kale & Butternut Squash
An easy, heart-healthy recipe featuring omega 3 rich salmon, alongside butternut squash and kale
if needed: dice butternut squash into small pieces
line sheet pan with parchment paper
Cooking Method:
Place salmon on a sheet pan. Marinate it with 1 tbsp of the sesame ginger salad dressing
In a mixing bowl, add the baby kale and squash. Add 2 tbsp of sesame ginger salad dressing, 1 tbsp of olive oil, garlic powder, and salt. Mix well until everything is fully coated.
Place the baby kale mix on the same sheet pan and spread it out evenly.
Bake everything in the oven for 10-15 minutes until the salmon has fully cooked.
Remove from the oven. Eat and enjoy!
If you love this recipe, check out these other recipes we know you’ll love too:
To provide the best experiences, we use technologies like cookies to store and/or access device information. Consenting to these technologies will allow us to process data such as browsing behavior or unique IDs on this site. Not consenting or withdrawing consent, may adversely affect certain features and functions.
Functional
Always active
The technical storage or access is strictly necessary for the legitimate purpose of enabling the use of a specific service explicitly requested by the subscriber or user, or for the sole purpose of carrying out the transmission of a communication over an electronic communications network.
Preferences
The technical storage or access is necessary for the legitimate purpose of storing preferences that are not requested by the subscriber or user.
Statistics
The technical storage or access that is used exclusively for statistical purposes.The technical storage or access that is used exclusively for anonymous statistical purposes. Without a subpoena, voluntary compliance on the part of your Internet Service Provider, or additional records from a third party, information stored or retrieved for this purpose alone cannot usually be used to identify you.
Marketing
The technical storage or access is required to create user profiles to send advertising, or to track the user on a website or across several websites for similar marketing purposes.


Oven Baked Shrimp with Asparagus and Panko Breadcrumbs
Equipment
Ingredients
Bread crumb mixture
Instructions