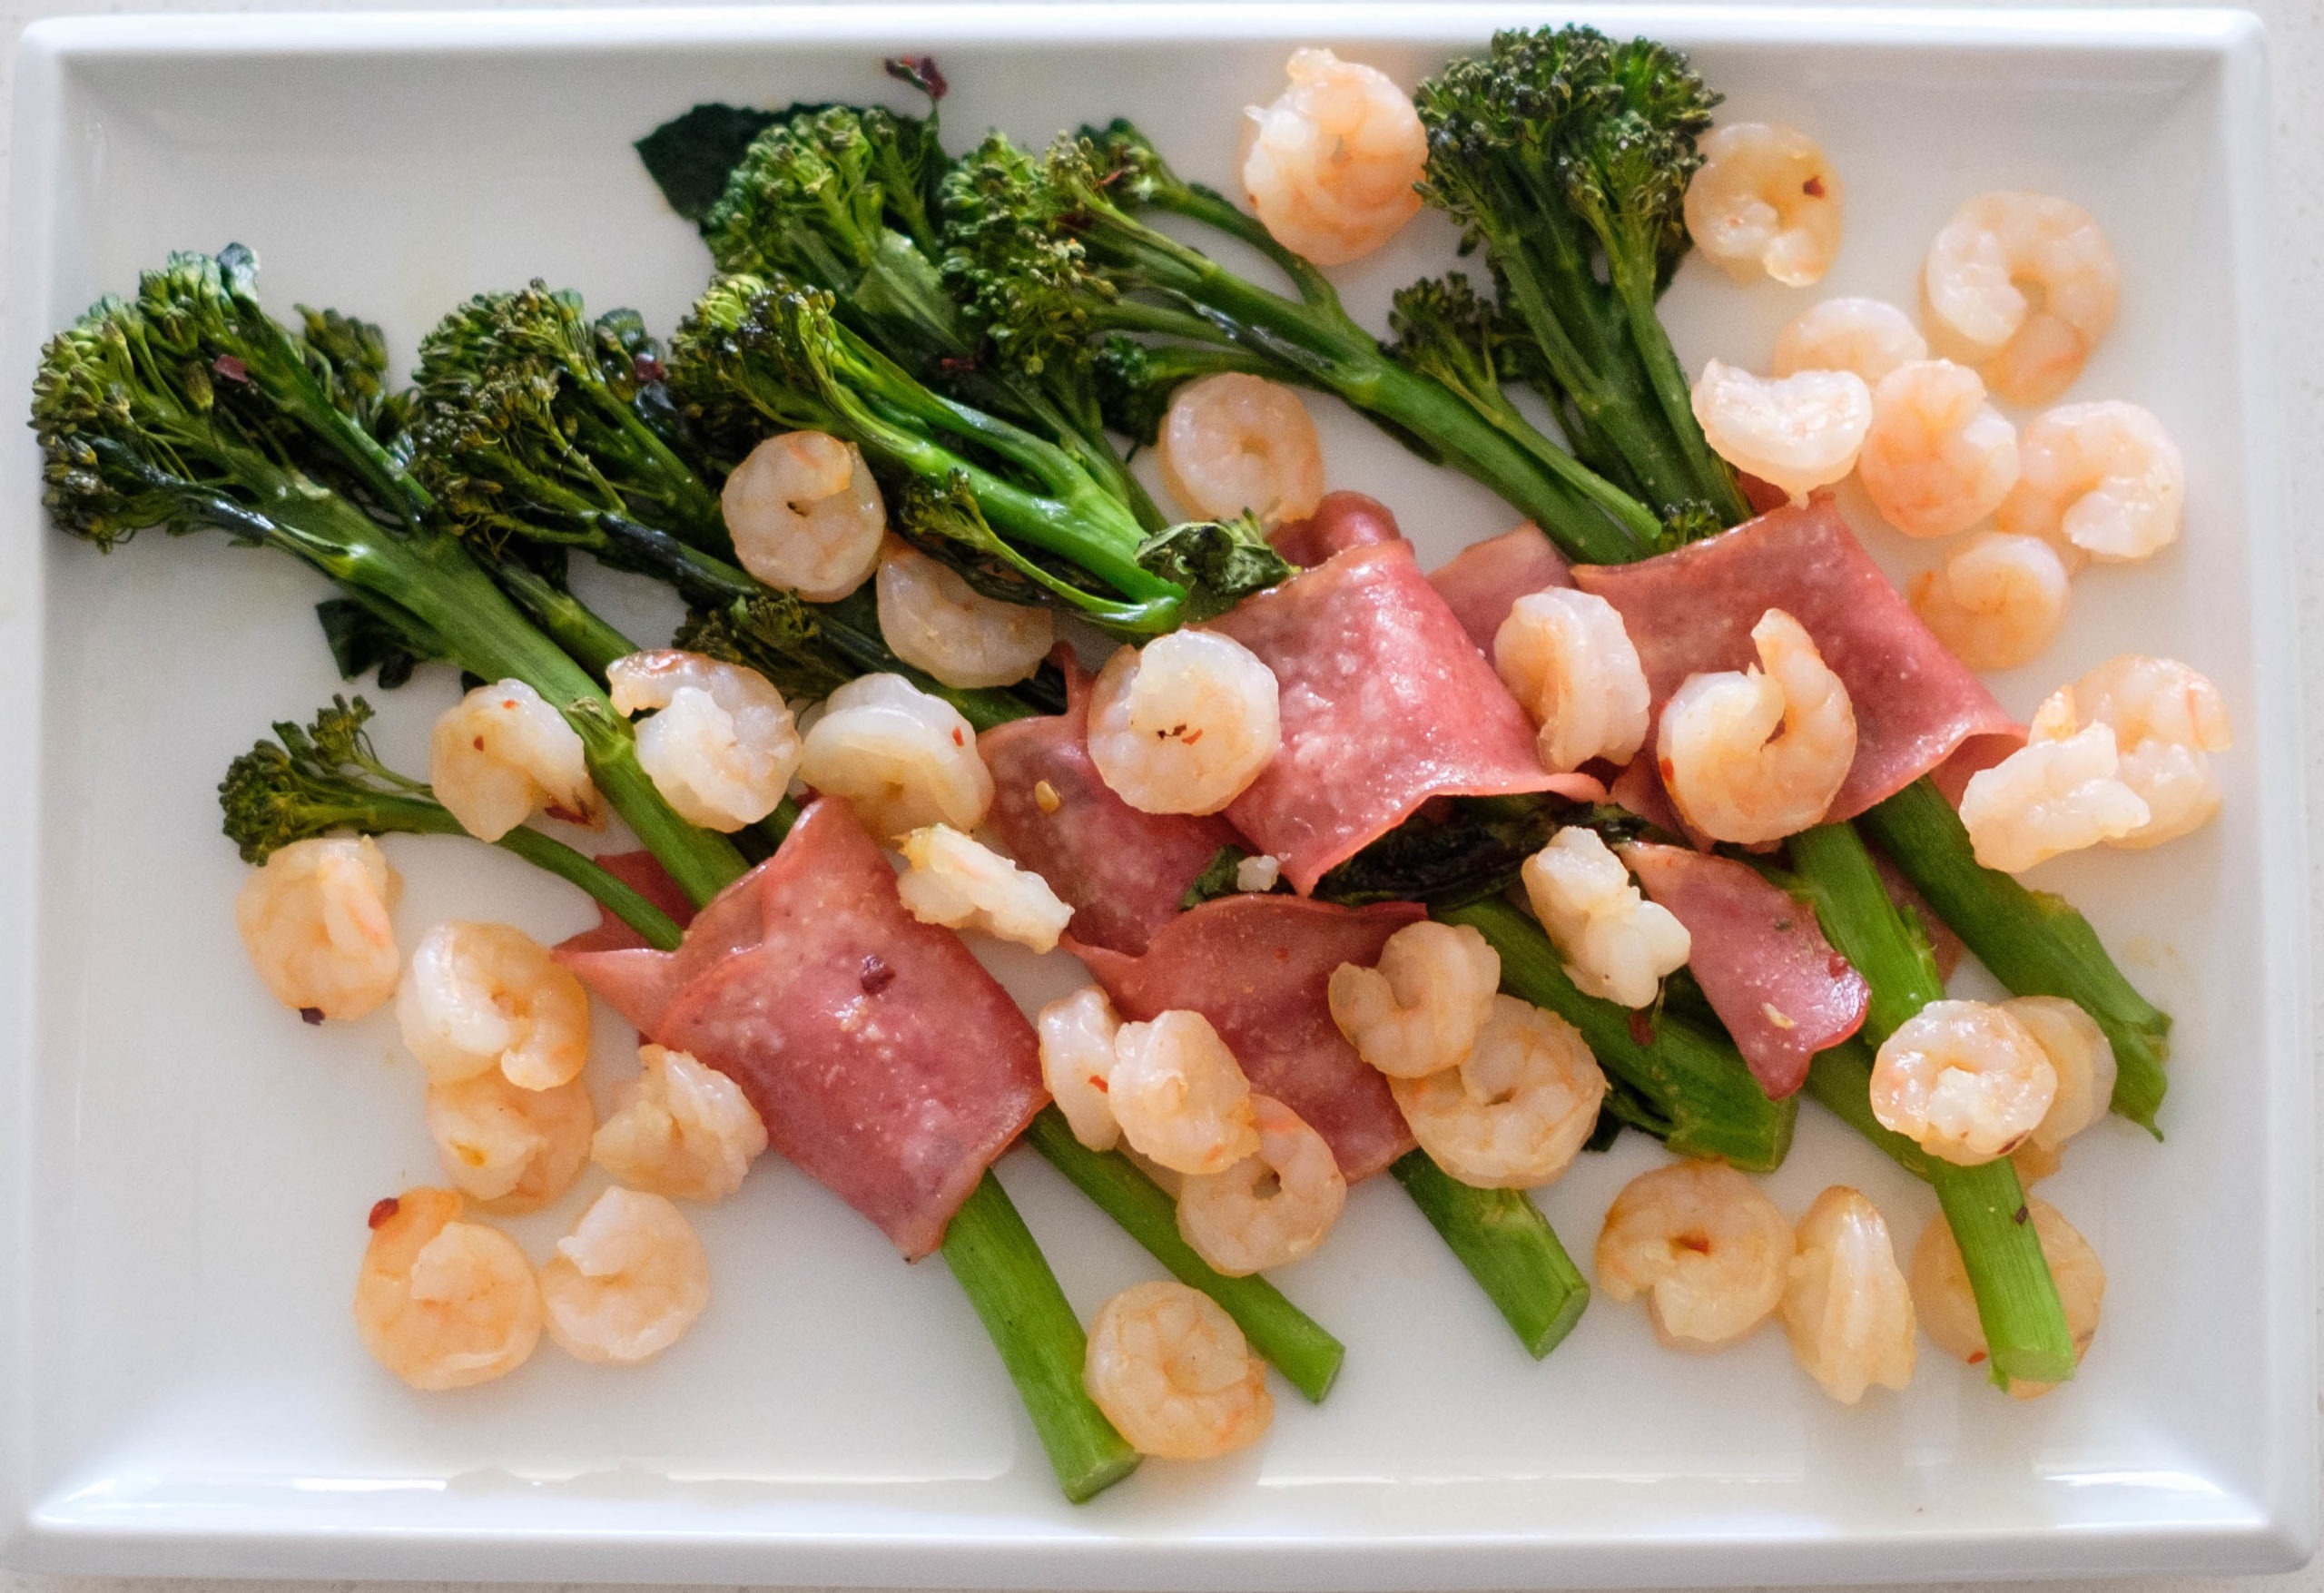
Posted on

Hard Boiled Eggs with Asparagus and Cherry Tomatoes

boiled eggs and asparagus

Looking for a quick, delicious, and energizing meal that fits perfectly into your busy schedule? Look no further! Our 15-Minute Asparagus and Egg Delight is a game-changer for those on the go. Bursting with vibrant flavors and nutritious goodness, this recipe requires just a handful of ingredients and minimal prep time. Picture this: perfectly seasoned asparagus roasted to perfection, accompanied by soft-boiled eggs with creamy yolks, all topped off with juicy cherry tomatoes. The combination of savory paprika, aromatic onion powder, and zesty garlic powder adds an extra kick that will tantalize your taste buds. Whether you’re rushing out the door or taking a well-deserved break, this dish is a speedy solution without compromising on taste. Get ready to indulge in a wholesome meal that’s as delightful as it is time-efficient – because being busy should never mean sacrificing flavor!

boiled eggs and asparagus

Hard Boiled Eggs with Asparagus and Cherry Tomatoes

No ratings yet
Servings 2

Ingredients
  

  • 4 oz asparagus
  • 4 each eggs
  • 1 cup cherry tomatoes
  • 1 tbsp olive oil
  • paprika, onion powder, garlic powder
  • salt and pepper

Instructions
 

Pre-Cook (Mise En Place)

  • Gather your equipment: sauce pan, cutting board, knife
  • Boil water into a sauce pan
  • Preheat the oven/toaster oven on 400F
  • Slice the cherry tomatoes
  • Cut the asparagus into small one inch pieces and season with 1 tsp paprika, 1 tsp onion powder, 1 tsp garlic powder, 1 tsp salt and pepper, place on a sheet pan, and drizzle with 1 tbsp of olive oil

Cooking Method:

  • Add the eggs to the boiling water and reduce the heat to medium
  • Cook the eggs for 5 to 6 minutes
  • While the eggs are boiling, place the asparagus in the oven and roast for 10 minutes
  • When the eggs are finished, let them cool for a few minutes before peeling and slicing in half
  • Remove the asparagus from the oven and serve them with the eggs, topped with fresh cherry tomatoes
Posted on

Beef Cauliflower Fried Rice with Fried Egg

Beef Cauliflower Fried Rice with Fried Egg

This delicious and healthy twist on traditional fried rice, replaces the typical rice with cauliflower rice for a lower-carb, higher-nutrient alternative. this cauliflower fried rice recipe offers a delightful combination of savory beef, crunchy rice, and a creamy fried egg yolk.

Cauliflower fried rice is a quick and easy dish to cook up that stores well and reheats great as well. If you’re meal prepping this for lunch at work, the fried egg may be better cooked through. Or you can simply cook the egg when you’re ready to reheat the rest of the dish.

Cauliflower offers a ton of reasons to substitute it in for rice. Cauliflower fried rice is going to be lower in calories, gluten free, and easier to digest. This makes the recipe perfect for a workday lunch. It’ll fill you up with delicious, nutritious food without weighing you down or making you feel sluggish.

Beef Cauliflower Fried Rice with Fried Egg

Beef Cauliflower Fried Rice with Fried Egg

No ratings yet
Prep Time 5 minutes
Cook Time 20 minutes
Course dinner, Main Course
Cuisine American, Asian
Servings 2

Equipment

  • knife
  • cutting board
  • spatula
  • saute pan

Ingredients
  

  • 10 ounces ground beef (lean)
  • 2 each eggs
  • 3 cups cauliflower rice
  • 1/2 cup shredded carrots
  • 1/4 cup red onion (diced)
  • 1/3 cup coco aminos
  • 2 cloves garlic (minced)
  • 1 tbsp olive oil
  • 1/4 tsp garlic powder
  • 1/4 tsp onion powder
  • 1/8 tsp salt
  • 1/8 tsp pepper

Instructions
 

  • Add olive oil to the saute pan on medium-high heat. Add the red onion and saute until it softens. Then, add the garlic ground beef. Season with garlic powder, onion powder, salt and pepper. Constantly stir the ground beef until it browns and fully cooks (about 6 to 7 minutes)
  • Next, add the cauliflower, carrots, and cabbage and continue to stir until they soften (about 3 to 5 minutes)
  • Then, season with coco aminos and mix well
  • Remove from the pan and set aside in a serving dish
  • Heat another pan on medium-high heat and add 1 tbsp of olive oil. Crack the eggs into the pan and cook for 3 to 5 minutes until the egg whites have fully cooked through
  • Place the eggs on top of the cauliflower rice
Posted on

Salmon with Cucumber Bacon Slaw

salmon and cucumber

This meal prep baked salmon is one of the easiest ways to cook salmon and is incredibly nutritious. Cooking the bacon and salmon in the same sheet pan at the same time makes this so much faster and easier to clean up. Salmon provides lean protein and healthy fats, making it an excellent meal prep choice to maintain muscle mass and support a healthy metabolism.

The cucumber bacon slaw not only adds flavor to the dish but also introduces a variety of textures and colors. The cucumber balances the turkey bacon with a refreshing flavor and complements the richness of the meal prep baked salmon. The slaw can also keep the fridge nicely so you can make multiple servings at the beginning of the week and pair it with proteins to complete meals.

incorporating this meal prep baked Salmon with Cucumber Bacon Slaw into your routine offers an amazing combination of nutritiousness, flavor, and convenience. This meal prep recipe provides essential nutrients for a healthy life as well as tasting fantastic. It’s a delicious and easy choice for those striving to maintain a balanced and nutritious diet amidst the demands of a busy lifestyle.

salmon and cucumber

Salmon with Cucumber and Bacon Slaw

No ratings yet
Prep Time 5 minutes
Cook Time 20 minutes
Course dinner, Main Course
Cuisine American
Servings 2

Equipment

  • knife
  • cutting board
  • mixing bowl
  • sheet pan
  • oven

Ingredients
  

Salmon and seasonings

  • 12 oz salmon
  • 1/4 tsp paprika
  • 1/4 tsp garlic powder
  • 1/4 tsp onion powder
  • 1/4 tsp salt
  • 1/4 tsp pepper
  • 1 tbsp olive oil

Cucumber Salad

  • 2 slices turkey bacon
  • 1 each cucumber (diced)
  • 1 each lemon
  • 1/4 cup mayonaise
  • 1 tbsp chives (chopped)
  • 1/4 tsp salt
  • 1/8 tsp pepper

Instructions
 

Salmon and Bacon

  • Preheat your oven to 400F
  • Place the salmon on a sheet pan and season it with paprika, garlic powder, onion powder, and salt and pepper. Coat it with olive oil
  • Place the bacon next to the salmon on the same sheet pan
  • Place the sheet pan in the oven for 15 minutes until the salmon cooks through
  • Remove both the salmon and turkey bacon from the oven
  • Let the turkey bacon cool for a few minutes and then chop into small pieces

Cucumber Salad

  • In a bowl, add the diced cucumber, cooled bacon, lemon juice, chives, and mayo. Season with salt and pepper Mix until the cucumber is fully coated with the mayo
  • Serve the cucumber mixture with the salmon
Posted on

Ground Beef with Chayote Squash

ground-beef-with-chayote-squash

Ground beef is an incredibly versatile protein, we’ve written about it before. Ground beef with Chayote Squash is a delicious and healthy meal that’s easy to meal prep. Ground beef is one of the easiest ingredients to cook properly, it takes well to tons of different seasonings, and cooks quickly. The other reason ground beef is so popular, it’s affordable. Ground beef is one of the most accessible protein options. That’s why we love it for meal prepping. Ground beef is an essential part of the busy week meal prep routine.

Chayote squash brings a fresh and unique dimension to your culinary repertoire. Its mild, crisp texture and slightly sweet flavor make it a versatile addition to a wide array of recipes. This tropical vegetable is also packed with essential nutrients, including vitamins, minerals, and dietary fiber, making it a healthy choice for those looking to maintain a balanced diet. Mixed with ground beef, the chayote provides a nice crunch and absorbs the flavors from the spices very well. It’s easy to balance the flavor of the squash so this dish is well balanced and if you need to tweak the seasonings to your preferences you can always adjust the recipe. 

Ground beef with Chayote Squash is a great way to introduce squash into your meal prep and it’s quick to whip up. It’s perfect for lunches at work or a quick family dinner. You can adjust the volume for more meals and the dish maintains its texture and flavor after reheating days later.

ground-beef-with-chayote-squash

Ground Beef with Chayote Squash

No ratings yet
Prep Time 5 minutes
Cook Time 20 minutes
Course dinner, Main Course
Cuisine American, Asian
Servings 2

Equipment

  • knife
  • cutting board
  • spatula
  • saute pan

Ingredients
  

  • 12 oz ground beef (lean)
  • 1 each chayote squash (cut into 1/2 inch cubes)
  • 1/2 cup cherry tomatoes (sliced)
  • 1/4 cup red onions (diced)
  • 1/2 cup tomato sauce
  • 1/4 cup chopped cilantro
  • 1/4 cup Coco Aminos
  • 1/4 tsp garlic powder
  • 1/4 tsp onion powder
  • 1/8 tsp salt
  • 1 tbsp olive oil

Instructions
 

  • Preheat your Saute Pan on Medium High Heat
  • Add oil to the saute pan and saute the red onions until they soften. Next, add the ground beef and season with salt. Cook until golden brown (about 6 to 7 minutes)
  • Next, add 1/4 cup coco aminos, garlic powder, and onion powder and mix well
  • Then, add the tomato sauce and chayote squash and stir the mixture
  • Cook until they soften (5 to 7 minutes)
  • Then add the cherry tomatoes and cilantro at the end as garnish
Posted on

Stir Fry Beef with Pears and Vegetables

stir-fry-beef-with-pears-and-vegetables

Stir Fry Beef with Pears and Vegetables is a delightful dish that offers a ton of reasons to be a staple in your meal-prep repertoire. This stir fry recipe perfectly balances between savory and sweet flavors, making it a delightful combination for your taste buds. The tender slices of beef, paired with the natural sweetness of ripe pears, create a harmonious flavor profile that’s both satisfying and unique. The bell peppers, mustard greens, and red onions add vibrancy and round out the meal’s nutritional balance. This stir fry beef with pears recipe is fun and easy to cook at home and will become a welcome addition to your meal prep routine.

Meal prepping this recipe is quick and can make any amount that you want so it’s perfect for weekday lunches. Batch cooking stir fry lets you control the portion sizes and saves a ton of time during busy weeks.This dish reheats exceptionally well, maintaining its flavors and textures, and can be customized to suit your dietary preferences.

Stir fry beef with pears is incredibly nutritious as well. Pears provide dietary fiber, vitamins, and antioxidants which assist in digestion and the immune system. Lean beef is an excellent source of protein that helps with weight management and fills you up faster for longer. You won’t get hungry as quickly which is one reason it’s great for lunch. You can feel full without feeling sluggish for the rest of the day.

stir-fry-beef-with-pears-and-vegetables

Stir Fry Beef with Pears and Vegetables

No ratings yet
Prep Time 5 minutes
Cook Time 20 minutes
Course dinner, Main Course
Cuisine American, Asian
Servings 2

Equipment

  • knife
  • cutting board
  • spatula
  • wok

Ingredients
  

  • 12 oz beef strips
  • 1 each orange bell pepper (sliced)
  • 2 cups mustard greens (chopped)
  • 1/4 cup red onions (diced)
  • 1 each pear (thinly sliced)
  • 1/4 cup coco aminos
  • 1/4 tsp garlic powder
  • 1 tbsp olive oil

Instructions
 

  • Wash and rinse the mustard greens, drain them, and chop into large chunks
  • Add olive oil to the saute pan on medium-high heat and add the beef and red onions and stir fry until golden brown (cook for 5 to 7 minutes until the meat cooks through)
  • Add the 1/4 cup of coco aminos and seasonings and mix well
  • Next, add the bell peppers and mustard greens and cook until they soften (about 3 to 5 minutes)
  • At the end, add the fresh pears and mix in with the beef and vegetable mixture
Posted on

Grilled Beef and Roasted Veggies

grilled-beef-and-roasted-veggies

Grilled beef with roasted veggies is a perfect meal prep for week day dinners and the leftovers make great meal prepped lunches. Deliciously marinated with a blend of spices, you likely already have in the spice rack, and olive oil makes this recipe flavorful as well as low calorie. The recipe is very versatile and can be adapted to a ton of combinations of spices, proteins, and vegetables. We use flank steak in our recipe however ribeye or sirloin will work as well. You just need to adjust your cooking times based on the thickness. Learning the cooking method and balancing the grilled beef with roasted veggies and the spice blend will open up a whole new set of combinations. That’s why we love this versatile recipe.

In this recipe we use an indoor grill/griddle for our grilled beef and the same cooking instructions apply to any grill as long as you set your heat appropriately.

Bell peppers and squash are great vegetables for roasting. The flavors are smooth and bold enough to blend well with the spices and a flavorful protein. Many different veggies can work in this recipe though. Try your own combinations the next time you make our grilled beef and roasted veggies recipe.

grilled-beef-and-roasted-veggies

Grilled Beef and Roasted Veggies

No ratings yet
Prep Time 5 minutes
Cook Time 20 minutes
Course dinner, Main Course
Cuisine American, Asian
Servings 2

Equipment

  • knife
  • cutting board
  • tongs
  • indoor grill pan
  • oven

Ingredients
  

  • 12 oz flank steak
  • 1 each orange bell pepper (sliced)
  • 1 each red bell pepper (sliced)
  • 1 each zucchini squash (sliced into coins)
  • 1/4 tsp paprika
  • 1/4 tsp garlic powder
  • 1/4 tsp onion powder
  • 1/4 tsp salt
  • 1/4 tsp pepper
  • 1 tbsp olive oil

Instructions
 

  • Preheat the oven to 400F
  • Preheat the indoor grill on medium-high heat
  • In a small bowl, mix together seasonings
  • Marinate the flank steak with half of the seasonings and coat with half of the olive oil
  • Place the beef on the preheated indoor grill and sear the beef on each side for 2-3 minutes
  • Remove the beef from the indoor griddle/grill and place it on a sheet pan.
  • Place the veggies on a sheet pan next to the beef and drizzle with the rest of the olive oil and sprinkle them with the rest of the seasonigns
  • Place the sheet pan in the oven for 15 minutes until the beef cooks all the way to an internal temperature of 145F.
  • After the beef cooks, let it rest for a few minutes before slicing into thin strips
Posted on

Steak and Watermelon Salad

steak-and-watermelon-salad

The contrasting flavors and textures of steak and watermelon salad makes for a truly exciting meal. The unlikely combination is unique and brings a surprise to the palette and your meal routine. The steak can be easily prepared in advance and the watermelon cut up so the meal prep is quick and easy. This is a great salad for nutrition as it provides its own dressing from the flavors of the marinade to the juice of the watermelon. The sweet and savory combo is a sure win for anyone but especially salad lovers.

The nutrition of the meal is as fantastic as the flavors. The steak provides good amounts of protein, good for muscle building and weight management, while the watermelon provides antioxidants. The B12 and iron from the steak will help with nerves and oxygen in the blood cells. The greens and tomatoes provide fiber and additional nutrients on top. This light and healthy meal will leave you full from the protein in the steak and hydrated from the fruits and vegetables. Perfect for a work day lunch or a summer evening.

Preparing the beef is the only potentially tough part of this meal and practice makes perfect. Searing the steak can take great timing and heat management. Everyone is different and the preferred level of doneness is up to you so learn how your grill heats up and cooks and you’ll cook perfect steaks without even trying. Slicing the steak is an important component as well. Cutting against the grain will allow for easy bites when you eat. When you cut with the grain you find that you are tearing the beef when you bite into it rather than having clean breaks. You can identify the grain of the steak by looking closely at the strands that run through it.

steak-and-watermelon-salad

Steak and Watermelon Salad

No ratings yet
Prep Time 5 minutes
Cook Time 15 minutes
Course lunch
Cuisine American
Servings 2

Equipment

  • knife
  • cutting board
  • tongs
  • indoor grill pan

Ingredients
  

  • 12 oz flank steak
  • 1 cup watermelon (cubed)
  • 1/2 cup cherry tomatoes (sliced)
  • 4 cups salad mix
  • 1/4 tsp chili powder
  • 1/4 tsp paprika
  • 1/4 tsp garlic powder
  • 1/4 tsp salt
  • 1/4 tsp pepper
  • 1 tbsp olive oil

Instructions
 

  • Marinate the flank steak with chili powder, paprika, garlic powder, salt, and pepper. Then coat it with olive oil
  • Pre-heat the indoor grill pan on medium-high heat
  • Sear the steak on each side for about 3 to 5 minutes until it reaches your desired doneness
  • Then, assemble your salad by mixing the cherry tomatoes and watermelon in a bowl. Add the salad mix and dress it with your favorite salad dressing to your preferred taste (2 tbsp of dressing per serving)
  • When the beef is finished, set it aside to cool for 5 minutes
  • Slice the beef cross wise and add it to the salad mix
Posted on

Stuffed Sweet Potatoes with Sausage

stuffed-sweet-potatoes-with-sausage

Stuffed sweet potatoes are delicious and a great way to mix up your meals. The usual stuffed potatoes are good too but sweet potatoes bring a new flavor and life to the dish that sets it apart. Each bite brings together the sweetness of perfectly roasted sweet potatoes and the richness of a savory sausage filling, creating a satisfying meal that’s both comforting and nourishing.

This cozy stuffed sweet potato recipe is perfect anytime of year but especially great on summer evenings or chilly winter days. It’s a quick and easy meal to put together and can be scaled up to feed the whole family. The rich flavors of the sausage is a great way to introduce sweet potatoes to anyone who is a little more picky on their meals as well.

Consider some sides as well. Additional vegetables and greens alongside this meal can really round it out nicely. The extra greens will provide additional nutrition and lighten the meal.

stuffed-sweet-potatoes-with-sausage

Stuffed Sweet Potatoes with Sausage

No ratings yet
Prep Time 5 minutes
Servings 2

Ingredients
  

  • 2 each pre-cooked beef sausage links (3 oz each)
  • 2 each sweet potatoes
  • 1 cup pasta sauce
  • 1/4 tsp garlic powder
  • 1/4 tsp salt
  • 1 tbsp olive oil

Instructions
 

  • Preheat oven to 425F
  • Wash and rinse sweet potato, cover with foil and place in the oven to cook for 30 minutes
  • Meanwhile, slice the beef sausage into coins
  • Then add oil to a saute pan medium-high heat and saute the sausage slices for about 2 to 3 minutes
  • Add the pasta sauce and simmer in the pan for 5-10 minutes. Season with garlic powder and salt
  • When the sweet potatoes are finished baking, remove from the oven and let it cool
  • Once cool, slice it in half and scoop out the sweet potato (save the middle for another side dish for another meal)
  • Feel free to top off with fresh herbs such as basil
Posted on

Chicken Sausage and Leeks

chicken-and-sausage-and-leeks

Chicken Sausage and Leeks

No ratings yet
Prep Time 5 minutes
Cook Time 20 minutes
Course dinner, Main Course
Cuisine American
Servings 4

Equipment

  • knife
  • cutting board
  • spatula
  • saute pan

Ingredients
  

  • 4 each chicken sausage links (sliced, 3 oz each)
  • 1 bundle fresh leeks
  • 1 each green bell pepper (diced)
  • 1 each red bell pepper (diced)
  • 1 cup celery (diced)
  • 1/4 tsp paprika
  • 1/4 tsp italian seasoning
  • 1/4 tsp garlic powder
  • 1/4 tsp salt
  • 1/4 tsp pepper
  • 1 tbsp olive oil

Instructions
 

  • Wash and rinse your vegetables
  • Thinly slice the leeks cross wise, using the white parts of the leeks
  • Add olive oil to a saute pan on medium-high heat.
  • Add the sausage and cook through until golden brown (about 3 to 5 minutes), then remove it from the pan
  • Then add the leeks and stir for 2-3 minutes (add another tbsp of oil if needed to coat the pan)
  • Add the diced peppers and celery. Season with paprika, italian seasoning, garlic powder, salt and pepper. Cook for another 2-3 minutes until they have wilted
  • At the end, add the sausage back to the pan and mix well
Posted on

Chicken and Mandarin Orange Salad

chicken-and-mandarin-orange-salad

Refreshing and delicious, this chicken and mandarin orange salad recipe is a perfect lunch on a busy work day or a light dinner. Salads are best served fresh however if you keep the vegetables, chicken, and oranges separate then you can easily store them and combine just before eating. The savory chicken, marinated in sun dried tomatoes and pesto, is balanced by the citrus flavor of the orange slices. You won’t need much salad dressing for this chicken and mandarin orange salad, the ingredients and marinade are excellent already.

The dish is stunning as well. The vibrancy alone makes the meal stand out and then the unique combination of vegetables, fruit, and protein make for a unique salad experience. If you’re looking for a way to add salads to your routine and have struggled with it in the past, try this recipe. It’s different then the typical salad. Or, if you’re an avid salad eater, mix up your routine with this chicken and mandarin orange salad recipe. Bring some new flavors to your usual meal prep.

This salad is super easy to make and assemble. It’s fast and versatile too. Grill or cook your chicken in an air fryer, on a grill, in the oven or even try a different protein. Steak works well with the flavors as well if you’re looking for a different take. Even adding different vegetables or nuts, for an added crunch, are great ways to mix up the recipe.

chicken-and-mandarin-orange-salad

Chicken and Mandarin Orange Salad

No ratings yet
Prep Time 5 minutes
Cook Time 20 minutes
Course lunch, Main Course
Cuisine American
Servings 4

Equipment

  • knife
  • cutting board
  • grill pan
  • tongs

Ingredients
  

  • 1 lb boneless chicken thigh or chicken breast
  • 4 tbsp sun-dried tomato pesto sauce
  • 1 cup canned mandarin oranges (drained)
  • 1 cup cherry tomatoes
  • 8 cups salad mix
  • 8 tbsp choice of vinaigrette dressing
  • 1/4 tsp salt
  • 1/4 tsp pepper

Instructions
 

  • Preheat your Indoor Griddle/Grill on Medium High
  • Marinate the chicken with the Sun-Dried Tomato Pesto Sauce, covering the whole surface of the meat
  • Place the chicken on the preheated indoor griddle/grill and sear the chicken on each side for 6 to 7 minutes until the chicken cooks for an internal temperature of 165F
  • While the chicken is cooking, assemble your salad by mixing the cherry tomatoes and mandarin oranges in a bowl. Add the salad mix and dress it with your favorite dressing to your preferred taste (recommend 2 tbsp per person)
  • When the chicken is finished, set it aside to cool for 5 minutes. 
  • Slice the chicken into bite size pieces and add it to the salad mix