Posted on Leave a comment

Ground Beef Cabbage Stir Fry

beef cabbage stir fry

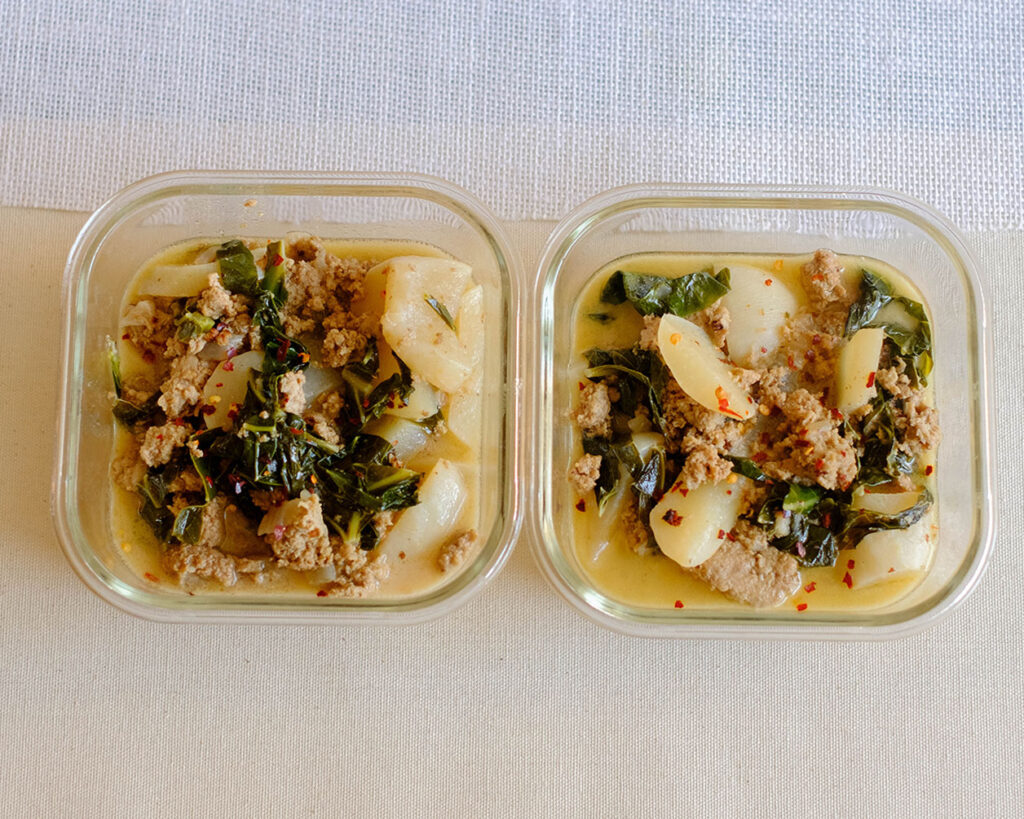
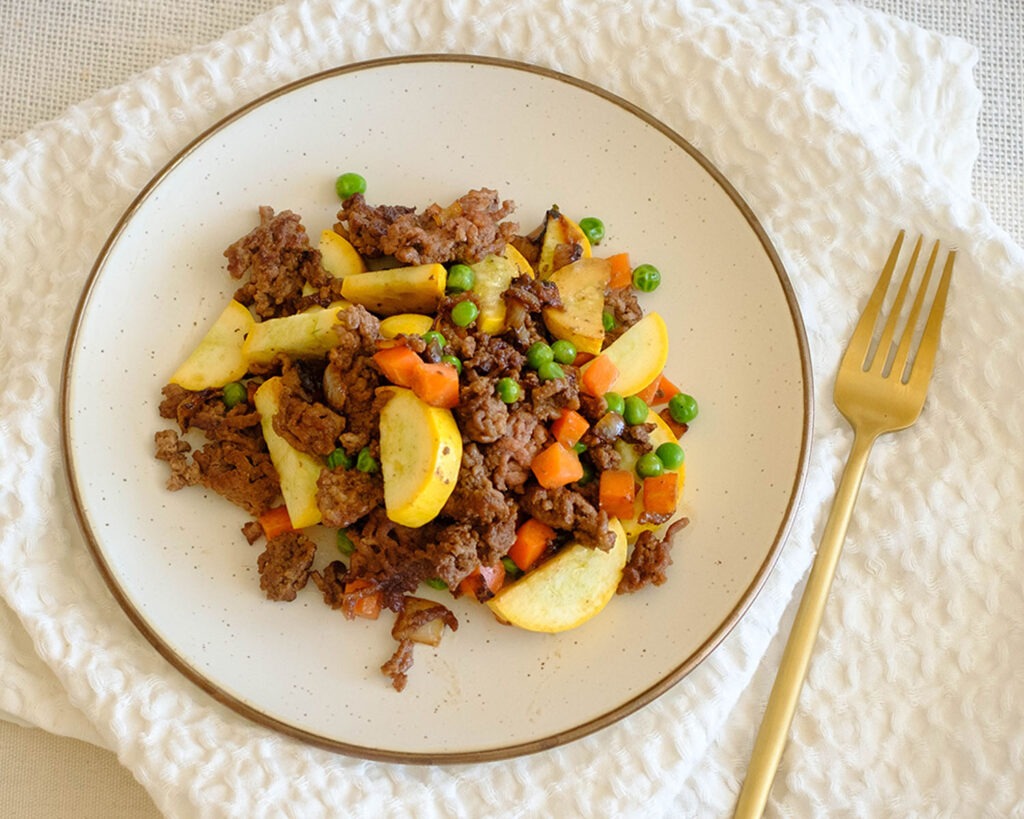
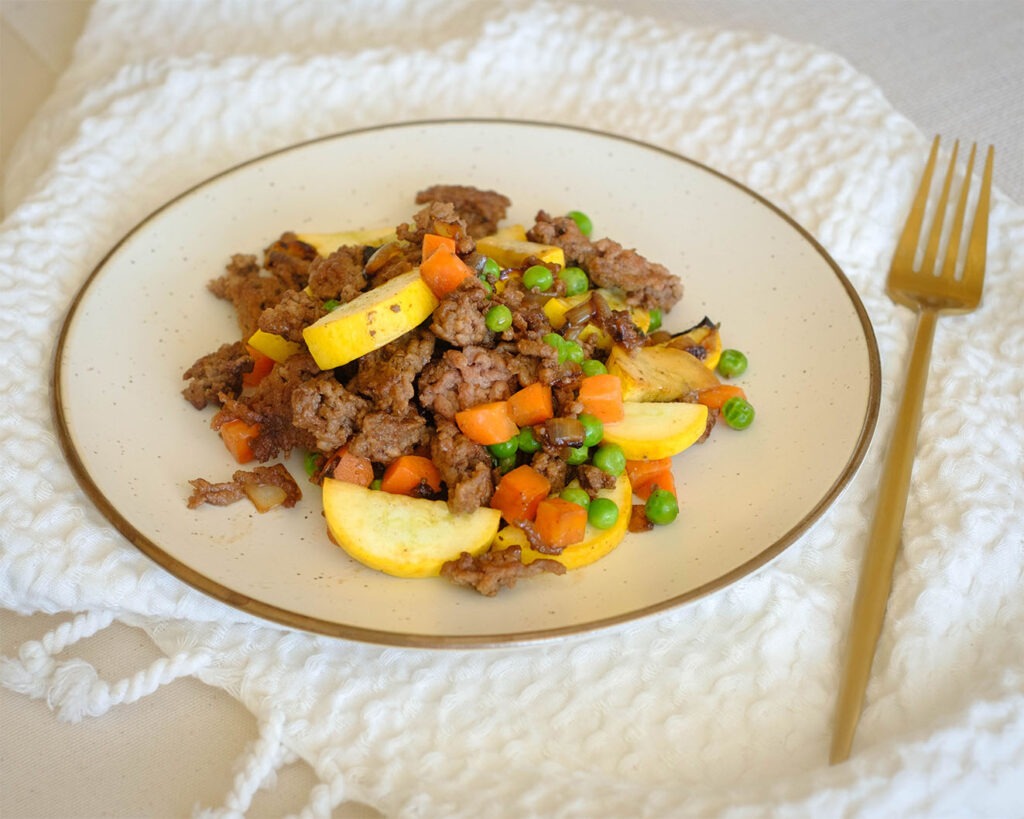
Today, I’ve got a delicious and low-carb recipe for you: Ground Beef Cabbage Stir Fry. This Ground Beef Cabbage Stir Fry is not only a taste sensation but also a great low-carb meal prep option. Perfect for those looking to keep their carb intake in check while enjoying a satisfying, homemade meal. Give it a try, and you won’t be disappointed!

This post may contain affiliate links. If you use these links to buy something we may earn a commission at no extra cost to you. Please read the disclosure policy.

Struggling with getting vegetables into your diet during your weekly meal prep? Well this recipe ground beef cabbage stir fry is the solution that you’ll definitely enjoy!

Round plate with stir fry ground beef with red and green shredded cabbage.

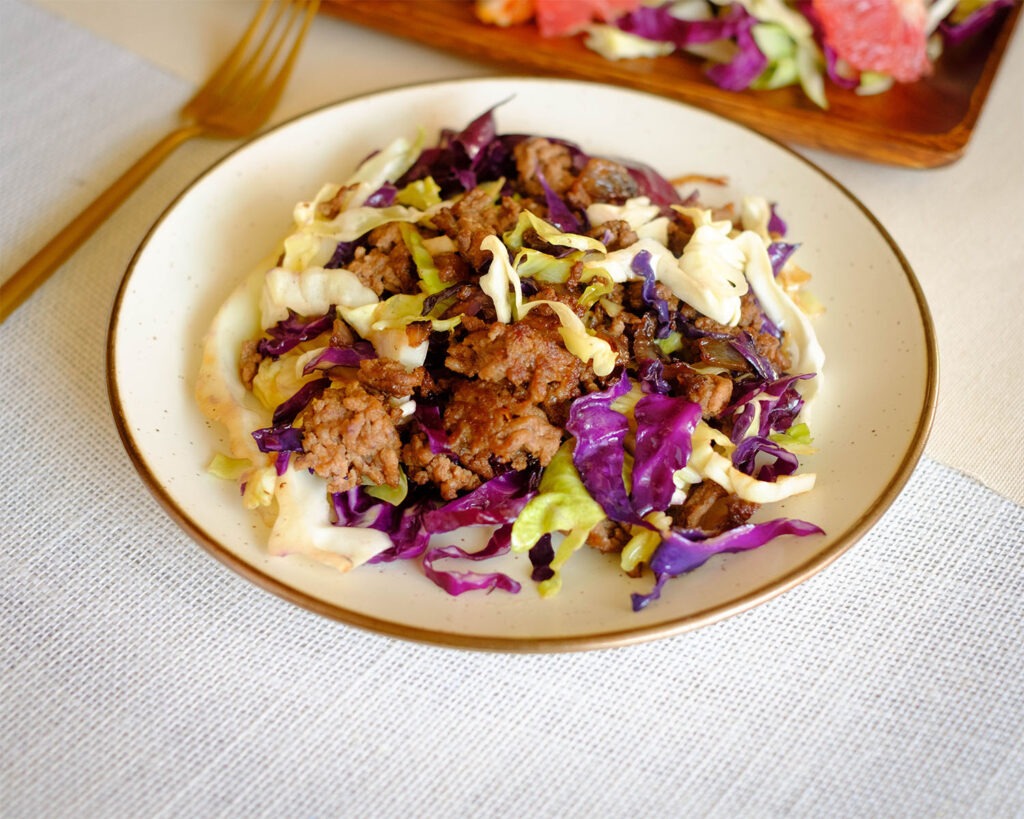
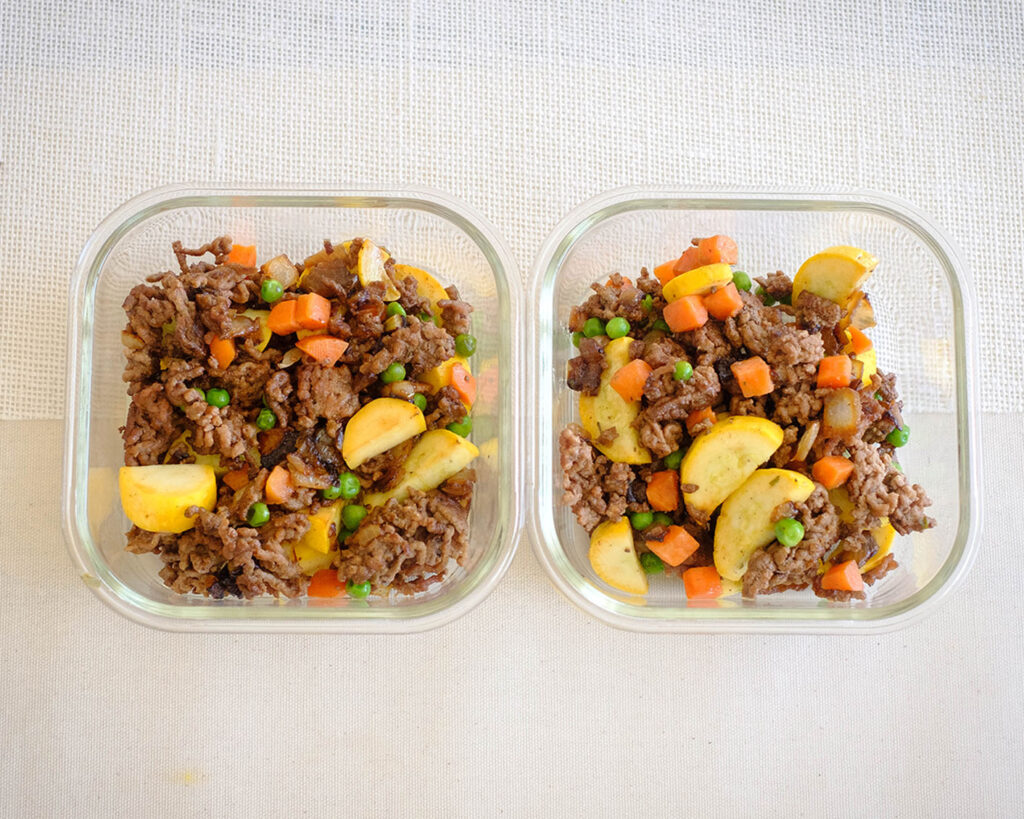
This easy ground beef meal prep dish is full of vegetables and has a lot of great flavors using simple ingredients.

The PrepYoSelf Newsletter

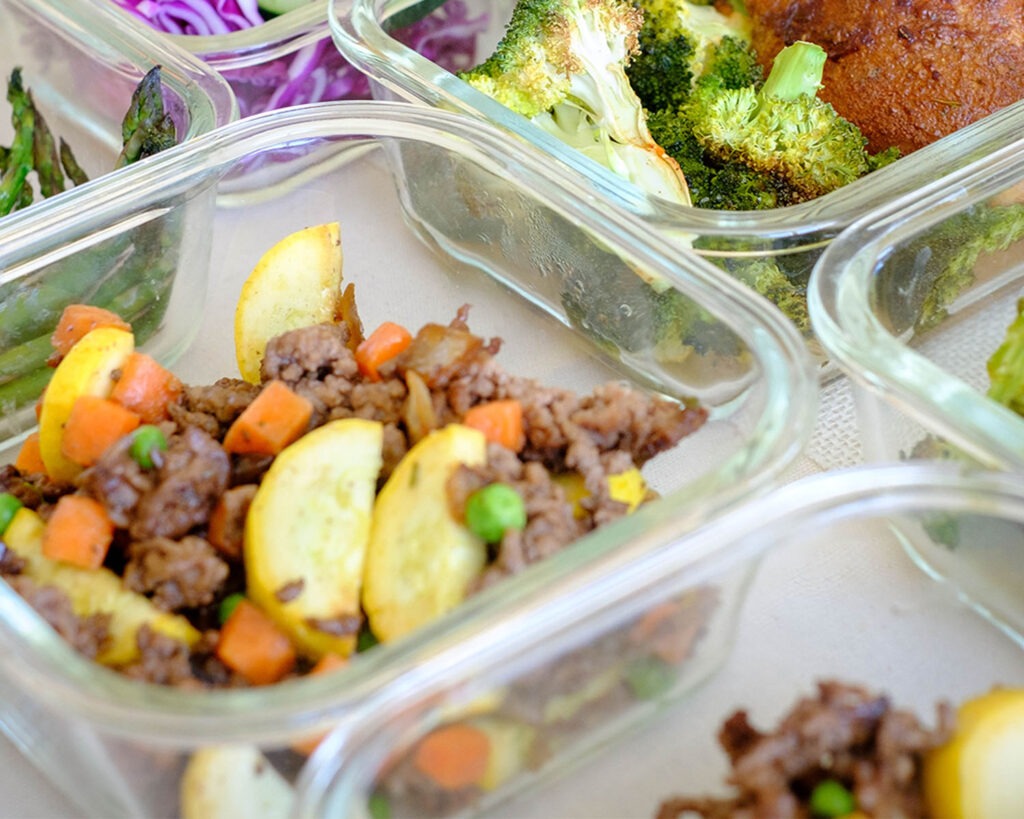
There are several options for vegetables that you can use for stir fry. For this recipe, we used a mix of green and red cabbage, but you can easily add more vegetables such as sliced mushrooms, shredded carrots, and green beans.

Glass meal prep container with stir fry ground beef with red and green shredded cabbage.

Simple Keto-Friendly, Low-Carb Beef Stir Fry Ingredients

  • Ground Beef: We used ground beef, but you can easily swap in ground pork, ground turkey, or ground chicken for this stir fry recipe.
  • Red Onions: We used diced red onions, but chopped green onions are also a great choice.
  • Cabbage: You can buy a head of cabbage, however, you may end up with tons of leftovers that you’ll be eating for days, so sometimes, we opt for pre-chopped coleslaw mix. It saves time with prep and you’re not stuck with food waste.
  • Soy Sauce: Soy sauce adds great savory flavors to stir fry, but you can also use other sauces such as hoisin sauce, gyoza sauce, or oyster sauce.
  • Oils: We stir fry with olive oil, but then drizzle in a little bit of sesame oil for extra flavor in the end.
Glass meal prep container with stir fry ground beef with red and green shredded cabbage.

How to Meal Prep Ground Beef and Cabbage Stir Fry

  • Add oil to a hot wok and saute the onions until they soften.
  • Next, add the ground beef and continue to stir until it fully cooks.
  • Then, add the shredded cabbage and season with soy sauce, and stir fry until it gets tender.
  • Finally, drizzle the dish with a little bit of sesame oil.

Reference the recipe card below for detailed instructions.

Glass meal prep containers with stir fry ground beef with red and green shredded cabbage.

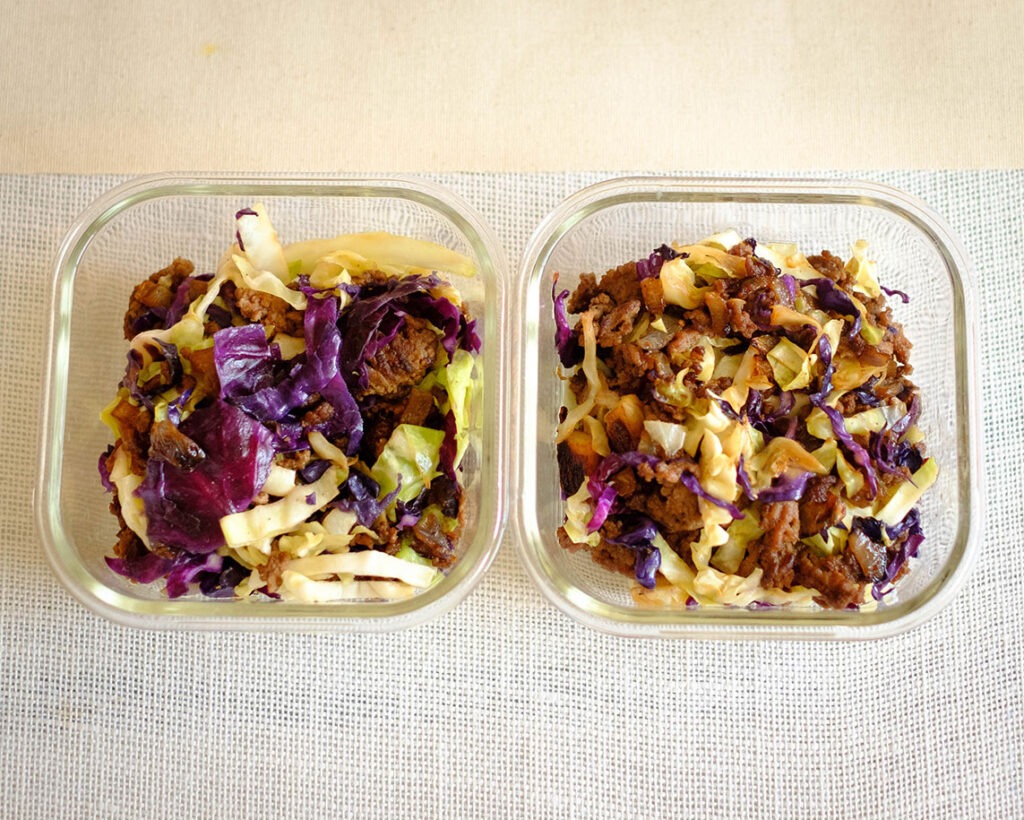
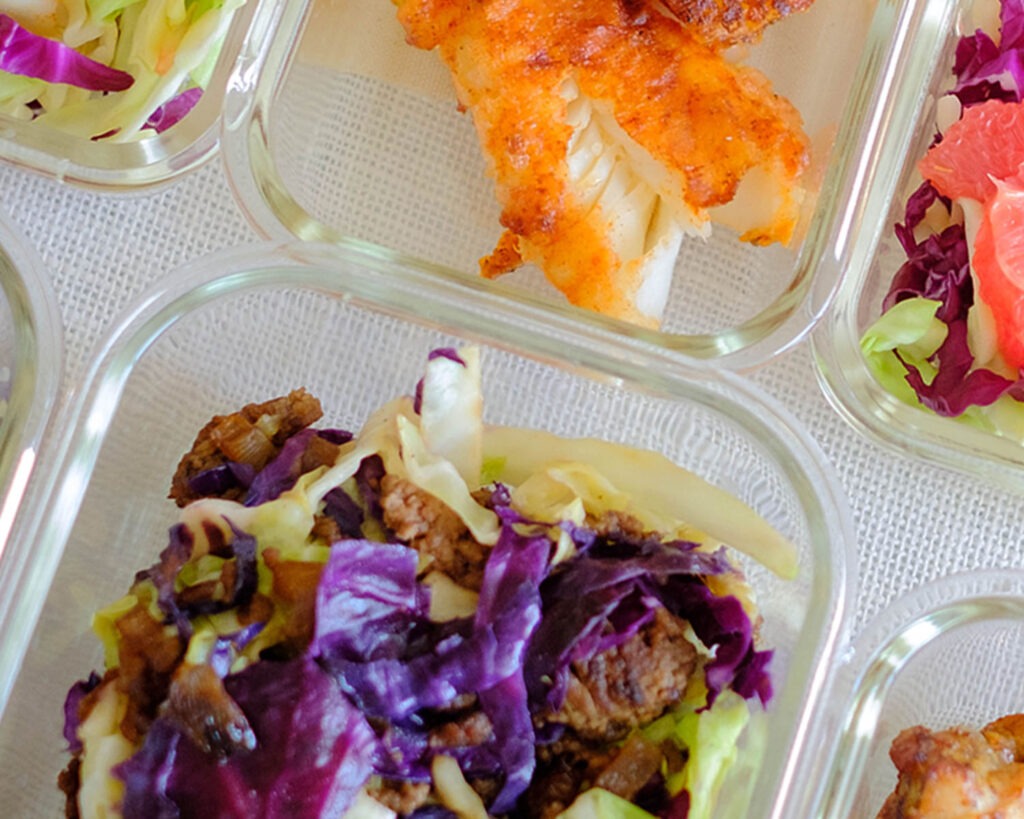
Meal Prep Tips for Ground Beef Stir Fry

  • To Serve: You can serve these with a side of steamed rice or soba noodles. If you want to keep it low-carb, you can also serve it with cauliflower rice or shirataki noodles.
  • To Reheat: Warm it up in the microwave for a few minutes until it heats through
  • To Store: You can store this in an airtight container in the refrigerator for up to 3 to 4 days
beef stir fry

Ground Beef Cabbage Stir Fry

This Ground Beef Cabbage Stir Fry is an easy meal prep recipe that you can cook in less than 15 minutes.
No ratings yet
Prep Time 5 minutes
Cook Time 15 minutes
Course dinner, Main Course
Cuisine Asian
Servings 2

Equipment

  • knife
  • cutting board
  • wok
  • spatula

Ingredients
  

  • 12 oz lean ground beef
  • 1/4 cup red onion (diced)
  • 2 cups green cabbage (shredded)
  • 2 cups red cabbage (shredded)
  • 1/2 teaspoon garlic powder
  • 2 tablespoons soy sauce
  • 1 tablespoon olive oil
  • 1 teaspoon sesame oil

Instructions
 

  • Add olive oil to a wok on medium-high heat and saute the red onions until they soften (about 2 to 3 minutes).
  • Next, add the ground beef and break it up into smaller pieces. Continue to stir it around for about 5 to 6 minutes until it fully cooks and is golden brown. Season with garlic powder.
  • Then, add the shredded cabbage and continue to stir until they soften. Season with soy sauce and mix thoroughly. At the end, drizzle with sesame oil and mix well.

Similar Recipes

peanut chicken

Peanut Chicken and Celery Stir Fry

beef and chinese broccoli

Garlicky Beef Stir Fry

tofu stir fry

Tofu and Veggie Stir Fry

You Might Also Like

Frequently Asked Questions

What are the benefits of cabbage?

Cabbage is rich in vitamin B6 and folate which help with energy metabolism. It is also a good source of fiber and contains powerful antioxidants that help protect the body.


Is cabbage low carb?

Yes, 1 cup of chopped raw cabbage only has 5 grams of carbs.


Is cabbage good for weight loss?

Yes, it is low in calories, fat, and high in fiber which well help you stay full longer. 

Posted on Leave a comment

Grilled Balsamic Salmon with Watermelon Salad

salmon and watermelon salad

If you’re looking for a way to figure out what to do with so much watermelon, try this refreshing watermelon and mozzarella salad served with grilled salmon.

This post may contain affiliate links. Please see our privacy policy for details.

Plate with grilled salmon and watermelon salad with mozzarella balls, cucumbers, and mint leaves drizzled with balsamic glaze.

Watermelon is such a refreshing fruit that provides so many nutrients. We replaced tomatoes with watermelon in this tasty twist of the classic Caprese salad.

Here are Ways to Enjoy Watermelon

  • Make it into a fruit slushie
  • Add it to salsa recipes
  • Make watermelon kebabs
  • Wrap it up in prosciutto for a healthy snack

The PrepYoSelf Newsletter

To Make this Watermelon Salad with Salmon, You’ll Need

  • Salmon: Salmon is full of nutrients, but you can also swap this out with chicken breasts if you prefer another protein option
  • Watermelon: You can also use cantaloupe or honeydew
  • Mint Leaves: You can also use fresh basil leaves
  • Mozzarella balls: You can also swap this out with feta cheese
  • Cucumber: This is another hydrating ingredient that makes this dish refreshing
  • Balsamic concentrate: If you don’t have the concentrate, you can use the vinaigrette

Plate with grilled salmon and watermelon salad with mozzarella balls, cucumbers, and mint leaves drizzled with balsamic glaze.

How to Make Grilled Salmon and Watermelon Salad

  1. Heat a grill pan and start with grilling the salmon flesh side down, then flip it over and cook it until the skin gets crispy.
  2. Meanwhile, prep your watermelon and cucumbers.
  3. In a mixing bowl, mix together the watermelon with the mozzarella, and mint leaves, and drizzle it with the balsamic concentrate.

Reference the recipe card below for detailed instructions.

Glass meal prep containers with grilled salmon and watermelon salad with mozzarella balls, cucumbers, and mint leaves drizzled with balsamic glaze.

Meal Prep Tips for Grilled Salmon and Watermelon Salad

  • To Store: Store in an airtight container in the refrigerator for up to 3 to 4 days. Separate the salmon from the watermelon salad to keep it from getting soggy.
  • To Reheat: You can serve the salmon chilled, however, you can also reheat the salmon in the microwave separately.

Glass meal prep containers with grilled salmon and watermelon salad with mozzarella balls, cucumbers, and mint leaves drizzled with balsamic glaze.

Salmon & Watermelon

Grilled Balsamic Salmon with Watermelon Salad

Watermelon and mozzarella salad drizzled with a balsamic glaze is the perfect salad to keep you cool during the warm weather. It's a mouthwatering twist on the classic Caprese salad.
No ratings yet
Prep Time 5 minutes
Cook Time 15 minutes
Course lunch, Main Course
Cuisine American, Mediterranean
Servings 2

Equipment

  • knife
  • cutting board
  • indoor grill pan
  • spatula
  • mixing bowls

Ingredients
  

Salmon & Seasonings

  • 12 oz salmon
  • 1/4 teaspoon garlic powder
  • 1/4 teaspoon onion powder
  • 1/4 teaspoon paprika
  • 1/4 teaspoon salt
  • 1/4 teaspoon pepper
  • 1 tablespoon olive oil

Watermelon Salad

  • 2 cups watermelon (cubed)
  • 1 cup cucumber (sliced)
  • 8 mini mozzarella balls
  • 3 mint leaves (chopped)
  • 2 tablespoons balsamic concentrate

Instructions
 

  • Season salmon with the seasonings. Heat a grill pan on medium heat and add the salmon, flesh side down, and cook for about 5 minutes. Flip it over and cook until the skin gets crispy (about 5 minutes).
  • Meanwhile, cut the watermelon into 1 inch cubes. Slice the cucumbers into rounds (1/4 inch thick). Chop the mint leaves.
  • In a mixing bowl, mix together the watermelon in a bowl with the mozarella and mint leaves. Drizzle the balsamic concentrate on top of the salmon and watermelon salad.

Similar Recipes

pine nut fish and spinach

Baked Pine Nut Crusted Tilapia with Sauteed Spinach

cajun tilapia

Cajun Tilapia with Roasted Broccolini and Potatoes

shrimp and asparagus

Oven Baked Shrimp with Panko Breaded Asparagus

You Might Also Like

Frequently Asked Questions

What are some best uses of watermelon?

If you’re tired of hydrating with water, make a refreshing drink by adding watermelon to your drink or add it to your smoothies. You can also make fruit pizza for kids.


Is watermelon good for weight loss?

It is 90% water so it’s low in calories and helps you stay hydrated.


Can I use shredded mozzarella instead of mozzarella balls?

Absolutely, shredded mozzarella will work. You can also use feta cheese crumbles.

Posted on Leave a comment

Baked Cilantro Lime Chicken with Strawberry Salsa

cilantro chicken

Let’s keep your basic baked chicken breasts from being boring for your next meal prep. We’re keeping it tasty with this cilantro lime pesto marinade, paired with perfect sides and condiments. Great for lunch or a chicken dinner with style.

This post may contain affiliate links. Please see our privacy policy for details.

Round plate with cilantro marinated chicken topped with strawberry salsa, black beans.

Not only do you get a good protein source from the chicken, but you also get an additional protein and fiber load from the tasty black beans.

To top it off, your tastebuds are going to be feeling fresh with the sweet and savory strawberry salsa.

Now we know what you are thinking…” Wow, that’s a lot to meal prep!”. Don’t worry, we’ll show you how to make this beautiful dish in no time.

The PrepYoSelf Newsletter

Gather the Following Ingredients

Ingredients For the Chicken and Cilantro Lime Pesto:

  • Chicken: We used boneless chicken thighs, but you can also use chicken breasts or chicken tenderloins.
  • Fresh Cilantro: If you don’t have cilantro, you can swap it out with green onions
  • Lime: You can also use oranges or lemons
  • Pine Nuts: If you don’t have pine nuts, you can use whatever nuts you have on hand
  • Garlic: We used fresh garlic, but you can also use garlic paste or garlic powder

Round plate with cilantro marinated chicken topped with strawberry salsa, black beans.

Ingredients For the Strawberry Salsa and Salad Mix:

  • Strawberries: Mango or pineapple are also good fruits to use in salsa
  • Cherry Tomatoes: We like cherry tomatoes because they are easy to slice into small pieces, but feel free to use regular tomatoes
  • Red Onions: Use whatever onions you have on hand, including shallots
  • Cilantro: You can also use green onions
  • Lime: Oranges or lemon can also be used
  • Spring Mix: Choose any kind of lettuce mix you like
  • Black Beans: Pinto beans will also work

Round plate with cilantro marinated chicken topped with strawberry salsa, black beans.

How to Bake Cilantro Lime Chicken:

  1. Make the Cilantro Pesto: In a blender, add the cilantro, pine nuts, juice of a lime, olive oil, garlic, and salt. Blend until smooth.
  2. Marinate the Chicken: Place the chicken in a mixing bowl. Pour in the cilantro pesto that you just blended. Marinate the chicken for at least 10 minutes.
  3. Bake the Chicken: Place the chicken on a sheet pan. Bake the chicken in the oven for 25-30 minutes until it is fully cooked. Meanwhile, prepare the strawberry salsa, salad, and black beans.

Reference the recipe card below for detailed instructions.

Glass meal prep container with cilantro marinated chicken topped with strawberry salsa, black beans.

Meal Prep Tips for Baked Cilantro Lime Chicken Dinner

  • Cook method variations: You can also cook the chicken in a small toaster oven or in the Air Fryer (cook at 360F for 20-25 minutes). Another option is to grill it on an outdoor grill or on an indoor grill pan which will give it a nice char and caramelized flavor.
  • To Serve: After the chicken cooks, let it rest for a few minutes before slicing it into bite-size pieces. This chicken dinner brings so much color and excitement to the plate.
  • To Store: Store it in an airtight container for up to 3 to 4 days in the refrigerator. Keep the salsa and beans separate from the spring mix to prevent the spring mix from getting soggy.
  • To Reheat: You can serve this meal chilled, but if want to reheat the chicken, you can warm it up in the microwave until it is heated through.

Cilantro Chicken

Oven Baked Cilantro Lime Chicken with Strawberry Salsa and Black Bean Salad

Cilantro Lime Marinated Chicken served with a light and refreshing strawberry salsa.
No ratings yet
Prep Time 5 minutes
Course lunch, Main Course
Cuisine American, Mexican
Servings 2

Equipment

  • knife
  • cutting board
  • blender
  • sheet pan
  • oven
  • mixing bowls

Ingredients
  

Chicken and Pesto

  • 12 oz boneless chicken thighs
  • 1 cup cilantro (chopped)
  • 1 lime (juiced)
  • 1/4 cup olive oil
  • 2 tablespoons pine nuts
  • 2 garlic cloves (peeled)
  • 1/4 teaspoon salt

Salad and Black Beans

  • 4 cups spring mix salad
  • 1 cup black beans (drained and rinsed)

Strawberry Salsa

  • 1/2 cup strawberries (diced)
  • 1/2 cup cherry tomatoes (sliced)
  • 1/4 cup red onions (diced)
  • 1/4 cup cilantro (chopped)
  • 1 lime (juiced)
  • 1/4 teaspoon salt

Instructions
 

  • Preheat the oven to 400F. Place the cilantro, pine nuts, juice of a lime, olive oil, garlic, and salt in a blender and blend until smooth.
  • Place the chicken in a mixing bowl and pour in the cilantro pesto. Marinate the chicken for about 10 minutes.
  • Next, place the chicken on a sheet pan and bake it in the oven for about 25-30 minutes until it reaches an internal temperature of 165F (half way through, flip over the chicken)
  • Meanwhile, rinse the strawberries and remove the stems. Cut them into quarters. Add them to another mixing bowl with the cherry tomatoes, red onions, cilantro, lime juice, and salt. Mix it all together.
  • After the chicken cooks, top it off with the strawberry salsa and enjoy it with a side of black beans and a side salad.

Notes

Instead of baking the chicken, you can also grill the chicken on an indoor grill pan for about 6 to 7 minutes on each side until it is fully cooked and reaches an internal temperature of 165F

Similar Recipes

bean and corn taco

Vegetarian Black Bean and Corn Soft Tacos

chicken salad

Oven Baked Honey Mustard Glazed Chicken Salad

balsamic chicken salad

Oven Baked Balsamic Chicken Salad with Strawberries

You Might Also Like

Frequently Asked Questions

What to serve with cilantro lime chicken?

If you have extra cilantro, you can make cilantro lime rice or serve the chicken with flour or corn tortillas.


Can you use lemon juice instead of lime juice?

Yes, they can be used interchangeably in this recipe.


How long can you keep marinated chicken in the refrigerator?

You can keep it for 24 hours, after that, any uncooked marinade should also be discarded.

Posted on Leave a comment

One Pot Turkey Toscana Soup

turkey soup

Here’s a healthy spin on a restaurant classic. This One Pot Turkey Toscana Soup recipe is lightened up with healthy ingredients that you can make in less than 30 minutes.

This post may contain affiliate links. Please see our privacy policy for details.

Soup bowl with turkey toscana soup that includes ground turkey, potatoes, and leafy greens.

Why You’ll Enjoy this Version of Turkey Toscana Soup

Zuppa Toscana soup is one of our favorite soups that we enjoy at Olive Garden. It’s typically made with Italian sausage, leafy greens, bacon, and potatoes. For our weekly meal prep, we are making this restaurant recipe with lighter ingredients at home.

  • In our recipe, we use high-protein ground turkey seasoned with Italian flavors
  • It’s satisfying and filling from the combination of tender potatoes and healthy collard greens
  • You can make everything in one pot and have minimal dishes for clean up

The PrepYoSelf Newsletter

Ingredients You’ll Need

This easy Turkey Toscana soup is a perfect one-pot meal loaded with flavors and nutrients. All you need is:

  • Ground Turkey: You can also use ground chicken or ground Italian pork sausage
  • Onions and Garlic: These aromatics provide a lot of flavors and give it the savory flavors for the soup
  • Collard Greens: Other dark leafy greens you can use are baby spinach or kale
  • Yukon Potatoes: Any kind of potatoes will work, but if you want to keep it low carb, you can use cauliflower florets
  • Chicken Stock: You can also use vegetable stock or broth
  • Coconut Milk: We used coconut milk to keep it dairy free, however, you can also use heavy cream if you are good with a little bit of dairy
  • Seasonings: We used a pre-made Italian seasoning with garlic powder and red pepper chili flakes for a little bit of heat

Glass meal prep container with turkey toscana soup that includes ground turkey, potatoes, and leafy greens.

Basic Steps to Make Turkey Soup

  1. Add oil to a soup pot on medium-high heat.
  2. Saute the onions and ground turkey until the turkey is cooked.
  3. Next, add the garlic and stir it around for a few seconds.
  4. Then, pour in the chicken broth and bring the liquid to a boil.
  5. Add the chopped collard greens, potatoes, and seasonings.
  6. Lower the heat to low-medium and let the soup simmer until the potatoes are fork tender.
  7. In the end, pour in the coconut milk and stir it all together.

Reference the recipe card below for detailed instructions.

Glass meal prep container with turkey toscana soup that includes ground turkey, potatoes, and leafy greens.

Meal Prep Tips for Turkey Toscana Soup

  • Adding vegetables: If you decide to swap in the cauliflower or spinach, you can add them towards the last 5 minutes of simmering the soup since these ingredients cook fast.
  • To reheat: Reheat it in the microwave until it is warm (about 2 minutes depending on your microwave settings).
  • Storage: Store in an airtight container in the refrigerator for up to 3 to 4 days for the best quality.
  • To freeze: If you want to freeze this meal, you can store it in freezer bags in the freezer for up to 3 months for the best quality. Just be sure to thaw it out in the refrigerator before reheating it.

Glass meal prep container with turkey toscana soup that includes ground turkey, potatoes, and leafy greens.

turkey toscana soup

One Pot Turkey Toscana Soup

A healthy, meaty, and completely slurpworthy soup that you can whip up in no time.
No ratings yet
Prep Time 5 minutes
Cook Time 25 minutes
Course dinner, lunch, Main Course
Cuisine American
Servings 2

Equipment

  • knife
  • cutting board
  • soup pan
  • spatula

Ingredients
  

  • 12 oz lean ground turkey
  • 1/2 cup red onions (diced)
  • 1 garlic clove (sliced)
  • 3 cups collard greens (rinsed and chopped)
  • 2 small yukon potatoes (cut in 1/2 inch cubes)
  • 3 cups chicken broth
  • 1/2 cup coconut milk
  • 1/2 teaspoon red pepper flakes
  • 1/4 teaspoon Italian seasoning
  • 1/2 teaspoon garlic powder
  • 1/2 teaspoon salt
  • 1 tablespoon olive oil

Instructions
 

  • Add oil to a soup pot on medium-high heat and saute the onions and garlic until they soften. Next, add the ground turkey and break it up into smaller pieces. Continue to stir until the turkey is golden brown (about 5 to 7 minutes).
  • Then, add the chicken broth, chopped collard greens, cubed potatoes, and seasonings. Stir it all together and bring the soup to a boil.
  • Once the soup reaches a boil, lower the heat to a low medium and simmer for 10-15 minutes until the potatoes are fork tender.
  • At the end, pour in the coconut milk and sprinkle with red pepper flakes.

Similar Recipes

chicken soup

One Pot Mexican Chicken Soup

beef cabbage stir fry

One Pot Ground Beef Cabbage Stir Fry

chicken pesto

Skillet Chicken Pesto and Peppers

You Might Also Like

Frequently Asked Questions

Can I use frozen vegetables?

Yes, most frozen vegetables are already pre-cooked, so the cooking time may be reduced. We love using broccoli florets instead of collard greens for this recipe and also add frozen cauliflower rice to thicken the soup. 


What can I serve with this soup?

This recipe can be served with a side salad or toasted sourdough bread. We also like getting breadsticks from the local bakery.


What else can I add to this soup?

You can also add legumes such as navy beans. They are mild flavored, dense, and smooth, and are an excellent source of dietary fiber and protein.

Posted on Leave a comment

Baked Breakfast Egg Stuffed Peppers

egg stuffed bell peppers

Baked breakfast stuffed peppers are perfect for a low-carb breakfast, brunch, or even as an afternoon snack.

This post may contain affiliate links. Please see our privacy policy for details.

Calories: 528kcal | Carbohydrates: 21g | Protein: 17g | Fat: 44g | Saturated Fat: 8g | Polyunsaturated Fat: 7g | Monounsaturated Fat: 27g | Trans Fat: 0.04g | Cholesterol: 327mg | Sodium: 1109mg | Potassium: 966mg | Fiber: 9g | Sugar: 3g | Vitamin A: 976IU | Vitamin C: 124mg | Calcium: 100mg | Iron: 3mg

White round plate with a baked yellow bell pepper stuffed with eggs. It is topped off with red harissa sauce and green pesto and slice avocado.

We love the natural sweetness of bell peppers, and using them as a vessel to bake eggs in them is an added bonus! And to level it up, we are topping it off with bold flavors such as harissa and pistachio pesto.

The PrepYoSelf Newsletter

Egg Stuffed Pepper Ingredients

Savory breakfast is definitely something we look forward to in the mornings. And it’s even better when it’s nutritious and flavorful in one bite. Here are the ingredients we used for our egg-stuffed peppers:

  • Bell Peppers: You can use any color of your choice. Green bell peppers are slightly more bitter, while the yellow, orange and red bell peppers are sweeter. Red bell peppers also are more nutrient-dense.
  • Eggs: We used 2 eggs per pepper half, however, depending on the size of your peppers, you may just need 1 egg.
  • Harissa: We used harissa to add some heat and smoky flavors, but you can easily use another kind of chili sauce such as sriracha. 
  • Pistachio Pesto: We made our pistachio pesto from scratch, however, you can use any kind of store-bought pesto such as basil pesto.
  • Avocado: To add some healthy fat, we added sliced avocado on top.

White round plate with a baked yellow bell pepper stuffed with eggs. It is topped off with red harissa sauce and green pesto and slice avocado.

How to Make Breakfast Egg Stuffed Peppers

  1. Preheat the oven to 400F.
  2. Using a chef’s knife, slice the bell pepper in half. Remove the inner ribs and seeds of the peppers.
  3. Lay the peppers cut side up on the baking sheet and crack the eggs into the pepper halves.
  4. Bake in the oven until the egg whites are firmly set.
  5. Top it off with harissa sauce, pesto, and sliced avocados.

Reference the recipe card below for detailed instructions.

Meal prep container storing a baked yellow bell pepper stuffed with eggs. It is topped off with red harissa sauce and green pesto and slice avocado.

Meal Prep Tips for Egg Stuffed Peppers:

  • Other Prep Methods: You can also cook this in a small toaster oven or in the Air Fryer (cook at 360F for 10-12 minutes).
  • Storage: Store them in an air-tight container in the refrigerator for up to 3 to 4 days. You can also freeze them and store them in the freezer for up to 3 months for the best quality. However, we recommend you don’t slice the avocado in advance. Wait to slice the avocado when you are ready to eat the peppers to prevent them from browning too early.
  • To Reheat: Heat them in the microwave until they warm through.

Glass meal prep containers storing a baked yellow bell pepper stuffed with eggs. It is topped off with red harissa sauce and green pesto and slice avocado.

Egg Stuffed Peppers

Oven Baked Breakfast Egg Stuffed Peppers

These egg stuffed peppers are topped with a flavorful harissa sauce and pistachio pesto perfect for a low carb breakfast or snack.
No ratings yet
Prep Time 5 minutes
Cook Time 15 minutes
Course Breakfast
Cuisine American
Servings 2
Calories 528 kcal

Equipment

  • knife
  • cutting board
  • blender
  • sheet pan
  • oven

Ingredients
  

Stuffed Pepper

  • 4 large eggs
  • 1 yellow bell pepper
  • 1 avocado
  • 1/4 teaspoon salt
  • 1 tablespoon harissa sauce

Pistachio Pesto

  • 1/4 cup pistachios (shelled)
  • 2 tablespoons olive oil
  • 4 tablespoons green onions (chopped)
  • 2 garlic cloves (peeled)
  • 1/2 teaspoon salt

Instructions
 

  • Pre-heat oven to 425F. Cut the bell pepper in half lengthwise and remove the ribs and seeds
  • Place the bell peppers on a sheet pan. Crack two eggs into each pepper half and season with salt. Bake in the oven for 12 to 15 minutes or until the egg whites have set.
  • While the peppers bake, use blender to blend together the pistachio, green onions, garlic, olive oil, and salt into a chunky paste. Or you can use a sharp knife to finely chop the ingredients
  • After the peppers cook, top off each pepper with a teaspoon of harissa sauce and pistachio pesto. Feel free to add more to your liking. And don't forget to enjoy them with avocado slices!

Notes

Nutrition information provided is an estimate. It will vary based on cooking method and specific ingredients used. Please consult with your healthcare provider for specific dietary needs. To gain a better understanding, explore our nutrition disclaimer here

Nutrition

Calories: 528kcalCarbohydrates: 21gProtein: 17gFat: 44gSaturated Fat: 8gPolyunsaturated Fat: 7gMonounsaturated Fat: 27gTrans Fat: 0.04gCholesterol: 327mgSodium: 1109mgPotassium: 966mgFiber: 9gSugar: 3gVitamin A: 976IUVitamin C: 124mgCalcium: 100mgIron: 3mg

Similar Recipes

fried egg and sausage hash

Fried Egg with Apple and Sausage Hash

Easy Cheese Omelette

easy sausage egg muffins

Sausage Egg Muffins with Strawberries

You Might Also Like

Frequently Asked Questions

What is harissa?

Harissa is a chile sauce that is made from dried red-chiles, garlic, citrus, and warm spices such as cumin, coriander, caraway seeds, and olive oil. They are a perfect way to perk up the flavor for your eggs.


What is pesto?

Pesto is a sauce that combines crushed herbs, nuts, garlic, and olive oil. You can serve it with pasta, use it as a spread for sandwiches. The sauce can easily brighten up the flavor of a simple dish.


Are bell peppers keto-friendly?

Yes, bell peppers are low in carbs and they can be a great vegetable option to add when planning ingredients for your keto meals.

Posted on Leave a comment

Sheet Pan Shrimp and Cauliflower with Corn

shrimp and corn

Easy Sheet Pan Shrimp with a corn and cauliflower bake that is ready in less than 20 minutes!

This post may contain affiliate links. Please see our privacy policy for details.

Wood plate with roasted shrimp, corn, cauliflower, and green onions.

This sheet pan lunch is a lighter version of a shrimp boil that makes it an easy weekday meal prep.

Here’s What We Love About This Pan Shrimp Recipe

  • We’ve got traditional ingredients such as shrimp and corn, but instead of potatoes that you often find in boil recipes, we used cauliflower for a lower carb option.
  • We also used corn kernels rather than corn on the cob so that you can just scoop it up easily with a fork without having to get your hands dirty.
  • Everything cooks at the same time in this pan shrimp recipe, making it a quick, easy, and flavorful prep when you are crunched for time.

The PrepYoSelf Newsletter

Here’s What You’ll Need

  • Shrimp: You can either use fresh or frozen shrimp. If you cook frozen shrimp, be sure to thaw it out in the refrigerator first before cooking, otherwise, it will get watery when it cooks in the oven
  • Corn Kernels: We choose frozen corn, however, you can use fresh corn on the cob if you prefer the traditional way to cook corn in a boil.
  • Cauliflower: You can also swap with another low-carb vegetable such as yellow squash or zucchini
  • Garlic and Green Onions: These aromatics add bold flavors to this simple dish
  • Seasonings and Olive Oil: We used garlic powder, chili powder, paprika, and salt. However, you can also use old bay seasoning or any pre-mixed seafood seasoning.

Wood plate with roasted shrimp, corn, cauliflower, and green onions.

How to Make This Tasty Shrimp “Boil” Bake

  1. Pre-heat the oven to 400F.
  2. Place the shrimp and veggies on a sheet pan.
  3. Sprinkle the ingredients with seasoning and drizzle with olive oil.
  4. Bake in the oven until fully cooked.

Reference the recipe card below for detailed instructions.

Glass meal prep containers with roasted shrimp, corn, cauliflower, and green onions.

Meal Prep Tips for Shrimp “Boil” Bake

  • Air Fryer Tip: You can also cook these ingredients in an Air Fryer. Cook it at 360F for 8-10 minutes
  • Stove Top Tip: If you prefer the stovetop, you can saute these ingredients in a skillet. Add oil to a hot pan and start with the cauliflower florets until they get tender. Then add the shrimp, followed by the corn. Add the seasonings and sprinkle with lemon juice at the end. Garnish with green onions.
  • Ingredient Tips: If you want to add more flavor, you can top it off with other fresh herbs such as basil, fresh cherry tomatoes, or sliced shallots.
  • To Serve: Pair this meal with a crispy, fresh green salad, buttery rice pilaf, or with flour tortillas

Glass meal prep containers with roasted shrimp, corn, cauliflower, and green onions.

Shrimp and Cauliflower

Sheet Pan Shrimp and Cauliflower with Corn

Simple sheet pan meal loaded with sweet corn, cauliflower, and shrimp. All ingredients baked together so that you can have it ready in no time.
No ratings yet
Prep Time 5 minutes
Cook Time 15 minutes
Course dinner, Main Course
Cuisine American
Servings 2

Ingredients
  

  • 8 oz shrimp (peeled and deveined)
  • 2 cups cauliflower florets
  • 1 cup corn
  • 2 tablespoons garlic (minced)
  • 2 tablespoons green onions (chopped)
  • 1/4 teaspoon garlic powder
  • 1/4 teaspoon salt
  • 1/4 teaspoon chili powder
  • 1/4 teaspoon paprika
  • 1 lemon (juiced)
  • 1 tablespoon olive oil

Instructions
 

  • Pre-heat oven to 400F. Place the shrimp and veggies on a sheet pan.
  • Sprinkle the seasonings and minced garlic on top. Coat everything with olive oil.
  • Bake in the oven for 12 to 15 minutes.

Similar Recipes

fish and creamed corn

Pan-Fried Tilapia with Creamed Corn

cajun tilapia

CajunTilapia with Roasted Broccolini and Potatoes

bean and corn taco

Black Bean and Corn Soft Tacos

You Might Also Like

Frequently Asked Questions

Can I use cauliflower rice?

Yes, cauliflower rice works well here.


How long can I store leftovers?

You can store it in an airtight container in the refrigerator for up to 3 to 4 days. 


What can I substitute for shrimp?

You can use any kind of protein such as sliced sausage, cubed chicken, and even cubed salmon. Just be sure that the pieces are small enough (about a 1-inch cube) so that all the ingredients cook through at the same time.

Posted on Leave a comment

Sauteed Ground Beef with Spring Veggies

ground beef

A healthy and savory blend of ground beef and colorful vegetables cooked all in one skillet. Good ground beef recipes are so versatile.

This post may contain affiliate links. Please see our privacy policy for details.

Round plate with sauteed ground beef, yellow squash, peas, and carrots.

You can’t really go wrong with savory ground beef browned in a skillet. All you need is budget-friendly ingredients and seasonings and you have an easy and delicious meal ready in less than 20 minutes.

The PrepYoSelf Newsletter

Why is this easy ground beef recipe great any time of the year?

  • You can pair it with any local, seasonal veggies you have on hand.
  • Pick from fresh, frozen, canned, or even a combination of all.
  • You just need a few seasonings to enhance the simple ingredients to bring it all together.

Round plate with sauteed ground beef, yellow squash, peas, and carrots.

Ingredients and Variations

  • Ground Beef: We used lean ground beef, but you can also use ground turkey or ground chicken.
  • Peas and Carrots: Frozen peas and carrots are a great staple to have in your freezer at all times. You can use them in soups, on top of salads, or in any skillet dish just like this.
  • Yellow Squash: Squash is a budget-friendly ingredient that is low in calories and it adds great bright colors to any dish
  • Seasonings: We used Italian seasoning, paprika, garlic powder, and salt
  • Olive oil: Keep it heart healthy with olive oil, and you can also use avocado oil

Glass meal prep containers with sauteed ground beef, yellow squash, peas, and carrots.

How to Make Sauteed Beef with Vegetables

  • Add oil to a hot pan and saute onions until they soften
  • Brown your beef and add the seasonings
  • Finally, add the peas, carrots, and yellow squash and cook until tender

Reference the recipe card below for detailed instructions.

Glass meal prep containers with sauteed ground beef, yellow squash, peas, and carrots.

Meal Prep Tips for Ground Beef and Veggies

  • Extra flavor: If you want to add more of a savory flavor, add 1/2 cup of tomato sauce or 1 tbsp of tomato paste while you brown the meat.
  • To Serve: Serve this dish with a side of brown rice, on top of a lettuce wrap, or even with a side of mashed potatoes or cauliflower
  • To Reheat: Warm it up in the microwave for a few minutes
  • To Store: Store in an airtight container in the refrigerator for 3 to 4 days

ground beef

Sauteed Ground Beef with Spring Veggies

Quick and Easy Ground Beef and Spring Veggie Skillet that you can prep in less than 20 minutes!
No ratings yet
Prep Time 5 minutes
Cook Time 15 minutes
Course dinner
Cuisine American
Servings 2

Equipment

  • knife
  • cutting board
  • spatula
  • saute pan

Ingredients
  

  • 12 oz lean ground beef
  • 1/4 cup red onions (diced)
  • 1 cup frozen peas and carrots
  • 1 yellow squash (sliced into half rounds)
  • 1/4 teaspoon garlic powder
  • 1/4 teaspoon italian seasoning
  • 1/4 teaspoon paprika
  • 1/4 teaspoon salt
  • 1 tablespoon olive oil

Instructions
 

  • Add oil to a saute pan on medium-high heat and saute the onions until they soften.
  • Next, add the ground beef to the pan and break it up into smaller pieces. Sprinkle in the Italian seasoning, paprika, garlic powder, and salt. Saute for about 5 to 6 minutes until it is golden brown and fully cooked.
  • Finally, add the peas, carrots, and yellow squash. Continue to stir for another 3 to 4 minutes until the veggies are tender.

Similar Recipes

sheet pan sausage

Sheet Pan Sausage and Roasted Veggies

cauliflower rice

Cauliflower Fried Rice

Air Fried Chicken

Crispy Air Fryer “Fried” Chicken

You Might Also Like

Frequently Asked Questions

Can I use other ground meat?

Of course! You can make it with ground chicken, turkey, or even pork.


What other low-carb vegetables can I use with ground beef?

Broccoli, green beans, cauliflower, bell peppers, and asparagus are all great low-carb options to make with sauteed ground beef.


What other seasonings can I use in ground beef recipes?

We often season ours with soy sauce for Asian-inspired dishes or you can use chili powder and cayenne if you are looking for heat. 

Posted on Leave a comment

Air Fryer Orange Soy Glazed Chicken with Broccoli

orange chicken

This sweet and tangy Air Fryer Chicken Thigh recipe is a healthier version of one of our favorite take-out meals.

This post may contain affiliate links. Please see our privacy policy for details.

Round plate with golden brown chicken thighs and crispy broccoli florets.

You can’t go wrong with ordering Orange Soy Chicken for take-out. Those bite-sized chicken pieces, dredged in fried, golden, and crispy batter tossed in a sweet orange sauce are just so full of flavor.

However, it’s also a lot of work making it at home, not to mention the guilt of loaded calories!

But we don’t want to miss out on those great flavors during our weekly meal prep, so we opted for an easier, more budget-friendly version, but with all the same great flavors.

For this recipe, we wanted to keep the crispy textures and decided to prep Air Fryer Chicken Thighs glazed in an orange soy marinade and paired it with broccoli florets.

The PrepYoSelf Newsletter

To Make this Healthy Air Fryer Orange Chicken, You’ll Need

  • Chicken Thighs: This may not be the leanest cut of chicken, but it’s a lower-calorie version than the chicken pieces dredged in flour and deep-fried in oil. But if you really want to keep it clean and lean, you can still make this recipe with chicken breasts or chicken tenderloins.
  • Marinade: We used a mixture of soy sauce, orange juice, honey, garlic powder, and sesame oil.
  • Broccoli: We love chicken and broccoli together, but you can also use other vegetables such as green beans, bok choy, or bell peppers.

Round plate with golden brown chicken thighs and crispy broccoli florets.

How to Prepare Easy Air Fryer Orange Soy Chicken

  1. Mix together your marinade in a bowl, then add the chicken. Make sure the chicken gets fully coated with the marinade.
  2. Next, place the chicken thighs in the Air Fryer and cook them for about 23 to 25 minutes at 360F.
  3. After the chicken cooks, remove it from the Air Fryer and place the broccoli in the Air Fryer. Sprinkle them with seasonings and coat them with sesame oil. Roast at 360F for 5 minutes.

Reference the recipe card below for detailed instructions.

Glass meal prep container with golden brown chicken thighs and crispy broccoli florets.

Meal Prep Tips for Air Fryer Orange Chicken

  • Other cook methods: If you don’t have an Air Fryer, you can bake it in an oven at 425F until it is crispy.
  • To serve: Serve with a side of grains such as brown rice pilaf or soba noodles.
  • Storage: Store in an airtight container in the refrigerator for up to 3 to 4 days for the best quality.
  • To Reheat: Both the chicken and broccoli can be reheated in the microwave.
  • Larger Batch: If you make a larger batch, you can shred the chicken and serve it on top of lettuce or in a lettuce wrap with Asian slaw.

Glass meal prep container with golden brown chicken thighs and crispy broccoli florets.

orange chicken

Air Fryer Orange Soy Glazed Chicken with Broccoli

Here's a home cooked version of tasty orange soy glazed chicken made right in the Air Fryer.
No ratings yet
Prep Time 5 minutes
Cook Time 25 minutes
Course dinner, Main Course
Cuisine American, Asian
Servings 2

Equipment

  • mixing bowl
  • Air Fryer

Ingredients
  

Chicken and Marinade

  • 4 bone in chicken thighs
  • 1/4 cup soy sauce
  • 1 orange (juiced)
  • 1 tablespoon honey
  • 1/2 teaspoon garlic powder
  • 1 tablespoon sesame oil

Broccoli and Seasonings

  • 4 cups broccoli florets
  • 1/2 teaspoon garlic powder
  • 1/4 teaspoon salt
  • 1 tablespoon sesame oil

Instructions
 

  • Place the chicken thighs in a mixing bowl and add the soy sauce, juice of an orange, honey, garlic powder, and sesame oil. Mix it all together making sure the chicken is fully coated.
  • Then, place the thighs in the Air Fryer and cook them at 360F for 23 to 25 minutes (you'll want to make sure it gets nice and crispy). After it cooks, check the temperature with a thermometer making sure it reaches an internal cook temperature of 165F.
  • Next, remove the chicken and place the broccoli in the air fryer. Sprinkle with the seasonings and sesame oil and cook at 360F for 5 minutes.

Notes

If you don’t have an air fryer, place the chicken on a sheet pan and bake it in the oven for 35-40 minutes at 400F. Bake the broccoli florets for 8-10 minutes.

Similar Recipes

chicken kale salad

Grilled Honey Dijon Chicken and Kale Salad

balsamic chicken salad

Oven Baked Balsamic Spinach and Strawberry Salad

chicken salad

Oven Baked Honey Mustard Glazed Chicken Salad

You Might Also Like

Frequently Asked Questions

Can I make orange soy glazed chicken in the oven?

If you don’t have an Air Fryer, you can also bake the chicken in the oven for 35-40 minutes at 400F until it reaches an internal temperature of 165F. Bake the broccoli florets for 8-10 minutes.


Is this recipe gluten-free?

Yes, we do not use any flour in this recipe like the classic take-out recipes use.


How long do chicken thighs take in the Air Fryer?

If you are cooking it at 360F, it typically takes 23-25 minutes, depending on how thick your chicken thighs are. Use a thermometer to check that it is fully cooked to an internal temperature of 165F.

Posted on Leave a comment

Oven Baked Chicken Fajitas with Mango Salsa

chicken fajitas

This post may contain affiliate links. Please see our privacy policy for details.

Sheet pan chicken fajitas are the fastest dinner you can make with tender chicken, and colorful veggies, and it’s an easy clean-up!

Plate with chicken fajitas, mango salsa, and colorful bell peppers and onions served with tortillas.

Why We Love This Oven Baked Chicken Fajitas

  • There is no need to spend extra dollars at a restaurant for your weeknight dinner.
  • This easy fajita dinner is budget-friendly and super tasty.
  • You can bake everything in one pan and you get juicy chicken with sweet roasted peppers and onions, and the oven does all the work.

The PrepYoSelf Newsletter

To Make Easy Baked Chicken Fajitas, You’ll Need

  • Chicken Tenderloins: You can also use chicken breasts or boneless chicken thighs
  • Bell Peppers and Onions: These ingredients add flavor and lots of color to the dish
  • Fajita Seasoning: We made our own mixture, however, you can also use pre-mixed seasonings
  • Tortillas: Serve it up with your flour tortillas or corn tortillas. There are also low-carb options and vegetable options such as jicama tortillas if you are keeping it keto-friendly
  • Mango Salsa: We love adding fruit to our salsa, especially if we have extra on hand. Other tasty toppings you can add are guacamole, pico de gallo, cheese, or sour cream

Plate with chicken fajitas, mango salsa, and colorful bell peppers and onions served with tortillas.

How to Cook Chicken Fajitas in the Oven

  1. Preheat the oven to 400F.
  2. Mix together your seasonings in a small bowl.
  3. Place the chicken tenderloins on one side of the sheet pan and the sliced peppers and onions on the other side.
  4. Coat all the ingredients with olive oil and sprinkle them with the seasonings.
  5. Bake everything in the oven until the chicken is fully cooked.
  6. Meanwhile, prepare the Mango Salsa and other toppings.

Reference the recipe card below for detailed instructions.

Glass meal prep container with chicken fajitas, mango salsa, and colorful bell peppers and onions served with tortillas.

Meal Prep Tips for Baked Chicken Fajitas

  • Large Batches: If you decide to increase the batch size, you can serve the fajita chicken and veggies on top of a salad or serve it in a lettuce wrap or with a side of Spanish rice and beans.
  • Other Recipe Ideas: You can also add veggie fajitas with breakfast tacos. Make pasta with the chicken and bell peppers simply by adding them to penne pasta, and adding shredded parmesan cheese.
  • Storage: Store in an airtight container in the refrigerator for up to 3 to 4 days for the best quality.

Glass meal prep containers with chicken fajitas, mango salsa, and colorful bell peppers and onions served with tortillas.

chicken fajitas

Oven Baked Chicken Fajitas with Mango Salsa

Budget-Friendly and flavorful chicken fajitas baked in the oven in less than 30 minutes!
No ratings yet
Prep Time 5 minutes
Cook Time 20 minutes
Course lunch, Main Course
Cuisine Mexican
Servings 2

Equipment

  • knife
  • cutting board
  • sheet pan
  • oven

Ingredients
  

Chicken & Seasoning

  • 12 oz chicken tenderloins
  • 1/4 teaspoon chili powder
  • 1/4 teaspoon cumin
  • 1/4 teaspoon garlic powder
  • 1/4 teaspoon paprika
  • 1/4 teaspoon salt
  • 1 tablespoon olive oil
  • 4 low carb tortillas

Fajita Veggies & Seasoning

  • 1 red bell pepper (sliced)
  • 1/4 cup red onions (sliced)
  • 1/4 teaspoon paprika
  • 1/4 teaspoon garlic powder
  • 1/4 teaspoon salt
  • 1 tablespoon olive oil

Mango Salsa

  • 1 mango (peeled and diced)
  • 1/4 cup cilantro (chopped)
  • 1/4 cup red onions (diced)
  • 1 cup cherry tomatoes (sliced)
  • 1 lime (juiced)
  • 1/4 teaspoon garlic powder
  • 1/4 teaspoon salt

Instructions
 

  • Pre-heat the oven to 400F. Place the chicken tenderloins, sliced bell peppers, and sliced onions on a sheet pan. Sprinkle them with the seasonings and coat them with olive oil
  • Bake in the oven for 20 minutes until the chicken is fully cooked and reaches an internal temperature of 165F. (cook for an additional 5 minutes until it reaches the internal temperature of 165F)
  • Meanwhile, add the diced mango, cilantro, red onion, and cherry tomatoes in a mixing bowl. Add the seasonings, juice of a lime, and mix everything together
  • After the chicken cooks, layer the chicken tenderloins in the middle of the tortillas and top it off with the fajita veggies and fresh mango salsa. Enjoy this beautiful colorful and tasty dish!

Similar Recipes

cilantro chicken

Cilantro Lime Chicken Salad with Strawberry Salsa

sweet and sour chicken wings

Air Fryer Sweet and Sour Chicken Wings

stuffed primavera chicken

Primavera Stuffed Chicken Breasts

You Might Also Like

Frequently Asked Questions

Is chicken fajita healthy?

Yes, baking it in the oven is one of the healthiest ways to make chicken fajitas because this recipe uses healthy fat, lean meat, and healthy vegetables.


What goes well with fajitas?

Serve it with a cilantro corn salad, avocado salad, or baked black beans.


How do you cut chicken breast for fajitas?

If you are using chicken breasts instead of tenderloins, you will want to let the cooked chicken rest before slicing it into thin strips. Slice it the chicken breasts horizontally into ½-inch thick slices.

Posted on Leave a comment

Easy Cheese Omelette

cheese omelette

Learn how to make a perfectly cooked egg omelette with these easy tips and tricks in this recipe for one.

This post may contain affiliate links. Please see our privacy policy for details.

White round plate with an omelette garnished with fresh tomatoes and green onions, recipe for one.

Why you’ll enjoy this omelette recipe for one:

Omelettes are one of our go-to breakfast choices at our favorite local diners, but they are also just easy to make at home. There are so many ways to fill and flavor your omelette. The great thing is that you can easily add whatever veggies and protein you have in your fridge.

The PrepYoSelf Newsletter

Here are the Ingredients You’ll Need:

For this recipe for one, we will use simple ingredients to teach you the basics of how to make an omelette.

  • Eggs: While most diners and restaurants build large-size omelettes using 3 to 5 eggs per serving, we are sticking to 2 large eggs per serving. That’s enough to fill the omelette and is a good portion size for your weekly meal prep.
  • Filling: We are using cheese, however, you can easily add other meat proteins such as breakfast sausage or turkey crumbles
  • Olive Oil: If you’re not using a non-stick pan, you’ll want to grease your pan with oil or cooking spray so that the eggs don’t stick

White round plate with an omelette garnished with fresh tomatoes and green onions, recipe for one.

How to Make an Omelette for One:

  1. Whisk the egg: Crack the eggs in a mixing bowl and whisk the eggs until you break up the egg yolks so that there is a more smooth mixture with the egg whites. 
  2. Add Seasonings: Since the cheese filling already contains a sufficient amount of sodium, we are seasoning the omelette with just a pinch of salt. However, you can easily add other seasonings such as garlic powder, paprika, or pepper.
  3. Heat the Skillet: Heat oil over medium heat in the non-stick skillet. You’ll want to pour just enough to cover the bottom of the skillet. (Make an additional batch as needed)
  4. Cook the eggs: Allow the eggs to set up for a minute, then take a spatula and gently push the firm portions toward the center of the skillet. Gently lift the skillet and tilt it in a circular motion to allow the runny portion of the eggs to flow into the empty edges of the pan.
  5. Add fillings: When most of the eggs are firmly set, add your fillings and use the spatula to fold the omelette in half.

Reference the recipe card below for detailed instructions.

Meal Prep Tips for Cheese Omelettes:

  • Adding Liquid: When you whisk your eggs, you can also add 1 to 2 teaspoons of milk, half and half, or heavy cream per egg. Adding the milk gives it a slightly richer taste.
  • Adding Vegetables: When adding vegetables, make sure they are chopped into small pieces. Be sure to saute them first, otherwise, they will become watery and make the center of the omelette soggy as it cooks through.
  • Adding oil: You can use olive oil or cooking spray, but if you want to enhance the flavor, frying the omelette with a small teaspoon of butter will give it a nuttier taste and a more golden brown surface that is classic for most diner-style omelettes.
  • To Serve: Enjoy these with fresh fruit. You can also add sliced avocado for healthy fat.
  • Storage: The eggs can be stored in an airtight container in the refrigerator for up to 3 to 4 days.
  • To Reheat: Heat them in the microwave until they warm through.

Glass meal prep containers storing a folded omelette with fresh tomatoes and green onions, recipe for one.

Omelette

Cheese Omelette

Cooking an omelette for yourself at home can be easy with these few quick steps.
No ratings yet
Prep Time 5 minutes
Cook Time 10 minutes
Course Breakfast
Cuisine American
Servings 2

Equipment

  • knife
  • cutting board
  • mixing bowl
  • whisk
  • 6 inch omelette pan
  • spatula

Ingredients
  

  • 4 large eggs
  • 1/2 cup shredded cheddar cheese
  • 1/2 cup cherry tomatoes (sliced)
  • 1 tablespoon green onions (chopped)
  • 1 tablespoon olive oil
  • 1/8 teaspoon salt (or to preferred taste)

Instructions
 

  • Add olive oil to a pan on medium heat making sure it coats the bottom of the pan.
  • Whisk the eggs in a bowl. Pour the egg mixture into the heated pan. Tilt the pan around to spread it to the edge of the pan. Let the eggs heat through and firm up. Use the spatula to gently push the sides toward the middle, letting the liquid egg flow to the edge of the pan.
  • Let the eggs cook for another 2 to 3 minutes and sprinkle the top of the eggs with the shredded cheese. Gently fold the omelette in half in a moon shape and cook for another 30 seconds to let the cheese melt
  • Garnish with fresh green onions and top it off with freshly sliced cherry tomatoes.

Similar Recipes

fried egg and sausage hash

Fried Egg with Apple and Sausage Hash

egg stuffed bell peppers

Oven Baked Breakfast Egg Stuffed Peppers

easy sausage egg muffins

Sausage Egg Muffins with Strawberries

You Might Also Like

Evolution Fresh Organic Pure 100% Cold-Pressed Orange Juice

Setton Farms Dry Roasted and Salted Pistachios

Filippo Berio Pesto, Classic Basil

Frequently Asked Questions

What is the best cheese for an omelette?

We like to use shredded cheddar or mozzarella cheese. If you want to make a specialty omelette, use gruyere or feta cheese.


What to serve with an omelette?

You can have it with roasted diced potatoes or bell peppers. Serve it up with a side of salsa or pico de gallo.


What can you use for omelette fillings?

We love sauteed mushrooms or spinach. Instead of bacon, we often use chopped turkey deli meat for less fat or prosciutto slices.