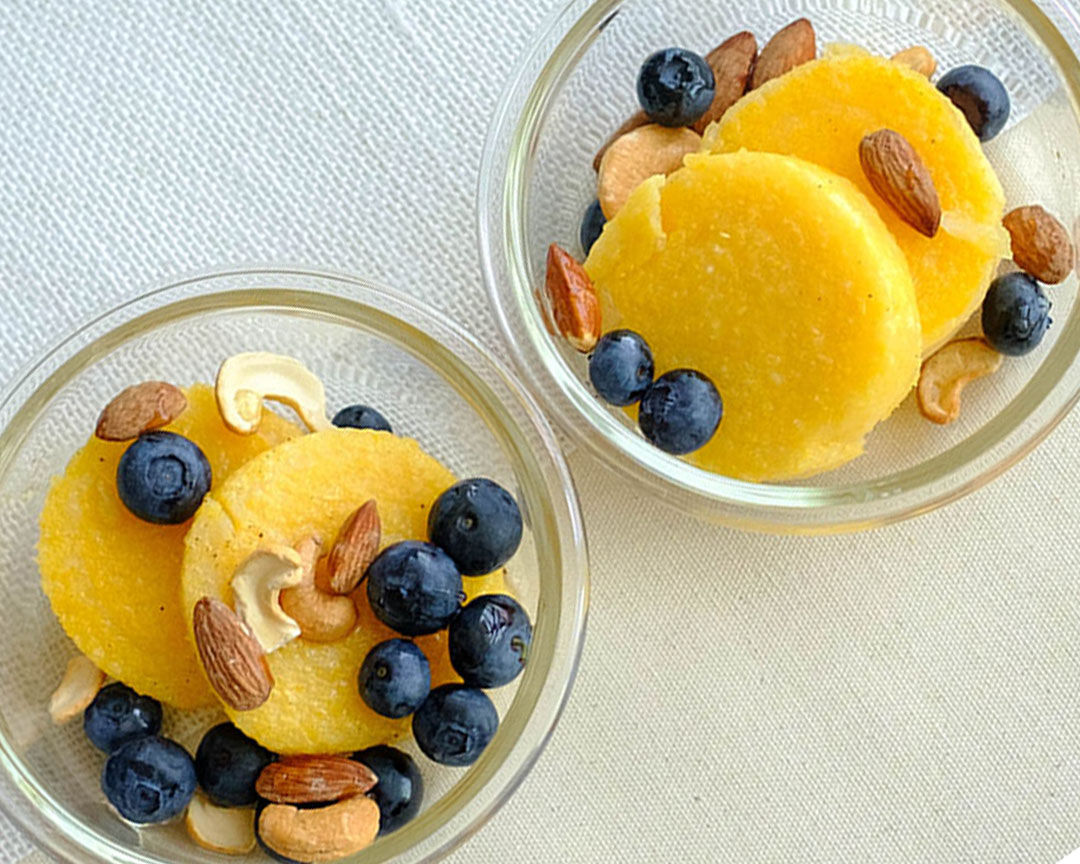
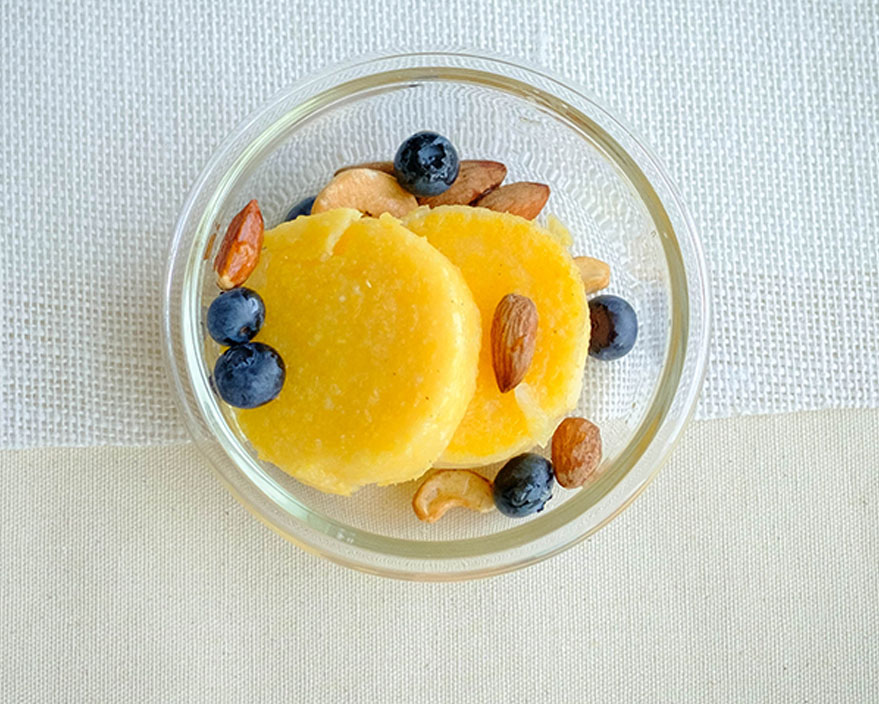
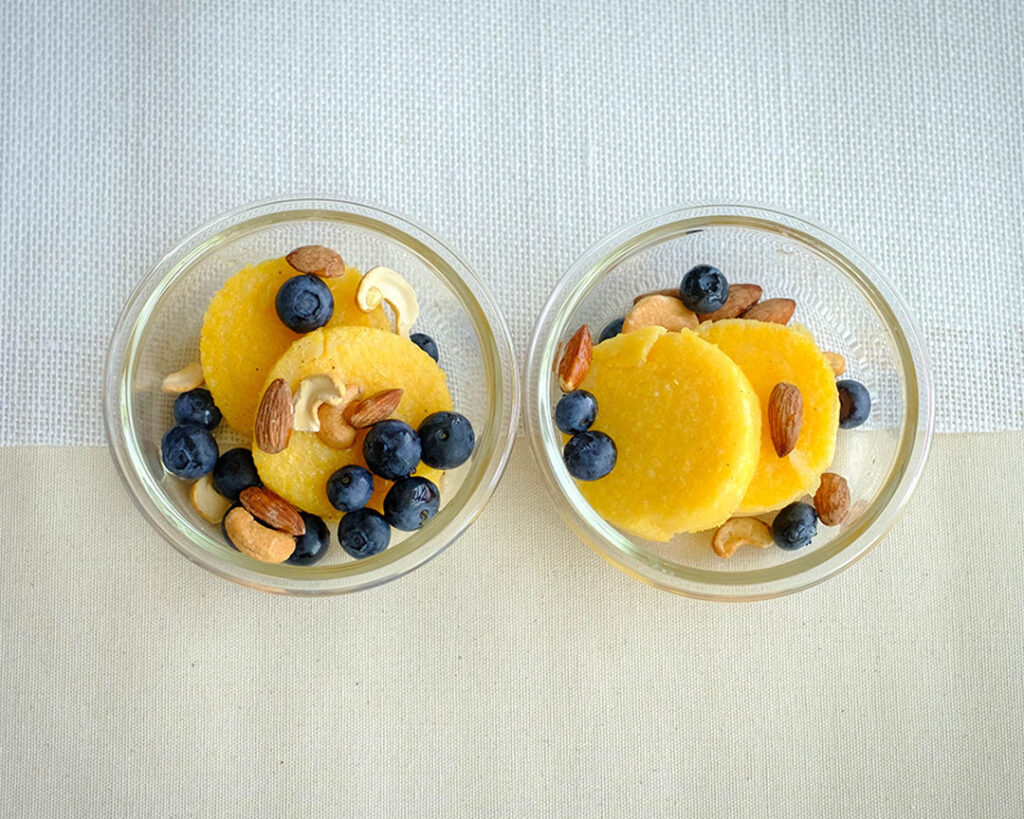
Posted on

Meal Prep Salmon With Butternut Squash Noodles

This meal prep Baked Salmon with Parmesan Butternut Squash Noodles is easy and simply perfect for a light and refreshing weekday lunch. It’s a great low carb meal with minimal ingredients that you can make in less than 20 minutes.

Easy of Making: Easy

When it comes to eating healthy, it’s all about including a balance of proteins, veggies, smart carbs, and healthy fats. This meal delivers a powerhouse of nutrients that will help you meet your health goals.

Salmon is a great source of protein that will help you keep full longer. It is also rich in healthy fats such as Omega-3 Fatty acids which may promote weight loss and decrease belly fat. Salmon is also high in B Vitamins which is important in helping the food you eat into energy, creating and repairing DNA, and reducing inflammation that can lead to heart disease. It is also tasty, versatile, and widely available. 

This baked salmon is paired with a superfood medley of butternut squash spirals, cherry tomatoes, and arugula. Butternut squash is a low calorie, low carb, a sweet, and nutty ingredient that makes a great addition to many savory recipes and is packed with vitamins, minerals, fiber, and antioxidants. Antioxidants help prevent cellular damage and reduce inflammation which may reduce your risk of several chronic diseases. 

To add flavor and pack it with even more nutrients, we mixed it in with arugula that has a distinctive peppery flavor and a great source of calcium and folate. The addition of tart flavors from the cherry tomatoes pair well with the savory and nutty flavors of this recipe.

So not only is this recipe tasty, but it is also packed with nutrients to help you meet a healthy and balanced diet.

Meal Prep Tips for Baked Salmon with Parmesan Butternut Squash Noodles:

How to pick the right salmon:

There are several types of salmon, such as pink salmon, red salmon, and Atlantic salmon. Any of these types can taste delicious in the oven. 

You do however want to make sure you choose a filet with firm flesh when you are buying at the store. When you gently press the fillet with your finger, it should spring back. You also want to avoid any fish that are dark around the edges or brown/yellow discoloration. And be sure to smell the fish. It should smell like saltwater or the sea smell and not have a strong fishy smell.

Baking salmon delivers soft, juicy, and tender salmon on the inside with crispy edges. 

The key to evenly cooking the fish is to let it sit on the counter for a few minutes until it comes to room temperature, otherwise, other parts of the fish might overcook while the other parts are still raw.

How to use frozen salmon:

If you are using frozen fish, be sure to let it defrost in the refrigerator overnight and also allow it to come to room temperature before baking.

The great thing about salmon is that you don’t need a lot of seasonings to make it taste good. However, you don’t want to add salt too early, otherwise, it will draw out the moisture if left for an extended period of time. For best results, salt the salmon right before you place it in the oven to cook.

Fish cooks fairly quickly, however, cook time will vary depending on the thickness. The thickest part of the salmon should look opaque and the layers within the salmon should flake apart easily.

Baked Salmon with Parmesan Butternut Squash Noodles

This Baked Salmon with Parmesan Butternut Squash Noodles is easy and simply perfect for a light and refreshing weekday lunch. It’s a great low carb meal with minimal ingredients that you can make in less than 20 minutes.
No ratings yet
Prep Time 5 minutes
Cook Time 15 minutes
Course Main Course
Cuisine American, Italian
Servings 2

Ingredients
  

Salmon

  • 12 oz salmon
  • 1/2 tsp garlic powder
  • 1/2 tsp onion powder
  • 1/2 tsp salt
  • 1/2 tsp red chili pepper flakes
  • 1 tbsp olive oil

Squash Noodles

  • 10 oz butternut squash noodles
  • 1 cup cherry tomatoes
  • 2 cups arugula
  • 1 tsp minced garlic
  • 1 tsp garlic powder
  • 1 tsp salt
  • 1 tbsp olive oil
  • 1/4 cup shredded parmesan cheese (optional)

Instructions
 

Pre-Cook (Mise En Place):

  • Gather your equipment: cutting board, knife, sheet pan, parchment paper, skillet, tongs
  • Pre-heat oven to 400F
  • Mince garlic, slice cherry tomatoes in half
  • Marinate the salmon with the seasonings and olive oil. Place on sheet pan lined with parchment paper

Cooking Method:

  • Place salmon in the oven and bake it for 10-15 minutes
  • Add olive oil to a skillet on medium high heat. Saute the garlic and butternut squash noodles for 3 to 5 minutes. Add seasonings and continue to stir until butternut squash is tender
  • Add fresh tomatoes and arugula
  • Top off the noodles with shredded parmesan cheese
  • Serve the salmon on top of the noodles. Eat and enjoy!

Video

If you love this recipe, check out these other recipes we know you’ll love too:

Posted on

Easy Caribbean Chicken And Rice In The Oven

Oven-baked chicken and rice was a staple growing up in my household. I mean who doesn’t love baked chicken? My parents would whip up mouthwatering baked chicken thighs seasoned in a tasty rub served on top of fluffy soft rice. 

Ease of Making: Medium

This chicken and rice recipe adds an island flair using Caribbean spices such as allspice and cayenne pepper. It is served on top of turmeric-infused rice pilaf with sautéed aromatics such as onions, bell peppers, and minced garlic. 

And my favorite part of the dish is pairing it with diced pineapple. The sweet and tart flavors of the pineapple pair well the savory and spicy flavors of the Caribbean species. 

This is definitely a dish that is vibrant and full of flavor and a great twist on chicken and rice. 

Meal Prep Tips for Caribbean Chicken and Rice Recipe

Many recipes normally start with searing chicken on the stovetop and rendering out the fat to get it crispy and golden brown.

For this recipe, there is no need for that extra step because the seasoned chicken will roast in a hot oven and the oven will do all the work. 

If you want to keep it low fat, remove the skin or you can use boneless chicken breasts or boneless chicken thighs instead of chicken thighs in this recipe. Just be sure to reduce the amount of time you cook the chicken by about 10-15 minutes. Use a thermometer to make sure that the chicken has cooked to an internal temperature of 165F,

What rice should I use?

Long grained white rice is what you normally would use for rice pilaf, but you can also swap it out for brown rice or barley which are great whole grain options. If you want to keep it low carb, then use cauliflower rice as an option.

Caribbean Chicken with Turmeric Rice Pilaf

This recipe adds an island flair using Caribbean spices such as allspice and cayenne pepper. It is served on top of turmeric-infused rice pilaf with sauteed aromatics such as onions, bell peppers, and minced garlic.
No ratings yet
Prep Time 5 minutes
Cook Time 50 minutes
Course Main Course
Cuisine Caribbean
Servings 4

Equipment

  • knife
  • cutting board
  • roasting rack
  • sauce pan
  • spatula

Ingredients
  

Chicken

  • 1 cup pineapple chunks (can use fresh, frozen, or canned)
  • 4 each leg quarters
  • 1/4 tsp garlic powder
  • 1/4 tsp paprika
  • 1/4 tsp ground all spice
  • 1/4 tsp nutmeg
  • 1/8 tsp cayenne pepper
  • 1 tsp brown sugar
  • 1/2 tsp salt
  • 1/2 tsp pepper
  • 1 tbsp olive oil

Rice Pilaf

  • 1 cup uncooked long-grained rice (for low carb option: use 4 cups of cauliflower rice)
  • 2 cups water (omit if using cauliflower rice)
  • 1/2 cup white onions (diced)
  • 2 each garlic cloves (minced)
  • 1/4 cup red bell pepper (diced)
  • 1/4 cup green onions (chopped)
  • 1/4 tsp turmeric
  • 1/4 tsp garlic powder
  • 1/2 tsp salt
  • 1 tbsp olive oil

Instructions
 

  • Pre-heat oven to 400F. Marinate the chicken with the seasonings and coat with olive oil
  • Place the chicken in the oven for 35-45 minutes. Cook until it reaches an internal temperature of 165F.
  • Meanwhile, prepare the rice pilaf. Add oil to a saucepan on medium-high heat.
  • Add the onions to the pot and saute until it softens and turns translucent, then add the garlic, bell peppers.
  • Next, add the rice and seasonings. Mix well until the rice is toasted and fully coated with the seasonings. Then add the green onions.
  • Pour in the water and bring it to a boil. Once it reaches a rolling boil, reduce the leat to low heat and let it simmer. Cover the pot with a lid and let it cook for 15-20 minutes until the rice is tender. (Note: If you are using cauliflower rice, omit the water. Just saute the cauliflower rice on medium high heat for about 5 to 7 minutes until it is cooked and tender)
  • Once the rice is cooked, fluff it with a fork.
  • Serve the chicken with the rice pilaf. Top it off with fresh pineapple. Eat and enjoy!

Video

Easy Caribbean Chicken with Turmeric Rice Pilaf. This dish hits all the right spots with notes of sweet and savory flavors, coupled with a delicious rice side.

Notes

Note: After the chicken cooks, you can split the recipe in half and shred half of the chicken meat, and use it as your protein for a lunch salad or in a sandwich.

If you love this recipe, check out these other recipes we know you’ll love too:

Posted on

How To Make Salmon Cakes In A Skillet

This crispy salmon cake recipe is a healthy meal prep protein option. Canned foods often get a bad rep, however canned salmon can be very nutrient-dense. One serving can provide up to 16 grams of protein, heart-healthy fats, and multiple micronutrients. 

Ease of Making: Easy

Growing up we used a lot of canned tuna, so using canned salmon in this recipe is a great switch. Eating salmon has been linked to anti-inflammatory properties, brain, heart, and bone health and due to its high protein content helps you stay feeling full longer.

And yes, canned salmon can be higher in sodium, however, pairing them with fresh veggies such as this corn and arugula salad can lighten it up and make it part of a healthy balanced meal.

Arugula has a distinctive peppery taste unlike other salad greens adding another flavor component. Adding other sweeter tasting veggies such as corn and red bell peppers can complement the flavors. Arugula is actually part of the cruciferous family such as Brussel sprouts and broccoli and is known to have high cancer-fighting agents. This high fiber salad option is low in sugar, calories, carbohydrates, and fats and has vital nutrients that help support the immune system. 

Meal Prep Tips for Pan-Fried Salmon Cakes recipe with Corn and Arugula Salad

One of my favorite things about cooking is the ability to be creative and take food and transform it by simply adding a few ingredients and changing the flavor profiles. Take this canned salmon, for example. Canned fish often has a really fishy profile, but making them into salmon cakes with other ingredients can definitely upgrade a simple can of salmon. 

First, be sure to drain the can before placing the salmon into a mixing bowl. Then you’ll want to add your choice of veggies. I like to use bright colored veggies such as red bell peppers, red onions, and green onions. 

Then, you will want to include some sort of binder such as breadcrumbs, mayonnaise, and dijon mustard to keep the patties packed together to keep it from crumbling when you pan fry them in the pan. Add your choice of seasonings and spices and mix it all together until it forms a paste-like texture.

You can use your hands to form the patties into balls and then flatten them in the pan, but a great tool to use is a small 2 oz ice cream scoop. I use this tool anytime I have to scoop and portion out for recipes. It saves time from having to roll it into a ball and it evenly portions out your serving sizes. 

Place the portioned out balls into the hot pan and use your spatula to flatten them out into patties. Have a plate lined with a paper towel to help drain the excess oil. Afterward, serve this salmon cake recipe on top of fresh greens with other veggies such as sweet corn.

Salmon Cakes With Corn and Arugula Salad

These crispy salmon patties are a healthy meal prep protein option. Canned foods often get a bad rep, however canned salmon can be very nutrient-dense. One serving can provide up to 16 grams of protein, heart-healthy fats, and multiple micronutrients.
No ratings yet
Prep Time 5 minutes
Cook Time 10 minutes
Course Appetizer, lunch, Main Course
Cuisine American
Servings 2

Equipment

  • knife
  • cutting board
  • spatula
  • saute pan

Ingredients
  

  • 12 oz canned salmon
  • 2 each large eggs
  • 1/4 cup red bell peppers (diced)
  • 1/4 cup red onions (diced)
  • 1/4 cup green onions (chopped)
  • 1/4 tsp salt
  • 1/4 tsp garlic powder
  • 1/4 tsp bay seasoning
  • 1 tbsp mayonnaise
  • 1 tsp dijon mustard
  • 1/4 cup breadcrumbs
  • 1 tbsp olive oil
  • 1 cup corn (frozen or canned)
  • 4 cups arugula salad
  • 4 tbsp choice of salad dressing recommend vinaigrette dressing

Instructions
 

  • Drain canned salmon and defrost the corn if frozen or drain the corn if canned
  • Place the canned salmon in a mixing bowl and crack two eggs. Mix well until eggs are incorporated
  • Next, add the peppers and onions and seasonings. Mix thoroughly
  • Then, add the mayo and dijon mustard and mix well
  • Finally, add the breadcrumbs and mix until the mixture forms a paste like texture
  • Add oil to a saute pan on medium to high heat. Using a 2 oz scoop (about 1/4 cup), scoop out even portions into the pan
  • Then, using a spatula, flatten the scooped salmon mixture into flat patties. Cook for 2 to 3 minutes until it is golden crispy. Flip it over to cook on the other side for about a minute until golden crispy.
  • Remove the patty from the pan and place it on a plate lined with a paper towel to drain the excess oil
  • Serve salmon cakes on top of a bed of arugula salad with corn. Add any additional fresh veggies to your preference and top it off with your choice of dressing. Eat and enjoy!

Video

If you love this recipe, check out these other recipes we know you’ll love too:

Posted on

Homemade Short Rib Noodle Soup Recipe

Pho, pronounced ‘fuh’,  is a hearty and comforting soup full of goodness and also has an array of health benefits. It originated in the early 20th century in Vietnam and has become a popular meal in America. The two most commonly known types are beef and chicken and served with hot broth and noodles.

Ease of Making: Easy

Traditionally, pho is cooked with lots of beef bones, extra veggies,  and cooks for a long period of time in order to create the rich broth and cozy blend of flavors that we all love.

For most of us cooking at home, we may not always have the time to make it all from scratch. So here is a version using the Instant Pot as a shortcut for your short rib noodle soup. 

The great thing about making pho at home is that you can really make it your own with your choice of noodles, choice of proteins, and pile it on with lots of fresh garnishes such as basil, green onions, freshly sliced white onions, bean sprouts, and lime. 

Meal Prep Tips for Instant Pot Short Rib Noodle Soup

Traditionally, pho is served with super-thinly sliced meat that is placed in the boiling hot broth right before you eat the meal. If you decide to go with this route, it will be easier to thinly slice the protein if you freeze the protein for about 45 minutes in the freezer and then slice it. However, for this recipe, we will be cooking the meat and bones in the Instant Pot with the broth. The bones and flavors from the meat will add to that rich flavor broth that we enjoy from traditional pho.

Pho is traditionally made with thin rice noodles, but if you’re looking for a pantry friendly ingredient, then you can use spaghetti just like in this recipe.

Now the important part of getting the “pho” broth flavor is making sure you use the spices normally used in pho. Star anise, cloves, cinnamon sticks, cardamom, and coriander seeds. Now if you don’t normally use all these ingredients in all your daily cooking and don’t want to waste money on ingredients for a one time use, then be sure to at least have cloves and cardamom in the recipe. 

Lastly, the garnish toppings are what make the soup and make it feel and taste fresh against all the richness from the broth, meat, and noodles. 

Instant Pot Short Rib Noodle Soup

No ratings yet
Prep Time 5 minutes
Cook Time 50 minutes
Course Main Course
Cuisine Vietnamese
Servings 4

Equipment

  • knife
  • cutting board
  • mallett
  • Instant Pot

Ingredients
  

  • 4-6 pieces short ribs
  • 1/4 cup green onions (diced)
  • 1/2 each white onions (sliced)
  • 3 each whole garlic cloves (peeled)
  • 1 each lemongrass stick
  • 4 oz shiitake mushrooms (sliced)
  • 2 cups bok choy (cut into chunks)
  • 2 each whole fresh basil leaves
  • 1.5 cups water
  • 1/2 tsp garlic powder
  • 1/2 tsp onion powder
  • 1/4 tsp cardamom powder
  • 1 each whole clove
  • 1 tsp salt
  • 1 tbsp soy sauce
  • 2 oz dry spaghetti pasta

Instructions
 

  • Place all the ingredients in the instant pot (but not the pasta). (Note: Crush the lemongrass with a mallett prior to placing in the pot. )
  • Close the lid and place the valve in the sealing position. Cook on high pressure setting for 35 minutes
  • Meanwhile, boil pasta according to package instructions. Once cooked, drain and set aside
  • When th beef has finished cooking, let it do a natural release for about 10 minutes before carefully switching the valve to a quick release. Carefully remove the lid.
  • Serve the soup on top of the noodles. Garnish with more fresh basil and other fresh veggies such as bell peppers.

If you love this recipe, check out these other recipes we know you’ll love too:

Posted on

How to Make Homemade Ramen in Under 20 Minutes

Ramen is easily one of our favorite dishes at PrepYoSelf, especially heading into fall. As the weather cools there’s nothing better than a warm bowl of homemade ramen noodle soup.

Even better, our Easy Shrimp Ramen is loaded with healthy ingredients with powerful benefits like the antioxidants in mushrooms and vitamins in bok choy. Antioxidants can help protect you from free radicals that may cause heart disease and cancer. Cruciferous vegetables like Bok Choy, have also been known to decrease your risk of heart disease. 

Our easy-to-make ramen recipe combines the ease of pre-made broth and the flavors of traditional ramen. This recipe is easy to whip together for any cold day of the week or to make ahead as a grab and go option. 

Ease of Making: Easy

How to Cook This Homemade Shrimp Ramen Recipe

When it comes to ramen, the broth is everything. You really want to focus on making the shrimp ramen broth pack the biggest flavor punch possible. You can do this by combining fresh, flavorful ingredients and letting them simmer together. For this recipe, we use a pre-made chicken or vegetable broth for the sake of time but if you want to make your own ramen broth these are the steps you would take:

How to Make Ramen Broth

Generally, there are three types of ramen broth. One made from the broth of chicken carcasses, one from pork bones (called Tonkotsu), and the last a combination from chicken and dashi stock. 

Steps:

  • Pick your stock base
  • Add in your aromatic root vegetables like ginger, garlic, and green onion
  • Simmer the stock base, root vegetables and cold water for around 3 hours
  • Add your dashi and other ingredients like miso, shoyu or shio

What To Add To Shrimp Ramen

Making your own homemade shrimp ramen recipe bowl is truly a customizable experience and can satisfy even the pickiest eaters. While we love ours with green onion, mushrooms and bok choy, you could also add these to spruce up your shrimp ramen:

  • A soft boiled egg 
  • Meats – think lean slices of pork, beef or chicken that will cook quickly but still remain tender. 
  • Vegetables – practically any vegetable can work in ramen. Try it out with broccoli, carrots, or snap peas. 
  • Spices or Hot Sauce – If you want to make your ramen spicy, try adding some sriracha or red pepper to the mix for an added kick. 

Meal Prep Tips for Shrimp Ramen

  1. Storing your ramen – store your prepped broth and noodles separately so the noodles don’t get soggy in the fridge.
  2. Freeze your broth – feel like making a ton of broth ahead? Ramen broth freezes wonderfully. We like using muffin tins to freeze individual portions we can easily grab and heat up in the microwave.
  3. Mix up your toppings – There’s nothing worse in meal prep than the same dish over and over, try new veggies, toppings, and sauce mix each time you make this to switch it up. 

Easy Shrimp Ramen

Our easy-to-make ramen recipe combines the ease of pre-made broth and the flavors of traditional ramen. This recipe is easy to whip together for any cold day of the week or to make ahead as a grab and go option.
No ratings yet
Prep Time 5 minutes
Cook Time 15 minutes
Course Main Course, Soup
Cuisine Japanese
Servings 2

Ingredients
  

  • 12 oz peeled and deveined shrimp
  • 1/4 cup green onions (diced)
  • 1/2 cup white onions (sliced)
  • 4 oz mushrooms (sliced)
  • 2 cups bok choy (chopped)
  • 3 cups low-sodium chicken broth
  • 1 tsp soy sauce
  • 1 tsp sesame oil
  • 1 package ramen noodles (3 oz) (discard flavor packets)
  • 1/4 tsp garlic powder
  • 1 /4 tsp onion powder
  • 1/4 tsp salt
  • 1 tbsp olive oil

Instructions
 

  • First, boil the chicken broth in the saucepot and add the soy sauce. Add the ramen noodles and boil for about 2 minutes until it is tender. Remove the ramen from the chicken broth and set it aside in bowls so that it does not continue to cook.
  • Then, add olive oil to a skillet/wok on medium high heat. Saute the green onions and white onions until they soften and turn translucent. Next, add the sliced mushrooms and saute until they soften.
  • Then, add the chopped bok choy and saute until they soften. Season with garlic powder, onion powder, and salt.
  • At the end, add the shrimp and pour in the broth and let it simmer for 2 to 3 minutes until the shrimp fully cooks.
  • Then, pour the soup mixture on top of the ramen noodles. Sprinkle with sesame oil to your liking.

Video

If you love this recipe, check out these other recipes we know you’ll love too:

Posted on

Easy Air Fryer Chicken Teriyaki Recipe

Our Air Fryer Teriyaki Chicken recipe is the perfect mix of a sticky and sweet sauce coupled with deliciously crispy and healthy fried chicken. We use chicken thighs in this air fryer recipe but you could easily adjust to chicken breast or wings if you’d like. Our chicken teriyaki marinade is made up of classic Asian flavors like soy sauce, ginger, garlic, and honey. All of which combine to provide the perfect teriyaki taste for your dish.

Ease of Making: Medium

We’ve paired our teriyaki chicken with one of our favorite sauteed bok choy recipes, that is loaded with minerals and vitamins. Most notably Bok Choy is high in Vitamin C, K and A. This antioxidant rich vegetable may also reduce your risk of heart disease, fights inflammation and has anti-cancer properties.

Another great side dish for teriyaki chicken is our cauliflower fried rice, which is low in carbs but high in flavor. This recipe combines similar flavors and ingredients of the marinade and would go well with any piece of teriyaki chicken you make in the air fryer. 

How to Cook Teriyaki Chicken Using an Air Fryer

Teriyaki chicken is easy to conquer in the air fryer. All you have to do is place your marinated chicken in the air fryer and press the chicken setting on your fryer to cook.

How to Prepare Bok Choy

Many of you may be wondering, “what is bok choy?” If you’re not familiar with this cruciferous vegetable, it is in the same vegetable family as some more common veggies like broccoli, cauliflower, brussel sprouts and kale. This group of vegetables is most known for their cancer fighting qualities, low caloric value and high densities of vitamins K, C, E and fiber. 

How to Cut Bok Choy

Bok choy may look like a strange cousin to your average head of romaine lettuce but prepping this vegetable isn’t much different. 

  1. First, you’ll want to rinse your bok choy
  2. Remove the thick white stems by cutting them off with a knife
  3. Gather your bok choy leaves and cut into 1-inch strips

Meal Prep Tips for Air Fryer Teriyaki Chicken Thighs

  1. Marinate your meat for extra flavor and tenderness. By making your teriyaki marinated chicken ahead, you can have your meat soak up all the sauce for an extended amount of time for extra flavor. 
  2. Save some sauce. If you make your meat marinade ahead, save some on the side to brush your chicken with after it has cooked for a sweet and sticky glaze.
  3. Remove the fat from chicken thighs. If you’re looking for a recipe a little lower in fat, try removing the skin from your thigh.

Air Fryer Teriyaki Chicken With Sauteed Bok Choy

Our Air Fryer Teriyaki Chicken is the perfect mix of a sticky and sweet sauce coupled with deliciously crispy and healthy fried chicken. We use chicken thighs in this air fryer recipe but you could easily adjust to chicken breast or wings if you’d like. Our chicken teriyaki marinade is made up of classic asian flavors like soy sauce, ginger, garlic and honey. All of which combine to provide the perfect teriyaki taste for your dish.
No ratings yet
Prep Time 5 minutes
Cook Time 25 minutes
Course Main Course
Cuisine Asian
Servings 2

Ingredients
  

Teriyaki Chicken

  • 4 pieces chicken thighs
  • 2 tbsp soy sauce (or coco aminos)
  • 1 tbsp honey
  • 1 tbsp minced ginger
  • 1 tbsp minced garlic
  • 1 tbsp olive oil
  • 1/2 tsp garlic powder
  • 1/2 tsp onion powder
  • 1/2 tsp salt

Bok Choy

  • 4 cups chopped bok choy
  • 1/4 cup chopped green onions
  • 1/2 tsp garlic powder
  • 1/2 tsp onion powder
  • 1/2 tsp salt
  • 1 tbsp sesame oil
  • 1 tbsp olive oil

Instructions
 

Pre-Cook (Mise En Place):

  • Gather your equipment: cutting board, knife, air fryer/oven, skillet/wok
  • if using oven: pre-heat to 400F
  • Marinate the chicken with all the seasonings for at least 30 minutes

Cooking Method:

  • Place the chicken in the air fryer and cook on the chicken setting. (Note: if using the oven, cook for 35-45 minutes until the internal temperature of the chicken reaches 165F)
  • While the chicken is cooking, add olive oil to a skillet/wok on medium high heat.
  • Add the green onions and saute until they soften. Then add the bok choy and season with garlic powder, onion powder, and salt. Keep stirring until the bok choy softens. At the end, drizzle with sesame oil and mix well.
  • Serve the chicken with the bok choy. Eat and enjoy!

If you love this recipe, check out these other recipes we know you’ll love too:

Posted on

Mango Glazed Salmon with Red Pepper Couscous

Mango salmon is one of our favorite summertime dishes. Combining omega-3 rich salmon filets and our mango glaze, your taste buds will no doubt be wanting more. This recipe also calls for asparagus and couscous, giving you a perfectly balanced meal with healthy carbs, fats, and protein. The mango flavor pairs perfectly with salmon as the sweetness of the sauce balances the heartiness of the fish.

Asparagus is one of the best vegetables to pair with salmon because you can toss them both in the oven for the same cooking time and come out with a nicely timed meal, all on one sheet pan. Other vegetables that go well with salmon in the oven are green beans, squash, and peppers.

Easy of Making: Easy

Benefits of Salmon

Salmon boasts a wealth of nutritional benefits including B12, Vitamins A and D and Omega-3 fatty acids. While Vitamins A and D have been proven to help boost immunity and B12 keeps your body making DNA and nerves happy, the true hero of salmon is the Omega-3s. Omega-3s help keep the cardiovascular system in check, reducing artery inflammation, lowering cholesterol levels and maintaining a healthy blood pressure.

Salmon is also a fantastic option for your daily protein intake, providing high protein counts and low saturated fats. Protein is essential to the body to prevent muscle loss, and protect your bones, among various other benefits. 

Meal Prep Tips for Mango Glazed Salmon with Red Pepper Couscous

Choosing the right salmon filet:

Whether you’re shopping at your local fish market, or grocery store there are several tips for picking out the perfect filet of salmon to make for this recipe:

  1. Feel: Touch the salmon with your finger and check to make sure the flesh bounces back and does not leave a sign of your fingerprint. 
  2. Smell: Pick up your package and check for any smells that appear to be off. While salmon can have a fishy smell, ensure that your chosen package doesn’t smell spoiled or rotten. 
  3. See: Salmon should have a bright orange-red hue. Any salmon that starts to lose its color is likely past its prime. Another thing to look for is moisture, avoid any filets that appear to be dried out. 

How Long to Bake Mango Glazed Salmon

The exact timing for your salmon will depend on the thickness of your filet. We recommend starting with 10 minutes in the oven and then checking every minute thereafter. Salmon can overbake and dry out quickly so it’s important to keep an eye on it. The perfect salmon will flake to the touch of a fork or finger and be an opaque pink on the outside and slightly translucent in the center. 

Tip: When salting your salmon before baking, only do so right before adding to the oven. Doing too far in advance can draw out the moisture in the dish and leave you with a dry fish.

Mango Glazed Salmon with Red Pepper Couscous

This mango-glazed salmon recipe is quick and easy and full of flavor. It's the perfect busy weeknight meal.
No ratings yet
Prep Time 5 minutes
Cook Time 15 minutes
Course Main Course
Cuisine Asian, Mediterranean
Servings 2

Equipment

  • knife
  • cutting board
  • sauce pot
  • sheet pan

Ingredients
  

Salmon and Asparagus

  • 12 oz salmon
  • 6 oz asparagus
  • 1 tbsp hoisin sauce
  • 1 tbsp Saucy Lips Tangy Mango Sauce
  • 1/4 tsp garlic powder or 1 tbsp minced garlic
  • 1/4 tsp salt
  • 1 tbsp olive oil

Couscous

  • 1/2 cup dry couscous
  • 1 cup water
  • 1/4 cup green onions (diced)
  • 1/2 cup red bell pepper (diced)
  • 1/4 tsp salt
  • 1/4 tsp garlic powder or 1 tbsp minced garlic
  • 1 tbsp olive oil

Instructions
 

  • Pre-heat oven to 400F
  • Place salmon and asparagus on a sheet pan lined with parchment paper. Marinate salmon with hoisin sauce and mango sauce. Drizzle olive oil on the asparagus and mix well
  • Place salmon and asparagus in the oven for 10-12 minutes
  • Meanwhile, start cooking the couscous. Add oil to a heated sauce pan on medium high heat
  • Add green onions and green pepper to the sauce pan and saute until they soften.
  • Then, add water and bring it to a boil. Add the couscous and stir well. Once the water is boiling, turn off the heat and let the couscous absorb all the water (about 7 to 10 minutes)
  • Once the couscous is cooked, fluff it with a fork.
  • Remove the salmon and asparagus from the oven and serve with the couscous. Eat and enjoy!

If you love this recipe, check out these other recipes we know you’ll love too:

Posted on

Grilled Zesty Cilantro Chicken with Rice and Beans

Our Grilled Zesty Cilantro Chicken with Rice and Beans is a modern twist on a classic Mexican favorite, cilantro lime chicken. Using two sauces from one of our favorite Whole 30 condiment companies, Saucy Lips, this easy to make chicken recipe is packed full of nutrients and flavors and comes together in under 30 minutes.  Cilantro is commonly combined with chicken for seasoning and in marinades in southwestern, Mexican and Caribbean dishes. 

Ease of Making: Medium

Cilantro, also known as coriander, has many health benefits and is great for high blood sugar and type 2 diabetic diets. Although, the seeds, oils and extracts from coriander are so effective at lowering blood sugar that those with diabetes or on diabetes medication should practice caution when using this powerful plant. 

Our main protein in this easy cilantro recipe, chicken, is also loaded with nutritional benefits and is more cost effective than most other proteins. Chicken is a lean meat that provides a high amount of protein to help keep bones strong and build muscles. It is also a powerhouse provider of B6, which can help reduce the amount of homocysteine, one of the key components linked to heart attacks. If you’re looking for a heart healthy protein, this is it.

Meal Prep Tips for Grilled Zesty Cilantro Chicken with Rice and Beans

It is healthy to eat rice and beans together because they combine both carbs and proteins while being low in fat. In fact, many people around the world eat this as a tool for survival. While you cannot live off rice and beans for the long term, these dishes do provide a fantastic protein source and 9 amino acids. 

How to make black beans and rice:

  1. Heat oil and saute green onions until translucent
  2. Add rice and season, stir until rice is fully coated
  3. Add beans and water
  4. Bring to a boil, then reduce to simmer for 20 minutes until rice is cooked

How many cups are in a can of beans:

Our recipe calls for one cup of beans, your average 15oz can of beans hold 1.75 cups of beans drained. So if you’re looking for extra ways to use your beans, try them in a soup, quesadilla, or on a salad. 

Grilled Zesty Cilantro with Rice and Beans

A quick and easy Grilled Cilantro Lime Chicken recipe. The chicken is perfectly grilled on the outside and bursting with juices and flavor from the marinade on the inside.
No ratings yet
Prep Time 5 minutes
Cook Time 25 minutes
Servings 2

Ingredients
  

Chicken and Marinade

Rice and Beans

  • 1 cup uncooked rice
  • 1 cup kidney beans (or use your choice of beans: black beans, pinto beans, etc)
  • 1/4 cup chopped green onions
  • 1/4 cup chopped cilantro
  • 1 tsp garlic powder
  • 1 tbsp olive oil
  • 2 cups water

Instructions
 

Pre-Cook (Mise En Place):

  • Gather your equipment: cutting board, knife, bowl, grill pan, tongs, sauce pan, spatula
  • Chop the green onions and cilantro
  • Marinate the chicken with the sauces and seasonings for at least 30 minutes prior to cooking

Cooking Method:

  • Heat a grill pan to high heat for about 2 to 3 minutes. Then add the chicken to the pan. Lower the heat to medium high heat. Cook for 5 to 6 minutes on the first side to develop dark grill marks
  • Then, flip the chicken using tongs to cook the other side for 5 to 6 minutes. Cook until the chicken reaches an internal temperature of 165F
  • Then, remove the chicken and let it rest before cutting it into bite size pieces
  • While the chicken is grilling, start cooking the rice by adding oil to a sauce pan on medium high heat. Add the green onions and saute until they soften and turn translucent
  • Next, add the rice and season with garlic powder and salt. Mix the rice well until it is fully coated with the oil and lightly toasts. Then add the beans
  • Pour the water and bring it to a boil. Once it comes a boil, cover the pan with a lid and reduce the heat to low heat. Simmer the rice for about 20 minutes until the rice is tender
  • Once the rice is cooked, fluff it with a fork and mix in fresh cilantro
  • Serve rice with the chicken and enjoy!

If you love this recipe, check out these other recipes we know you’ll love too:

Posted on

How To Make Pan-Fried Eggplant With Meat Sauce

eggplant and marinara sauce

Pan-fried eggplant with meat sauce is a delicious and healthy option if you’re craving the heartiness of an Italian meat but looking to reduce the carbs you would normally find with pasta as the main ingredient. The fried eggplant slices come to a golden crisp and are topped with our homemade sauce and of course, some cheese. 

Ease of Making: Medium

This eggplant milanese is brought together by dredging your eggplant in a combination of egg wash and seasoned breadcrumbs. You don’t need any flour to fry eggplant in this recipe. If you’re concerned about your eggplant absorbing oil when cooking, you can salt the eggplant or soak it in milk ahead of time to break down the plant and break down the porous structure of the plant. 

Eggplant has many fantastic benefits like increasing brain function, preventing anemia, helping with digestion and improving heart health. It’s high fiber content can lead the way to reducing the cholesterol in your system by binding it to the bile in your digestive system and removing it naturally. 

Preparing Your Eggplant for Cooking

Before you begin your cooking process, you’ll want to remove the stem, leaves and the top and bottom of the plant. You can leave the skin on or remove it, that’s totally up to you. For this recipe it is important to salt the eggplant. Salt helps bring out the extra moisture that can provide a mushy and soggy result when cooked. Slice your eggplant into circles and salt both sides, letting it sit on a kitchen towel or paper towel  for at least twenty minutes. 

Historically, eggplant was actually salted before cooking to reduce some of the bitter flavor that came with the plant. However, the eggplants we have now have mostly bred out the bitterness. 

What are the Different Types of Eggplant

There are countless varieties of eggplant that can vary widely in shape, size and even color. Most common at American grocery stores, is you guessed it, the American eggplant. This eggplant is also known as the globe eggplant and has a tougher, meatier texture than other eggplants. 

Some other varieties of eggplant:

Graffiti Eggplant – Slightly sweeter than the traditional eggplant, the graffiti eggplant is most recognizable by its purple and white striped skin. Which is why it is also known as striped eggplants.  This variation is great for eating pureeing, eating whole or substituting in for traditional eggplant if you need. 

Japanese Eggplant – Both the Japanese and Chinese eggplants vary from traditional varieties in their long, oblong shape. The Japanese variation of eggplant is deep in it’s purple color and has a creamy flesh that works great in stir frys. 

Fairy Tale Eggplant – Similar in color to the graffiti eggplant, the purple and white striped fairy tale eggplant is small and can fit in the palm of your hand. Due to the tender nature of this variety, it is wonderful for grilling. 

White Eggplant – There isn’t a lot of difference between the classic American eggplant or  “Globe Eggplant” other than the color that the plant is wrapped in. Both the  white and American eggplant have a  smooth creamy skin and meaty flesh. These are great for both bread and protein substitutes. 

Indian Eggplant – The Indian Eggplant is a dark, reddish-purple in color and more spherical than other varieties you may come across. The texture in the Indian eggplant is different from other varieties as it is more tender, making it perfect for roasting, soups, stews and more. 

Little Green Eggplant – A fantastic eggplant for baking, the little green eggplant, is a bright green variety of this “fruit” and is most known for being mild and sweet in flavor. 

Thai Eggplant – Thai eggplant is round, small in size, and traditionally hard to find. These miniature eggplants are typically a greenish-white color with a light pink flesh. Most notably, Thai eggplant is more bitter than other varieties, to remove some of the bitterness you can try removing the seeds. If you’re able to score some at your local market, try throwing a few in our recipe for Thai Red Beef Curry.

There are countless other varieties and heirloom versions of each that are available to eggplant lovers across the world. Try experimenting with the various types when you’re making something new and see which you like best!

Eggplant FAQ

What is the best time of year for eggplant?

Eggplant is available year-round but it’s peak season runs from July to October. 

How to store eggplant?

Eggplants can’t withstand temperatures below 45 degrees Fahrenheit so storing in the refrigerator can sometimes be counterproductive. If you choose to do so, store it in the vegetable drawer or the warmest part of your fridge. Eggplants can also be kept out of the fridge, which may actually help increase their lifespan. Store in an area that is cool and away from direct sunlight. 

How to choose an eggplant?

Due to the fact that there are many varieties of eggplants and each is slightly different, a general rule of thumb is to look for a firm, shiny skin. Avoid eggplants that have started to wrinkle or have soft, brown spots on their skin.  Eggplants should feel heavy and not hollow. 

Is eggplant a fruit or vegetable?

Most people are under the assumption that eggplants are vegetables, but in fact they are fruits!

Do I need to peel eggplant before cooking?

Nope! The skin on eggplant is entirely edible and removing it is more of a preference of the person eating it.

Meal prep tips for Pan-Fried Eggplant

  • Salt your eggplant – this will help reduce moisture and prevent a soggy outcome. 
  • When reheating your pan-fried eggplant, toss it in the oven or an air fryer if you have one to crisp it back up.
  • Soak in milk – soak your eggplant for up to an hour before cooking to help reduce oil absorption when frying. 
  • Microwave before cooking – this is another tactic for reducing oil absorption when frying, as pre-cooking helps break down the spongy texture. 
eggplant and marinara

Pan-Fried Eggplant with Meat Sauce

No ratings yet
Prep Time 5 minutes
Cook Time 20 minutes
Course Main Course
Cuisine Italian
Servings 2

Equipment

  • knife
  • cutting board
  • spatula
  • saute pan

Ingredients
  

Meat Sauce

  • 10 oz lean ground beef
  • 1 cup marinara sauce
  • 1/4 cup white onions (diced)
  • 1/2 each green bell pepper (cubed)
  • 1/2 each red bell pepper (cubed)
  • 1 tbsp olive oil
  • 1/8 tsp garlic powder
  • 1/8 tsp salt
  • 1/8 tsp pepper

Eggplant

  • 1/2 each eggplant
  • 1 each large eggs
  • 1/4 cup breadcrumbs
  • 1/8 tsp garlic powder
  • 1/8 tsp onion powder
  • 1/8 tsp salt
  • 1 tbsp olive oil

Instructions
 

Meatsauce

  • Add olive oil to a saute pan on medium high heat and saute the onions and bell peppers until they soften
  • Add the ground beef and break it into pieces. Saute until it is golden brown and fully cooked (about 5 to 7 minutes)
  • Next, add the marinara sauce and mix it well. Let it simmer on low for 5 to 7 minutes

Eggplant

  • Next, slice the eggplant into 1/2 inch rounds
  • Prepare the egg wash by scrambling the eggs in a bowl large enough to fit the eggplant
  • Prepare the breadcrumbs and seasonings in another large bowl
  • Dip the eggplant slices in the egg wash, then dredge it in the breadcrumbs, making sure all sides are fully coated
  • In another pan, add oil on medium high heat and place the eggplant slices in the pan
  • Cook on each side for about 2 to 3 minutes until it is golden brown all around
  • Top off the eggplant slices with the meat sauce

Notes

Optional: Top it off with shredded parmesan cheese

Links to other recipes:

Posted on

How To Make Shrimp Soba Noodle Salad

shrimp soba noodles

Shrimp soba noodle salad is one of our favorite Japanese recipes and is incredibly easy-to-make, so it’s perfect for beginners. The soba noodle is in an underrated noodle that falls second to ramen in popularity and use. However, this buckwheat based noodle is as versatile as it is healthy, move over ramen there’s a new noodle in town. 

Ease of Making: Easy

Soba noodles are one of the healthiest types of noodles as they are gluten-free, low fat and high in both protein and fiber. One cup of cooked soba noodles contains 6 grams of protein which is essential to building muscle, and producing hemoglobin to keep your immune system healthy. 

The shrimp in this recipe coupled with the soba, provides even more protein. Shrimp is a powerhouse food if you’re on a diet because it’s high in protein but low in carbs, calories and fats. Shrimp contains a wide variety of nutrients including antioxidants and omega-3 fatty acids which have shown to improve heart health. 

How to Cook Soba Noodles 

If you’re wondering how to make soba noodles, there are several steps you can take to ensure you get it right. Soba noodles are extremely versatile and can be served both hot or cold depending on which soba noodle recipe you’re following. The noodles in the recipe will be warm after cooking but will cool as you rinse them and  add in the ingredients for the sauce. You can eat this warm or chilled as a prepped item for the week. 

Step 1: Pick a big enough pot so your noodles have room to move around.

Step 2: Don’t salt your pasta water. 

Step 3: Cook for a short amount of time. Soba noodles only need a maximum of 7 minutes (depending on how much you are cooking) in the water before they should be removed. The majority of soba noodles will cook in 3-5 minutes depending on their thickness. You’re aiming for an al dente noodle. Try testing out the noodles at the five minute mark to see how they are coming along. 

Step 4: Rinse! Soba noodles can stick together and form a gummy clump of noodle mess if you don’t immediately rinse the starch from the pasta after cooking. Leave your soba noodles in a colander and rinse under cold water for at least a minute while you whirl them around your pot. Your water should run clear before stopping your rinse.

Step 5: Drain, serve your soba noodle salad and enjoy!

Soba Noodle FAQ

What are soba noodles? 

Soba noodles are noodles made from buckwheat and whole wheat flours. Soba, is the Japanese word for buckwheat, a food many consider a superfood due to its ability to improve heart health, promote weight loss, and help manage diabetes. This type of a noodle has a mild nutty, earthy taste. 

Where to buy soba noodles?

Dried soba noodles can be found in most grocery stores in the international foods aisle. Look for a noodle that is similar in appearance to spaghetti but slightly flatter and brown in color. 

If you live in an area with a specialty asian food market, keep an eye out for fresh soba noodles which are fantastic as well. 

Do soba noodles have egg in them?

As a general rule, soba noodles are considered vegan and do not have egg. However, there are brands that may include egg so always be sure to check the label. 

Should you rinse soba noodles?

Without a doubt, you want to rinse your soba noodles. This removes excess starch and prevents a big sticky mess.

Are soba noodles bad for you?

Soba noodles are a healthier option than most other pasta options. However, there are some brands that use more refined wheat flour than buckwheat and those would be considered less nutritious. 

How do you cook soba noodles so they don’t stick?

Choose a pot that is large enough to give them plenty of room to move around and rinse them immediately after cooking with cold water. 

Can you use soba noodles for spaghetti?

Sure, you could! Soba noodles are similar to spaghetti in shape and function but will have a nuttier taste than a traditional pasta. 

Meal prep tips for Shrimp Soba Noodle Salad

Our chilled soba noodle recipe is the perfect grab-and-go option for a quick, healthy meal. Here are some tips to make it even better. 

  • If you like your shrimp warm but the salad cool, store them separately in the fridge. You can then reheat the shrimp and toss them in your already chilled salad. 
  • Rinse your noodles. We’ve repeated this multiple times because it’s important.
  • Don’t overcook them. Soba noodles should be served al dente or they can become mushy. Taste your noodles as they cook in an effort to prevent this from happening. 
  • Sub low-sodium soy sauce. If you’re watching your sodium intake, this is a flawless substitution to make this recipe even healthier. 
  • Add in other vegetables like broccoli, snap peas, or carrots. These all make for a great crunch alongside the slippery noodles and shrimp.
shrimp soba noodles

Shrimp Soba Noodle Salad

No ratings yet
Prep Time 5 minutes
Cook Time 15 minutes
Course Main Course, Salad
Cuisine Asian, Japanese
Servings 2

Equipment

  • knife
  • cutting board
  • strainer
  • small boiling pot

Ingredients
  

  • 12 oz pre-cooked frozen shrimp (peeled and deveined)
  • 4 oz soba noodles
  • 1 cup shelled edamame (defrosted)
  • 1 each red bell pepper (diced)
  • 2 tbsp soy sauce
  • 1 tbsp fresh lime juice
  • 1 tsp sesame oil
  • 1 tsp olive oil

Instructions
 

  • Rinse the soba noodles in cold water and then boil it in a pot according the packaged instructions.
  • After it cooks, place the noodles in a strainer and rinse with cool water. Then, drain the noodles
  • Place the noodle mixture in a bowl. Add the soy sauce, lime juice, sesame oil, and olive oil to the bowl. Mix well
  • Then top it off with the shrimp, edamame, and bell pepper. Eat and enjoy!

If you love this recipe, check out these other recipes we know you’ll love too: